
Networking the future
XRouter Pro
User’s Manual
MIH-130A

Copyright
Copyright © 2000 by this company. All rights reserved. No part of this doc-
umentation may be reproduced in any form or by any means or used to
make any directive work (such as translation or transformation) without
permission from Xsense Connectivity, Inc. Xsense Connectivity, Inc.
reserves the right to revise this documentation and to make changes in
content without obligation among Xsense Connectivity, Inc. to provide noti-
fication of such revision or change.
All products and their associated features are subject to change or
upgrade at the time of the shipment or of the sales.
FCC Notice
This equipment has been tested and found to be FCC Rules certified.
These restrictions are designed to provide protection against harmful inter-
ference from residential installations. This equipment generates radio fre-
quencies that may cause interference with radio communications if not
used in accordance with the instructions. Interference may even occur
during proper installation. If this equipment causes interference, the user
is suggested to correct the it by one or more of the following:
1. Reorient or relocate the receiving antenna.
2. Increase the separation between the equipment and receiver.
3. Connect the equipment into an outlet on a circuit that is separate
from the one to which the receiver is connected.
4. Consult the dealer or an experienced radio/television technician for
help.
CE Declaration of Conformity
The equipment complies with the requirements relating to electromanetic
compatiblity, the essential protection requirement of Council Directive/EEC
on the approximation of the Member States relating to Electromangnetic
compatibility.
Trademarks
All products and Brand names are trademarks and/or registered trade-
marks of their respective companies.
I

Safety Precautions
1. Follow all warnings and instructions marked on the product.
2. Slots and openings on the device are provided for ventilation. To
protect it from overheating, these openings must not be blocked or
covered.
3. Do not use or store this product in the environment that exceeds
temperature and humidity specifications. Do not place this product
near a radiator or heat register, or in a built-in installation unless
adequate ventilation is provided.
4. Before cleaning, unplug this product from wall outlet. Do not use
liquid cleansers or aerosol cleansers. Use a damp cloth for
cleaning.
5. Do not place cords or cables where they may be walked on or
tripped over.
6. Be sure to comply with any applicable local safety standards or
regulations.
7. General purpose cables are provided with this product. The use of
any other cables or requirements mandated by local authority is
user’s responsibility.
8. Cables attached to devices in different locations with different
power sources and grounding may cause hazardous voltage.
Consult a qualified electronic consultant before installing the prod-
uct to check if this phenomenon exists and, if necessary, take cor-
rective action.
9. Never touch uninsulated telephone wires or terminals unless the
line has been disconnected.
10. Avoid using telephone equipment or installing the product
during an electrical storm.
11. Never install this product, or any kind of telephone jacks, lines,
network cables, and power connections in wet locations.
12. Never spill liquid of any kind on the product.
II

Contents
1.0 INTRODUCTION . . . . . . . . . . . . . . . . . . . . . . . . . . .1
1.1 Sharing Internet Access . . . . . . . . . . . . . . . . . . . . . . . . .1
1.2 Modems Supported . . . . . . . . . . . . . . . . . . . . . . . . . . . . .1
1.3 Built-in DHCP Server . . . . . . . . . . . . . . . . . . . . . . . . . . .1
1.4 4-Port Switched Ethernet Hub Inside . . . . . . . . . . . . . . . .2
1.5 Easy Configuration . . . . . . . . . . . . . . . . . . . . . . . . . . . . .2
1.6 Virtual Server . . . . . . . . . . . . . . . . . . . . . . . . . . . . . . . . .2
1.7 Security . . . . . . . . . . . . . . . . . . . . . . . . . . . . . . . . . . . . .2
1.8 NAT (Network Address Translation) . . . . . . . . . . . . . . . . .2
2.0 BEFORE YOU START . . . . . . . . . . . . . . . . . . . . . .3
2.1 Package Overview . . . . . . . . . . . . . . . . . . . . . . . . . . . . .3
2.2 Items Required . . . . . . . . . . . . . . . . . . . . . . . . . . . . . . . .3
2.3 System Requirements . . . . . . . . . . . . . . . . . . . . . . . . . . .3
3.0 EASY INSTALLATION . . . . . . . . . . . . . . . . . . . . . .4
3.1 Hardware Installation . . . . . . . . . . . . . . . . . . . . . . . . . . .4
3.1.1 Connecting the XRouter Pro to Your Modem . . . . . . .4
3.1.2 Connecting Computers to the XRouter Pro . . . . . . . .5
3.1.3 Connecting the Power Supply . . . . . . . . . . . . . . . . . .6
3.2 Software Configuration . . . . . . . . . . . . . . . . . . . . . . . . . .7
3.2.1 Setting Up TCP/IP . . . . . . . . . . . . . . . . . . . . . . . . . .7
3.3 Windows 95/98 TCP/IP Configuration of Computers . . . .7
3.3.1 Assigning TCP/IP Values Manually . . . . . . . . . . . . . .9
3.4 Mac OS TCP/IP Configuration . . . . . . . . . . . . . . . . . . . .10
3.4.1 Assigning TCP/IP Values Manually . . . . . . . . . . . . .11
3.4.2 Setting Up the XRouter Pro Through a Web Browser12
4.0 ADVANCED CONFIGURATION . . . . . . . . . . . . . .16
4.1 DHCP Server Settings . . . . . . . . . . . . . . . . . . . . . . . . . .16
4.2 Access Control . . . . . . . . . . . . . . . . . . . . . . . . . . . . . . .16
4.2.1 URL Access Setting . . . . . . . . . . . . . . . . . . . . . . . .17
4.2.2 IP Access Setting . . . . . . . . . . . . . . . . . . . . . . . . . .18
4.3 Virtual Server . . . . . . . . . . . . . . . . . . . . . . . . . . . . . . . .20
III

4.4 Device Administration . . . . . . . . . . . . . . . . . . . . . . . . . .21
4.5 Status Monitor . . . . . . . . . . . . . . . . . . . . . . . . . . . . . . . .22
4.6 Special APP . . . . . . . . . . . . . . . . . . . . . . . . . . . . . . . . .24
4.7 DMZ (DeMilitarized Zone) Host . . . . . . . . . . . . . . . . . . .25
4.8 RIP (Routing Information Protocol) . . . . . . . . . . . . . . . .26
4.9 Static Routing . . . . . . . . . . . . . . . . . . . . . . . . . . . . . . . .27
4.10 PPPoE Settings . . . . . . . . . . . . . . . . . . . . . . . . . . . . .28
4.11 Firmware Upgrade . . . . . . . . . . . . . . . . . . . . . . . . . . . .29
5.0 TROUBLESHOOTING . . . . . . . . . . . . . . . . . . . . .30
APPENDIX A - Specifications . . . . . . . . . . . . . . . . . .31
APPENDIX B - Hardware Description . . . . . . . . . . . .32
Rear Panel Description . . . . . . . . . . . . . . . . . . . . . . .33
Glossary . . . . . . . . . . . . . . . . . . . . . . . . . . . . . . . . . . .34
IV

1.0 INTRODUCTION
Thanks for purchasing the XRouter Pro MIH-130A Internet Sharing Hub.
The XRouter Pro functions as an easy-to-use communication device which
allows you to connect a local area network (LAN) to the Internet afford-
ably. With the XRouter Pro you can get as many as 252 Macintosh or PC
users online simultaneously through one cable line or DSL, with one ISP
account. The XRouter Pro installs quickly and easily, and best of all, it’s a
breeze to use.
1.1 Sharing Internet Access
The XRouter Pro provides high-speed Internet access to multiple users by
splitting the bandwidth from a cable line or from DSL (Digital Subscriber
Line) into tiny portions and routing these bandwidth “slices” to almost
every Internet users. The fewer the number of users be online at the same
time, the faster the information they receive via internet. Internet users on
different nodes are not limited to access to the same Web pages. Each
node functions independently from the other nodes connected to the
XRouter Pro.
1.2 Modems Supported
The XRouter Pro supports both cable modems and DSL modems. It has
one WAN (Wide Area Network) port to connect itself to a cable modem or
a DSL modem. This provides more than enough bandwidth to accommo-
date the needs of even large groups of Internet users.
1.3 Built-in DHCP Server
The XRouter Pro’s built-in DHCP Server dramatically reduces the amount
of efforts needed for configuration and maintenance by allowing you to
automatically configure the TCP/IP setting over a local area network.
1
Chapter 1 - INTRODUCTION

1.4 4-Port Switched Ethernet Hub Inside
In addition to providing Internet sharing capability, the XRouter Pro also
functions as an Switched Ethernet Hub, which offers four 10/100 Mbps
switched RJ-45 ports that allow you to connect a series of computers to
form a small LAN.
1.5 Easy Configuration
The XRouter Pro can be configured through a Web browser, and it fea-
tures the web-based management for a simple, intuitive set up.
1.6 Virtual Server
Internet users can set up an in-house web server, such as WWW or FTP,
through the XRouter Pro’s Virtual Server mapping function. The Virtual
Server allows you to select a particular computer within the network for
responding to outside Internet requests.
1.7 Security
The XRouter Pro provides firewall-like security through NAT (Network
Address Translation) to prevent unauthorized Internet users from access-
ing internal files. It can also filter out Internet requests from certain nodes
on a local network for administrative purposes.
1.8 NAT (Network Address Translation)
The MIH-130A features NAT (Network Address Translation) as a means of
translating private IP addresses into a global IP address. NAT masks local
IP addresses to the outside world, allowing a group of Internet users to
share a single ISP account. (No separate account is needed for each
users)
2
Chapter 1 - INTRODUCTION

2.0 BEFORE YOU START
2.1 Package Overview
Prior to setting up your XRouter Pro, make sure your XRouter Pro pack-
age includes the following items:
• an XRouter Pro
• a power adapter
• manual
• a Category-5 UTP cable with RJ-45 connectors
2.2 Items Required
• an account from an ISP (Internet Service Provider)
• a cable line or DSL
• a cable modem or DSL modem
• additional UTP cables with RJ-45 connectors (for additional comput-
ers)
2.3 System Requirements
• Computer equipped with 10 BASE-T Ethernet connection inter face
to support TCP/IP protocol
• Windows 95/98/2000, Windows NT 4.0 or that of later versions
• Mac OS 7.5.3 or later versions
• Netscape Communicator 4.0 or above (Microsoft Internet Explorer
4.0 or later versions is necessary for Web configuration.
Note: For future firmware upgrades, one of the operating systems listed
above is needed.
3
Chapter 2 - BEFORE YOU START

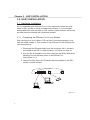
3.0 EASY INSTALLATION
3.1 Hardware Installation
Prior to connecting the XRouter Pro to LAN, please be certain that your
cable or DSL service is active and operating correctly. If you are experi-
encing difficulties with the cable or DSL service, please contact the service
provider before continuing the installation process.
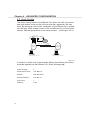
3.1.1 Connecting the XRouter Pro to Your Modem
After verifying that your cable or DSL service is functioning properly, con-
nect the cable modem or DSL modem to the XRouter Pro by following the
instructions below:
1. Disconnect the Ethernet cable from the computer that is currently
connected to the DSL or cable modem if you have not done so.
2. Plug the RJ-45 connector from this cable into the WAN (Wide Area
Network) port on the back panel of the XRouter Pro.
(See Figure 3.1-1)
3. Leave the other end of this Ethernet cable connected to the DSL
modem or cable modem.
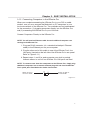
Figure 3.1-1
4
Chapter 3 - EASY INSTALLATION

3.1.2 Connecting Computers to the XRouter Pro
When you complete connecting the XRouter Pro to your DSL or cable
modem, now you may connect the Macintosh or PC computers in your
local area network to the XRouter Pro. Two methods can be implemented
for the connection: (1) plugging computers directly into the XRouter Pro,
and (2) connecting the XRouter Pro to your LAN hub.
Connect Computers Directly to the XRouter Pro
NOTE: You will need an Ethernet cable for each additional computer con-
necting to the XRouter Pro.
1. Plug one RJ-45 connector (of a standard twisted-pair Ethernet
cable) to the Ethernet port on your computer.
2. Plug the other end of this cable to one of the XRouter Pro’s four
LAN ports (located on the left side of the XRouter Pro’s rear panel.
Refer to Figure 3.1.1)
3. Repeat steps 1 and 2 for each computer you wish to provide
Internet access to until all four XRouter Pro LAN ports are filled.
NOTE: To connect more than four computers to the XRouter Pro, simply plug
additional computers into a network hub and plug this hub into the XRouter
Pro’s uplink port. Read below for further instructions.
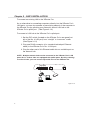
Figure 3.1.2
Switch to right for
normal mode
Switch to left for
crossover mode
5
Chapter 3 - EASY INSTALLATION

To connect an existing LAN to the XRouter Pro:
As an alternative to connecting computers directly into the XRouter Pro’s
LAN ports, you can also connect a pre-existing network of the computer to
the XRouter Pro by uplinking your network’s central LAN hub to the
XRouter Pro’s uplink port. (See Figure 3.1-3)
To connect a LAN hub to the XRouter Pro’s uplink port:
1. Set the DIP switch (located on the XRouter Pro’s rear panel just
left of the No. 4 LAN port) from “straight” to “crossover” mode.
(See Figure 3.1-2)
2. Plug one RJ-45 connector (of a standard twisted-pair Ethernet
cable) to the XRouter Pro’s No. 4 LAN port.
3. Plug the other end of this Ethernet cable into an available port on
the network hub.
NOTE: Multiple network hubs can be connected to the XRouter Pro’s LAN
ports No.1-3 if these hubs are equipped with uplink ports. By daisy-chaining
a series of hubs, you can connect up to 252 users to the XRouter Pro.
Figure 3.1-3
6
Chapter 3 - EASY INSTALLATION

3.1.3 Connecting the Power Supply
To provide your XRouter Pro with power:
1. Plug the power adapter of the XRouter Pro into an AC power out-
let.
2. Plug the other end of the power adapter cable into the power
receptacle on the rear panel of the unit.
3. The Power LED on the XRouter Pro’s front panel should be lit
immediately.
3.2 Software Configuration
3.2.1 Setting Up TCP/IP
Congratulations on installing the XRouter Pro’s hardware! Next we will
show you how to enable communication between the XRouter Pro and its
managing and client computers.
Part of the process of enabling communication involves setting the IP
addresses for the computer. It will manage directly the XRouter Pro’s
operations and the client computers which receive the Internet access
from. These computers must have their IP addresses configured such that
they share the same subnet numbering scheme as does the XRouter
Pro’s default IP address. We will explain this in more detail later in the
chapter.
Configuring the IP addresses is a simple task that can be performed
through your computer’s control panel. We have provided instructions for
the configuration process for both Macintosh and PC users. Find the
appropriate set of instructions in the following pages.
7
Chapter 3 - EASY INSTALLATION

3.3 Windows 95/98 TCP/IP Configuration of Computers
1. Double-click the Control Panel icon in My Computer folder.
2. In the Control Panel, double-click the Network icon. The network
interface card (installed on your computer) appears along with the
network protocol on the Configuration list.
3. Double-click TCP/IP protocol on the list. If TCP/IP does not
appear on the list, you must install the TCP/IP protocol first as
illustrated in step 4. Clients with TCP/IP already installed may skip
to step 5.
Figure 3.3-1
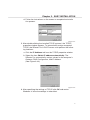
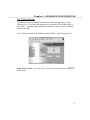
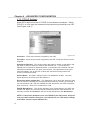
4. To install the TCP/IP protocol: (See Figure 3.3-1)
a. Keep your copy of Windows 95/98 CD-ROM on hand. (You will
need it for this installation.)
b. Click the Add button from the Configuration list of the Network
window. A new window appears.
c. Double-click Protocol. Then, in the Select Network Protocol
window, choose Microsoft on the Manufacturers list, and select
TCP/IP on the right side of the list. (See Figure 3.3-2)
8
Chapter 3 - EASY INSTALLATION

d. Follow the instructions on the screen to complete the installa-
tion process.
Figure 3.3-2
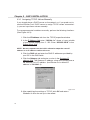
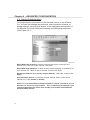
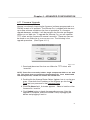
5. After double-clicking the installed TCP/IP protocol, the TCP/IP
properties window appears. To automatically assign computer’s
TCP/IP, the XRouter Pro’s DHCP server must perform the follow-
ing functions:
a. Click the IP Address tab from the TCP/IP properties window.
b. Select the item Obtain IP address automatically. The
XRouter Pro automatically assigns values for the computer’s
Gateway, DNS Configuration, and IP Address.
(See Figure 3.3-3)
Figure 3.3-3
6. After specifying the settings of TCP/IP click OK and restart
Windows to allow the settings to take effect.
9
Chapter 3 - EASY INSTALLATION

3.3.1 Assigning TCP/IP Values Manually
If you already have a DHCP server on the network, or if you prefer not to
use the XRouter Pro’s DHCP server to assign TCP/IP values automatical-
ly, you can input these values manually.
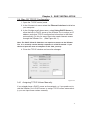
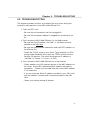
To manage computer’s address manually, perform the following functions:
(See Figure 3.3-4)
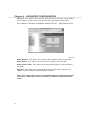
1. Click the IP Address tab from the TCP/IP properties window.
2. In the IP
Address field enter “192.168.1.x” where x is any variable
of your choice ranging from 2 - 252. Enter “255.255.255.0” in the
Subnet Mask field
.
NOTE: No two computers on the LAN is allowed to adopt the same IP
address or an IP address conflict will occur.
3. Click the DNS tab and enter the DNS IP addresses provided by
your ISP in the DNS fields.
4. Click the Gateway tab and enter a value in the Gateway IP
address field. The Gateway IP address value must be thesame as
the XRouter Pro's IP address. (the XRouter Pro’s default IP
address is 192.168.1.1).
Figure 3.3-4
5. After specifying the settings of TCP/IP click OK and restart
Windows to allow the set up to take effect.
10
Chapter 3 - EASY INSTALLATION

Chapter 3 - EASY INSTALLATION
3.4 Mac OS TCP/IP Configuration
1. Open the TCP/IP control panel.
2. In the Connect via menu select the Ethernet interface installed on
your computer.
3. In the Configure pull-down menu, select Using DHCP Server to
allow the built-in DHCP server of the XRouter Pro to assign an IP
address and other TCP/IP configuration information to the client
automatically. Do this for every client who needs Internet access
through the XRouter Pro. (See Figure 3.4-1)
Note: The DHCP Client ID field does not require to connect to the XRouter
Pro. It is normally used to identify computers in a DHCP network. If you
desire to input the name of computer in this field, you may.
4. Close the TCP/IP window and save the changes.
Figure 3.4-1
3.4.1 Assigning TCP/IP Values Manually
If you already have a DHCP server on the network, or if you prefer not to
use the XRouter Pro’s DHCP server to assign TCP/IP values automatical-
ly, you can input these values manually.
11

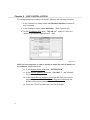
To manage computer’s address manually ,perform the following functions:
1. In the Connect via menu select the Ethernet interface installed in
your computer.
2. In the Configure menu select Manually. (See Figure 3.4-2)
a). In the IP
Address field, enter “192.168.1.x” where x is any vari-
able of your choice ranging from 2 - 252.
Figure 3.4-2
NOTE: No two computers on LAN is allowed to adopt the same IP address or
an IP address confict will occur.
b). In the Subnet Mask field enter “255.255.255.0”.
c). In the Router
Address field enter “192.168.1.1”, the XRouter
Pro’s default address.
d). In the Name Server
Address field enter the DNS information
provided by your ISP. In the Search Domains field enter the
domain information provided by your ISP.
e). Close the TCP/IP window and save the changes.
12
Chapter 3 - EASY INSTALLATION

3.4.2 Setting Up the XRouter Pro Through a Web Browser
Now that you have completed the configuration of TCP/IP addresses of
the client and managing computers, you may begin configuring the
XRouter Pro’s Internet settings. This can be done through a standard Web
browser (such as Netscape Navigator, Netscape Communicator, or
Microsoft Internet Explorer).
IMPORTANT: Before you begin, you must find out if your ISP provides one
of following IP addressing types:
Dynamic with PPPoE: If your service is dynamic addressing with PPPoE sup-
port, you do not need to follow the instructions below. However,you will need to
proceed to the PPPoE Settings section in the Advanced Configuration section of
this manual.
Dynamic: If the service is dynamic, you do not need to follow the instructions
below because the XRouter Pro automatically configures the TCP/IP information
provided by your ISP (you should already have Internet access.) Now you are
done installing the XRouter Pro and can begin accessing the Internet from any of
the client computers.
NOTE: The ISPs require the use of a MAC address (hardware address of a
network device) for service connection. Then you will need to contact to the
service provider and inform them the Public MAC address of your XRouter
Pro. It can be found on the OnePage Setup of the XRouter Pro. To access
the XRouter Pro’s OnePage Setup screen, follow the instructions below.
Static with PPPoE: If the ISP has provided a static IP address or if you would like
to make further changes to the advanced features, you will need to enter the Web-
based configuration described below to configure the static IP address provided by
your ISP. You will also need to use the PPPoE Settings section in the Advanced
Configuration section of this manual.
Static: If your ISP has provided a Static IP address or if you would like to make
further changes to the advanced features, you will need to enter the web-based
configuration described below to configure the static IP address provided by your
ISP.
Enter the Web-based configuration
1. Launch the Web browser.
NOTE: Netscape Communicator 4.0, Internet Explorer 4.0 or above is neces-
sary for configuring the XRouter Pro.)
13
Chapter 3 - EASY INSTALLATION

2. Type the XRouter Pro's default IP address (192.168.1.1) in the
URL field. This is the area where you would normally enter a Web
site address such as “
www.macsense.com”.
3. Press Enter. The Username and Password window will then
appear.
4. Leave the User name field
blank and type “admin“ as the default
password for the XRouter Pro. You can change the password
through a Web management page later. Click OK.
(See Figure 3.4-3)
Figure 3.4-3
Note: It is recommended to change the default “admin” password of your
XRouter Pro for security purpose. This can be done in the “Device Admin”
page of the web based configuration of the XRouter Pro. For more informa-
tion ont the “Device Admin” please refer to the Advance Configuration sec-
tion on this manual.
14
Chapter 3 - EASY INSTALLATION

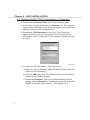
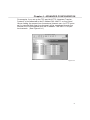
5. The OnePage Setup window now appears. Note that this page is
divided into two basic sections: Private IP Address, and Public IP
Address.
Figure 3.4-5
(See Figure 3.4-5)
Host Name: This is an optional section. Some ISPs require a host name in order
to be recognized by their systems. Your ISP should provide this if it is needed for
the systems.
Private IP Address: This section can be used for the changes in XRouter Pro’s
internal IP Address. However, we recommend that you do not alter the default IP
address “192.168.1.1” unless some modifications are necessary to be made for
your network environment.
Public IP Address: This section can be used to manually enter IP address infor-
mation provided by your ISP. You will not need to make any changes to the default
values in this section if the ISP automatically assigns IP addresses. However, if it
provides you with a static IP address, you will need to enter this information by fol-
lowing the instructions below.
To make changes to the Public IP Address fields:
1. Select Specify an IP Address.
2. Enter the static IP address provided by your ISP in the field locat-
ed immediately to the right of Specify an IP
Address.
3. Enter the Public Subnet Mask
provided by your ISP.
15
Chapter 3 - EASY INSTALLATION
Page is loading ...
Page is loading ...
Page is loading ...
Page is loading ...
Page is loading ...
Page is loading ...
Page is loading ...
Page is loading ...
Page is loading ...
Page is loading ...
Page is loading ...
Page is loading ...
Page is loading ...
Page is loading ...
Page is loading ...
Page is loading ...
Page is loading ...
Page is loading ...
Page is loading ...
Page is loading ...
Page is loading ...
Page is loading ...
Page is loading ...
Page is loading ...
Page is loading ...
Page is loading ...
-
 1
1
-
 2
2
-
 3
3
-
 4
4
-
 5
5
-
 6
6
-
 7
7
-
 8
8
-
 9
9
-
 10
10
-
 11
11
-
 12
12
-
 13
13
-
 14
14
-
 15
15
-
 16
16
-
 17
17
-
 18
18
-
 19
19
-
 20
20
-
 21
21
-
 22
22
-
 23
23
-
 24
24
-
 25
25
-
 26
26
-
 27
27
-
 28
28
-
 29
29
-
 30
30
-
 31
31
-
 32
32
-
 33
33
-
 34
34
-
 35
35
-
 36
36
-
 37
37
-
 38
38
-
 39
39
-
 40
40
-
 41
41
-
 42
42
-
 43
43
-
 44
44
-
 45
45
-
 46
46


Ask a question and I''ll find the answer in the document
Finding information in a document is now easier with AI
Related papers


Other documents
-
 SnapGear 1.7.8 User manual
-
Linksys EtherFast BEFSRU31 User manual
-
 Planet Technology ADE-3000 User manual
-
SonicWALL Pro 200 Owner's manual
-
SMC Networks SMC2804WBR V.2 User manual
-
SMC WBR14-G User manual
-
 Planex BRL-04EX User manual
-
-
 Eusso 5,750 KB Owner's manual
-
 Eusso UIS1404-SU Owner's manual


