INSTALLATION INSTRUCTIONS
ChromaDim™ Puck
“Lighting Enhanced by Design”
®
“Lighting Enhanced by Design”
®
©2022 GM Lighting
Specifications are subject to change
without notice.
18700 Ridgeland Ave.,
Tinley Park, IL 60477
Toll-Free: (866) 671-0811
FAX: (708) 478-2640
www.gmlighting.net
ChromaDimPuck-A_040522
RECESSED INSTALLATION:
NOTE: WE RECOMMEND THAT YOU ENGAGE A QUALIFIED AND
LICENSED ELECTRICIAN. ALL SYSTEM PARTS ARE COMPATIBLE
WITH AND ONLY WORK TOGETHER. DO NOT ATTEMPT TO SWAP
OUT OTHER MANUFACTURERS PRODUCTS. INSURE THAT BOTH
WALL SWITCH AND LED DRIVER IS GROUNDED IN ACCORDANCE
WITH NEC OR LOCAL ELECTRICAL CODES.
DO NOT INSTALL IN AN APPLICATION THAT IS OUTSIDE OF THE
PRODUCTS LISTED AMBIENT TEMPERATURE AND IN AN AREA THAT
IS NOT EASILY ACCESSED FOR SERVICE REQUIREMENTS.
MOUNT AND CONNECT CHROMADIM DRIVER AND WALL
CONTROLLER PER INSTRUCTIONS THAT COME WITH THAT UNIT.
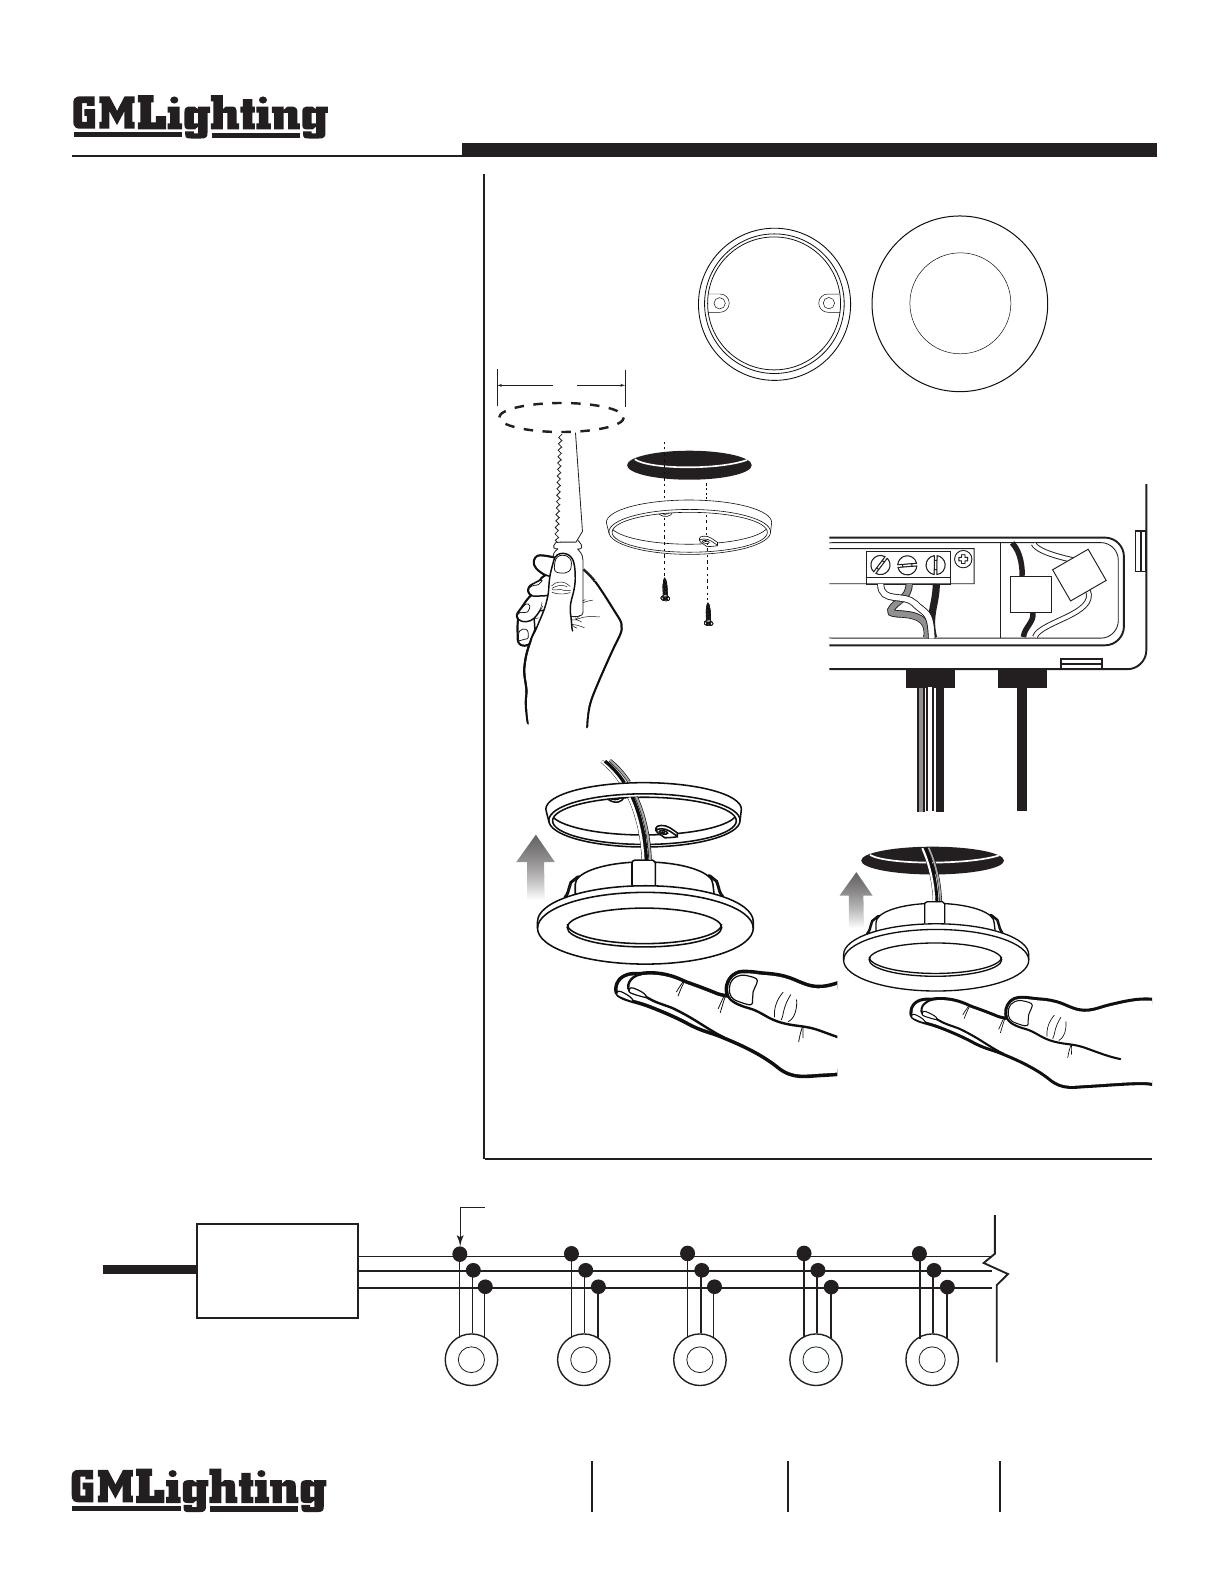
1. Familiarize yourself with the puck mounting ring, and the puck
body. You’ll need the mounting ring for surface mounting. Discard it
for recessed mounting (Fig. 1)
2. Determine the position of your puck(s) and trace a 3” diameter
circle on surface material. Using a keyhole saw or 3” hole saw, cut
through surface (Fig. 2).
SURFACE INSTALLATION:
3. Screw puck mounting ring to surface. (Fig. 3).
4. Feed three-wire leads up into surface hole. Connect puck leads
to White, Red and Green terminals in ChromaDim driver (Fig. 4).
Push puck firmly up into surface mount ring, allowing the springs to
compress and hold puck tightly to surface mount ring (Fig. 5).
RECESSED INSTALLATION:
5. Follow previous steps, but omit using surface mount ring.
Instead, push ChromaDim puck body up into hole cut out, achieving
a clean recessed installation (Fig. 6).
MULTIPLE PUCK INSTALLATION:
6. You can install as many as 30 - 3W ChromaDim pucks on one
lead. In order to do this, first layout your run, giving ample distance
between pucks, and install per directions for surface mount or
recessed installation. Follow the diagram at right (Fig. 7).
BEFORE YOU START:
• Please check local electrical codes before beginning
• Turn power off before installing
• Make sure to use proper rated wire
TOOLS NEEDED:
• Keyhole Saw, Hole Saw or other
• Phillips Screwdriver
ChromaDim Puck
surface mount ring ChromaDim Puck
puck body
3”
Fig. 2
Fig. 1
Fig. 3
ChromaDim
Driver
Make Connection
RED
3 Watt 3 Watt 3 Watt 3 Watt 3 Watt = 15 Total Watts
GREEN
WHITE
RR R R
R
GG G G G
R
WWWWW
120V
24V
MULTIPLE PUCK
WIRING SCHEMATIC
3-WIRE SYSTEM
Fig. 5
Fig. 6
To Puck To Wall
Switch
RED
Fig. 4
Fig. 7


