Page is loading ...

User’s Guide
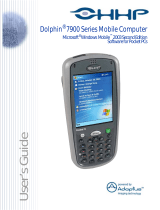
Dolphin
®
7200
Mobile Computer

Disclaimer
Hand Held Products, Inc. (“Hand Held Products”) reserves the right to make changes in specifications and other information
contained in this document without prior notice, and the reader should in all cases consult Hand Held Products to determine
whether any such changes have been made. The information in this publication does not represent a commitment on the part of
Hand Held Products.
Hand Held Products shall not be liable for technical or editorial errors or omissions contained herein; nor for incidental or
consequential damages resulting from the furnishing, performance, or use of this material.
This document contains proprietary information that is protected by copyright. All rights are reserved. No part of this document
may be photocopied, reproduced, or translated into another language without the prior written consent of Hand Held Products.
© 2005 Hand Held Products, Inc. All rights reserved.
Web Address: www.handheld.com
Trademarks
Microsoft, Windows 3.11, Windows 95, Windows 2000, and Windows NT and Excel are trademarks or registered trademarks of
Microsoft Corporation. Dolphin and HomeBase are trademarks or registered trademarks of Hand Held Products. Other product
names mentioned in this document may be trademarks or registered trademarks of their respective companies and are hereby
acknowledged.

Dolphin® 7200 User’s Guide iii
1
Chapter 1 - Introduction
Safety...................................................................................................................................................1-2
Required Safety Labels.................................................................................................................1-2
Canadian Notice............................................................................................................................1-3
CDRH Laser Safety Statement: 7200 Batch.................................................................................1-3
EN 60825-1 Laser Safety Statement.............................................................................................1-3
Regulatory and Safety Agency Approvals ..........................................................................................1-4
Batteries ........................................................................................................................................1-4
Care and Cleaning of the Dolphin.......................................................................................................1-4
Chapter 2 - Getting Started
About the Dolphin 7200 ......................................................................................................................2-1
Accessories for the Dolphin ................................................................................................................2-1
Dolphin 7200 Models..........................................................................................................................2-3
Dolphin 7200 Batch Terminal.......................................................................................................2-3
Dolphin 7200 RS-232 Terminal....................................................................................................2-3
Dolphin 7200 2D Terminal...........................................................................................................2-3
Bar Code Symbologies Supported.......................................................................................................2-4
Using Dolphin for the First Time ........................................................................................................2-4
Inserting the Battery Pack.............................................................................................................2-5
Removing the Battery Pack...........................................................................................................2-5
Turning the Dolphin On................................................................................................................2-5
Turning the Dolphin Off ...............................................................................................................2-6
Chapter 3 - Dolphin 7200 Basics
System Features...................................................................................................................................3-1
CPU...............................................................................................................................................3-1
Disk Drives ...................................................................................................................................3-1
Front Panel Features............................................................................................................................3-1
Light Emitting Diodes (LEDs)......................................................................................................3-1
Liquid Crystal Display (LCD) ......................................................................................................3-1
Speaker..........................................................................................................................................3-1
Using the Alphanumeric Keypad ........................................................................................................3-2
Alphanumeric Key Combinations for Functions and Special Characters.....................................3-3
Using the Numeric Keypad .................................................................................................................3-4
Key Combinations for Functions and Special Characters ............................................................3-5
Entering Alpha and Special Characters ........................................................................................3-5
Display Symbols..................................................................................................................................3-5
Battery Charging Symbol..............................................................................................................3-5
Keyboard Mode.............................................................................................................................3-6
Table of Contents

iv Dolphin® 7200 User’s Guide
Back Panel Features.............................................................................................................................3-6
Laser Engine .................................................................................................................................3-7
Image Engine ................................................................................................................................3-7
Lanyard Eyelet for Optional Wrist Strap......................................................................................3-7
Battery Well..................................................................................................................................3-7
Reset Switch..................................................................................................................................3-7
Infrared Communications Port......................................................................................................3-7
Battery Charging Contacts............................................................................................................3-7
Maintaining the Dolphin's Batteries....................................................................................................3-8
Internal NiMH Backup Battery.....................................................................................................3-8
NiMH Battery Pack.......................................................................................................................3-8
Resetting the Dolphin Terminal ........................................................................................................3-10
Chapter 4 - Dolphin 7200 RS-232
About Dolphin 7200 RS-232...............................................................................................................4-1
Cables ..................................................................................................................................................4-1
Charging the Battery Through the RS-232 Port..................................................................................4-1
Sending and Receiving Data................................................................................................................4-2
Chapter 5 - Dolphin 7200 2D Mobile Computer
About the Dolphin 7200 2D Mobile Computer...................................................................................5-1
Supported Symbologies.......................................................................................................................5-1
Reading Barcodes................................................................................................................................5-2
Capturing Images.................................................................................................................................5-3
Lighting Conditions.............................................................................................................................5-3
Dolphin 7200 2D Demo Software.......................................................................................................5-3
Re-Installing the Dolphin 7200 Demo Applications.....................................................................5-3
Dolphin Demo Main Screen .........................................................................................................5-4
F1 - Decoding Demo.....................................................................................................................5-4
F2 - Imaging Demo.......................................................................................................................5-5
F3 - I.Q. Imaging Demo................................................................................................................5-5
Chapter 6 - Dolphin OS and System Development Software
Installation ...........................................................................................................................................6-1
Default Installation Directories.....................................................................................................6-1
Help File, Document and Utility Icons................................................................................................6-2
Dolphin Utilities ..................................................................................................................................6-3
BMP2LCD.EXE ...........................................................................................................................6-3
BURN.EXE...................................................................................................................................6-3
DCOMM2.EXE - Dolphin File Transfer Utility...........................................................................6-3
DWIZARD.EXE (Dolphin Upgrade Wizard)...............................................................................6-4
HBCFG.EXE - HomeBase Configuration Utility.........................................................................6-4
STL.EXE.......................................................................................................................................6-5
YX.EXE........................................................................................................................................6-5
ZZZ.EXE.......................................................................................................................................6-6
ROM Image...................................................................................................................................6-6

Dolphin® 7200 User’s Guide v
Dolphin Application Development......................................................................................................6-7
Compiling Applications for the Dolphin ......................................................................................6-7
Sample Applications .....................................................................................................................6-7
Building the Samples...........................................................................................................................6-8
Compiling the Sample Programs ..................................................................................................6-8
Transferring Files to or from the Dolphin Terminal............................................................................6-9
For a sample, see YX.EXE on page 6-5. ......................................................................................6-9
Sending a File to the Dolphin .......................................................................................................6-9
Sending a File From Dolphin to Your PC.....................................................................................6-9
Sending Files at a Higher Rate......................................................................................................6-9
Using the Dolphin File Transfer Program and YX in Menu Mode ............................................6-10
Dolphin EVS Engine .........................................................................................................................6-11
Dolphin ROM Image and Bootloader ...............................................................................................6-11
Upgrading the Dolphin ROM Image ..........................................................................................6-11
Upgrading the Dolphin Bootloader ...................................................................................................6-12
Chapter 7 - Troubleshooting
Dolphin Terminal and HomeBase.......................................................................................................7-1
Troubleshooting with Dolphin 7200-2D .............................................................................................7-2
Chapter 8 - Dolphin HomeBase
Hub of the System ...............................................................................................................................8-1
Battery Management.....................................................................................................................8-1
IrDA Optical Communications.....................................................................................................8-1
Convenient Storage.......................................................................................................................8-1
Dolphin 7200 HomeBase Parts and Functions....................................................................................8-2
Front Panel....................................................................................................................................8-2
Back Panel.....................................................................................................................................8-3
Side Panels...........................................................................................................................................8-4
Main Communications Port ..........................................................................................................8-4
Multi-HomeBase Port ...................................................................................................................8-4
Charging Batteries in the Dolphin 7200 HomeBase ...........................................................................8-5
Charging a Dolphin Terminal .......................................................................................................8-5
Charging an Additional NiMH Battery Pack................................................................................8-6
Deep-Cycling the Battery....................................................................................................................8-6
Communications..................................................................................................................................8-6
Setting up the Dolphin HomeBase ......................................................................................................8-7
Connecting the Cables ..................................................................................................................8-7
Setting the Configuration Switches...............................................................................................8-7
Setting the Baud Rate....................................................................................................................8-8
Configuring a Single Dolphin 7200 HomeBase..................................................................................8-8
Version Number............................................................................................................................8-8
Baud Rate Selection......................................................................................................................8-8
Creating a Dolphin 7200 HomeBase Network....................................................................................8-9
How to Daisy Chain the Dolphin HomeBases..............................................................................8-9
Programming Commands .............................................................................................................8-9
Communicating with the Dolphin Terminal......................................................................................8-11

vi Dolphin® 7200 User’s Guide
Chapter 9 - Compact HomeBase
Hub of the System ...............................................................................................................................9-1
Battery Management.....................................................................................................................9-1
IrDA Optical Communications.....................................................................................................9-1
Convenient Storage.......................................................................................................................9-1
Dolphin 7200 Compact HomeBase Parts and Functions.....................................................................9-2
Front Panel...........................................................................................................................................9-2
Back Panel...........................................................................................................................................9-3
Bottom Panel .......................................................................................................................................9-4
Baud Rate Switches ......................................................................................................................9-4
Powering the Dolphin Terminal ..........................................................................................................9-4
Charging a Dolphin Terminal..............................................................................................................9-5
Deep-Cycling Batteries........................................................................................................................9-5
Mounting the Dolphin 7200 Compact HomeBase ..............................................................................9-5
Desk Mounting:.............................................................................................................................9-5
Wall Mounting:.............................................................................................................................9-6
Setting Up for Communications..........................................................................................................9-8
Setting up the Dolphin Compact HomeBase.......................................................................................9-8
Connecting the Cables ..................................................................................................................9-8
Communicating with the Dolphin Terminal........................................................................................9-9
Chapter 10 - Dolphin Vehicle Base
Introduction .......................................................................................................................................10-1
Basic Features....................................................................................................................................10-1
Bottom Panel .....................................................................................................................................10-1
Setting Up the Dolphin VehicleBase ..........................................................................................10-1
Connecting The Serial Cable ......................................................................................................10-1
Supplying Power to the Dolphin VehicleBase............................................................................10-2
Selecting the Baud Rate..............................................................................................................10-2
Side Panel Features............................................................................................................................10-3
Inserting the Dolphin Terminal into the VehicleBase.......................................................................10-4
Charging Batteries in the VehicleBase..............................................................................................10-4
Battery Temperatures..................................................................................................................10-4
Cables for the VehicleBase................................................................................................................10-5
Standard Serial Cable..................................................................................................................10-5
Making Your Own Cable............................................................................................................10-5
Chapter 11 - Dolphin MultiCharger
Introduction .......................................................................................................................................11-1
Basic Features .............................................................................................................................11-1
Intelligent Battery Charging........................................................................................................11-1
Top Panel...........................................................................................................................................11-2
Setting Up the Dolphin MultiCharger ...............................................................................................11-2
Supplying Power to the Dolphin MultiCharger..........................................................................11-2
Inserting the Dolphin Battery Pack.............................................................................................11-3
Charging Batteries in the Dolphin MultiCharger ..............................................................................11-3
Battery Temperatures..................................................................................................................11-3

Dolphin® 7200 User’s Guide vii
Servicing the Battery Pack ................................................................................................................11-3
Troubleshooting.................................................................................................................................11-4
Declaration of Conformity.................................................................................................................11-5
Chapter 12 - Customer Support
Product Service and Repair ...............................................................................................................12-1
Online Product Service and Repair Assistance...........................................................................12-2
Technical Assistance .........................................................................................................................12-2
Online Technical Assistance.......................................................................................................12-2
Limited Warranty ..............................................................................................................................12-3
Appendix A - Technical Specifications
Dolphin 7200 Terminal Specifications...............................................................................................A-1
Appendix B - Bar Code Samples
Code 39 (Code 3 of 9)..................................................................................................................B-1
Code 128 ......................................................................................................................................B-1
UPC-A..........................................................................................................................................B-1
Interleave 2 of 5 (I2of5)...............................................................................................................B-1
Appendix C - Decoding Demo Menu Layout
2D Decoding Demo Diagram.............................................................................................................C-1
2D Decoding Demo Screen Shots ......................................................................................................C-2
Setup Menu ..................................................................................................................................C-2
Display Options Menu .................................................................................................................C-2
Symbologies.................................................................................................................................C-2
Decoding Options .......................................................................................................................C-3
Decode Mode...............................................................................................................................C-3
Centering Window.......................................................................................................................C-4
ALD Window .....................................................................................................................................C-5
Appendix D - IQ Imaging Test Target
Appendix E - GS-DOS Commands

viii Dolphin® 7200 User’s Guide
Internal Commands Supported by GS-DOS....................................................................................... E-1
HELP............................................................................................................................................ E-1
BREAK........................................................................................................................................ E-1
CALL ........................................................................................................................................... E-1
CD (CHDIR)................................................................................................................................ E-2
CLS .............................................................................................................................................. E-2
COPY........................................................................................................................................... E-2
CTTY ........................................................................................................................................... E-2
DATE........................................................................................................................................... E-2
DEL (ERASE or ERA) ................................................................................................................ E-2
DELAY........................................................................................................................................ E-2
DIR............................................................................................................................................... E-2
ECHO........................................................................................................................................... E-3
EXIT............................................................................................................................................. E-3
GOTO........................................................................................................................................... E-3
IF.................................................................................................................................................. E-3
MD (MKDIR) .............................................................................................................................. E-3
PATH ........................................................................................................................................... E-3
PAUSE......................................................................................................................................... E-3
PROMPT...................................................................................................................................... E-4
RD (RMDIR) ............................................................................................................................... E-4
REM............................................................................................................................................. E-4
REBOOT...................................................................................................................................... E-4
REN.............................................................................................................................................. E-4
SHIFT........................................................................................................................................... E-4
SET............................................................................................................................................... E-4
SHIFT........................................................................................................................................... E-5
SYNC........................................................................................................................................... E-5
TIME............................................................................................................................................ E-5
TRUENAME ............................................................................................................................... E-5
TYPE............................................................................................................................................ E-5
VER.............................................................................................................................................. E-5
VERIFY ....................................................................................................................................... E-5
VOL ............................................................................................................................................. E-5
Appendix F - Declarations of Conformity

Dolphin® 7200 User’s Guide 1 - 1
1
Introduction
Congratulations on the purchase of your new Dolphin 7200 mobile computer!
You have made a wise choice in selecting the Dolphin 7200, a device known worldwide for its ergonomic shape, light weight,
versatility and single-handed data collection features.
Ergonomics
The patented shape allows true, one-handed operation and fits either hand comfortably. Built to last, the Dolphin's ruggedly built
case houses a 386 microprocessor and DOS operating system that is easily programmable with standard programming tools like
Microsoft Visual C/C++, Borland C/C++, or Visual Basic.
Durability
Dolphin is one of the most durable devices available, and is designed to withstand repeated five-foot drops onto a concrete floor.
It also resists extreme temperatures, humidity levels and dust conditions.
Features
The Dolphin's basic features include long-lasting Nickel Metal Hydride (NiMH) batteries, a large, easy-to-read 8 line x 20
character backlit display that can display text or graphics, a natural scan and viewing angle, and two keypad options.
Multiple Configurations
The multiple configurations available for the Dolphin 7200 make it one of the most versatile terminals in the automatic data
collection industry. The terminal may be equipped with a scan engine capable of reading all standard bar code symbologies.
The Dolphin 7200 RS-232 terminal features a micro-DB9 RS-232 for serial data input/output and charging in addition to the
infrared port.
The Dolphin 7200-2D terminal comes available with the IMAGETEAM™ 4250 Image Engine, a low power, high-resolution digital
image engine for omni-directional and auto-discrimination reading and decoding of linear barcodes, stacked linear (PDF417) and
2D matrix codes. The image engine functions like a digital camera and also provides Optical Character Recognition (OCR)
functionality.
Load up the Dolphin with your custom software application and the ultimate data collection solution for your business fits in the
palm of your hand.

1 - 2 Dolphin® 7200 User’s Guide
Safety
The Dolphin 7200 handheld computer/bar code scanner meets or exceeds the requirements of all applicable standards
organizations for safe operation. However, as with any electrical equipment, the best way to ensure safe operation is to know the
possible risks. The following safety guidelines are designed to protect both you and others around you. Please read them
carefully before using your Dolphin.
Required Safety Labels
Dolphin 7200 terminals use a low power Visible Laser to scan bar codes. Short-term exposure to CDRH Class II laser light is not
known to be harmful. As with any bright light source, such as the sun, you should avoid direct eye exposure.
Locations
The following are required safety labels, as they should appear on the back panel of the Dolphin 7200:
Label for Laser Batch Terminals Label for Dolphin 7200-2D Terminals
Product ID Label

Dolphin® 7200 User’s Guide 1 - 3
Statement of Agency Compliance
This device complies with part 15 of the FCC Rules. Operation is subject to the following two conditions: (1) this device may not
cause harmful interference, and (2) this device must accept any interference received, including interference that may cause
undesired operation.
FCC Class A Compliance Statement
This equipment has been tested and found to comply with the limits for a Class A digital device, pursuant to part 15 of the FCC
Rules. These limits are designed to provide reasonable protection against harmful interference when the equipment is operated
in a commercial environment. This equipment generates, uses, and can radiate radio frequency energy and, if not installed and
used in accordance with the instruction manual, may cause harmful interference to radio communications. Operation of this
equipment in a residential area is likely to cause harmful interference, in which case the user will be required to correct the
interference at his own expense.
Caution: Any changes or modifications made to this device that are not expressly approved by Hand Held Products may void
the user's authority to operate the equipment.
Note: To maintain compliance with FCC Rules and Regulations, cables connected to this device must be shielded cables, in
which the cable shield wire(s) have been grounded (tied) to the connector shell.
Canadian Notice
This equipment does not exceed the Class A limits for radio noise emissions as described in the Radio Interference Regulations
of the Canadian Department of Communications.
Le present appareil numerique n'emet pas de bruits radioelectriques depassant les limites applicables aux appareils numeriques
de la classe A prescrites dans le Reglement sur le brouillage radioelectrique edicte par le ministere des Communications du
Canada.
CDRH Laser Safety Statement: 7200 Batch
This product complies with US DHHS 21 CFR J Part 1040.10. This product is a CLASS II LASER PRODUCT with a maximum
output of 1.0 mW at 670 nanometers and continuous wave.
EN 60825-1 Laser Safety Statement
This product is classified as a CLASS 2 LASER PRODUCT with a maximum output of 1.0 mW at 670 nanometers per EN 60825-
1:1994, Issue 2, June 1997.

1 - 4 Dolphin® 7200 User’s Guide
Regulatory and Safety Agency Approvals
The CE mark on the product indicates that the system has been tested to and conforms with the provisions noted within
the 89/336/EEC Electromagnetic Compatibility Directive and the 73/23/EEC Low Voltage Directive.
For further information please contact:
Hand Held Products, Inc.
5627 BT Eindhoven
The Netherlands
Hand Held Products shall not be liable for use of our product with equipment (i.e., power supplies, personal computers, etc.) that
is not CE marked and does not comply with the Low Voltage Directive.
Batteries
• Use only the battery supplied with your Dolphin or a replacement battery supplied, recommended, or approved by Hand Held
Products.
• Replace a defective battery immediately as it could damage the Dolphin terminal.
• Never throw a used battery in the trash. It contains heavy metals and should be recycled according to local guidelines.
• Don't short-circuit a battery or throw it into a fire. It can explode and cause severe personal injury.
• Excessive discharge damages a battery. Recharge the battery when your Dolphin indicates low battery power.
• Although your battery can be recharged many times, it will eventually be depleted. Replace it after the recommended usage
period (about 500 charge cycles for the 1500 mAh NiMH battery) or if the battery does not hold a charge.
• If you are not sure the battery or charger is working properly, please send it to Hand Held Products or an authorized Hand
Held Products service center, for inspection.
The Dolphin handheld computer/bar code scanner meets or exceeds all applicable standards and has been manufactured to the
highest level of quality.
Care and Cleaning of the Dolphin
When needed, clean the laser engine window and the LCD display with a clean non-abrasive, lint-free cloth.
Parameter Specification
U.S.A. FCC Part 15, Class A
Canada IEC 0003
Europe EN 55022 (CISPR22) Class A
EN 55024

Dolphin® 7200 User’s Guide 2 - 1
2
Getting Started
About the Dolphin 7200
The Dolphin is a handheld computer and imager/bar code scanner with a 386 33 MHz microprocessor that runs with GS-DOS
and is PC-compatible and is designed for easy, single-handed data collection.
Accessories for the Dolphin
The Dolphin 7200 is part of a data collection system that includes accessories specifically designed for vehicle, desktop and hub
operations. Accessories available include serial and networkable communications/charging cradles, serial communications/
charging cables, desktop "gang chargers" and vehicle mounted charging/communication cradles.
You can use these accessories with the Dolphin:
Dolphin HomeBase
™
Dolphin Compact HomeBase
™
Charges one Dolphin terminal and one extra battery pack in its
auxiliary batter well; includes power adapter for proper current.
For more information, see Dolphin HomeBase on page 8-1.
For more information, see Compact HomeBase on page 9-1.
Dolphin HomeBase Power Adapter
Replacement power adapter for Dolphin HomeBase.
Note: Use only power adapters approved for use by Hand Held
Products. Failure to do so may result in improper
operation or damage to the unit.
Dolphin MultiCharger
™
10-slot battery charger designed specifically for Dolphin NiMH
battery packs that charges and reconditions 10 batteries in
under four hours. Supports 90-264V.
For more information, see Dolphin MultiCharger on page 11-1.

2 - 2 Dolphin® 7200 User’s Guide
Note: Use your Dolphin only with accessories supplied, recommended or approved by Hand Held Products, Inc. Use of non-
approved accessories can be dangerous and will invalidate any warranty or liability claims.
Dolphin VehicleBase
™
Battery charging and/or communications cradle designed for
in-transit applications. Mounted inside a vehicle, this cradle
provides connectivity to any RS-232 serial device including
printers, radio modems, GPS, on-board computers and vehicle
monitoring systems.
For more information, see Dolphin Vehicle Base on page 10-1.
Wrist Strap for Dolphin
A convenient way to carry the Dolphin.
Note: Lanyard ring for attaching strap not available with the
Dolphin 7200 RS-232.
Holster
Another convenient way to carry the Dolphin. Available in
leather or cordura, a rugged synthetic fabric.
NiMH Battery Pack
Nickel Metal Hydride (NiMH) 3.6V rechargeable battery for the
Dolphin.
For more information, see Dolphin MultiCharger on page 11-1.
Communication/Charging Cable for
Dolphin 7200 RS-232
Connects the Dolphin 7200 RS-232 terminal directly to host
computer using micro-DB9 to DB9 serial cable, and recharges
the battery using the Universal Power Adapter PS9U-11.
6' RS-232 Serial Cable
Connects the Dolphin HomeBase to your desktop PC.

Dolphin® 7200 User’s Guide 2 - 3
Dolphin 7200 Models
Hand Held Product's family of Dolphin 7200 handheld portable data collection terminals includes these models:
Dolphin 7200 Batch Terminal
The Dolphin 7200 Batch terminal is a DOS programmable handheld computer/bar code scanner with a unique, ergonomic shape
designed for single-handed use. The basic terminal has 2MB RAM and 8MB FLASH EEPROM memory. It also features an IrDA
infrared transceiver for data communications.
Options
• 36-key alphanumeric keypad or 20-key numeric keypad with shifted alpha characters
• Standard High Performance, Long-Range or High Density scan engines
• 2 MB RAM with 8 MB non-volatile FLASH memory (expandable to 16 MB on Dolphin 7200 Batch only)
• No scan engine (manual entry only)
• Integrated image engine
• Micro-DB9 RS-232 serial port
Dolphin 7200 RS-232 Terminal
The Dolphin 7200 RS-232 terminal is identical to the Dolphin 7200 Batch terminal except that it features a micro-DB9 RS-232
port on the back panel for serial data input/output and charging.
Dolphin 7200 2D Terminal
The Dolphin 7200 2D terminal is identical to the Dolphin 7200 Batch terminal with IQ Imaging
™
. IQ Imaging offers a suite of
features to increase productivity when reading all major linear, stacked linear (PDF417), and matrix bar code symbologies, OCR
fonts, and performing image capture. IQ Imaging features the IMAGETEAM
™
4250 Image Engine, a low power, high-resolution
digital image engine for omni-directional and auto-discrimination reading and decoding.

2 - 4 Dolphin® 7200 User’s Guide
Bar Code Symbologies Supported
1D Linear Codes: Code 3 of 9, Interleaved 2 of 5, Code 11, MSI, UPC A, UPC EO, UPC EI, EAN/EAN13, Codabar,
Code 128, Code 93, UPC
2D Codes: PDF417, microPDF, Maxicode, Datamatrix, Aztec, QR Code, Code 49
Composite Codes: RSS-14, CODABLOCK, AZTEC MESA
OCR Codes: OCR A and OCR B
Postal Codes: Postnet and most international 4 state codes, PLANET CODE, BPO 4 STATE, CANADIAN 4 STATE,
DUTCH POSTAL, AUSTRALIAN 4 STATE, JAPANESE POSTAL
Using Dolphin for the First Time
This section will show you how to:
1. Be sure that you've received all items included with your Dolphin order
2. Charge the battery
3. Turn the Dolphin on and off
4. Set the date and time
Note: Be sure to keep the original carton and packaging in the event that the Dolphin terminal or Dolphin HomeBase should
need to be returned for service.
Step 1. Checking Your Package
If you ordered a Dolphin 7200 Batch or 2D terminal, inspect the package to see that the following standard items and accessories
(if ordered) are included:
• Dolphin 7200 terminal
• Battery (1500 mAh, Nickel Metal Hydride (NiMH)
• Dolphin 7200 HomeBase
• AC-DC Power Adapter for Dolphin HomeBase
If you ordered a Dolphin 7200 RS-232 terminal, inspect the package to see that the following standard items and accessories (if
ordered) are included:
• Dolphin 7200 RS-232 terminal
• Battery - 1500 mAh, Nickel Metal Hydride (NiMH)
• Dolphin 7200 RS-232 Communication/Charging Cable
• AC-DC Universal Power Adapter
Step 2. Charging the Battery
Use only 3.6V battery packs provided by Hand Held Products. The use of any other battery pack in the Dolphin terminal
will void your warranty and may result in damage to the Dolphin terminal or battery.
Although the Dolphin 7200 terminal is received with the battery inserted, it is NOT ready for charging and/or deep-
cycling. Remove the plastic insulator located between the terminal and battery connectors. Failure to remove the
insulator may result in damages to the terminal.
The terminal's NiMH battery is not conditioned at the factory and is shipped discharged of all power and inserted in the Dolphin
terminal. For maximum battery life, Hand Held Products recommends that you deep-cycle the battery twice before initial use.
To deep-cycle, insert the battery into the HomeBase auxiliary battery well. Then, push and hold the Service Aux Batt button for
at least four seconds. For more information, see Deep-Cycling the Battery on page 8-6. You may also use the CycleBat software
utility to deep-cycle the battery. This utility is available for download from the Partners Area of www.handheld.com.
Note: For maximum battery life, Hand Held Products recommends that you deep-cycle (service) the battery twice before initial
use and then, once a month thereafter.
!
!

Dolphin® 7200 User’s Guide 2 - 5
If you have a Dolphin 7200 RS-232 terminal and are using the communication/charging cable instead of a HomeBase to charge
the battery, charge the terminal for 24 hours before initial use.
After deep cycling the battery, you may charge the battery using one of these methods:
• Place the battery in the auxiliary battery well on the Dolphin HomeBase. Time to Charge: 3 hours
• Place the battery in the 10-slot Dolphin MultiCharger. Time to Charge: 3 hours
• Install the battery in the Dolphin, place the Dolphin in the HomeBase and connect the HomeBase to an external power source.
Time to Charge: 5 ½ hours
• Plug the micro-DB9 end of the communication/charging cable into Dolphin 7200 RS-232 terminal's RS-232 port and connect
to an external power source. Time to Charge: 5 ½ hours
Inserting the Battery Pack
1. Hold the Dolphin with the front panel (keypad) facing down.
2. Insert the end without the locking tab into the bottom of the battery opening and snap the battery into place with a hinging
motion. The battery case serves as the back cover of the Dolphin.
Removing the Battery Pack
1. Hold the Dolphin with the front panel (keypad) facing down.
2. Push the locking tab on the battery pack down and pull the battery out from the Dolphin terminal with a hinging motion.
Step 3. Turning the Dolphin On And Off
Turning the Dolphin On
1. Install the charged battery pack in the Dolphin.
2. Hold the Dolphin in the palm of your hand so that you can press the ON/SCAN key easily with your thumb.
3. Press the ON/SCAN key to turn the Dolphin on. Your Dolphin will boot up just like a desktop PC and the title screen for the
Demo Application will appear on the display.
4. If the title screen does not appear on the display of your Dolphin, the Demo Application has been removed from your
terminal. Therefore, you will see a DOS prompt on the screen; for example:
C:\ or A:\ .

2 - 6 Dolphin® 7200 User’s Guide
Note: If using the Dolphin for first time or if the terminal has been without a battery pack for more than 30 minutes and you are
now inserting a battery, you may receive a CMOS error when the terminal boots up. Don't worry, the terminal is OK. This
simply means that the internal back-up battery needs to be recharged and the date and time need to be reset. To recharge
the internal backup battery and reset the date and time, insert a fully charged battery in the Dolphin and then use the DOS
date and time function to set the correct date and time. The internal back-up battery requires a minimum of 5 hours of
charging time in order to perform and maintain the system as described on page 30.
Turning the Dolphin Off
The Dolphin is never actually turned off. To conserve power, the Dolphin goes into "sleep mode" when it is inactive for a
programmed period of time as defined by your application. The screen is blank when the Dolphin is in "sleep mode."
Step 4. Setting the Date and Time
Use the DOS date and time function to set the correct date and time for your Dolphin terminal.
To Set the Date on an Alphanumeric Terminal:
1. Enter DATE at the Dolphin's DOS prompt.
2. Press NUM LOCK to put the Dolphin in numeric mode.
3. Enter the new date mm-dd-yyyy.
4. Press ENTER.
To Set the Date on a Numeric Terminal:
1. Press SHIFT to put the Dolphin in alpha mode.
2. Enter DATE at the Dolphin's DOS prompt; see Using the Numeric Keypad on page 3-4.
3. Press SHIFT to put the Dolphin back in numeric mode.
4. Enter the new date mm-dd-yy.
5. Press ENTER.
To Set the Time
To enter the new time, enter TIME at the Dolphin's DOS prompt instead of DATE and follow the directions for the Dolphin model
you are using.

Dolphin® 7200 User’s Guide 3 - 1
3
Dolphin 7200 Basics
System Features
CPU
The Dolphin's computing power is provided by a highly integrated AMD ELAN SC310 386SX 33 MHz microprocessor.
Disk Drives
The Dolphin contains two disk drives that provide storage for system files, applications, and data. A third drive is also present if
you purchase the FLASH expansion option.
Drive A Drive A contains a 120K executable FLASH EEPROM to store system utilities and to initialize the boot
process. This drive is read-only and is not usable by the developer/end-user.
Drive C Drive C is an 8MB FLASH virtual hard drive used for program and data storage. Drive C is an image
of the Drive A and not a physical drive.
Drive D If you add the expanded memory module to your Dolphin Batch terminal, it will appear as Drive D.
Eight MB of additional FLASH memory can be added via the FLASH expansion module. This option
is available in the Dolphin Batch terminal only.
Front Panel Features
This section describes features on the Dolphin's front panel. The alphanumeric and numeric Dolphins have identical back panels.
Light Emitting Diodes (LEDs)
The red LED located at the upper right corner of the LCD display is labeled SCAN. This LED illuminates when the user presses
the ON/KEY key and activates the scan engine.
The green LED located at the upper left corner of the LCD display is labeled DECODE. This LED illuminates when the bar code
software successfully decodes a bar code. Both LEDs are software programmable.
Liquid Crystal Display (LCD)
The alphanumeric, scrollable LCD consists of nine rows with 20 character positions per row and 119 x 73 graphics pixels, which
are software addressable. The electroluminescent backlight allows you to view the display in low light conditions. To conserve
power, the backlight is automatically turned off after 30 seconds. The on/off function and contrast is software programmable.
Note: The ninth row is used for system icons and application-defined icons.
Speaker
The Dolphin Batch terminal's internal speaker emits a sound level of 80dB at 10 cm.

3 - 2 Dolphin® 7200 User’s Guide
Using the Alphanumeric Keypad
The Dolphin's alphanumeric, splash-resistant keypad has 36 epoxy coated keys. The keyboard's yellow background enhances
the readability of the numeric and special character keys.
-
SCAN
DECODE
LIGHT
CLR
NUM
LOCK
ESC
DOS PLATFORM
POWER MGMT
INFRA RED COMM
SINGLE-HANDED
POCKET-SIZE
LASER SCANNER
SPC
7
4
1
=
8
5
2
0
9
6
3
.
D O L P H I N
+
-
SHIFT BKSP
A
F
K
P
U
VWX Y
Z
Q
RST
LMNO
GH I
J
B
C
DE
ENTER
ON
SCAN
F1
F3
F4F2
The F1, F2, F3 and F4 keys are
user-definable function keys
and may be programmed for a
variety of functions.
The BKSP key moves you to
move the cursor back one
space each time the key is
pressed.
The LIGHT key toggles the
LCD backlight on and off.
The NUM LOCK key toggles
between the alphabetic and
numeric modes.
The ENTER key confirms
data entry.
The Dolphin's ON/SCAN key
"wakes" the terminal from
sleep mode. Its position also
allows convenient one-handed
bar code scanning.
The SHIFT key toggles the
Dolphin from alpha to numeric
mode and back and, in
combination with other keys,
allows you to enter special
characters.
/