Page is loading ...

V1.2 2013
Installation Manual
ELECTRIC STRIKE FES20M
PRODUCT
FES20M Monitored Strike (SCEC approved)
ACCESSORIES
FES20-EL 15 (15mm)
Extension Lips.
FES20-EL 25 (25mm)
FES20-EL 50 (50mm)
FES20-EL 75 (75mm)
The FES20M is now equipped with the option to install a Silencer Rubber Buffer.
Silencer Rubber Buffer
To install the Silencer Rubber Buffer (supplied in the installation kit), simply remove the screw
located between the body of the strike & the keeper and replace it with the buffer
(see instruction on last page).
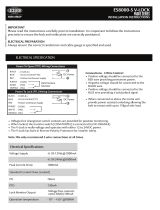
WIRING
NOTE
FES20 Series Electric Strike factory setting is Power to Lock (PTL).
The control circuit for the door strike is protected against reverse polarity connection.
No additional diode protection required.
Power Input
Multi Voltage 11-30VDC 12 VDC – current 220 mA 24 VDC – current 110 mA
Wire output
Red (+) Black (-)
LSS (Lock Status Sensor)
Black (Common) Yellow (NO-PTO); (NC-PTL) Green (NC- PTO); (NO-PTL)
DSS(Door Status Sensor)
Black (Common) Blue (NO) Orange (NC)
ATS (Anti – tamper Sensor)
Black (Common) Red (NO) White (NC)
Sensor Output
LSS Sensor Output
3 A, 125 VAC;
2 A, 30 VDC.
DSS Sensor Output
3 A, 125 VAC;
2 A, 30 VDC.
Anti-tamper Sensor Output
5 A, 125 VAC;
3 A, 250 VAC.

V1.2 2013
PRODUCT DIMENSIONS

V1.2 2013
INSTALLATION
If the frame is not prefabricated, use the enclosed stick-on template to prepare strike
cut-out in frame. Install strike as described in diagram.

V1.2 2013
POSITION OF DOOR LATCH
As drawn in the diagrams, there should be a 1mm gap between the door latch and the
front-face of the strike keeper, preventing the door from creating back pressure on the
strike keeper when the door is closed.

V1.2 2013
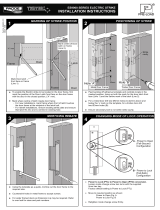
CONVERSION FROM EX-FACTORY SETTING PTL (POWER TO LOCK) TO PTO (POWER TO OPEN)
PROCEDURE TO INSTALL THE SILENCER RUBBER BUFFER
Prepare changeover tool
Fully loosen both of the capstan release screws (screws
are captured by the plastic grommet)
Insert the changeover tool through the window. Turn the
capstan wheel in the direction away from the strike
keeper (see arrow on sticker PTO). Turn the wheel until it
hits the stop. The strike is now in Power to Open/Fail Secure
mode
Remove the rubber cap to expose the capstan
changeover wheel
Tighten the two capstan releasing screws replace and
plug in the rubber cap back to close the window.
[Type a quote from the
document or the summary of
an interesting point. You can
position the text box anywhere
Remove the
silencer rubber
buffer from
accessory kit
Remove the buffer
screw
Replace screw with
rubber buffer
/