Page is loading ...

SPH-5 Maxillofacial Shield
(MFS) Assembly
Installation/Operation Instructions
© 2014 Gentex Corporation
GENTEX

When you replace components or install additional components on
Gentex products, always use genuine factory-new Gentex parts. This
will ensure a correct t and maintain the safety of the product. Use
of non-Gentex parts (salvage, refurbished, etc.) for replacement
or additional installation will void any product warranty and may
compromise the safety of the user.

Contents
Description . . . . . . . . . . . . . . . . . . . . . . 1
Installation . . . . . . . . . . . . . . . . . . . . . . 2
Operation . . . . . . . . . . . . . . . . . . . . . . 16
Trimming MFS for ANVIS Compatibility. . . . . . . 17
Cleaning MFS . . . . . . . . . . . . . . . . . . . . 18
Replacing Striker . . . . . . . . . . . . . . . . . . 18
Replacing Latch Assembly . . . . . . . . . . . . . 18
Replacing End Cap . . . . . . . . . . . . . . . . . 19
Part 1: Preparing Adhesives . . . . . . . . . . . . . . 19
Part 2: Removing and Installing End Cap . . . . . . . 20
Parts Lists . . . . . . . . . . . . . . . . . . . . . . 22


1
Description
The SPH-5 Maxillofacial Shield (MFS), shown in Figure 1, protects the lower
facial area from ying debris. Latches on the right and left sides of the MFS
attach it to the helmet-mounted strikers.
This booklet includes instructions for installing the strikers on the helmet,
attaching the MFS to the strikers, maintaining the MFS, and replacing end caps.
NOTE: The MFS and mounting jigs are available in sizes Regular and X-Large.
They are used on SPH-5 helmet sizes as follows:
MFS and Mounting Jig Size Helmet Size
Regular Small and Regular
X-Large X-Large and XX-Large
Figure 1. MFS Components
Mounting jigs for striker attachment
• Marked according to size: REG (Regular)
and XL (X-Large).
• Size Regular shown. Size X-Large (not
shown) has a slightly different shape.
MFS
Strikers and hardware

2
Installation
In the procedure below, you will use the mounting jigs with the MFS to locate
and mark the hole locations for the attachment of the strikers to the helmet.
NOTE: Throughout the procedure, “left side” and “right side” refer to the helmet
as worn.
Tools and Materials Needed
• Drill with 0.185 and 0.040 bits
• Flat-tip screwdriver
• Phillips screwdriver
• Well-sharpened pencil
• White glue
Procedure
1. Prepare the helmet (Figure 2). Do the following:
a. Pressing the connector release button (hidden under shrink tubing),
unplug the microphone cord from the connector.
b. Detach the boom microphone by removing the outer hardware (center
screw or quick-disconnect bracket screws) from the helmet. (The inner
hardware, covered by foam, will remain in place. Attachment style may
vary.) Set the removed parts aside for reinstallation.
c. On one side of the helmet, remove the two lower outer screws that attach
the earcup cross straps to the inside of the helmet. (The rearward inner
post also will be removed. The forward inner post, covered by foam, will
remain in place.) Repeat for the other side.
Figure 2. Preparing Helmet for Installation
GENTEX
GENTEX
Unplug
Press
NOTE: This gure shows the center screw
being removed. The helmet may have a
quick-disconnect bracket instead.
Remove
Remove
Remove
(four places)

3
2. Familiarize yourself with the mounting jigs (Figure 3). Note the following
features:
a. Each mounting jig is marked REG (Regular) or XL. Be sure to select the
correct size for your helmet.
b. Each mounting jig is marked LEFT or RIGHT. Be sure to install each one
on the correct side of the helmet.
c. Each mounting jig is marked FRONT (with an arrow). Be sure that the
arrow points toward the front of the helmet when the jig is installed.
d. Each mounting jig has four slots to allow for variations in cross strap
attachment on SPH-5 helmets. The upper two slots are marked A; the
lower two are marked B. You will attach each jig to the helmet with the
lower cross strap attachment hardware (which you removed in Step 1c)
via the jig slots at the lower helmet cross strap attachment points. Be
sure to use like-marked slots (AA or BB, not AB or BA). Choose the
slots (AA or BB) that will align most closely with the lower cross strap
attachment points.
Figure 3. Mounting Jigs
Left mounting jig
Right mounting jig

4
3. Attach the mounting jigs to the MFS (Figure 4). Select the correct jig (LEFT
or RIGHT) for each side of the MFS (left or right as worn). On one side of the
MFS, insert the pin of the latch into the striker feature on the jig and ip the
latch closed. Repeat to attach the other mounting jig to the other side.
4. Lower the inner visor (Figure 5). Push the visor knob outward, and lower
the inner visor to the lowest position. Ensure that the bottom edge of the visor
is level
—
not skewed. Place the helmet face up on a suitable work surface.
Figure 4. Attaching MFS to Jigs
Figure 5. Preparing Helmet
GENTEX
GENTEX
Insert pin into striker feature
Flip latch closed
Lower inner visor
Bottom edge of visor
(viewed from front)
(Level)
Place helmet face up

5
5. Attach the MFS to the helmet (Figure 6). Do the following:
a. Align the MFS within the lower edge of the visor. Ensure that the lower
edge of the visor is aligned evenly with the upper raised edge of the MFS
.
b. Position each jig over the ear dome area of the helmet. Ensure that the
striker feature is within the ear dome — not on or past the edge of
the helmet. Determine which set of jig slots (upper or lower) will align
most closely with the lower cross strap attachment holes.
c. On one side of the helmet, use the cross strap screw and post (which you
removed in Step 1c) to attach the jigs to the helmet at the lower rear cross
strap attachment points via the selected jig slot
.
Repeat for the other side.
Tighten both screws snugly
.
6. Detach the MFS and install the front screws (Figure 7). With the jigs
attached to the helmet, unlatch the MFS from the jigs. Install both front cross
strap screws snugly. (The inner front posts remain in place behind the foam.)
Figure 6. Aligning and Attaching MFS
Figure 7. Detaching MFS
GENTEX
GENTEX
GENTEX
GENTEX
Striker feature
within ear dome
Align MFS within visor
Position jig
(both sides)
Attach screw
and post
(both sides)
Attach screw
(both sides)
MFS detached
Jig attached
Flip latch open
(both sides)

6
7. Have the wearer don the helmet (Figure 8). Do the following:
a. Grasp the helmet in the earcup area, and carefully ex the helmet just
enough to clear the head. Be careful not to move the jigs.
b. Place the inside front of the helmet against the forehead, and rotate the
helmet downward onto the head.
c. Press the helmet rmly downward with both hands to ensure that the
helmet is properly seated on the head and the ears are surrounded by
the earcups.
d. Check the distance between the eyebrows and the edge of the helmet
shell. Generally, this distance should be approximately ¾ inch for
optimum eld of view. However, the helmet should be positioned as
normally worn.
Figure 8. Donning Helmet
GENTEX
Grasp helmet
¾ inch
(approx.)
Rotate down
onto head

7
8. Have the wearer tighten the nape strap (Figure 9). Adjust the hook-and-
pile closure and tighten the nape strap through the adjustment buckle.
9. Have the wearer fasten the chinstrap (Figure 9). Do the following:
a. If not already done, insert the snap end of the chinstrap through the
D-ring on the right side (as worn) of the retention assembly and fasten
the snap.
b. Feed the other end of the chinstrap through the D-rings on the left side of
the helmet.
c. Split the D-rings, loop the chin strap end back through inner D-ring, and
pull the chin strap through both D-rings.
d. Tighten the chinstrap to the desired tension. Once the desired tension is
achieved, you can fasten and unfasten the chinstrap via the snap.
For helmet stability, always tighten the nape strap and the chinstrap
as snugly as possible when wearing the helmet. Failure to do so may
result in injury.
Figure 9. Adjust Nape Strap and Chin Strap
Tighten
nape strap
Snap
Tighten
chinstrap
Adjust
closure

8
10. Attach the MFS to the jigs (Figure 10). Attach one side of the MFS to
the jig by inserting the MFS latch pin into the striker feature on the jig and
ipping the latch to the closed position. Repeat for the other side.
11. Lower the inner visor to the lowest position (Figure 11). Push outward
and down on the visor knob until it locks in the lowest detent.
Figure 10. Attaching MFS to Mounting Jig
Figure 11. Lowering Visor
GENTEX
GENTEX
GENTEX
Lower
Insert latch pin
into stiker feature
(both sides)
Flip latch closed
(both sides)

9
12. Align the upper raised edge of the MFS within the lower edge of the visor
lens (Figure 12). Ensure that (1) the wearer’s eld of view is not obstructed for
the performance of duties and (2) the MFS does not touch the wearer’s nose.
13. Based on feedback from the wearer, evaluate the t of the MFS. Do the
following:
a. If the t seems good to the wearer, raise the visor, unlatch and remove
the MFS (Figure 12), and proceed to Step 14.
b. If the MFS contacts the nose, loosen the jig screws and adjust the jigs to
raise the MFS slightly (Figure 12). Ensure that the wearer’s eld of view
is not obstructed. Tighten the screws.
c. If the MFS still contacts the nose, adjust the visor upward to next detent
(Figure 12), and adjust the MFS upward. Ensure that the wearer’s eld of
view is not obstructed.
d. If the MFS still contacts the nose, adjust the visor upward one more
detent, and
adjust the MFS upward. E
nsure that the wearer’s eld of view
is not obstructed.
e. If the MFS still contacts the nose, notify your supervisor.
NOTE: Be sure all jig screws are properly tightened before you proceed to Step 14.
Figure 12. Adjusting MFS
GENTEX
GENTEX
Align MFS
Adjust jigs
(if necessary)
Unlatch and
remove MFS
(if t is good)
Adjust visor
(if necessary)

10
14. Mark the hole locations (Figure 13). On one side of the helmet, use a well-
sharpened pencil to mark the upper and lower holes as shown. Repeat for
the other side.
15. Remove the helmet (Figure 14). Raise the inner visor; have the wearer
remove the helmet.
16. Drill pilot holes (Figure 15). With the jigs still installed, use a drill with a
0.040 bit to drill upper and lower pilot holes on one side of the helmet through
the two hole locations. (You will drill through the interior foam.) Repeat for the
other side of the helmet. Then remove both jigs from the helmet.
GENTEX
GENTEX
Figure 14. Removing Helmet
Figure 15. Pilot Holes to Drill (0.040 bit)
Figure 13. Holes to Mark
Upper hole
Raise visor
Remove helmet
Lower hole
Upper hole
Lower hole

11
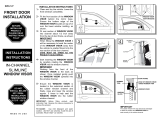
17. Drill the upper holes only (Figure 16). With the jigs removed, use a drill with
a 0.185 bit to drill the upper hole only on one side of the helmet. (You will drill
through the interior foam.) Repeat for the other side of the helmet.
18. Partially install the strikers (Figure 17). Install a striker screw (included
with striker) through the top striker hole, through the upper drilled helmet
hole, and into a striker post (included with striker) inside the helmet. Tighten
the screw snugly. Repeat for the other side of the helmet.
19. Have the wearer don the helmet (Figure 18). Ensure that the wearer
fastens and adjusts all straps for a snug t.
GENTEX
Figure 16. Upper Hole to Drill (0.185 bit)
Figure 17. Partial Installation of Striker
Figure 18. Donning Helmet
Upper hole
This side
toward rear
of helmet
Install
screw
Install
post
Rear of helmet
Position helmet as
normally worn
Adjust all straps
for snug t

12
20. Attach the MFS to the strikers (Figure 19). On one side, insert a latch pin
into the striker and ip the latch closed. Repeat for the latch on the other side.
21.
Lower the visor; ensure that the upper raised edge of the MFS is aligned
within the lower edge of the visor, and have the wearer evaluate the
MFS t. Depending on the wearer’s feedback, do one of the following:
a. If the wearer’s eld of view is clear for the performance of duties, and the
MFS does not contact the nose, proceed to Step 22.
b. If the wearer’s eld of view is obstructed and/or the MFS contacts the
wearer’s nose, loosen the striker screw on both sides (Figure 20), adjust
the MFS until the problems are corrected, and tighten the striker screws.
Mark a new lower striker hole on each side. Then proceed to Step 22.
Figure 19. Attaching MFS to Strikers
Figure 20. Adjusting MFS (If Necessary)
GENTEX
Mark lower hole
(if necessary)
Lower
visor
Loosen screw (both
sides) and adjust MFS
(if necessary)
Attach (both sides)
Flip latch closed
(both sides)

13
22.
Prepare for nal drilling. Raise the visor. Remove the MFS. Have the wearer
remove the helmet. Remove the strikers from the helmet.
NOTE: If you marked a new lower hole in Step 21, drill a new pilot hole with the
0.040 bit before you proceed to Step 23.
23.
Drill the lower holes (Figure 21). Use a drill with a 0.185 bit to drill the lower
hole on one side of the helmet. (You will drill through the interior foam.) Repeat
for the other side of the helmet.
24. Install the strikers (Figure 22). Use the included screws and posts. Apply
white glue to the ends of each screw.
Repeat for the other side.
25. Reattach the earcup cross straps (Figure 23). Inside the helmet, reattach the
lower ends of the straps with the screws and rear post in the X-pattern as shown.
Apply white glue to the ends of each screw. (Foam holds front post in place.)
Repeat for the other side.
Figure 23. Reattaching Cross Straps
Lower hole
Cross straps
Attach screw
Attach screw
Attach post
This side toward rear of helmet
Figure 21. Lower Hole to Drill (0.185 bit)
Figure 22. Installing Strikers

14
26. Reattach the boom microphone (Figure 24).
a. Reinstall the hardware. (Attachment style may vary.)
b. Plug the microphone cord into the helmet connector.
c. Adjust the microphone boom so that it can be placed behind the MFS.
(Loosen the knurled knob on the boom swivel, move the boom forward or
back as needed, and tighten the knurled knob.)
27. Have the wearer don the helmet; attach the MFS and test visor
alignment (Figure 25). Do the following:
a. Insert the pin on one side of the MFS into the slot of the striker, and ip
the latch against the helmet. Ensure that the latch is locked in place.
Repeat for the other side.
b. Lower the inner visor to test alignment.
GENTEX
GENTEX
GENTEX
GENTEX
Figure 24. Reattaching Microphone
Figure 25. Attaching MFS and Adjusting Visor
Reattach
Insert
Lower
Adjust
Plug in
Flip (both)

15
Figure 26. Interfacing Microphone Boom with MFS
28. Interface the boom microphone with the MFS. Do the following:
a. Ensure that:
• The microphone is centered behind the MFS.
• The microphone is not touching the wearer’s lips.
• The microphone is not contacting the inside of the shield.
b. If necessary, readjust the boom as described in Step 26.
c. Route the boom and the microphone cord through the end cap as shown
in Figure 26.
GENTEX

16
Operation
Operation includes opening the MFS on one side when donning or dofng the
helmet, and removing the MFS.
1. Open the MFS on one side (Figure 27).
a. Flip one latch away from the helmet.
b. Swing the MFS open.
2. Remove the MFS (Figure 28).
a. Flip both latches away from the helmet.
b. Remove the MFS from the strikers.
Figure 27. Opening MFS
Figure 28. Removing MFS
GENTEX
Remove
Flip
(one)
Flip
(both)
Open
/