Page is loading ...

DIGITAL MONITORING PRODUCTS, INC.
© 2020
LT-1789 19282
PROGRAMMING GUIDE

CONTENTS
For Your Information........................1
System Types ...................................................1
Compliance Instructions ..............................1
LED Operation .................................................1
Reset Button .....................................................1
On-Board 1100 Series Wireless .................2
Wireless Keypads ...........................................2
Wireless Zones ................................................2
Wireless Key Fobs and Outputs ..............2
On-Board Z-Wave Connection .................2
On-Board Wi-Fi Network ............................2
Wi-Fi LEDs ........................................................2
Special Keys .....................................................3
Current Programming ..................................3
Type in the Keypad .......................................3
Begin Here ........................................4
Access the Programmer Menu .................4
Programmer Lockout Code .......................4
Reset Timeout .................................................4
Initialization ..................................... 5
Initialization ......................................................5
Clear All Codes ...............................................5
Clear All Schedules .......................................5
Clear Events .....................................................5
Clear Zone Programming ...........................5
Clear Communication ..................................5
Clear Wi-Fi ........................................................5
Set to Factory Defaults ...............................5
Initialization ......................................................5
Fast Programming ........................... 6
Fast Program .................................................. 6
Account Number ........................................... 6
First IP Address ............................................. 6
WPS ................................................................... 6
App Key ............................................................ 6
System............................................................... 6
Hours from GMT ............................................ 6
Weather Zip Code ........................................ 6
Enter Siren Serial Number ......................... 6
Zone Number ................................................. 6
Zone Name ...................................................... 6
Zone Type ........................................................ 6
Area .................................................................... 6
Serial Number ................................................ 6
Stop .................................................................... 6
Communication ................................ 7
Communication ..............................................7
Account Number ............................................7
Transmission Delay ........................................7
Communication Type ...................................7
Backup Cell ......................................................7
Test Time ...........................................................7
WI-FI Test Days...............................................7
Cell Test Days ..................................................7
CheckIn Reports ............................................ 8
Fail Time ........................................................... 8
Send Communication Trouble ................. 8
First Cell APN (Access Point Name) ..... 8
Receiver 1 Programming ............................ 8
Alarm Reports ................................................ 8
Supervisory/Trouble Reports ................... 8
Opening/Closing User Reports ............... 8
Test Report ...................................................... 8
First IP Port ..................................................... 9
Second IP Address ....................................... 9
Second IP Port ............................................... 9
Receiver 2 Programming ........................... 9

CONTENTS
Alarm Reports ................................................ 9
Receiver 2 Backup?.......................................9
Supervisory/Trouble Reports ................... 9
Opening/Closing and User Reports ...... 9
Test Report ...................................................... 9
First IP Address ............................................. 9
First IP Port ....................................................10
Second IP Address ......................................10
Second IP Port ..............................................10
Network Options ............................ 11
Network Options ........................................... 11
Wi-Fi Setup .....................................................11
WPS ................................................................... 11
List ...................................................................... 11
Manual .............................................................. 12
Tes t .................................................................... 12
DHCP ................................................................ 12
Local IP Address .......................................... 12
Gateway Address .........................................12
Subnet Mask .................................................. 12
DNS Server ..................................................... 12
Programming Port ....................................... 12
Device Setup ...................................13
Device Setup .................................................13
Device Number ............................................. 13
Device Name .................................................13
Serial Number ...............................................13
Supervision Time .........................................13
Remote Options ............................. 14
Remote Options ...........................................14
Remote Key .................................................... 14
Remote Disarm .............................................14
App Key ........................................................... 14
System Reports ...............................15
System Reports ............................................15
Opening/Closing Reports......................... 15
Abort Reports ...............................................15
Zone Restoral Reports ...............................15
Bypass Reports .............................................15
Code Change Reports ............................... 15
Send Stored Messages .............................. 15
Ambush ...........................................................15
Late To Open .................................................16
Early To Close ................................................16
Entry Check-in Protection.........................16
System Options ...............................17
System Options ............................................ 17
System.............................................................. 17
Closing Code ................................................. 17
Closing Check ............................................... 17
Entry Delay 1 .................................................. 17
Entry Delay 2 ................................................. 17
Exit Delay ........................................................17
Cross Zone Time ..........................................18
Power Fail Hours ..........................................18
Swinger Bypass Trips .................................18
Reset Swinger Bypass ...............................18
Zone Activity Hours ....................................18
Arm Activity Days .......................................19
Time Zone Changes .................................... 19
Time Display ..................................................19
House Code ....................................................19
Detect Wireless Jamming ........................19
Wireless Audible Annunciation .............20
Wireless Encryption...................................20
Enter Passphrase..........................................20
Enable Keypad Panic Keys ......................20

Occupied Premises ....................................20
Use False Alarm Question .......................20
Weather Zip Code ......................................20
Celsius Temperature Option....................20
Bell Options .....................................21
Bell Cuto Time ............................................ 21
Automatic Bell Test ..................................... 21
Bell Output ..................................................... 21
Bell Action ...................................................... 21
Fire ..................................................................... 21
Burglary ........................................................... 21
Supervisory .................................................... 21
Panic ................................................................. 21
Emergency ..................................................... 21
Auxiliary 1 ....................................................... 22
Auxiliary 2 ...................................................... 22
Output Options ..............................23
Communication Failure Output.............23
Fire Alarm Output ...................................... 23
Fire Trouble Output ...................................23
Panic Alarm Output ................................... 23
Ambush Output ........................................... 23
Entry Output................................................. 23
Begin Exit Output ....................................... 23
End Exit Output .......................................... 23
Ready Output ...............................................23
Armed Home Output ................................24
Armed Away Output .................................24
Disarmed Output ........................................24
Burglary Output ..........................................24
Arm-Alarm Output ..................................... 24
Heat Saver Temperature ..........................24
Cool Saver Temperature ...........................24
Carbon Monoxide Alarm Output...........24
Zone Monitor Output.................................24
Output Setup..................................25
Output Number ........................................... 25
Output Name ................................................ 25
Serial Number .............................................. 25
Supervision Time ........................................ 25
Trip with Panel Bell Option .....................25
Area Information ...........................26
Area Type .......................................................26
Area Name .....................................................26
Bad Zones ......................................................26
Automatic Arming ......................................26
Automatic Disarming ................................26
Zone Information ...........................27
Zone Number ............................................... 27
Key Fob ...........................................................28
Style .................................................................28
DMP Wireless................................................ 29
Serial Number Entry ..................................29
Contact ...........................................................29
Supervision Time ........................................29
LED Operation .............................................30
Disarm/Disable ............................................30
Wireless PIR Pulse Count ........................30
Wireless PIR Sensitivity ............................30
Pet Immunity ................................................30
Next Zone ......................................................30
1144 Series Key Fobs .................................. 31
Key Fob User Number ...............................31
Key Fob Serial Number .............................31
Key Fob Supervision Time .......................31
Number of Key Fob Buttons ................... 31
Key Fob Button Selection (Four
Buttons) ...........................................................31
Key Fob Button Selection (Two
Buttons) ...........................................................31
CONTENTS

Button Action ............................................... 32
Button Press Time ...................................... 32
Arm/Disarm Area Selection ................... 32
Output Number ...........................................33
Output Action ..............................................33
Alarm Action ................................................33
Disarmed Open ............................................33
Message To Transmit .................................34
Output Number ...........................................34
Output Action ..............................................34
Swinger Bypass ...........................................35
Prewarn Address .........................................35
Chime ..............................................................35
Entry Delay ....................................................35
Cross Zone ....................................................36
Priority ............................................................36
Trac Count .................................................36
Zone Audit Days .........................................36
Receiver Routing......................................... 37
CONTENTS
Zone Number ............................................... 37
Stop .................................................38
Set Lockout Code ..........................39
Appendix ....................................... 40
Status List ......................................................40
Transmission Delay ..................................... 40
False Alarm Reduction .............................40
Diagnostics Function ................................. 41
Using the Walk Test ................................... 43
Trip Counter For DMP Wireless Check-in
Test (WLS) ..................................................... 43
Test End Warning ........................................ 43
Failed Zones Display .................................44
Keypad Speaker Operation .....................44
Cross Zoning .................................................44
Zone Type Descriptions ...........................44
Zone Type Defaults .................................... 45
Common Keypad Messages ...................46
Listed Compliance Specifications ....................................................................47
Introduction .................................................................................................................................................47
Use Marking .................................................................................................................................................47
Locations and Wiring ...............................................................................................................................47
NFPA 72 .........................................................................................................................................................47
Types Of Service ........................................................................................................................................47
Police Station Phone Numbers.............................................................................................................47
Bypass Reports ...........................................................................................................................................47
System Testing ............................................................................................................................................47
FCC Notice ...................................................................................................................................................47
Household Burglar-Alarm System Units ANSI/UL 1023 ............................................................ 48
Central Station Burglar Alarm Units ANSI/UL 1610 ..................................................................... 48
Household Fire Warning System ANSI/UL 985 NFPA 72 Specifications ........................... 48
False Alarm Reduction Programmable Options ANSI/SIA CP-01-2010 .............................. 49
Z-Wave Certification Information ....................................................................50
Removing or Replacing Failed Devices ........................................................................................... 50
Z-Wave Terminology ............................................................................................................................... 50
Z-Wave Certification ................................................................................................................................ 50

1 XTLtouch Series Programming Guide | Digital Monitoring Products
FOR YOUR INFORMATION
Before programming the XTLtouch™, we recommend you read through the contents of this guide. Use this information
to learn the programming options and operational capabilities of the XTLtouch. The XTLtouch contains all of its
programming information in an on-board processor and does not require an external programmer. In addition to this
guide, you should also be familiar with the following XTLtouch documents:
▶ XTLtouch Series Installation Guide (LT-1788)
▶ XTLtouch Series Programming Sheet (LT-1790)
▶ XTLtouch Series Fast Programming Sheet (LT-1790F)
▶ XTLtouch Series System User Guide (LT-1791)
XTL Series panels with Version 194 firmware and higher ship with a unique four-digit default master code. This master
code is generated using an algorithm based o of the last four digits of the serial number to ensure that it cannot be
duplicated. This code can be modified or deleted. In order to revert back to the default code 99, use the initialize code
option found in panel programming.
Wireless Keypad Association
Associate up to seven DMP 9000 Series Thinline Keypads or 9800 Series Graphic Touchscreen Keypads with the
XTLtouch. It’s important to keep the XTLtouch as Device 1 when associating additional keypads.
System Types
The XTLtouch can be programmed to operate as any of the following system types:
▶ All/Perimeter: Provides one perimeter area and one interior area.
▶ Home/Sleep/Away: Provides one perimeter, one interior, and one bedroom area. The bedroom area provides for
any protection devices the user wants disarmed during their sleeping hours and armed in the Away mode.
▶ Area: Provides up to six areas of protection that can be independently armed or disarmed.
Compliance Instructions
For applications that must conform to a local authority’s installation standard or a National Recognized Testing
Laboratory certificated system, please see the Listed Compliance Specifications section near the end of this guide for
additional instructions.
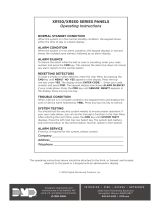
LED Operation
The LED at the top of the XTLtouch indicates the
power and armed status of the panel. Depending
on the operation, the LED displays in red or blue as
listed in the table.
Reset Button
The RESET button is located on the back of the unit in the lower left corner under the backplate and is used to reset the
XTLtouch panel. To reset the panel prior to reprogramming, press the RESET button without powering down the system.
After resetting the panel, begin programming within 30 minutes. If you wait longer than 30 minutes, you must reset the
panel again.
COLOR AND ACTIVITY OPERATION
Blue steady Panel is disarmed, primary power is okay, battery is okay
Blue blinking Panel is disarmed, primary power is okay, battery is faulted
No light Panel is disarmed, primary power is faulted, battery is okay
Red steady Panel is armed, primary power is okay, battery is okay
Red/blue alternate Panel is armed, primary power is okay, battery is faulted
Red blinking Panel is armed, primary power is faulted, battery is okay

2 XTLtouch Series Programming Guide | Digital Monitoring Products
On-Board 1100 Series Wireless
Wireless Antenna
The XTLtouch Wireless Antenna is integrated into the circuit board. The panel’s built-in wireless receiver operates with
DMP 1100 Series transmitters.
Wireless LED Operation
The wireless LEDs are located on the back of the unit under the backplate and function as follows:
▶ Green: The green LED flashes every time the receiver transmits. If the panel is reset, or the panel is powered o,
the green LED is o. Under normal operation, the green LED flashes constantly with no interruption or change.
▶ Yellow: The yellow LED flashes every time the panel receives a message from a programmed wireless
transmitter. When a message is sent by a transmitter, typically by pressing or releasing the TAMPER button,
the yellow LED should flash indicating that the panel received a message from the transmitter. If the LED never
flashes, the transmitter is not getting through to the panel. This could be because of a misprogrammed serial
number or the transmitter is too far away. Under normal operation, the yellow LED flashes at every trip of every
wireless transmitter and when the transmitters perform their periodic check-in. It is not unusual for this LED to
stay o for many minutes at a time when no transmitters are communicating.
Wireless Keypads
XTLtouch supports up to seven additional wireless keypads on addresses 2-8.
Wireless Zones
XTLtouch provides 99 wireless zones numbered 1 to 99. A default zone name, zone type, and area assignment are
provided for zones 1-48 and can be changed in Zone Information programming as needed. The defaults are provided as
a programming convenience to help reduce installation time.
Wireless Key Fobs and Outputs
The XTLtouch provides eight wireless key fob or output addresses numbered 51 to 54 and 61 to 64. A default name
is provided as a programming convenience to help reduce installation time. The default names are described in the
programming sections of this guide and can be changed in Output Information or Zone Information programming as
needed.
On-Board Z-Wave Connection
The XTLtouch features an on-board controller that allows short range radio control of Z-Wave devices that you or your
installation company may provide such as lighting control modules, thermostat controls, doors, and garage doors.
Z-Wave Setup allows you to program the system to control the Z-Wave devices from smartphones using the DMP Virtual
Keypad App or with the Virtual Keypad Browser. The available setup options are: Add, List, Remove, Favorites, Transfer,
and Optimize.
On-Board Wi-Fi Network
The XTLtouch connects directly to a Wi-Fi network for TCP communication using a Wireless-B/G connection. The
XTLtouch uses wireless 802.11b/g Wi-Fi technology.
Wi-Fi LEDs
The Green Wi-Fi LED is located to the right of the wireless LEDs on the back of the unit under the backplate.
Wi-Fi LED displays solid when the network is connected and is o when there is no network connectivity.

3 XTLtouch Series Programming Guide | Digital Monitoring Products
Special Keys
The following keys are common to all DMP keypads.
CMD (command)
Pressing CMD allows you to advance through the programming menus and is used to enter information into
the XTLtouch such as phone numbers and zone names. As you advance through the programming menus, the
XTLtouch display shows any current programming already stored in the panel memory. If no change is required for a
programming option, press CMD to advance to the next option.
<— (back arrow)
Use the back arrow to go back one step in a programming menu or to erase a typing error while entering in formation.
Select Areas
Use the select areas to select programming options when programming the XTLtouch. When there are more than four
programming options to choose from, press CMD to display the remaining options. Pressing the back arrow to return
to the previous options.
Current Programming
Each programming option that displays shows the information that is already programmed in the panel memory. To
change the already programmed information, simply replace the information. To change a programming option that
requires a NO or YES response, press the select key or area for the desired response.
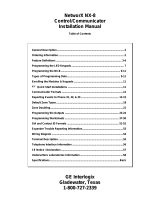
Type in the Keypad
You have the option to use the number pad or the standard keyboard when entering information while programming.
Use Table 1 if using the number pad or see Figure 1 for button locations if using the standard keyboard.
Number Pad
1. Choose a character from the table.
2. Identify the Number the character correlates with and press it on
the number pad.
3. Identify the Select Key or Area for that character and press that
select key or area on the keypad. Press that select key or area again
to access the uppercase letter.
4. When the desired character displays on the keypad, return to Step 1
to enter another character or press CMD if finished.
Standard Keyboard
▶ Press ABC to access uppercase letters.
▶ Press abc to access lowercase letters.
▶ Press !@# to access symbols.
▶ Press 123 to access the number pad.
Note: Not all keypad prompts accept letters and/or symbols. For
example, pressing P on the ENTER CODE prompt could display a 6
on the keypad.
NUMBER
SELECT KEY OR AREA
1 2 3 4
1 A B C ( [ {
2 D E F ) ] }
3 G H I ! ^ ~
4 J K L ? “ |
5 M N O / \ `
6 P Q R & $
7 S T U @ %
8 V W X , =
9 Y Z space, : _ ;
0 -, + ., ‘ *, < # >
ABC
!@#
123
q w e r t y u i
o p
a s d f g h j k l
z
x c v b n m CMD
TABLE 1
FIGURE 1

4 XTLtouch Series Programming Guide | Digital Monitoring Products
BEGIN HERE
Access the Programmer menu in the XTLtouch. Once you have accessed the Programmer menu, press CMD to advance
through the menu. Press a select area to select a menu option and to access the functions of that option.
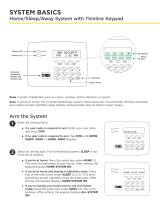
Access the Programmer menu
1. Remove the backplate from the XTLtouch.
2. Press the RESET button for two seconds.
3. On the keypad, press KEYPAD in the carousel menu.
4. Enter 6653 (PROG) and then CMD to access the Programmer menu.
Programmer Lockout Code
Although the XTLtouch allows access to the Programmer menu without a lockout code, you have the option to program
a lockout code to restrict Programmer access to authorized individuals only. Follow the directions below to program a
lockout code or wait until you get to the programming option when programming the XTLtouch.
Program a lockout code
Once you are in the Programmer menu, press CMD until SET LOCKOUT CODE displays and press a select key.
At ENTER CODE, enter a 1 to 5 digit lockout code and press CMD.
At ENTER AGAIN, enter the same lockout code and press CMD. The display shows CODE CHANGED. The new code
number must now be entered before the Programmer menu can be accessed.
Note: The lockout code should be written down and kept in a secure place with access limited to authorized persons
only. If you lose or forget the lockout code, the panel must be sent back to the factory to be reset. There is no field
option for gaining access to the panel without a valid lockout code if one has been programmed.
Reset Timeout
The XTLtouch has a feature that requires you to enter the Programmer menu within 30 minutes of resetting the panel.
After 30 minutes, if you attempt to program by entering 6653 (PROG), the keypad displays RESET PANEL. You must
reset the panel and enter the program code within the next 30 minutes.
If you are already in the Programmer menu and do not press any keys on the XTLtouch you’re programming for
30 minutes, programming is terminated. All data entered up to that point is saved in the XTLtouch.
To exit the Programmer menu, you must use the Stop function to save all information entered in the XTLtouch to that
point. Once you exit the Programmer menu, the XTLtouch returns to the home screen.

5 XTLtouch Series Programming Guide | Digital Monitoring Products
INITIALIZATION
Initialization allows you to set the XTLtouch back to its factory defaults. After selecting YES to clear a memory option,
the XTLtouch asks if you’re sure you want to clear that option’s memory. This safeguards you against accidentally
deleting current programming. Programming isn’t cleared from XTLtouch until you answer YES to SURE? YES NO.
INITIALIZATION
Press a select area.
CLEAR ALL CODES
NO: Leaves existing user codes intact.
YES: Clears the user code memory and assigns User Code 99 to User 99.
CLEAR ALL SCHEDULES
NO: Leaves existing schedules intact.
YES: Clears all schedules from the XTLtouch.
CLEAR EVENTS
NO: Leaves existing events intact.
YES: Clears all events held in the Display Events buer.
CLEAR ZONE PROGRAMMING
NO: Leaves existing zone information intact.
YES: Sets all zones in the system to unused.
CLEAR COMMUNICATION
NO: Leaves existing communication and messaging intact.
YES: Resets communication and messaging to factory defaults.
CLEAR WI-FI
NO: Leaves existing Wi-Fi programming intact.
YES: Resets Wi-Fi to factory defaults.
SET TO FACTORY DEFAULTS
Only use this function when the network primary controller is missing or inoperable.
NO: Leaves the remainder of the existing panel programming intact.
YES: Sets the XTLtouch back to factory defaults and clears all Favorites. Selecting yes
does not clear event memory, zones, user codes, or schedules.
INITIALIZATION
Press CMD to move to the FAST PROGRAM menu.
INITIALIZATION
CODES? NO YES
SURE? YES NO
SCHEDS? NO YES
SURE? YES NO
EVENTS? NO YES
SURE? YES NO
ZONES? NO YES
SURE? YES NO
COMMS? NO YES
SURE? YES NO
WIFI? NO YES
SURE? YES NO
DEFAULTS? NO YES
SURE? YES NO
INITIALIZATION

6 XTLtouch Series Programming Guide | Digital Monitoring Products
FAST PROGRAMMING
Fast programming allows you to quickly program the essential XTLtouch settings. When the panel programming defaults
are acceptable for an installation and only basic programming options are needed, fast programming allows you to
quickly enter information without navigating through all of the programming menus.
FAST PROGRAM
Press a select area.
ACCOUNT NUMBER
Press a select area to enter the account num ber sent to the receiver. The range of
account numbers you can use is 1 to 65535. The default is 12345.
FIRST IP ADDRESS
Press a select area to enter the primary IP address. The default is 0.0.0.0.
WPS
Select YES and then push the WPS button on the router. WIFI SETUP PAIRING displays
until the router connects to the IP address you entered.
APP KEY
Press a select area and enter the eight-digit app key obtained in DMPDealerAdmin.com.
SYSTEM
Press a select area to display AREA, A/P (All/Perimeter), and H /A (Home/Away). Select
a system type and press CMD. The default is H/A .
HOURS FROM GMT
Press a select area to enter the number that indicates the GMT (Greenwich Mean Time)
where the XTLtouch is located. The range is 0 to 23. The default is 6.
WEATHER ZIP CODE
Enter the area zip code where the XTLtouch is located. The default is blank.
ENTER SIREN SERIAL NUMBER
Enter the eight-digit serial number for the wireless siren. The siren is automatically set to
Output 61.
ZONE NUMBER
Enter the desired zone number of the device you’re programming.
ZONE NAME
Press a select area to change the default zone name. You can enter up to 16 characters
for the new zone name.
ZONE TYPE
Press any select area to change the default zone type.
AREA
Press any select area to change the default area.
SERIAL NUMBER
Enter the eight digit serial number, including leading zeros, found on the wireless device.
STOP
When all zones are programmed, press the back arrow to display FAST PROGRAM.
Press CMD until STOP displays and then press any select area to save and exit the
Programmer menu.
FAST PROGRAM
ACCOUNT NO: 12345
FIRST IP ADDR:
0.0.0.0
WPS? NO YES
APP KEY: ********
SYSTEM: HOME/AWAY
HRS FROM GMT: 6
ENTER WEATHER
ZIP CODE: -
ENTER SIREN
SERIAL#: -
ZONE NO: -
*UNUSED*
ZONE TYPE: -
AREA: -
SERIAL#: -
STOP

7 XTLtouch Series Programming Guide | Digital Monitoring Products
COMMUNICATION
Communication allows you to program communication settings for the XTLtouch.
COMMUNICATION
Press any select area.
ACCOUNT NUMBER
Press a select area to enter the account num ber sent to the receiver. The range of
account numbers you can use is 1 to 65535. The default is 12345.
TRANSMISSION DELAY
Press a select area to enter the number of seconds the panel waits before sending
burglary alarm reports to the receiver. The wireless siren and relay outputs are not
delayed during this period. The range is 15 to 45. The default is 30. Enter 0 (zero) to
disable this function.
COMMUNICATION TYPE
Press a select area to display WIFI, CEL, and NONE. Select how the XTLtouch should
communicate with the receiver. The communication types are described below:
▶ WIFI: This option allows network communication to DMP Model SCS-1R or
SCS-VR Receivers.
▶ CEL: This option allows communication over cellular network using cellular
communicators to DMP Model SCS-1R or SCS-VR Receivers.
▶ NONE: This option is used for local systems. Selecting this ends communication
programming.
BACKUP CELL
If you selected WIFI as the communication type, you can program a Backup Cell if
Wi-Fi communication fails. Backup Cell will attempt to send the message, using Wi-Fi,
to the receiver for 60 seconds. The message will discard if Backup Cell fails to send the
message within 60 seconds.
TEST TIME
Press CMD to display 01:45 PM. Press a select area and enter the time of day the panel
should send the test report to the SCS-1R receiver. Use entries between 12:00 to 11:59
and then choose AM or PM.
WI-FI TEST DAYS
Press a select area to enter how often the panel test report is sent to the receiver. The
range is 1 to 60 days. The default is 1. Enter 0 (zero) to disable the test report.
This option
only displays if a test time is entered.
CELL TEST DAYS
Press a select area to enter how often the panel test report is sent to the receiver. The
range is 1 to 60 days. The default is 1. Enter 0 (zero) to disable the test report.
This option
only displays if backup cell was enabled.
COMMUNICATION
ACCOUNT NO: 12345
XMIT DELAY: 30
COMM TYPE: WIFI
BACKUP CELL
NO YES
- : AM PM
TEST TIME
WIFI TST DAYS: 1
CELL TST DAYS: 1

8 XTLtouch Series Programming Guide | Digital Monitoring Products
CHECKIN REPORTS
Checkin reports are a method of supervising the panel for communication with the
receiver. Press a select area and enter the number of minutes between Checkin reports.
The range is 0 or 3-240 minutes. The default is 0. Entering 0 (zero) disables Checkin.
Note: If Cell Checkin is used, additional cell charges may apply.
FAIL TIME
Fail Time allows the SCS-1R or SCS-VR receiver to ignore a defined number of Checkins
before logging that the panel is missing. Fail Time must be equal to or greater than the
Checkin minutes. The range is 3 to 240 minutes. Entering 0 (zero) disables Fail Time.
SEND COMMUNICATION TROUBLE
If this option is enabled and the panel detects a communication failure, the panel
sends an S72 (Comm Trouble) message through a backup communication method with
notification of the failure. If both primary and secondary methods of communication
fail, then two S72 messages will be sent via the third communication method, if
programmed. When communication is restored, the panel sends an S73 (Comm
Restored) message through the primary communication. The default is NO.
Note: If the primary or secondary communication type is CELL, S72 and S73 messages
include the cell signal strength as a -dBm value.
FIRST CELL APN (Access Point Name)
This option allows an access point for cellular communication and is used to connect
to a DNS (domain name system) network. Press a select area to display the default,
SECURECOM400 or press a select area to change the name. The APN can contain up to
32 characters.
RECEIVER 1 PROGRAMMING
Press CMD to program the first receiver the panel attempts to send reports to.
ALARM REPORTS
Select YES to allow Abort, Alarm, Alarm Restoral, Alarm Bell Silenced, Ambush, Exit
Error, and System Recently Armed reports to be sent to this receiver. The default is YES.
SUPERVISORY/TROUBLE REPORTS
Select YES to allow Supervisory, Trouble, Trouble Restoral, Force Armed, Late to Close,
and Fault reports to be sent to this receiver. The default is YES.
OPENING/CLOSING USER REPORTS
Select YES to allow Opening/Closing, Code Changes, and Bypass reports of users to be
sent to this receiver. The default is NO.
TEST REPORT
Select YES to allow the Recall Test report to be sent to this receiver. The default is YES..
FIRST IP ADDRESS
Press a select area to enter the primary IP address where the panel sends network or
cellular information to. The message is sent using first Cell APN and the first IP Address.
If an acknowledgment isn’t received, the first Cell APN and the second IP address
are used and followed, if needed, by the second Cell APN and the first and second IP
addresses. Enter all 12 digits and leave out the periods. The default is 0.0.0.0.
CHECKIN 0
FAIL TIME
COM TRBL: NO YES
FIRST CELL APN:
RECEIVER 1 PROG
ALARM NO YES
SPV/TRBL NO YES
O/C USER NO YES
TEST RPT NO YES
FIRST IP ADDRESS
0. 0. 0. 0

9 XTLtouch Series Programming Guide | Digital Monitoring Products
FIRST IP PORT
Press a select area to enter the first IP port number that will be used with the first IP
Address. The IP port identifies the port used to communicate messages to and from the
panel. The default is 2001.
SECOND IP ADDRESS
Enter the second (secondary) IP address where the panel sends network or cellular
information. Enter all 12 digits and leave out the periods, they will auto-generate.
SECOND IP PORT
Enter the second IP port number to be used in conjunction with the second IP address.
The IP port identifies the port used to communicate messages to and from the panel.
The default IP Port setting is 2001.
RECEIVER 2 PROGRAMMING
Press CMD to program the second receiver the panel attempts to send reports to. If
you select YES for any of the Receiver 2 options, you must have at least one IP address
programmed in Receiver 2 programming. All Receiver 2 programming options are
defaulted to NO.
RECEIVER 2 BACKUP?
Select NO to allow Receiver 2 to send dual messages to the central station. Select YES
to allow Receiver 2 to start receiving messages only when Receiver 1 stops working.
Receiver 2 will return to its backup state when Receiver 1 returns to its normal sate. The
default is NO.
ALARM REPORTS
Select YES to enable Abort, Alarm, Alarm Restoral, Alarm Bell Silenced, Ambush, Exit
Error, and System Recently Armed reports to be sent to this receiver. Default is NO.
SUPERVISORY/TROUBLE REPORTS
Select YES to allow Supervisory, Trouble, Trouble Restoral, Force Armed, Late to Close,
and Fault reports to be sent to this receiver. Default is NO.
OPENING/CLOSING AND USER REPORTS
Select YES to allow Opening/Closing, Code Changes, and Bypass reports by user to be
sent to this receiver. Default is NO.
TEST REPORT
Select YES to allow the Recall Test report to be sent to this receiver. Default is NO.
FIRST IP ADDRESS
Press a select area to enter the primary IP address where the panel sends network or
cellular information to. The message is sent using first Cell APN and the first IP Address.
If an acknowledgment isn’t received, the first Cell APN and the second IP address
are used and followed, if needed, by the second Cell APN and the first and second IP
addresses. Enter all 12 digits and leave out the periods. The default is 0.0.0.0.
FIRST IP PORT
Press a select area to enter the first IP port number that will be used with the first IP
Address. The IP port identifies the port used to communicate messages to and from the
panel. The default is 2001.
FIRST PORT IP
2001
SECOND IP ADDRESS
0. 0. 0. 0
SECOND IP PORT
2001
RECEIVER 2 PROG
ALARM NO YES
SPV/TRBL NO YES
O/C USER NO YES
TEST RPT NO YES
FIRST IP ADDRESS
0.0.0.0
FIRST PORT IP
2001
BACKUP?
NO
YES

10 XTLtouch Series Programming Guide | Digital Monitoring Products
SECOND IP ADDRESS
Enter the second (secondary) IP address where the panel sends network or cellular
information. Enter all 12 digits and leave out the periods, they will auto-generate.
SECOND IP PORT
Enter the second (secondary) IP address where the panel sends network or cellular
information. Enter all 12 digits and leave out the periods, they will auto-generate.
SECOND IP ADDRESS
0.0.0.0
SECOND IP PORT
2001

11 XTLtouch Series Programming Guide | Digital Monitoring Products
NETWORK OPTIONS
Network Options allow you to program the XTLtouch to use either Wi-Fi or Cellular communication. Keep in mind, IP
addresses and port numbers may need to be assigned by the network administrator.
NETWORK OPTIONS
Press a select area.
WI-FI SETUP
If the COMM TYPE was set to WIFI in Communication programming, Wi-Fi Setup will
display. A Wi-Fi icon will display at the top of the keypad when the system is connected
to a Wi-Fi network. Choose one of the four options below to connect to a Wi-Fi network:
▶ Select WPS to allow the XTLtouch to automatically connect to a WPS-enabled
router.
▶ Select LIST to view the name and signal strength of any Wi-Fi routers in range.
▶ Select MANUAL to enter the name of the Wi-Fi router you wish to connect the
XTLtouch to.
▶ Select TEST to verify the system is connected to a Wi-Fi network.
WPS
PAIRING displays if you selected WPS. Press the WPS button on the WPS-enabled
router you’re attempting to connect to. SEARCHING displays for up to two minutes or
until the XTLtouch connects to the router. Refer to the router’s instruction manual for
information on sending a security key to the XTLtouch. If the panel fails to connect to
the router, WPS FAILED RETRY? NO YES will display. Press the fourth select area to
RETRY connection or press the third select area to display WPS LIST MANUAL to try
another connection method.
LIST
If you selected LIST, the keypad displays the network name and that network’s signal
strength if the Wi-Fi networks that are in range. Press CMD to advance through the list
of available Wi-Fi networks. When the desired network displays, press any select area to
connect to it and enter the password, if necessary. The keypad will display CONNECTED
and advance to the DHCP programming option.
If the XTLtouch is unable to detect the wireless network security type, W/L SECURITY
WPA-PSK displays. If a dierent security type is required, press a select area and WEP
WPA NONE displays. Select the desired option.
Enter the W/L KEY to allow the XTLtouch to attempt a connection to that Wi-Fi
network. When connection is successful, CONNECTED displays on the keypad. If the
XTLtouch doesn’t connect to the Wi-Fi network, NOT CONNECTED will display.
NETWORK OPTIONS
WIFI SETUP
TEST
WIFI SETUP
WPS LIST MANUAL
SIGNAL
▐▐▐▐▐▐
HOMENET123
W/L KEY
************************
WEP WPA NONE
W/L SECURITY
WPA-PSK
W/L KEY
************************
PAIRING
SEARCHING
WPS LIST MANUAL

12 XTLtouch Series Programming Guide | Digital Monitoring Products
MANUAL
The default network settings of the XTLtouch display if you selected MANUAL. Press
CMD to continue with SECURECOM as the default Wi-Fi network or press a select
area to enter a new SSID (Wi-Fi Network name) and press CMD. The keypad displays
SSID FOUND or SSID NOT FOUND. When the SSID is found, the security type is also
detected. This option may take several seconds to process.
TEST
If you selected TEST, the panel will attempt to verify connection of your system to the
desired Wi-Fi network. The keypad will display CONNECTING and then CONNECTED
when the XTLtouch is connected to the Wi-Fi network.
DHCP
If the XTLtouch uses a dynamic IP address, select YES to allow the XTLtouch to operate
in DHCP and not use the local IP address number.
LOCAL IP ADDRESS
Enter the local IP address for the XTLtouch. The local IP address must be unique and
cannot be duplicated on the network. The default is 192.168.98.26.
GATEWAY ADDRESS
Enter the local gateway address for the XTLtouch. The Gateway IP Address is needed to
exit the local network. The default is 192.168.0.77.
SUBNET MASK
Enter the local subnet mask assigned to the XTLtouch. The default is 255.255.254.0.
DNS SERVER
Enter the IP address of the DNS (Domain Name System) used by the XTLtouch
to resolve domain names into IP addresses. The DHCP programming option
must be set to NO. The default is 192.168.0.97.
PROGRAMMING PORT
Press a select area to enter the programming port number which identifies the port used
to communicate messages to and from the panel. The default is 2001.
DHCP NO YES
LOCAL IP ADDRESS
192.168.98.26
GATEWAY ADDRESS
192.168.0.77
SUBNET MASK
255.255.254.0
DNS SERVER
192.168.0.97
PROG PORT: 2001
WPS LIST MANUAL
TEST

13 XTLtouch Series Programming Guide | Digital Monitoring Products
DEVICE SETUP
Device Setup allows you to program wireless keypads in the system. You can install and address up to seven wireless
keypads. Addresses 2-8 are available for wireless keypads.
DEVICE SETUP
Press a select area.
DEVICE NUMBER
Enter the device number of the wireless keypad you’re programming. The valid range is
2-8. Keep in mind that Address 1 is reserved for the XTLtouch programming keypad that
you’re using right now. Repeat the steps in this section for each additional keypad.
DEVICE NAME
Press a select area to name the device you’re programming. To remove a keypad from
the system, press a select area to clear the name and then press the back arrow key.
SERIAL NUMBER
Enter the eight-digit serial number found on the wireless keypad.
SUPERVISION TIME
Press a select area to change the supervision time required for the device or press
CMD to accept the default time of 240 minutes. The device must check in at least once
during this time or a missing condition is indicated for that device. Zero (0) indicates an
unsupervised wireless keypad. When the XTLtouch is reset, powered down, powered up,
or programming is complete, the supervision timer restarts for all connected wireless
keypads.
Press the back arrow until DEVICE SETUP displays and press CMD to advance to the
next programming section.
DEVICE SETUP
DEVICE NO: -
* UNUSED *
SERIAL #:
SUPRVSN TIME: 240

14 XTLtouch Series Programming Guide | Digital Monitoring Products
REMOTE OPTIONS
Remote Options allows you to program the XTLtouch for Remote Command and Remote Programming operation using
the Wi-Fi network.
REMOTE OPTIONS
Press a select area.
REMOTE KEY
This option allows you to enter a 1 to 8-digit code to verify the authority of an alarm or
to allow remote connections to perform a remote command/programming session. The
receiver must give the correct key to the XTLtouch before being allowed access to it. All
XTLtouch panels are shipped from the factory with the Remote Key preset as blank.
To enter a new Remote Key, press any select area and enter any combination of up to
eight digits.
REMOTE DISARM
Select YES to allow the panel to be disarmed remotely. Selecting NO disables remote
disarming. The default is YES.
APP KEY (FOR EASYCONNECT ONLY)
Press a select area and enter the 8-digit App Key obtained in DMPDealerAdmin.
com. This communication option is used to eliminate the need for a static IP address
programmed in Network Options. The default is blank.
REMOTE OPTIONS
RMT KEY:
DISARM NO YES
APP KEY: * * * * * * * *

15 XTLtouch Series Programming Guide | Digital Monitoring Products
SYSTEM REPORTS
System Reports allows you to select which reports the XTLtouch sends to the receiver.
SYSTEM REPORTS
Press any select area.
OPENING/CLOSING REPORTS
Select YES to allow them to be sent to the receiver for each programmed area. The
default is NO.
ABORT REPORTS
Select YES to allow the XTLtouch to send an Alarm Abort Report to the receiver when
an area is disarmed during Transmit Delay before an alarm report is sent and the Bell
Cuto Time has not expired. The area and all alarmed zones must be disarmed. Enabling
this option also allows a Bell Silenced Report to be sent to the receiver if the alarm bell
is silenced with a valid user code during an alarm. The default is NO.
Note: Alarm Cancel or Verify Reports are sent if the alarm is canceled or verified after
being sent to the receiver if the Bell Cuto timer has not expired. The Abort Reports
option does not aect Cancel or Verify reports. The XTLtouch will not send Abort
reports for Fire or Supervisory-type zones.
ZONE RESTORAL REPORTS
Select YES to allow the XTLtouch to send zone restoral reports to the receiver when
zones restore from an alarmed or troubled condition. Select NO to allow the XTLtouch
to send zone restoral reports when zones that have restored from an alarm or trouble
are disarmed. Twenty-four hour zones send restorals immediately. The default is YES.
BYPASS REPORTS
Select YES to allow the XTLtouch to send all zone bypass, reset, and force arm reports
to the receiver. The bypass report includes the zone number, zone name, and the user
number of the user bypassing the zone. The default is YES.
CODE CHANGE REPORTS
Select YES to allow the XTLtouch to send all code additions, changes, and deletions to
the receiver. The code change report includes the user number added or deleted and
the user number of the user making the change. The default is NO.
SEND STORED MESSAGES
If a panel loses communication with the receiver, it will store any messages that are
not able to be sent while communication was down. Select YES to allow the XTLtouch
to send all stored messages to the receiver when communication is restored. The time
at which each message was generated is also sent. If the panel is programmed to
communicate to a second IP address (IP2), SEND STORED MESSAGES must be enabled
for the panel to send a special check-o message to IP2 once communication is restored
to the primary IP address (IP1). The default is NO.
AMBUSH
Select YES to allow an ambush report to be sent to the receiver when User Code 1 is
entered at a keypad. Selecting NO disables the ambush report and allows user code
number one to operate the same as all other codes. The default is NO.
SYSTEM REPORTS
O/C RPTS NO YES
ABORT NO YES
RESTORAL YES NO
BYPASS NO YES
CODE CHG NO YES
SEND STORED
MESSAGES? NO YES
AMBUSH NO YES
/