Riva RC3502SV-7311IR Installation guide

Category
Security cameras
Type
Installation guide

The Riva RC3502SV-7311IR is a high-definition security camera with a 1/2.8” 1080p CMOS image sensor, delivering crisp and clear footage. This camera is equipped with True Day/Night functionality, allowing it to capture clear images even in low-light conditions. The DC Auto Iris Lens and WDR (Wide Dynamic Range) capabilities further enhance image quality by adjusting exposure levels to compensate for variations in lighting. Additionally, the camera features a built-in IR illuminator for effective night vision, making it suitable for 24/7 surveillance.

The Riva RC3502SV-7311IR is a high-definition security camera with a 1/2.8” 1080p CMOS image sensor, delivering crisp and clear footage. This camera is equipped with True Day/Night functionality, allowing it to capture clear images even in low-light conditions. The DC Auto Iris Lens and WDR (Wide Dynamic Range) capabilities further enhance image quality by adjusting exposure levels to compensate for variations in lighting. Additionally, the camera features a built-in IR illuminator for effective night vision, making it suitable for 24/7 surveillance.

www.rivatech.de
Specification subject to change without notice
RC3502SV-7311IR
Installation Guide
RC Series RC3502SV-7311IR Installation Guide
04-2017-A www.rivatech.de 2
Precautions & Notes
Please read this manual carefully before installing the unit.
Never disassemble the camera. Unauthorized disassembly may cause equipment
failure or damage to the unit.
Please do not install the camera in a place exposed to direct sunlight.
Do not operate the camera in environments beyond the specified temperature.
Refer to Environment Condition on APPENDIX (A): SPECIFICATIONS in this manual.
Before applying power to the camera, check the power source to ensure that it is
within the specifications. Refer to Electrical Characteristics on APPENDIX (A):
SPECIFICATIONS.
RC Series RC3502SV-7311IR Installation Guide
04-2017-A www.rivatech.de 3
Table of Contents
Precautions & Notes ................................................................................................. 2
1. FEATURES ............................................................................................................. 4
2. PACKAGE CONTENTS............................................................................................. 5
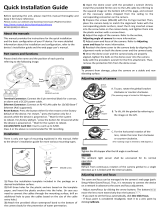
3. PART NAMES ........................................................................................................ 6
4. INSTALLATION ...................................................................................................... 7
4.1. Installing the camera .......................................................................................................... 7
4.1.1. Installation without bracket ........................................................................................ 7
4.1.2. Compatible Accessories .............................................................................................. 9
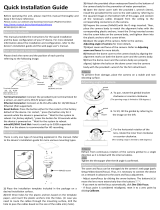
4.2. Adjusting angle of the camera ......................................................................................... 10
4.3. Adjusting zoom and focus ................................................................................................ 11
4.4. Setting the Image Attributes ............................................................................................ 11
5. CONNECTIONS .................................................................................................... 12
6. CONFIGURATION ................................................................................................ 15
6.1. Set up network environment ........................................................................................... 15
Generic IP Environment ...................................................................................................... 15
Custom IP Environment ...................................................................................................... 16
6.2. View video on web page .................................................................................................. 17
6.2.1. ActiveX Installation .................................................................................................... 17
6.2.2. View video using IPAdmin Tool ................................................................................. 18
6.3. Reboot .............................................................................................................................. 19
6.4. Factory Default ................................................................................................................. 19
6.5. Safe Mode ........................................................................................................................ 20
APPENDIX (A): SPECIFICATIONS .............................................................................. 21
Summary ................................................................................................................................. 21
Electrical Characteristics ......................................................................................................... 22
Environment Condition ........................................................................................................... 22
Mechanical Condition ............................................................................................................. 22
APPENDIX (B): POWER OVER ETHERNET ................................................................. 23
Power Comparison .................................................................................................................. 23
APPENDIX (C): DIMENSIONS ................................................................................... 24
APPENDIX (D): HEXADECIMAL-DECIMAL CONVERSION TABLE ................................. 25
REVISION HISTORY ................................................................................................. 26
RC Series RC3502SV-7311IR Installation Guide
04-2017-A www.rivatech.de 4
1. FEATURES
Camera
1/2.81080p CMOS Image Sensor
True Day / Night
DC Auto Iris Lens
WDR
Embedded IR Illuminator
Remote Zoom/Focus Control(One Click AF)
Weather proof (IP66)
Vandal proof (IK10)
Video
H.264 Baseline, Main, High Profile(MPEG-4 Part 10 / AVC), MJPEG(Motion JPEG)
Max 30fps in 1080p
Text Overlay
Network
10 / 100 Base-T Ethernet
Integration
Software Development Kit (SDK) available
ONVIF Compliant (Profile S & Profile G)
General
Micro SD/SDHC slot
Power Over Ethernet (PoE)
Video Contents Analytics (VCA)
VCA Presence (Standard)
* Licenses with higher specifications than VCA Presence are optional.
RC Series RC3502SV-7311IR Installation Guide
04-2017-A www.rivatech.de 5
2. PACKAGE CONTENTS
Please unpack the package carefully and handle the equipment with care.
The packaging contains:
Camera
DC Power Adaptor & Plugs
DC Power Jack Cable
Terminal Block
Screws(M4x30) / Plastic Anchors / O-rings
Installation Template
Silicon Waterproof Band
Hex Wrench (3mm)
Quick Installation Guide
Ferrite Core
Note
i
The contents above are subject to change without prior notice.
RC Series RC3502SV-7311IR Installation Guide
04-2017-A www.rivatech.de 6
3. PART NAMES
Terminal connector
Connector for cable connection of digital input/output, audio input/output, and DC12V power.
Refer to 5.CONNECTIONS for more information.
LAN connector
RJ45 LAN connector for 10/100 Base-T Ethernet (PoE supported)
Reset button
Use the button to restart the device or to reset it to factory default. Refer to 6.3. Reboot and
6.4. Factory Default for more information.
microSD/SDHC card slot
An SD card up to 32GB supported. Class 4 and higher recommended for HD recordings.
CDS Light Sensor
Used to detect the level of ambient light or the intensity of the light. The sensor should not be
blocked by a cable or any other objects.
* Models herein and their appearance are subject to change without any prior notice.
AUDIO
O
I1
+
DC12V
C
1
C
1
C
DI
AUDIO
O
I1
+
DC12V
C
1
C
1
C
DI
RC Series RC3502SV-7311IR Installation Guide
04-2017-A www.rivatech.de 7
4. INSTALLATION
4.1. Installing the camera
4.1.1. Installation without bracket
Installation Template
(Unit: mm)
Caution
!
Installation templates image size scale in this installation guide is not 1:1.
The correct-size template design paper can be found inside the package separat
ely.
Installation template
3502 V1.0
RC Series RC3502SV-7311IR Installation Guide
04-2017-A www.rivatech.de 8
Note
i
< Use of Ferrite Core >
Installing the ferrite core to a LAN cable is highly recommended to reduce high frequency
noise level. Please follow the instructions below.
1. Open the ferrite core by lifting the clip.
2. Make two loops with the cable through the ferrite core.
3. Close the ferrite core to hold the cable loops into its place.
Caution
!
Sealing gaps is recommended as gaps may appear after the camera installation.
Gaps may cause problems such as moisture, water leakage, and etc., which
negatively affect the operation of the camera if gaps remain unsealed.
1) Place the installation template included in the
package on the desired installation surface.
2) Drill the three holes in the correct positions based
on the template paper, and insert the plastic anchors
into the holes (In case you need to connect the cables
through the mounting surface, drill an additional hole
to pass the cables based on the size of the cable entry
hole.)
3) Attach the silicon waterproof band included in the
package to the cameras mounting surface.
4) Open the cameras dome cover using the L wrench
(3mm) included in the package.
5) Install the provided ferrite core to the LAN cable by
reference to the first note below, and connect all the
cables to the camera. Then, route the cables through
the cable entry hole either at the bottom or at the
side of the camera body.
6) Place the camera body to match the alignment
holes with the corresponding anchor blocks, and hold
the camera against the surface where the camera will
be mounted.
7) Insert O-ring gasket under each screw (M4x30)s
head, and tighten the anchor blocks with the screws.
8)
Adjust the angle of the camera. Refer to
4.2.Adjusting angle of the camera for more details.
9) Adjust zoom and focus of the camera. Refer to 4.3.
Adjusting zoom and focus for more details.
10) Place the dome cover on the main body of the
camera by matching the dome covers three
alignment holes with the camera bodys alignment
holes.
11) Once the dome cover and the camera body are
properly placed, insert the bolts into the three holes
through the main body, and tighten them up using
the hex wrench.
2 turns
RC Series RC3502SV-7311IR Installation Guide
04-2017-A www.rivatech.de 9
4.1.2. Compatible Accessories
The various combinations of the compatible accessories to mount this camera model are as
follows.
Model Names & Combinations
FMB-3502
WMB-3000 + (CMA-U100 or PMA-U100)
WMB-3000P + PMC-3000 + (JBK-U100) + (CMA-U100 or PMA-U100)
CMB-3000P + PMC-3000
GBA-3000
Refer to the corresponding accessory models installation guide for the instructions.
Note
i
The models in the parenthesis, (), may or may not be required depending on
the installation environment.
Model Image
FMB-3502
WMB-3000
WMB-3000P
CMB-3000P
INSTALL TEMPL ATE
Anchor b olt tigh tening posinon
?192 Center
Cutting line
INSTALL TEMPL ATE
Anchor b olt tigh tening posinon
?192 Center
Cutting line
WMB-3000/CMB-3000
This guide i llustrates how to asse mble the corner mount adapter and
pole mount adapter.
Check the le tter of the alpha bet assigned to each adapter and tighten
the screws in the corresponding holes to assemble the adapter.
A-A-A(M4TAP)
A
A
A
IPE-3500
IPE-2100
IPN-2102
IPN-3102
IPN-3502
IPE-3100
PMC-3000
JBK-U100
CMA-U100
PMA-U100
A
A-A-A : IPN3202HD
B-B : IPN352HD & IPX5502HD
C-C : IPN3402HD
D-D-D : IPN2103HD & IPN3102HD & IPN3502HD
D
D
B
A C
B
A
C
D
A-A-A : IPN6802HD
B-B-B : IPN6702HD
C-C-C-C : IPN6602HD
D-D-D-D : WMB-3000P & CMB-3000P
1
HOUSING COVER에 WALL MOUNT CABLE을 통과시킨다.
2
3
1
2
3
1
2
1
2
1
2
3
4
5
1
2
3
4
5
1
2
HOUSING COVER와 WALL MOUNT BRACKET을 조립한다
결합 후 상태 이미지
3mm Hex Wrench를 사용하여 볼트를 푼다. (4EA 동일 방법)
Hinge를 젖힌 후 빼낸다. (2EA 동일 방법)
B
BULLET CAMERA의 CABLE을 HOUSING COVER에 통과시킨다.
장착하는 CAMERA에 맞는 BOLT를 사용하여
CABLE을 GASKET에 끼운 후 위치에 맞게 삽입한다.
CABLE을 GASKET에 맞춰 정리한 후 GASKET을 접어 닫는다.
M3x12 BOLT를 사용하여 PLATE를 조립한다.
왼쪽 상세 이미지를 참고 하여 CABLE GLAND조립한다.
CABLE GLAND를 HOUSING COVER에 완전히 조립한다.
HOUSING COVER의 LOWER와 UPPER
HOUSING COVER의 UPPER와 LOWER를
BB
A A
A
C C
CC
D D
DD
PMA-U100 CMA-U100 WMA-U100
M5x12 BOLT를 사용하여 HOUSING COVER와 PMA-U100을 체결한다.
결합 후 상태 이미지
M5x12 BOLT를 사용하여 HOUSING COVER와 CMA-U100을 체결한다. M5x12 BOLT를 사용하여 HOUSING COVER와 WMA-U100을 체결한다.
결합 후 상태 이미지 결합 후 상태 이미지
이미지와 같이 위치 시킨 후 HINGE를 사용하여 체결한다.
3mm Hex Wrench를 사용하여 볼트를 조인다. (4EA 동일 방법)
E E
E
E-E-E : ODE-1000T
1
2
HOUSING COVER에 조립한다.
PMA-U100/CMA-U100
This guide illustrates how to assemble the corner mount adapter and
pole mount adapter.
Check the letter of the al phabet assigned to each adapter and tighten
the screws in the corresponding holes to assemble the adapter.
A-A-A(M4 PAM)
IPN6802HD
B-B-B(M4 PAM)
IPN6702HD
C-C-C-C(M5 PAM)
IPN6602HD
D-D-D(M6 PAM)
ODE-1000T
E-E-E-E(M6 PAM)
WMB-3000P & CMB-3000P
F-F-F-F(M5 PAM)
JBK-U100
PMA-U100/CMA-U100
This guide illustrates how to assemble the corner mount adapter and
pole mount adapter.
Check the letter of the alphabet assigned to each adapter and tighten
the screws in the corresponding holes to assemble the adapter.
A-A-A(M4 PAM)
IPN6802HD
B-B-B(M4 PAM)
IPN6702HD
C-C-C-C(M5 PAM)
IPN6602HD
D-D-D(M6 PAM)
ODE-1000T
E-E-E-E(M6 PAM)
WMB-3000P & CMB-3000P
F-F-F-F(M5 PAM)
JBK-U100
G-G-G-G(M6 PAM)
WMB-3000 & WMB-3000S
GBA-3000
Caution
!
The internal heater does not work when the device is powered via PoE.
The camera may fall off the ceiling even after the proper installation and
mounting. To prevent any accident, make sure the ceiling is firm and stable
enough to support the camera. If the stability is in doubt, consult safety
personnel, and then proceed with the installation.
Caution
!
RC Series RC3502SV-7311IR Installation Guide
04-2017-A www.rivatech.de 10
4.2. Adjusting angle of the camera
Adjust the angle of the camera by manually moving the corresponding parts following the directions
below.
Caution
!
The ambient light sensor shall be uncovered for its normal operation.
Caution
!
Tighten the tilt stopper after the tilt angle is confirmed.
Caution
!
Refrain from continuous rotation of the camera gimbal to a single direction as it
is linked with the IR-LED cable inside the dome.
DO DI
1 1C C
+
DC12V
ETHERNET
RESET
MICRO
SD
DO DI
1 1C C
+
DC12V
ETHERNET
RESET
MICRO
SD
ETHERNET
WIRE
DO DI
1 1C C
+
DC12V
ETHERNET
RESET
MICRO
SD
DO DI
1 1C C
+
DC12V
ETHERNET
RESET
MICRO
SD
ETHERNET
WIRE
DO DI
1 1C C
+
DC12V
ETHERNET
RESET
MICRO
SD
DO DI
1 1C C
+
DC12V
ETHERNET
RESET
MICRO
SD
ETHERNET
WIRE
1. Panning Adjustment
1. Perform the panning adjustment by turning the gimbal
bracket horizontally either clockwise or counter-
clockwise. If the panning angle is properly adjusted, fix
the gimbal bracket not to move when other parts are
adjusted.
2. Tilting Adjustment
Gimbal Bracket
2. Perform the tilting adjustment by moving the inner liner
vertically to upward or downward direction. Then,
tighten the screws on both sides of the gimbal bracket
to fix the tilt angle.
3. Horizontal rotation of lens
Camera Gimbal
Inner Liner
Gimbal Bracket
3. Rotate the inner liner clockwise or counter-clockwise for
the rotation of the lens.
*Please try not to leave fingerprints on the CDS light sensor.
Tilt Stopper
RC Series RC3502SV-7311IR Installation Guide
04-2017-A www.rivatech.de 11
4.3. Adjusting zoom and focus
*To be able to adjust zoom and focus, it is necessary to connect the device to a network.
Please refer to 6.CONFIGURATION for the detailed method of network connection.
Once the device is on the network and the webpage is open, go to Setup> Video & Audio >
Zoom/Focus. Then, the features shown below will appear.
1. Adjust zoom and focus by clicking arrow buttons: the buttons
move the lens
more extensively than the buttons
.
2. Click One Click Focus to automatically set the lens focus.
3. If focus point is considered misaligned, reset it to a zero point by clicking Calibrate.
4.4. Setting the Image Attributes
On the camera’s webpage, users can configure the image attributes. The menu of the image
attributes is available at Video Appearance via the path, Setup > Video & Audio > Camera.
The following features can be adjusted: Brightness, Contrast, Saturation, and Sharpness.
For more detailed information, refer to the webpage users manual.
RC Series RC3502SV-7311IR Installation Guide
04-2017-A www.rivatech.de 12
5. CONNECTIONS
Alarm (DO) connection
Only the relay type is supported.
Relay Rating: Max 24VDC 50mA
Caution
!
Do not exceed the maximum relay rating.
Sensor (DI) connection
Sensor (DI) can be connected to either a voltage type sensor or a relay type sensor like the
following figures. Settings can be done through the cameras webpage.
Input voltage range: 0VDC minimum to 5VDC maximum, Max 50mA
Caution
!
Do not exceed the maximum input voltage or relay rate.
DO
COM
Relay Type
Device
Internal
AUDIO
O
I1
+
DC12V
C
1
C
1
C
DI
X
X
C
1
C
1
O
I
+
DO (N.O)
DI
AUDIO
DC12V
Reserved
RC Series RC3502SV-7311IR Installation Guide
04-2017-A www.rivatech.de 13
Audio Connection
The camera provides a mono audio input and output. Due to low audio output power, an
amplified speaker is recommended for enhanced sound (Refrain from connecting a
headphone or an earphone directly to the camera).
- Microphone In: Max 2Vp-p, 20K (90dB)
- Headphone Out: 60mW, 16 (95dB)
Mic
Amp Speaker
ETHERNET
MICRO SD
DC12V
DO
DI
1
OutOut
1
VIDEO
C C
In
AUDIO
+
Reset
SW1 SW2 SW3
SW5 SW6
N / A N / A
N / A N / A
SW1
SW2
SW3
SW4
SW5
SW6
+3.3V
DI
COM
DI
COM
+
-
Relay Type
Voltage Type
+
-
Output of
Sensor
Output of
Sensor
Internal
Internal
+
-
RC Series RC3502SV-7311IR Installation Guide
04-2017-A www.rivatech.de 14
Power Connection
The camera can be powered from either 12VDC or PoE. The connection via the terminal
connector is for DC12V power. To operate your camera using 12VDC, make sure that the
polarity is correct before connecting the power cable. Incorrect connection may cause a
damage to the device.
If the camera is powered via PoE, refer to Appendix (B). Power over Ethernet for more
information.
LAN connection
The camera uses an RJ45 LAN connector for 10/100 Base-T Ethernet. Use the Ethernet cable
(RJ45) to connect the device to a hub or a router in the network. When the LAN cable is
connected, the orange LED light will become solid and green LED will blink every 250
millisecond. Refer to Appendix (B). Power over Ethernet for more infromation.
Green LED Orange LED
12V
Red
Black
RC Series RC3502SV-7311IR Installation Guide
04-2017-A www.rivatech.de 15
6. CONFIGURATION
6.1. Set up network environment
The default IP address of the device is 192.168.XXX.XXX. Users can identify the IP address of
the device from converting the MAC address’s hexadecimal numbers, which is attached to the
device. Be sure that the device and PC are on a same area network before running the
installation.
IP address : 192.168.xxx.xxx
Subnet mask: 255.255.0.0
Generic IP Environment
In case of generic private network environment where IP address 192.168.XXX.XXX are used,
users may view the live streaming images on a web page using the device’s default IP address:
1. Convert the device’s MAC address to the IP address. Refer to the Hexadecimal-Decimal
Conversion chart at the end of the manual.
(The MAC address of the device is attached on the side or bottom of the device.)
2. Start the Microsoft® Internet Explorer web browser, and enter the IP address of the device.
3. Web streaming and device configurations are supported through ActiveX program. When the
ActiveX installation window appears, authorize and install the ActiveX.
MAC address = 00-13-23-01-14-B1 → IP address = 192.168.20.177
Convert the last two sets of hexadecimal numbers to decimal numbers.
RC Series RC3502SV-7311IR Installation Guide
04-2017-A www.rivatech.de 16
Custom IP Environment
Please access our website and download necessary IPAdminTool first:
http://www.rivatech.de/en/downloads/software
IPAdminTool is a management tool, which automatically scans all of the network products for
users to perform administrative tasks, which includes network configurations, firmware
update, device reboot, and device organizations.
To modify the device’s default IP address for customized network area:
1. Find the device from the IPAdminTool’s list and highlight the device’s name.
2. Right-click the mouse, select IP Address, and select one between Single and Multiple;
The IP Setup window appears.
* There are two options that are for a single device or for multiple devices respectively. Refer to Using IPAdminTool.pdf for more information.
3. On the New Information table in the Single IP Change window, modify the last two digits of
the devices IP address, and modify the rest parts including subnet mask, gateway, and DNS
if necessary by checking the user/ PC network area information.
4. Make sure to input the correct ID and PW of the device (default: root / pass).
5. Click Apply to complete the modification.
Give a new unique IP address by
modifying the last two digits.
RC Series RC3502SV-7311IR Installation Guide
04-2017-A www.rivatech.de 17
6.2. View video on web page
Type the proper IP address to view the live streaming images through a web browser.
The default username and password is root / pass.
6.2.1. ActiveX Installation
1. When the browser asks to install the AxUMF software, click Install to proceed.
2. When the Setup installation pop-up window appears, click Install to proceed with the rest
of the installations.
Note
i
Depending on system OS and Internet Explorer version, installation experience
may differ from one another. Figures described above are from Windows 7,
Internet Explorer 9 environment.
RC Series RC3502SV-7311IR Installation Guide
04-2017-A www.rivatech.de 18
Caution
!
6.2.2. View video using IPAdmin Tool
IPAdminTool automatically searches all activated network encoders and IP cameras and shows
the product name, IP address, MAC address and etc.
1. From the IPAdminTools product list, select the device by highlighting it.
2. Right-click the mouse, and select Web View. The systems default web browser opens the
devices address.
Whether directly accessing the streaming video by typing the IP address on a
web page or taking steps through IPAdminTool, ActiveX is needed to be
installed for Microsoft® Internet Explorer to have the complete configuration
privileges.
RC Series RC3502SV-7311IR Installation Guide
04-2017-A www.rivatech.de 19
6.3. Reboot
Perform the following procedures to reset your device.
On the camera
1. Press the reset button for 2 seconds when the device is powered on.
2. Wait for the system to reboot.
Caution
!
Do not press the reset button for more than 2 seconds. Otherwise, the camera
may be switched to its factory default settings.
On the webpage
1. Go to Setup > Maintenance > Reboot on the cameras webpage.
2. Click Reboot. A dialog box will appear to ask you if you really want to reboot.
3. Click OK, and wait for the system to complete booting.
6.4. Factory Default
Resetting the device back to the factory default will initialize all the parameters of the device.
However, the factory default on the webpage allows a certain main parameters to be
preserved.
On the camera
1. Press the reset button for 10 seconds by making sure that booting is complete on the
device.
2. Wait for the system to reboot.
Then, all the parameters of the device will be initialized.
On the webpage
1. Go to Setup > Maintenance > Reset All Settings on the cameras webpage.
2. Select the items among network settings, user account information and time zone setting to
keep from the factory default.
3. Click Reset All Settings. A dialog box will appear to ask you if you want to reset all settings.
4. Click OK, and wait until the Reset All Settings page is refreshed after the reboot.
Then, all the parameters except for the unchecked items will be initialized.
Note
i
The factory default settings can be inferred with the following information:
IP address: 192.168.xx.yy
Network mask: 255.255.0.0
Gateway: 192.168.0.1
User ID: root
Password: pass
RC Series RC3502SV-7311IR Installation Guide
04-2017-A www.rivatech.de 20
6.5. Safe Mode
There may be certain occasions that your camera repeatedly fails to boot. Then, your camera
may enter safe mode to be recovered from the occasions.
What may have caused Safe Mode?
Here below are the main typical causes.
* The power supply is continually unplugged certain times in the middle of system booting.
* The firmware files required for system booting are damaged.
* There are conflicts in the system settings.
How to recover your system from Safe Mode
The messages above will appear on the webpage when your device has been rebooted in safe
mode. Then, you should follow the instructions on the webpage according to each step.
Note
i
There is another method to update firmware, which is using IPAdminTool.
Please refer to IPAdminTool Users Manual.pdf for the detailed procedure.
Note
i
If your device is still in safe mode after trying to update firmware, please contact
your local agency to get further assistance.
Browse
  • Page 1 1
  • Page 2 2
  • Page 3 3
  • Page 4 4
  • Page 5 5
  • Page 6 6
  • Page 7 7
  • Page 8 8
  • Page 9 9
  • Page 10 10
  • Page 11 11
  • Page 12 12
  • Page 13 13
  • Page 14 14
  • Page 15 15
  • Page 16 16
  • Page 17 17
  • Page 18 18
  • Page 19 19
  • Page 20 20
  • Page 21 21
  • Page 22 22
  • Page 23 23
  • Page 24 24
  • Page 25 25
  • Page 26 26

Riva RC3502SV-7311IR Installation guide

Category
Security cameras
Type
Installation guide

The Riva RC3502SV-7311IR is a high-definition security camera with a 1/2.8” 1080p CMOS image sensor, delivering crisp and clear footage. This camera is equipped with True Day/Night functionality, allowing it to capture clear images even in low-light conditions. The DC Auto Iris Lens and WDR (Wide Dynamic Range) capabilities further enhance image quality by adjusting exposure levels to compensate for variations in lighting. Additionally, the camera features a built-in IR illuminator for effective night vision, making it suitable for 24/7 surveillance.

Ask a question and I''ll find the answer in the document

Finding information in a document is now easier with AI