Page is loading ...

Proteus 2000 Operation Manual
21
A/EVOLUME B/F C/G D/H
AUDITION MULTI SAVE/COPY
HOME/ENTER
MIDI
POWER
TONE
ATTACK
DYNAMIC 1
A-D
E-H
I-L
PRESENCE
DECAY/RLS
DYNAMIC 2
SHAPE
MOVEMENT
FX A
IMAGE
RATE
FX B
MASTER EDIT
Volume
Control
Master
Menu
Edit
Menu
Cursor
Controls
Power
Switch
Control
Button
Headphone
Jack
Realtime
Control Knobs
Display
Audition
Button
Multimode
Button
Save/
Copy
Home/
Enter
Data
Entry
CO 1 A Vo l 1 27 Pan0 1
R
P
M
CSR
022
3
st r:
B
aroqueQua tetr
Basic Operations
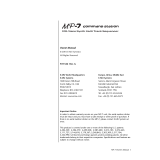
Front Panel
The Proteus 2000 front panel contains an LCD screen, nine buttons and
four real-time controllers. Functions are grouped logically and the controls
are arranged for ease of use. Precisely because Proteus is so simple to use,
you might be tempted to skip this section. If you just can’t help yourself, at
least read the Real-time Controller information beginning page 23. There
are several “power user” features in the interface which make programming
even easier and we wouldn’t want you to miss them.
Volume Control
This control is the master volume control for all audio outputs. The Volume
Control does not affect any editing or user interface operations.
Master Button
The Master menu contains parameters that affect the entire machine, not
just certain presets. An illuminated LED to the right of the button indicates
that you are in the Master menu.
Edit Button
Use the Edit menu when you want to create or modify a preset. An illumi-
nated LED to the right of the button indicates that you are in the Edit
menu.
Control Button
The Control button is used to change the function of the Controller knobs
(see the next section). Each time you press the Control button, the Control
Mode toggles to select only one of the three Control Rows. The currently
selected Control Row is indicated by one of the three LEDs to the right of
the row’s label.

22
E-mu Systems
Basic Operations
Front Panel
Audition Button
The Audition button allows you to hear any preset without hooking up a
MIDI keyboard. When the Audition button is pressed, the LED next to the
button will illuminate and a short “Riff” (programmed as part of the preset)
will play. The Riff is latched on and plays continuously until the button is
pressed again. Presets can be changed while Audition is latched on.
OO
OO
See “Bank Select
Commands“ on page 80 for
more information on selecting
banks via MIDI.
The top line of the display changes to show the MIDI Bank Select controller
values needed to select the preset being auditioned. This handy feature lets
you know the exact Bank and Preset number to enter into your sequencer.
Left/Right Cursor
Buttons
These buttons move the cursor to the next parameter on the display. (The
cursor is a little flashing line underneath one of the parameters in the
display.) Press either cursor button until the cursor is underneath the
desired parameter. The cursor buttons have an auto-repeat feature which
advances the cursor when the button is held continuously.
The cursor can be moved bidirectionally using the Data Entry Control
while either cursor select button is held down (for example, press and hold
the right cursor button and turn the Data Entry Control).
Multimenu Button
The Multimenu button allows you to select a Multi-setup. A Multi-setup is a
group of parameters that you might associate with a particular sequence or
song. It is like a “snapshot” of the current configuration of the module.
There are 128 setups numbered 0-127.
A Multisetup includes all of the following parameters:
•
The Preset/Volume/Pan assignments for each of the 32 MIDI channels.
•
All Master menu parameters, except for the User Tuning Tables and the
MIDI program change->preset map.
•
The Multisetup name.
Save/Copy Button
The Save/Copy button is used to save or copy presets and to copy data.
Selected groups of parameters, such as PatchCord settings, can be copied
between Presets and/or between Layers using this menu.
The LED to the right of the button illuminates to indicate that you are in
the Save/Copy menu. The LED also illuminates when any preset parameter
has been changed in the Edit menu (or if the front panel knobs have been
moved with Quick-Edit mode enabled).
BankSel 0:004 32:3
CMPSR
0
02
3
pad: RiffTrippin’
MSB
LSB
Preset #

Proteus 2000 Operation Manual
23
Basic Operations
Front Panel Controller Modes
Home/Enter Button
The Home/Enter button is dual purpose. In general, this button acts as the
“Home” button. For example, when in an Edit menu, this button snaps the
cursor to the page name field of the current screen. When viewing the
Preset Select screen (we also call it the main screen), this button snaps the
cursor to the preset number field. In these instances, the LED is not used.
Some screens and parameter fields use this button as the “Enter” button. In
these cases, the LED blinks when the cursor is moved to one of these fields
indicating that the module is waiting for your response to initiate the
operation.
Data Entry Control
The Data Entry Control is a stepped, variable control switch used to change
parameter values. The wheel increments or decrements the current value
one unit with each click. This control incorporates acceleration, which
advances the value faster if the Data Entry Control is turned quickly.
Controller Knobs
Each of the four Real-time Controller knobs has a corresponding LED to its
upper right side. The function of the Real-time Controllers depends on
which row is currently selected and the programming of the preset.
Front Panel
Controller
Modes
The Real-time Controller Knobs serve three purposes:
1.
Real-time control of synthesizer parameters
2.
“Quick Editing” the initial settings of the real-time controllers
3.
“Deep Editing” the parameters
This section describes each of the three uses.
Real-time Control
The Real-time controller knobs provide direct control of the Proteus 2000’s
synthesizer parameters. They are always active when on the Preset Select
(main) screen. They can optionally be used to transmit MIDI controller
messages to other MIDI devices.
The Control button (left of the knobs) changes the function of the real-time
controller knobs. Each time the button is pressed, the Control Mode toggles
to select one of the three Control Row groups. The currently selected
Control Row is indicated by the illuminated LED to the right of the button.
The control knob functions are determined by the selected Control Row.
The three Control Rows generate MIDI data that can control the preset on
the current MIDI channel (the channel showing on the Preset and main
screen. The labels (Tone, Presence, Shape, Image, etc.) printed on these rows
show how the factory ROM presets may be programmed to respond.
(The
controls might not conform to the front panel labels depending on the preset.)
You
can change the way a preset responds to MIDI A-L messages from the Edit
menu (PatchCords).

24
E-mu Systems
Basic Operations
Front Panel Controller Modes
There is an LED next to each of the control knobs which illuminates to
indicate that the knob setting has been changed from the value
programmed in the preset (when Quick Edit mode is enabled). If the knob
position is returned to the original setting, the LED is extinguished.
If the “
Knobs MIDI Out
” parameter in the Master menu (see “Knobs/Riff
MIDI Out” on page 49) is set to “transmit,” the system sends a MIDI
controller message when you turn off the Control knob. The MIDI
controller message is sent on the current MIDI channel (also called the
basic channel) using the controller number assigned in the Master menu
(see “Real-time Controller Assignment” on page 46).
The knobs only generate a message when you move a knob to a new value.
The current value jumps to the new value.
Quick Edit
This mode uses the Controller knobs to “Quick-Edit” the currently selected
preset without having to enter the Preset Edit menu. This mode is only
active when on the Preset Select screen and when
“Quick-Edit”
is enabled in
the Master menu (see “Knob Preset Quick-Edit” on page 48).
Initial controller values can be stored in every preset. When you move a
knob with Quick-Edit enabled, the Initial Controller Value is updated with
the knob’s new value. The knob’s LED lights indicating that the preset value
has been changed. The three Control Rows’ MIDI A-L values are stored in
the corresponding
Initial Controller Amount
parameter in the Edit menu (see
“Initial Controller Amount” on page 120). The Save/Copy button LED
illuminates to remind you that the preset has been edited. “Quick-Edits”
made to a preset are lost if you select another preset before saving them.
þ
To Quick-Edit a Preset
__
__
Quick-Edit mode must
be enabled in the Master menu.
1.
Use the Control Knobs to change the sound of the current preset as
desired.
2.
Press the Save/Copy button. The display reads, “Save Preset to.”
3.
Press the right cursor button to select the bottom row.
4.
Optional: Select a new preset location if you don’t want to overwrite
the current preset, or if the current preset is a ROM preset.
5.
Press the Enter button to save the preset.

Proteus 2000 Operation Manual
25
Basic Operations
Front Panel Controller Modes
Deep Edit Mode
When in the Master, or Edit menus, you can use the Controller Knobs to
edit parameters. Using the Controller Knobs is a faster method for entering
data, but the Data Entry Control offers finer precision.
þ
To Enable Deep Edit Mode:
1.
Press the Master button and use the Data Entry Control to advance to
the “Knobs Deep Edit” screen as shown in the following illustration.
2.
Press either Cursor key to move the cursor to the bottom line in the
display.
3.
Use the Data Entry Control to change the value to “enabled.”
4.
Press the Master menu button to exit the Master menu.
When you enter any of the Edit menus:
1.
The four Controller Knobs are used for editing.
2.
All the Controller LEDs are off.
3.
All the Control Row LEDS are off.
When you turn a knob, the field value jumps to the current knob value.
You can still use the Data Entry Control for editing by moving the cursor to
the desired field.
To move through menus horizontally, use the Data Entry Control (the
page’s title field is the default cursor position). To move through menus
vertically (preset layers), press the left cursor to get to the layer field, then
change layers with the Data Entry Control.
•
Use the Data Entry Control to move through menus (horizontally) or
layers (vertically).
•
Use the Controller Knobs to change parameter values within each page.
KNOBS DEEP EDIT
disabled
L1
KEY: LO FADE HIGH FADE
C-2 000 G8 000
A/E/I B/F/J C/G/K D/H/L

26
E-mu Systems
Basic Operations
Main Screen
Main Screen
The Preset Select screen is Proteus 2000’s default screen (also called the
main screen) and is active when you have not selected any of the other
button-activated menus. From this screen you can change or examine the
Preset, Volume, Pan Position and Preset Location for each of the 32 MIDI
channels.
MIDI Channel
Selection
þ
To Change the MIDI Channel
1.
Press either cursor button until the cursor is underneath the channel
number. (The cursor is the little flashing line underneath one of the
parameters in the display.)
The channel number
shown in the main screen is the
“basic MIDI channel” when in
Omni or Poly modes.
2.
Rotate the Data Entry Control to select a MIDI channel (01A-16A,
01B-16B). As the channel number changes, the display changes to show
the preset, volume, pan and preset location associated with the
displayed channel.
Preset Selection
þ
To Change the Preset
1.
Press either cursor key until the cursor is underneath the preset number.
(The cursor is a little flashing line underneath one of the parameters in
the display.) As you rotate the Data Entry Control, the preset number
and name changes.
2.
The displayed preset is assigned to the displayed MIDI channel. Presets
are arranged into banks of 128, as shown in the diagram at left.
Using the screen above as an example, the superscripted number 2 in the
second line of the display identifies the current bank number.
C01A Vol127 Pan01
R
USER
032
2
bas: Interference
Bank Contents
128 RAM Presets
128 RAM Presets
128 RAM Presets
128 RAM Presets
128 ROM Presets
128 ROM Presets
128 ROM Presets
Depending on
ROM sets installed
0
1
2
3
0
1
2
??
USERROM 1
C01A Vol127 Pan01
R
USER
Number
Preset
Bank Number
032
2
bas: Interference
MIDI Channel
ROM or RAM Preset Location
The USER preset banks can
be modified or replaced with
your own sounds.

Proteus 2000 Operation Manual
27
Basic Operations
Main Screen
•
Select banks independently of the of the preset number by locating the
cursor on the Bank field and turning the Data Entry Control.
The Bank numbers start at zero for each ROM sound set installed in Proteus 2000.
Channel Volume
Channel Volume sets the volume of the selected MIDI channel in relation
to the other channels. This is the same parameter as MIDI volume control
#7, and changes made over MIDI are shown in the display.
þ
To Change the Channel Volume
1.
Press either cursor key until the cursor is underneath the volume value.
2.
Rotate the Data Entry Control to select a volume level. The Channel
Volume range is 000-127.
USER
0
1
2
3
Bank
128 User Presets
128 User Presets
128 User Presets
128 User Presets
COMPOSER
0
1
2
3
Bank Bank
128 ROM Presets
128 ROM Presets
128 ROM Presets
128 ROM Presets
4
5
6
7
128 ROM Presets
128 ROM Presets
128 ROM Presets
128 ROM Presets
032
2
bas: Interference
C01A Vol127 Pan01
R
USER
Volume

28
E-mu Systems
Basic Operations
Main Screen
Channel Pan Channel Pan sets the stereo position of the selected MIDI channel. This
control operates like the balance control on your home stereo system.
Channel Pan is the same parameter as MIDI pan controller #10, and
changes made over MIDI are shown in the display.
Note: Pan settings in the preset ADD algebraically with the Channel Pan
setting. Therefore, if the pan setting in the preset were set to “63R,” moving
the Channel Pan setting full left would return the sound to the center
position.
þ To Change the Channel Pan
1. Press either cursor key until the cursor is underneath the pan field.
2. Rotate the Data Entry Control to select a pan value. 64L indicates a hard
left pan, 63R indicates a hard right pan. With a setting of “00,” the
sound is centered in the stereo field.
032
2
bas: Interference
C01A Vol127 Pan01
R
USER
Pan Position

Proteus 2000 Operation Manual 29
Basic Operations
Sound Navigator
Sound
Navigator
Sound Navigator allows you to search through preset and instrument
categories to find the type of sound you’re looking for. Each preset and
instrument has a name and a three letter preset category. You can create
your own categories in order to group favorite presets. The preset category
is assigned in the Edit menu (Preset Name). Instrument categories are fixed.
Preset Category When you want to find presets in a particular category, you simply change
the category field in the main screen, then move the cursor to the preset
name field to scroll through all the presets in the selected category.
When the cursor is on the Preset Category field, turning the Data Entry
Control selects different preset categories. The Name Field will change to
show the first preset in each category.
þ To Change the Preset Category
1. Press either cursor key repeatedly until the cursor is underneath the
preset category field.
2. Rotate the Data Entry Control to select one of the preset categories.
Preset Categories are displayed in alphabetical order.
þ To Select a Preset within a Category
1. After selecting a category, move the cursor to the Preset Name field.
2. Rotate the Data Entry Control to scroll through the presets in the
selected category. Note that the preset numbers will no longer change
sequentially.
Instrument Category When the cursor is on the Instrument Category field (Edit menu), turning
the Data Entry Control selects different instrument categories. The Name
Field changes to show the first instrument in each category. Move the
cursor back to the instrument number to select instruments in the selected
category.
C01 Vol127 Pan00
USER
032
2
bas: Interference
Preset Category
Preset Name
L1
INSTRUMENT Rom:ORCH
0322 bas: Buzz Bass

30 E-mu Systems
Basic Operations
Multitimbral Operation
Multitimbral
Operation
Multitimbral operation means that Proteus 2000 can play more than one
sound at the same time. Follow these instructions to access multiple presets
on different MIDI channels simultaneously.
þ To Set Up Proteus 2000 for Multitimbral Operation
1. Set the MIDI mode to “multi mode,” using the MIDI mode function in
the Master menu.
2. Decide which MIDI channels you want the Proteus 2000 to receive (32
channels can be used simultaneously). If you are using 16 MIDI
channels or less, just use the “A” MIDI port. Use both MIDI ports if you
need more than 16 MIDI channels. You can turn any unused channels
OFF using the MIDI Enable function in the Master menu.
3. Select the desired preset for each of the MIDI channels you want the
Proteus 2000 to receive using the MIDI Channel/Preset selection screen
(see previous instructions).
OO
OO
Save the Multisetup
using the instruction provided in
Chapter 3:Multisetup.
4. Proteus 2000 now responds multitimbrally on each of the MIDI
channels you have specified. The volume and pan position parameters
can be adjusted over MIDI (for each MIDI channel) or using the Cursor
and Data Entry Control in the Preset Select screen.
Proteus 2000 has two MIDI inputs with 16 MIDI channels each. Each of the 32 MIDI
channels can be assigned to play a specific preset with unique volume and pan settings.
SCOTTS VALLEY CA. U.S.A.
B
THRU
A
~
“A” MIDI
channels 1-16
“B” MIDI
channels 1-16
IN
IN
Volume
Pan
Channel 01
A
Volume
Pan
Preset
Channel 02
A
Volume
Pan
Preset
Channel 03
A
Volume
Pan
Preset
Channel 16
A
Preset
Volume
Pan
Preset
Channel 01
B
Volume
Pan
Preset
Channel 02
B
Volume
Pan
Preset
Channel 03
B
Volume
Pan
Preset
Channel 16
B
/