Page is loading ...

5.9
11 21
mmol
L
B
A
The most important function of your meter
is to measure your blood glucose level. The
Glucometer
®
E
SPRIT
™ system is designed
to make this task as simple as possible. The test
is done in the TESTING MODE using a simple,
integrated step.
The system also provides for those who want
more detailed information like averages and
other special features. All such options are
provided in a separate mode called — the
FEATURES MODE. The buttons on the instru-
ment are only used for the additional features.
Because the options of the FEATURES MODE
take more time to learn than the use of the
TESTING MODE, we encourage you to go
through the User Guide and decide what fea-
tures are right for you to make your diabetes
more manageable.
B
LOOD
G
LUCOSE
M
ONITORING
S
YSTEM
USER GUIDE
99939679 Rev. 7/97
© 1997 Bayer Corporation
Printed in the U.S.A.
Bayer Australia Ltd.
A.C.N. 000 138 714
875 Pacific Highway
Pymble NSW 2073
Australia
Telephone 1 800 028 251
Distributed by:

Meter with
Test Sensor
Disc inserted
The most important function of your meter
is to measure your blood glucose level. The
Glucometer
®
E
SPRIT
™ system is designed
to make this task as simple as possible. The test
is done in the TESTING MODE using a simple,
integrated step.
The system also provides for those who want
more detailed information like averages and
other special features. All such options are
provided in a separate mode called — the
FEATURES MODE. The buttons on the instru-
ment are only used for the additional features.
Because the options of the FEATURES MODE
take more time to learn than the use of the
TESTING MODE, we encourage you to go
through the User Guide and decide what fea-
tures are right for you to make your diabetes
more manageable.

Testing Materials
Test Sensor Disc
(Contains ten
Test Sensors)
Fold out this page for testing reference
If you have any questions or concerns as
you learn how to use the system, see
Customer Service, page 34.
Display
Meter Parts
Test Sensor
Batteries
End Latch
Battery
Capsule
Pad ↔
(moves left
and right)
Slide ↕
(moves
forward
and back)
Button A
Button B
Microlet™ or
Glucolanz™ Lancet
Microlet™ Device
Control
Solution
Programme
Number
EXAMPLE
CAUTION: Before using any product to test your blood glucose (sugar),
read all instructions and practice the test. Do all quality control checks
as directed and consult with a diabetes health professional. These
recommendations apply to all blood glucose monitoring systems and
are supported by the American Association of Diabetes Educators,*
the American Diabetes Association, the Food and Drug Administration
and the Health Industry Manfacturers Association.
Test Sensor
Carton
control
ranges

ii
Table of Contents
iii
Table of Contents
CHAPTER PAGE
Review Time-Specific Averages . . . . . . . 20
Review Test Results . . . . . . . . . . . . . . . . 22
Erase All Test Results . . . . . . . . . . . . . . . 23
Transfer to a Computer . . . . . . . . . . . . . 24
Meter Maintenance . . . . . . . . . . . . . . . . 25
Cleaning Procedure . . . . . . . . . . . . . . 25
Battery Replacement . . . . . . . . . . . . . 26
Problem Solving . . . . . . . . . . . . . . . . . . . 28
Error Codes . . . . . . . . . . . . . . . . . . . . . 28
Warning Codes . . . . . . . . . . . . . . . . . . . 30
Meter and Test Sensor . . . . . . . . . . . . . 32
Technical Information . . . . . . . . . . . . . . . . 34
Customer Service . . . . . . . . . . . . . . . . . 34
Specifications . . . . . . . . . . . . . . . . . . . . 35
Replacement Products . . . . . . . . . . . . . 36
Technical Information . . . . . . . . . . . . . . 37
Warranty Information . . . . . . . . . . . . . . . . 40
10
11
13
14
15
16
9
12
CHAPTER PAGE
Preview . . . . . . . . . . . . . . . . . . . . . . . . . 1
• Testing Mode
• Features Mode
Inserting a Test Sensor Disc . . . . . . . . . . 2
Enter Programme Number . . . . . . . . . 4
Blood Glucose Test . . . . . . . . . . . . . . . . 6
Prepare for the Finger Puncture . . . . . 6
Blood Glucose Test . . . . . . . . . . . . . . 7
Control Test . . . . . . . . . . . . . . . . . . . . . . 10
Enter Features Mode . . . . . . . . . . . . . . . 13
Test Sensor Count . . . . . . . . . . . . . . . 13
Last Test Results . . . . . . . . . . . . . . . . . 13
Set Time and Date . . . . . . . . . . . . . . . . . 14
Reset Time-Specific Averages . . . . . . . . . 16
Reset Basic Features (optional) . . . . . . . . 18
Beeper . . . . . . . . . . . . . . . . . . . . . . . . . 19
Blood Units (mmol/L to mg/dL) . . . . . . 19
Clock Format (24 hour to 12 hour) . . . . 19
Temperature Format (°C to °F) . . . . . . . 19
2
3
5
6
1
7
8
4

A
A
B
CHAPTER
CHAPTER
1
1
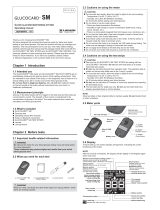
1 Preview –
There are two operation modes:
Move Pad
left/hold
then move
Slide forward.
Move Slide
forward.
To Turn the Meter On
in the Testing Mode:
The Features Mode is used to:
■ set time/date
■ set specific average times
■ reset meter options
■ review results
■ erase test results
■ transfer to a computer
The Testing Mode is used to:
■ run a blood glucose test
■ run a control test
The Testing Mode The Features Mode
To Turn the Meter On
in the Features Mode:
NOTE: You can turn off Meter
(move Slide back) at any time in
Features Mode: any settings that
have been changed are stored.
A
B
➠
➠
➠
Button
A
Button
B
Button A:
Allows you to move to
the next setting.
Button B:
Allows you to change
the setting.

CHAPTER
Inserting a Test Sensor Disc 2
32
CHAPTER
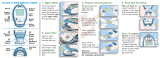
2 Inserting a Test Sensor Disc
3. Before inserting the
disc (bumpy side up), note
the two blue Meter Tabs
on the inside of the Meter.
2. Remove the Test
Sensor Disc from the
Paper Pak.
Gently press the disc into
place under the two Meter
Tabs. Please note the
Programme Number on
your Test Sensor Disc.
Materials Needed:
Meter Test Sensor Disc
1. Open the Meter by
releasing the End Latch.
Important to know:
• Each Test Sensor Disc has ten Test Sensors.
• Each disc is assigned a Programme Number to
assure accuracy in test results when the Meter is
set to match that number.
Latch
Tabs

CHAPTER
Inserting a Test Sensor Disc 2
54
CHAPTER
2 Inserting a Test Sensor Disc
To Remove the Used
Test Sensor Disc:
Open the Meter and lift
the edge of the used Test
Sensor Disc out from
under the two blue Tabs
and remove from the
Meter.
4. Close the Meter and
fasten the End Latch.
You may now run ten tests
before replacing the Test
Sensor Disc.
Latch
5. After inserting a Test
Sensor Disc, set the
Programme Number.
Move Slide forward to
enter Features Mode. The
Programme Number
flashes in the display.
Press Button B to the
Programme Number
(P1 to P62) that matches
the number you noted
on the Test Sensor Disc
(see cover foldout exam-
ple) or end flap on
Test Sensor Carton.
Press Button A to continue
(set time/date) or move
Slide back to turn Meter
off.

CHAPTER
Blood Glucose Test 3
76
CHAPTER
3 Blood Glucose Test
Materials Needed:
Microlet™ Device with Endcap
Glucolanz™ Lancet
Prepare for the Finger Puncture
4. Wash your hands with
warm soapy water. Rinse and
dry thoroughly.
1. Remove the endcap.
3. Replace the endcap.
2. Insert lancet firmly until
the lancet comes to a full stop
— then twist off lancet cap.
NOTE: See Microlet package
insert for complete instructions.
➠
1. To enter the Test Mode,
move Pad left and hold
while moving the Slide for-
ward. Be sure Slide is
moved all the way to the
end. A Test Sensor appears
and the display prompts
blood application with a
flashing drop .
If a Programme Number (P1 to P62) appears, press Button
B to change (if needed) and then Button A to continue. If no
change press Button A to prompt blood application.
Programme Number appears in display if Meter has been
opened since last used.
Materials Needed:
Meter with
Test Sensor
Disc inserted
Before running a test, be sure:
• The Test Sensor Disc is inserted. See page 1.
• The date and time are set (if you want correct date or
time stored in memory with test result). See page 14.
2. Prick your finger with
the Microlet Device and
form a small drop of blood.
➠
➠

CHAPTER
Blood Glucose Test 3
98
CHAPTER
3 Blood Glucose Test
mmol
L
4. The test result displays
after 30 seconds.
Do not apply blood
directly from an above position.
If you do not wish to
store a result, then press
Button B before closing
the Slide. An X appears on
the display.
Deleted results appear in
the memory, marked with
an X. These results are
deleted from the average
of stored test results.
B
5. Point Meter down (over
waste container) and move
Slide back all the way to
the end. The Test Sensor
is released.
NOTE: Test results are
stored automatically when
Slide is closed.
IMPORTANT: If your glucose level is below
2.8 mmol/L or above 13.9 mmol/L, test again.
If your glucose level is still below 2.8 mmol/L or
above 13.9 mmol/L, it may indicate a potentially
serious medical condition. We recommend you consult
your physician or healthcare professional immediately.
Note: The Meter automatically turns off if it is left on
for 3 minutes (without sensor) or 15 minutes (with
sensor) with no activity. To preserve the battery life,
remember to turn off the Meter after you have used it.
m
m
o
l
L
➠
3. Hold your fin-
ger level with the
drop of blood
on top. Bring the
Meter in from
the side to the
drop of blood.
Let the entire
front edge of the
Test Sensor
touch the surface
of the blood
drop.
Blood is auto-
matically drawn
into the inside of
the Test Sensor.
Hold there until
Test Sensor is
filled and you
hear a beep.
Test
Sensor

CHAPTER
Control Test 4
1110
CHAPTER
4 Control Test
Materials Needed:
Meter with Test Sensor
Disc inserted
Control
Solution
1. Move Pad left and hold
while moving the Slide
forward. Be sure Slide is
moved all the way to the
end. A Test Sensor appears
and the display prompts for
application of the sample
with a flashing drop .
If a Programme Number
appears, press Button B to
change (if needed) and then Button A to continue. If no
change, press Button A to prompt sample application.
Programme Number appears in display if Meter has been
opened since last used.
WHEN: Anytime you want to check performance of the
system (Meter, Test Sensor Disc or your testing
technique).
WHY: If the test result is not within range, there may
be a problem with the Test Sensor or the Meter.
See page 33.
➠
➠
Test Sensor Carton
with Control Range
3. Bring the Meter in from
the side to the drop of control
solution. Let the entire front
edge of the Test Sensor
touch the surface of the
control solution drop. Hold
there until the Test Sensor
is filled with solution (you
will hear a beep).
2. Squeeze a drop of
control solution onto a
clean surface.
4. The test result displays
after 30 seconds. Press the
B Button twice to mark the
test result with a “tick” (✓)
when stored in the memory.
Marked control tests will
not be included in any
averages.
Compare the test result to the range listed on the end
flap of the specific Test Sensor carton being used.
Note: The Control Solution contains a red dye
which may stain.
mmol
L
Test Sensor
Do not
fill Test
Sensor
directly
from
bottle.

CHAPTER
Enter Features Mode 5
1312
CHAPTER
4 Control Test
Move Slide forward.
The Features Mode
Anytime you enter the Features Mode, the following
information is always displayed automatically and in
this order.
1. The number of remaining
Test Sensors left in your
Meter appears with the
present
time
and
date.
2. The last two test
results
appear with the time and date
of the test.
NOTE:
If the Meter is new and no test results are stored in memory,
the Meter will display the number of remaining sensors only.
3. After reviewing the above information, turn the
Meter off.
mmol
L
mmol
L
To Turn the Meter On
in the Features Mode:
➠
5. Point the Meter down
(over waste container) and
move Slide back all the
way to the end. The Test
Sensor is released to
be discarded.
➠
Button
A
Button
B
Date
Time
Number of Test
Sensors remaining
Button A:
Allows you to move to
the next setting.
Button B:
Allows you to change
the setting.

CHAPTER
Set Time and Date 6
1514
CHAPTER
6 Set Time and Date
To set the time and date, follow these directions.
1. Move Slide forward to enter
Features Mode.
2. Press and release Button A
(average displays if test results
are in memory).
If no blood glucose test results are
in memory, the
number of remain-
ing Test Sensors
flashes.
If the number of Test Sensors is
not correct, press Button B to
change and then go on to Step 3.
If test results are in memory, press
and hold Button A. The
number of
remaining Test Sensors
flashes.
Press Button B if you want to
change the number and then go
on to Step 3.
3. Press and release Button A —
the minute flashes. Press Button B
to make a change.
4. Press and release Button A —
the hour flashes. Press Button B to
make a change.
5. Repeat step 4 to set:
■ day
■ month
■ year
6. Move the Slide back to turn
Meter off.
➠

CHAPTER
Reset Time-Specific Averages 7
17
5. Press and release
Button A. The hour flashes.
Then press Button B to
change the hour.
6. Press and release
Button A again and move
to A2Average.
Press Button B to change
the minute. If you want to
continue changes for A 2,
A 3 and A 4, repeat steps
5 through 6. Then move
Slide back to turn Meter off.
If you only want to change
a specific time(s), press
Button A repeatedly to
scroll to that display.
16
CHAPTER
7 Reset Time-Specific Averages
The Meter calculates four time-specific averages
identified as A1, A2, A3,and A4. These times are
preset for meal times but may be changed to meet
your schedule. To be included in the average, the
testing time must occur within one hour before or
after the specific set time.
The preset times are:
A 3 1 8 : 00
A 4 2 1 : 0 0
A 1 6 : 00
A 2 1 2 : 00
PROCEDURE:
1. Move Slide forward to
enter Features Mode.
2. Press and release
Button A. Average dis-
plays if three test results
have been stored.
Press and hold Button A
until
number of remaining
sensors
appears. Press and
release Button A—time
appears.
4. Press Button B to
change the minute for the
A 1 Time-Specific Average.
3. Press and hold Button
A until A 1 appears.
Release Button A. The
minute flashes.
➠

CHAPTER
Reset Basic Features (optional) 8
19
OPTIONAL SETTINGS:
(Repeat #4 to change settings)
mg
dL
mmol
L
Blood Glucose Units:
Time Clock:
Temperature:
5. Move Slide back to turn Meter off.
18
CHAPTER
8 Reset Basic Features (optional)
The basic features are preset but may be reset to
fit your needs:
■ from beeper on to beeper off.
■ from mmol/L to mg/dL blood glucose units.
■ from a 24 hour to a 12 hour (am/pm) time clock.
■ from Celsius (C) to Fahrenheit (F) temperature units.
PROCEDURE:
1. Move Slide forward to
enter Features Mode.
If a Programme Number
appears and needs to be
changed, see page 4 (#5).
3. Then press and hold
Button A until “b”
(beeper) appears.
Release Button A and
go on to Step 3 (next
page).
BEEPER SETTING:
4. Press Button B to
make the change and
press Button A again to
move to the next feature.
(beeper
on)
(beeper
off)
➠
2. Press and hold Button A
four times.

CHAPTER
Review Time-Specific Averages 9
21
mmol
L
mmol
L
mmol
L
4. Press Button B again
and the A 2 average
displays. Continue to press
Button B after each two
(successive) displays to
show the remaining
averages.
5. Move Slide back to turn the Meter off
or continue to review stored test results.
See next page, step 3.
NOTE:
■ If no average is available for a specific time
(there must be at least 3 stored blood glucose
test results in the last two weeks), the display
scrolls to the next available Time-Specific
Average. If there are no averages stored, the
first result shown will be the last test result
(see Chapter 10).
20
CHAPTER
9 Review Time-Specific Averages
2. Press and hold
Button A. The first display
shows the two-week
average of all glucose
results.
3. Press Button B; two
displays follow showing
the A 1 average test
result.
mmol
L
mmol
L
mmol
L
The average of all blood glucose results and the time-specific
averages are based on a two-week testing period. A minimum
of three tests must be run within a two-week period to give an
average. For example:
if three tests are run within two weeks
for A 1 and A 4 time periods only, then A 2 and A 3 will not
display in your review.
TIME-SPECIFIC AVERAGES
1. Move Slide forward to
enter Features Mode. The
number of remaining Test
Sensors displays and the
last two test results.

CHAPTER
Erase All Test Results 11
23
ERASE ALL TEST RESULTS
You can erase all test
results stored in the Meter
if you press and hold both
A and B Buttons while
reviewing stored test
results (#3/Chapter ).
However, you must press the buttons before the beep
signals the last test result.
Press and hold both Buttons until “000” appears
(about 5 seconds). If you change your mind, to cancel
erasing — press either Button before closing the Slide.
10
When the Slide is moved
back, all stored test results
are erased.
22
CHAPTER
10 Review Test Results
mmol
L
mmol
L
TEST RESULTS
3. Press Button B to
review any average results
and all other stored test
results (beginning with the
latest result). Continue to
press and release Button B
or hold to scroll through all
stored test results.
A beep signals the last
test result and returns to
original display.
mmol
L
1. Move Slide forward to
enter Features Mode.
2. Press and hold Button
A (average displays).
➠
➠

CHAPTER
Meter Maintenance 13
2524
CHAPTER
12 Transfer to a Computer
• Your Meter can transfer test results to a computer
where results can be electronically summarized in a
logbook report, graph or chart.
• To make use of this feature, you need special soft-
ware and a connecting cable.
• For more information relating to this program,
contact your nearest Bayer Diagnostics office.
EXTERIOR CLEANING PROCEDURE
The exterior of the Meter can be cleaned using a
moist (not wet) lint-free tissue with a mild detergent or
disinfecting solution.
✽
Wipe dry with lint-free tissue
after cleaning.
✽
1 part bleach mixed with 9 parts water.
INTERIOR CLEANING
PROCEDURE
The Latch: Open Meter and
wipe inside of Latch with moist
tissue and dry thoroughly.
The Test Sensor Guide: Gently
wipe any moist area on Test
Sensor Guide and nearby areas
with dry tissue.
It is important to avoid
excessive water. The electronics
may be affected.
WARNING: POTENTIAL BIOHAZARD: Healthcare professionals
using this system on multiple persons should be aware of the follow-
ing, and should follow the infection control procedure approved by
their laboratory facility. All products or objects which come into con-
tact with human blood, even after cleaning, should be handled as if
capable of transmitting viral diseases.
The user should follow the recommendations for prevention of
blood-borne transmissible diseases in healthcare settings, as recom-
mended for potentially infectious human blood specimens in the
Health Service Guidelines on Decontamination of Equipment prior
to inspection service or repair, Ref. HSG. (93) 26.
Test Sensor
Guide

CHAPTER
Meter Maintenance 13
27
4. Insert two new lithium
batteries (CR2016) into the
Battery Capsule with the
+ side on top. Push down
gently to lock them into
place.
5. Replace the Battery
Capsule.
IMPORTANT:
Remember to reset date
and time before running
another test. See page 14
for directions.
WARNING:
• Keep batteries away from children.
• Lithium batteries are poisonous.
• If swallowed, immediately contact
your physician.
• Discard batteries according to your
local environmental regulations.
26
CHAPTER
13 Meter Maintenance
1. Locate the Battery
Capsule.
2. Using a fingernail,
thin coin or similar object,
pry the capsule loose and
lift from Meter.
3. Push through the small
semicircular hole to release
the two batteries.
BATTERY REPLACEMENT
➠
➠
➠
➠

CHAPTER
Problem Solving / Error Codes 14
29
CODE CAUSE / SOLUTION
Meter has detected an error;
accurate results not possible:
■ Test Sensor Guide is wet. Clean
inside of Meter (page 25).
Be sure inside is dry before reuse.
■ Blood applied before Meter is
ready. Repeat test, making sure
blood icon displays.
■ Test Sensor has been damaged
due to intense heat exposure.
If problem cannot be corrected,
call the Customer Service
Department or 1-800-028-251
(toll free).
Meter has malfunctioned.
Call the Customer Service
Department or 1-800-028-251
(toll free).
28
CHAPTER
14 Problem Solving / Error Codes
CODE CAUSE / SOLUTION
Battery life has ended.
■ Replace batteries (two lithium
batteries — size CR2016). See
directions — page 26.
Temperature:
— too cold (below 0° C)
— too hot (above 50° C).
■ Use Meter in an area of correct
operating temperature (10° to
40° C).
Test Sensor removed during the test.
■ Move Slide back to turn the Meter
off and then repeat the test.
Meter is turned on when the End
Latch is open.
■ Move Slide back (close) to turn
the Meter off and then close the
End Latch.
{
possible
causes

CHAPTER
Problem Solving / Warning Codes 14
31
CODE CAUSE / SOLUTION
Temperature is too low (between
0° and 10° C) and could affect test
results.
■ Test within operating temperature
range (10° to 40° C).
Temperature is too high
(between 40° to 50° C) and could
affect test results.
■ Test within operating temperature
range (10° to 40° C).
Low Batteries
■ Replace batteries within one
week or 20 readings.
30
CHAPTER
14 Problem Solving / Warning Codes
CODE CAUSE / SOLUTION
Test Result is below 0.6 mmol/L.
■ Meter has detected an error.
Repeat the test and make sure
Test Sensor is filled.
Test Result is above 33.3 mmol/L.
■ Repeat the test. If still high,
contact your physician or diabetes
educator regarding a possible
hyperglycemic condition (high
blood sugar).
mmol
L
mmol
L
Deleted Test Result
■ If the temperature is too low or
too high, the test result is marked
with an X and deleted from the
average.
mmol
L
EXAMPLE
/