Page is loading ...

Thank you for choosing GLUCOCARD
TM
SM.
We have designed this compact blood glucose meter for faster and easier
testing of your blood glucose. We hope our product will help you manage your
diabetes. This manual explains how to use your new meter. Before testing,
carefully read through this manual and the package inserts that come with the
GLUCOCARD
TM
SM TEST STRIPS and GLUCOCARD
TM
SM CONTROL. Pay
particular attention to listed warnings and cautions. Please keep this manual
handy for future reference. If you have any questions, please contact
A. Menarini Diagnostics on the numbers listed at the end of the manual.
Chapter 1 Introduction
1.1 Intended use
The GLUCOCARD
TM
SM meter and GLUCOCARD
TM
SM TEST STRIPS are for
quantitatively measuring the glucose level in fresh capillary whole blood. They
are intended for use outside of the body (in vitro diagnostic use) at home or in a
clinical setting as an aid to monitor and control blood glucose levels.
Do not use them to diagnose diabetes. Also, do not alter treatment based
on the test results of this meter without instructions from your doctor or
healthcare professional.
1.2 Measurement principle
Glucose in the blood reacts with the reagent in the test strip and this produces
a small electric current. The strength of this current is proportional to the
concentration of glucose in the blood. The meter measures this current and
calculates your blood glucose level.
1.3 What’s included
GLUCOCARD
TM
SM
Carrying case
Operating manual (this manual)
Guide on Bluetooth connection
GLUCOCARD
TM
SM TEST STRIPS
Lancets
Lancing device
Chapter 2 Before tests
2.1 Important health-related information
WARNING
Do not use this meter for your blood glucose testing if you are being tested
for xylose absorption.
These treatments may produce higher test results than your actual
blood glucose level.
2.2 What you need for each test
a. GLUCOCARD
TM
SM
(meter)
b. GLUCOCARD
TM
SM
TEST STRIPS
c. Lancing device d. Lancet
WARNING
Keep the meter, test strips and other items away from young children. Small
items are choking hazards.
Operating manual
2.3 Cautions on using the meter
CAUTION
For accurate test results, allow the meter to adjust to the surroundings:
Temperature: 8 to 40 °C (46 to 104 °F)
Humidity: 20 to 80% RH (Relative Humidity)
for 30 minutes before testing your blood glucose.
Do not store or use the meter where:
• Humidity is high enough to cause condensation (bathrooms, drying
rooms, kitchen, etc.).
•
Do not use the meter after it has been dropped in liquid or liquids have
entered inside, even if dried afterwards.
Avoid hand contact with test strip slot on the meter. A thermo sensor is
housed inside the meter to minimize errors.
Do not connect the meter to a computer via USB cable during testing. The
meter may be damaged, leading to inaccurate test results.
Do not apply blood directly to the test strip slot on the meter.
Do not share your meter with anyone to avoid the risk of infection.
2.4 Cautions on using the test strips
CAUTION
Use only the GLUCOCARD
TM
SM TEST STRIPS for testing with the
GLUCOCARD
TM
SM meter. Do not use other test strips as it causes
inaccurate test results.
Do not use test strips beyond their expiration date. The expiration date is
written on the test strip bottle next to the “Use by” symbol.
For accurate test results, allow test strips to adjust to the surroundings:
Temperature: 8 to 40 °C (46 to 104 °F)
Humidity: 20 to 80% RH (Relative Humidity)
for 30 minutes before testing your blood glucose.
Do not use the test strips if 6 months or more have passed since opening
the laminated pouch.
The test strips are for single use only. Do not use test strips that have
already absorbed blood or control solution.
NOTE
Store test strips in their original bottle to maintain quality. Do not transfer them
to other containers.
2.5 Meter parts
Display
Test strip
ejector
Battery cover
Test strip slot light
Micro-B USB
port
Test strip slot
Insert a test strip here
before testing.
button
(Down button)
button
(ON/OFF button)
button
(Up button)
2.6 Display
At each start-up, the screen displays all segments, indicating the correct
functioning of the meter.
NOTE
After 30 seconds of inactivity, the display will dim slightly. It will brighten again
when next used.
Result average symbol
High blood sugar (high
value) warning flag
Alarm symbol
Hospital device icon
Date symbol
Time symbol
Delete flag
Past results symbol
Low blood sugar (low
value) warning flag
Battery symbol
Beeper volume symbol
Control test flag
Sound mute symbol
Before bedtime flag
Blood symbol:
Appears when the meter
is ready for testing.
Bluetooth symbol:
Flashes during wireless
communication
Personal device icon
Before-meal flag:
indicates the “After-meal flag”.
Thermometer symbol
Setting symbol:
Appears when you set up the meter.
Wireless communication setting symbol
Appears when you set up the wireless
communication (BLE = Bluetooth Low Energy).
Memory symbol:
Appears when you are
reviewing a past result
from the meter memory.
BLOOD GLUCOSE MONITORING SYSTEM

2.7 Inserting test strips into the meter
Follow the steps below to test your blood glucose level.
1. With clean, dry hands, remove 1 test strip from the bottle.
Do not bend the test strip.
NOTE
Tightly close the bottle immediately after taking out a test strip.
Do not apply blood to the test strip before inserting it into the meter.
2. Insert the test strip fully into the test strip slot.
The meter turns on. Check that a full display appears as
shown in paragraph 2.6.
After the most recent test result
on the screen.
If nothing appears on the screen, remove the test strip and insert it back into
the test strip slot.
NOTE
If the thermometer symbol appears on the screen, see chapter 10
“Troubleshooting”.
CAUTION
If any part of the display screen is missing (see 2.6), call your distributor.
If you cannot test your blood glucose due to a problem with your meter or
test strips, promptly contact your healthcare professional and distributor.
Next ...
Go to chapter 3 “Blood sampling”. Draw blood and apply it to the test strip no
more than 5 minutes after you insert the test strip into the meter. Otherwise, the
meter turns itself off.
Chapter 3 Blood sampling
For information on how to use the lancing device, read the relevant instructions
for use.
CAUTION
Wash the puncture site with soap and water (avoid disinfectants). Dry the
site thoroughly before sampling blood.
Do not share the same lancet or lancing device with anyone to avoid the
risk of infection.
Always use a new lancet. Lancets are for single use only. Do not reuse a
lancet that you have already used.
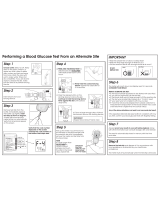
3.1 Alternative site testing (AST)
before testing blood from the palm, forearm or upper arm.
Use blood from: If you are going to test:
Fingertip, palm,
forearm or upper
arm
Before meals
Two hours or more after meals
Two hours or more after exercise
Fingertip
When there is the possibility of blood glucose level
changing rapidly (e.g. after meals or exercise)
When experiencing symptoms of hypoglycemia
sensation or trembling
When immediate testing is needed for suspected
hypoglycemia
When in poor physical condition such as having a
cold, etc.
Chapter 4 Testing your blood glucose
If nothing appears on the screen, remove the test strip and insert it back into
2. Touch the tip of the test strip to the drop of blood.
with blood.
Accurate test results will not be obtained if you apply your blood to the check
window directly.
The meter counts down. After 5 seconds, a beep sounds and the test result
and date/time are shown.
NOTE
For accurate test results, touch the test strip to your blood immediately after
seconds.
Use only a round drop of blood. Wipe away smeared blood.
Do not test blood that runs or spreads out from the puncture site.
Do not smear blood on the test strip.
Do not press the test strip against your puncture site with force.
Do not add any extra blood. It may cause inaccurate test results.
Do not touch the test strip until the test result appears.
3. Read your test result.
The meter stores this test result with the test date and
time in the memory.
WARNING
Test results are shown in mg/dL. You cannot change the unit of measure.
If, by any chance, the results appear in mmol/L, contact your distributor
immediately. Using mmol/L may cause you to misread test results and lead
to incorrect treatment.
CAUTION
If “Lo” or “Hi” appears on the screen:
Repeat the test. If “Lo” or “Hi” still appears, contact your doctor or
healthcare professional. “Lo” appears if your test result is less than 10
mg/dL. “Hi” appears if your test result is more than 600 mg/dL.
If test results do not match how you feel:
Make sure you performed the test properly as explained in chapters 2 to
4. Then, do a control test to check that there are no problems with the
meter or test strips. If you tested blood from the palm, forearm or upper
match how you feel, contact your doctor or healthcare professional.
Do not ignore test results. Do not alter your blood glucose management
or treatment without consulting your doctor or healthcare professional. It
is important to follow their instructions.
4. Remove the used test strip.
Point the test strip down. Slide the test strip ejector to eject the test strip. The
meter turns itself off.
NOTE
When the wireless communication is ON, test results will be transmitted
automatically.
Disposal of biohazardous waste
Test strips and lancets qualify as biohazardous waste once used to test blood
glucose. After use, dispose of them according to your local regulations on
biohazardous waste.

Chapter 5 Managing your test results
5.1 Flagging test results
Flags help you categorize and identify results.
1. Leave the test strip in the meter after the test result appears on the screen.
2. Press the
Before-meal
For results
obtained
before eating.
After-meal
For results
obtained after
eating.
Before
For results
obtained
before
sleeping.
For inaccurate
results.
Not part of
your result
averages.
3. Point the test strip down. Slide the test strip ejector to eject the test strip. The
meter turns itself off.
5.2 Reviewing past results
You can review past results stored in the memory. Your meter stores up to 500
test results. New results beyond the 500th overwrite previously stored results in
1. Make sure the meter is off.
2. Hold down
button for 2 seconds to turn on the meter.
3.
button.
4.
button.
The meter displays the most recent test result stored in the memory.
Three bars “---” appear when there is no past result.
NOTE
When the wireless communication is ON, the current receiving device is
displayed before past results. See “Transmitting all test results” in chapter 7 for
details.
5. View the test result you want.
To go back to the previous result, press
button.
To go to the next result, press
button.
To scroll through results, hold down
or button.
6. To turn off the meter, hold down
button for 3 seconds.
5.3 Viewing result averages
You can view average values of past results.
1. See steps 1, 2 and 3 in paragraph 5.2.
2. Press
3.
button.
The result average changes in the order
of 7-, 14-, 30-, 60- and 90-day each time
button is pressed.
Three bars “---” appear when there is no past result to be included in the
average calculation.
4.
button.
5. To turn off the meter, hold down
button for 3 seconds.
5.4 Deleting all test results
You can delete all test results from the memory. Remember that results cannot
be retrieved once deleted.
1. See steps 1, 2, 3 and 4 in paragraph 5.2.
2. Hold down both
and
the operation at this point and return to the previous level, hold down the
button for 1 second).
The number of
tests included in
the calculation of
the result average.
3. Hold down button and button together for 3 seconds to delete all test
results (a long beep sounds and “---” appears).
4. To turn off the meter, hold down
button for 3 seconds.
5.5 Downloading test results
Test results stored in the GLUCOCARD™ SM meter’s memory can be
downloaded to GlucoLog
®
software and apps by A. Menarini Diagnostics using
either BLE communication (Bluetooth 4.0) or a standard Micro-B USB cable.
GlucoLog
®
software and apps are supplied separately.
For information on how to set the meter for Bluetooth communication, see
chapter 7 of this manual.
For additional information, consult the guide on Bluetooth connection provided.
When the meter is connected with a USB cable, “USB” blinks
on the display.
NOTE
Set the connection using electrical and electronical equipment (cable,
computer, etc.) that is compliant with applicable requirements.
To prevent software errors, which could lead to accidental data loss,
download test results to GlucoLog
®
software and apps only.

Setup mode
2. Press button.
3. Press button.
1. Select an alarm
number.
A1, A2, A3, A4 or A5
2. Turn on the alarm. 3. Set the hour. 4. Set the minute.
To the top
of the alarm
setting.
- To follow the gray arrows ( ), press button.
- To follow the black arrows ( ), press button.
- To change the settings or numbers in italic, press
or
button.
- To scroll through the numbers, hold down
or
button.
- To cancel a setting and return to the previous level, hold down
button for 1
second.
- To turn the meter off (in any screen), hold down
button for 3 seconds.
SET mode selection
Alarm
1. Hold down button
for 2 seconds to
turn on the meter.
To the top of
the HYPO setting.
1. Turn on the
HYPO flag.
2. Set the
threshold value.
A HYPO flag
appears when
your test results
are below the
threshold value.
10 to 120 mg/dL
HYPO
Current setting
HYPER
To the top of
the HYPER setting.
1. Turn on the
HYPER flag.
2. Set the
threshold value.
A HYPER flag
appears when
your test results
are above the
threshold value.
150 to 600 mg/dL
Beeper
volume
On1: Low
On2: Normal
On3: High
OFF: Off
1. Select a setting.
To the top of the
beeper volume setting.
Date
1. Set the year.
To the top
of the date
setting.
2. Select a date
format.
3. Set the month. 4. Set the day.
d-n: Day - month
n-d: Month - day
Time
1. Select a time
format.
To the top of
the time setting.
2. Set the hour. 3. Set the minute.
12h or 24h
Current setting
Current setting
Current setting
Current setting
Current setting
Chapter 6 Meter setup
Alarm: Off HYPO: Off HYPER: Off Time: Current local time (default format: 24 h)
Date: Current local date (default format: day - month) Beeper volume: High(3) BLE: Off
(See chapter 7 “Using the wireless communication function” to change the “BLE” settings.)

Pairing a new
receiving device
and turning
the wireless
communication
ON
NOTE: It is possible to turn the wireless communication on only for one receiving
device at a time. The last paired receiving device is set automatically on.
NOTE: It is possible to register
up to 3 receiving devices.
4. Select an icon ( ).
It is possible to identify each
receiving device with an icon:
select between the options
("personal device" icon,
"hospital device" icon, no
icon) using the buttons.
The selected receiving
device is turned on
automatically. Its number
and icon will appear on the
mode selection screen with
the sign "On".
Your meter and device
are now ready for
wireless communication.
BLE mode selection
2. Press button.
1. Hold down the
button for
2 seconds to
turn on the meter.
3. Press button. Setting at first use
- To follow the gray arrows ( ), press button.
- To select among different options, use the
buttons.
‐ To cancel a setting and return to the previous
level, hold down the button for 1 second.
‐ To turn the meter off (in any screen), hold down
the button for 3 seconds.
Wireless communication setup mode
Transmitting all test results
1. Select a number (1‐2‐3)
for the receiving device
( ).
3.
Pairing starts automatically.
Check the settings of your receiving
device to finalize the pairing procedure.
2. Select "PrG".
Selection of
a different
receiving
device
1.
Select the number of the
receiving device ( ).
3. Edit the icon assigned
(optional)
( )
.
2. Select "On"
( )
.
To the
BLE mode
selection.
SUCCESS
FAILURE
Back to step 3.
Check the
settings of
your receiving
device.
Turning
the wireless
communication
OFF
1. Select "OFF"
( )
.
To the
BLE mode
selection.
Deletion of a
receiving device
1.
Select the number of the
receiving device ( ).
3. Select "YES"
( )
.
2. Select "DEL"
( )
.
To the
BLE mode
selection.
This function is
accessible from
the MEM mode
and only when
wireless
communication
is ON
1. Select "MEM"
( )
.
3. Confirm the number of
the receiving device
( )
.
2. Select "ALL"
( )
.
Wireless
communication
starts automatically.
Back to
step 3.
SUCCESS
FAILURE
Chapter 7 Using the wireless communication function
This chapter provides information on how to set the meter (transmitting device) for wireless communication via BLE. Before starting communication, also check the
instructions of your receiving device (smartphone, tablet, etc.).
When the wireless communication function is on, test results will be transmitted automatically after measuring blood glucose and removing the test strip (the
the settings of your receiving device.
It is also possible to transmit manually all previous test results whenever needed (e.g. when a new receiving device is registered, or when the usual receiving device
is not present at the time of measurement, or its battery ran out). For this function, see “Transmitting all test results” below.

Chapter 8 Control test
This meter checks itself every time you insert a test strip. You do not need to
run frequent control tests. Do a control test if:
You suspect the meter or test strips are not working properly.
You dropped the meter.
You damaged the meter.
Your test results do not match how you feel.
You want to check performance of the meter and test strips before a blood
glucose test.
NOTE
Use only the GLUCOCARD
TM
SM CONTROL to test your meter and test strips.
CAUTION
Do not use control solutions beyond their expiration date. The expiration
date is written on the control solution bottles next to the “Use by” symbol.
Leave the meter, test strips and control solution at 8 to 40 °C
(46 to 104 °F) and 20 to 80% RH for at least 30 minutes before running
the control test.
Do not drink control solution. It is not for human consumption.
1. See steps 1 and 2 in paragraph 2.7.
screen.
!
the test strip to a drop of control solution.
Accurate test results will not be obtained if you apply the control solution to the
check window directly.
The meter counts down. After 5 seconds, a beep sounds and the test result,
NOTE
Tightly close the control solution bottle.
Do not touch the test strip until the test result appears.
"
the measurement results.
CAUTION
solutions, and contact your distributor.
5. Check that your test result is within the acceptable range.
The acceptable range is shown on the label of test strip bottles. If within range,
the meter and the test strip are working properly. If out of range, test the control
solution again.
CAUTION
If you still have test results that are out of the acceptable range, stop using
your meter, test strips and control solutions, and contact your distributor.
6. Point the test strip down. Slide the test strip ejector to eject the test
strip.
The meter turns itself off.
Chapter 9 System care
9.1 Storing your system
After use, tightly close the caps of the test strip bottle and control solution bottle
to maintain their quality.
Store your meter, test strips, control solutions and manuals in your carrying
case and keep this in a dry location. The correct storage temperatures are 0 to
50 °C (32 to 122 °F) for the meter, 1 to 30 °C (34 to 86 °F) for test strips, and 2
to 30 °C (36 to 86 °F) for control solutions. Do not freeze. Avoid heat, humidity
and direct sunlight.
CAUTION
To obtain accurate test results:
Do not use test strips or control solutions if their bottles are broken or
have been left open.
Do not use the test strips or control solutions beyond their expiration
dates.
9.2 Cleaning your meter and lancing device
Your meter and lancing device do not need special cleaning. If your meter and
lancing device get dirty, wipe them with a soft piece of cloth moistened with
water. To disinfect these items after cleaning, wipe with a soft cloth moistened
with 70% ethanol, 70% isopropanol or diluted household bleach (0.05% sodium
hypochlorite solution).
9.3 Changing the batteries
When the battery symbol appears permanently on the screen, the
batteries are getting low (approximately 100 tests can be performed).
Before using your meter, change the batteries. Date and time settings
will not be cancelled if you insert new batteries within 30 seconds. Past
results remain in the memory even when the batteries are changed.
NOTE
Your meter uses two 1.5V alkaline LR03/AAA batteries. This type of battery is
available in many stores. Keep spare batteries handy at all times.
1. Make sure the meter is off.
2.
3. Remove the old batteries.
NOTE
Do not use sharp objects that may damage the meter.
4. Insert two AAA alkaline batteries in the correct direction.
5. Close the battery cover.
NOTE
The meter may enter date setting mode the next time it is
turned on. In this event, set the correct date and time.
Dispose of old batteries according to your local environmental regulations.

Chapter 10 Troubleshooting
Error message What it means What to do
E01
(strip issue)
The insertion portion
(electrode) of the test strip
is dirty.
A used test strip is inserted
into the meter.
A different type of test strip
is inserted into the meter.
The test strip is wet or
contaminated by water.
Repeat the test with a new
test strip.
E04
(empty battery)
The batteries are almost dead.
Test results and changes
made in the setup mode are
not stored in the memory.
Change the batteries.
See paragraph 9.3.
E06
(environment
conditions
issue)
The operating environment is
not right for testing.
Leave the meter and test
strips somewhere where the
temperature is 8 to 40 °C
(46 to 104 °F) and humidity
is 20 to 80% RH for at least
30 minutes.
Remove the test strip and
insert it back into the slot.
Test your blood only
after the error and the
thermometer symbol
disappear.
If the error still appears on
the screen, contact your
distributor.
E07
(temperature
issue)
There was a sharp change in
the surrounding temperature.
E11, E21, E22
(meter issue)
There is a problem with the
inside of the meter.
Contact your distributor.
E13
#$
issue)
The test strip touched blood
again after the test started.
The test strip inside the
meter moved during testing.
The blood was not correctly
drawn into the test strip.
amount of blood to perform
the test.
The test strip is wet or
contaminated by water.
Repeat the test with a new
test strip.
E14
(sample issue)
The insertion portion
(electrode) of the test strip
is dirty.
Repeat the test with a new
test strip.
Hematocrit range is
Sample type is
Repeat the test using
a suitable sample (see
paragraph 11.1).
E23
(temperature
%$
issue)
The meter could not detect
the surrounding temperature
correctly.
See “What to do” for E06/E07.
Symbol What it means What to do
The batteries are getting
low (approx. 100 tests
can be performed).
Change the batteries (if the symbol
is displayed permanently). See
paragraph 9.3.
The surrounding
temperature is too low or
too high.
The meter has not
adjusted to the
surrounding temperature.
Leave the meter and test strips
somewhere where the temperature is 8
to 40 °C (46 to 104 °F) and humidity is
20 to 80% RH for at least 30 minutes.
Remove the test strip and insert it back
into the slot. Test your blood only after
the thermometer symbol disappears.
NOTE
Your meter can test your blood even
when the thermometer symbol is
displayed, but this may produce
inaccurate test results. These results
are stored along with the thermometer
symbol and cannot be part of your
result averages.
Chapter 11 Technical information
&$
Product GLUCOCARD
TM
Model SM
Test item Blood glucose level
Sample Fresh capillary whole blood
Sample size
Assay method
dehydrogenase (FAD-GDH) based method. Mediator:
hexaammineruthenium(III) chloride, 1-Methoxy PMS.
Calibration The results are equivalent to plasma glucose
concentration (capillary plasma referenced)
Test strips GLUCOCARD
TM
SM TEST STRIPS
Test strip coding Auto Coding
Unit of measurement mg/dL
Test range 10 to 600 mg/dL
Hematocrit range 20 to 70% (hematocrit compensated)
Test time 5 seconds
Temperature
compensation
Automatic compensation using built-in thermo sensor
Battery 1.5 V alkaline LR03/AAA battery × 2 (the meter is
shipped with the batteries loaded)
Battery life Approximately 1,000 tests or approximately 12 months
(counting 3 tests/day), with Bluetooth transmission after
each test. The actual number of tests may be lower
depending on conditions of use, environment conditions
and individual variability.
Power consumption 0.1 W (Max.)
Memory capacity 500 test results
Data transmission Yes (USB and Bluetooth 4.0)
Auto power off 2 minutes after last user operation (5 minutes when
waiting for blood application)
Operating
environment
Temperature: 8-40 °C (46-104 °F)
Humidity: 20-80% RH (no condensation)
Test Strip storage
conditions
Temperature: 1-30 °C (34-86 °F)
Humidity: 20-80% RH
Meter storage
conditions
Temperature: 0-50 °C (32-122 °F)
Humidity: 20-80% RH
Expected Meter life 3 years
Dimensions L94.0 x W57.0 x 18.5 mm (L3.7 x W2.2 x 0.7 inches)
Weight Approx. 70 g (2.47 ounces)
11.2 Product safety information
The meter complies with applicable electromagnetic emission requirements
(EMC). However, do not perform a glucose measurement with this meter
near mobile devices or electrical or electronical equipment that are sources of
electromagnetic radiation, as these may interfere with the proper operation of
the meter.
Electromagnetic interference (EMI)
This meter complies with CISPR 11:2003, Class B (Radiated Only). It emits low
levels of energy that are not likely to interfere with nearby electronic equipment.
&$
This meter clears immunity requirements for Level 3 electrostatic discharge
set forth in IEC 61000-4-2. This meter clears immunity requirements for radio
frequency interference in the 80 MHz to 2.5 GHz range (3 V/m) set forth in IEC
61000-4-3.
11.3 Disposing of your meter
When no longer needed, remove the batteries and dispose of the meter
according to your local regulations on biohazardous waste. This meter is not
subject to requirements of European Directive 2002/96/EC (Directive on Waste
Electrical and Electronic Equipment (WEEE)).

"&$
Symbol Description
Storage temperature limitation
In Vitro Diagnostic Medical Device
Manufacturer
Biological risks
Caution, consult instructions for use
Batch code
Use by
This product complies with Directive 98/79/EC
Suitable for self testing
Authorized Representative in the European Community
Serial number
Consult instructions for use
Blood glucose meter
revision
Direct current (voltage)
Catalogue number
ISSUED: 2015.07
Distributed by
A. MENARINI Diagnostics
Via Sette Santi 3
50131 Firenze - Italy
Tel. +39 XXX.XXXXXXX
E-mail: xxxxxx@xxxxxxxxxx
47430-07/15
IVD Directive (98 / 79 / EC)
GLUCOCARD™ SM
Made in Philippines
GLUCOCARD™ SM TEST STRIPS,
GLUCOCARD™ SM CONTROL
See relevant instructions for use
/


![LivongoBlood Glucose Monitoring System [PL00497]](http://vs1.manuzoid.com/store/data/001794217_2-3e764f07ad29ea86e9aa74e34fbfeb35-160x210.png)