Page is loading ...

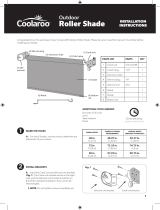
Exterior Corded Sun Shade with PE Fabric
Description Part Number Qty Included
Clutch Bracket CB9 1
Plug Bracket PB9 1
Bracket Cover BC9 2
Clutch with cord (pre-installed) C9 1
Plug with pin (pre-installed) P9 1
Bottom Rail (pre-installed) BR9 1
Bottom Rail Caps (pre-installed) BRC9 2
Fabric F9 1
Screws (not shown) SCR9 6
Cord Safety Device CSD17 1
Bottom Rail Ring (pre-installed) BRR9 2
INSTALLATION INSTRUCTIONS
Maintenance
To clean your shade simply rinse with water and scrub with any non-abrasive cleaner (us-
ing bleach or other abrasive cleaners will void your warranty). Roll the shade down to air
dry.
Step 4: Install Cord Safety Device
The Cord Safety Device keeps the Cord secure and reduces the risk of
strangulation. This is a very important step, we strongly recommend
that you utilize your Cord Safety Device. Note: You must install
this device for your shade to work properly The Cord Safety
Device is pre-installed on the Cord.
Make sure the cord is tight before you secure the Cord Safety Device. To secure the Cord
Safety Device, drill two (2) Cord Safety Device Screws into a wall/post (Fig L). If a wood
stud is not available, you will need to use an anchor (not included). See your local hard-
ware store for more information. Note: Your Cord Safety Device may look different than
the one pictured in gure L. The installation process however, is the same.
303.652.6164 (p)
Figure L
Moving Cord to left side of the shade
Clutch Bracket
(CB9)
Figure A
M1021-E
Securing your shade
Your shade has Bottom Rail Rings pre-installed on
the Bottom Rail. These rings can be used to secure
your shade during slightly windy conditions. You
may use a screw, nail, S-hook, or any other device to
secure your shade. (Fig O)
Clutch (w/ cord)
(C9)
Plug (with pin)
(P9)
Plug Bracket
(PB9)
Bottom Rail Cap
(BRC9)
Cord Safety Device
(CSD17)
Bottom Rail Ring
(BRR9)
Bracket Cover
(BC9)
Fabric
(F9)
Bottom Rail
(BR9)
Tools required: phillips screwdriver, leveling device (laser level, standard level, etc.), and
power drill (if pre-drilling the holes).
Your shade is already prepared for the Cord to be located on the right side of the shade. If
you want to move the Cord to the left side of the shade, remove the plug bracket cover (Fig
M.), loosen the screws. Then you will need to rotate the metal disc in the Plug Bracket
(Fig N). Tighten the screws then replace the plug bracket
No change is needed to the Clutch Bracket, you only need to rotate the Clutch so the Cord
hangs down, towards the ground. You are now ready to install you shade with the cord on
the left side.
www.shadeinfo.com
Note: your parts and fabric may differ in color than shown in this manual
Figure N
Don’t forget to send us your warranty/registration card.
Figure M
Figure O

Step 1: Mark holes for installation
Be sure to mount the brackets to a wood stud. If a wood stud cannot be located, an anchor
must be used (not included). Visit your local hardware store for more information.
Step 2: Install brackets
Before you can hang your solar shade, it will help to mark the holes where you will put
your screws. Figure D will help you determine where your holes should be located.
Shade Type Fabric width Screw to screw
measurement
Total width
(installed)
Approximate weight
4’ x 6’ 46.10’’ (117.1 cm) 46.65’’ (118.5 cm) 48” (121.9 cm) 3.1 lbs (1.41 kgs.)
6’ x 6’ 70.12’’ (178.1 cm) 70.67’’ (179.5 cm) 72’’ (182.9 cm) 4.3 lbs (1.95 kgs.)
8’ x 6’ 94.09’’ (239 cm) 94.65’’ (240.4 cm) 96’’ (243.8 cm) 5.6 lbs (2.54 kgs.)
10’ x 6’ 118.11’’ (300 cm) 118.66’’ (301.4 cm) 120’’ (304.8 cm) 6.8 lbs (3.09 kgs.)
Remove the Bracket
Covers from both Brackets, then
secure the Clutch Bracket and
Plug Bracket with the provided
wood screws (see Fig. H). Note:
the Clutch Bracket should be
installed on the right side of
the shade. The Plug Bracket is
designed to be placed on the left
side of the shade. Please see page
4 of this manual if you prefer to
place your Clutch Bracket on the
right side.
WALL MOUNT
CEILING MOUNT
Figure B
Figure C
Step 3: Install solar shade
Figure H
Figure D
Your shade can be installed against a wall (Fig B) or against a ceiling/overhang (Fig C).
Your shade is already prepared for either installation; no changes to the brackets are neces-
sary.
IMPORTANT: if you are installing
against a wall, you must leave
approximately 1 1/2’’ clearance above
the brackets to allow the shade to slide
into the Plug Bracket (Fig G).
At least 1.5’’
Figure G
To install your shade, start by attaching the Clutch (with cord) to the Clutch Bracket
(Fig I). Note: make sure the cord hangs down, towards the ground.
Next, slide the Plug with pin into the Plug Bracket. Note: the Plug (with pin) should slide
into the metal disc on the Plug Bracket (Fig J).
Figure I
Figure J
Figure K
Push brackets in, towards shade
to reduce slack
Now re-install the Bracket Covers.
If your shade moves side-to-side, you
may want to adjust the brackets to re-
duce any movement between the shade
and the brackets.
To prevent your shade from moving
from side-to-side, roll your shade down
and loosen the screws slightly. Push
the brackets in, towards the shade and
retighten screws. (Fig K)
If a template has been provided, you can use
it to help position your pilot holes. Start by
temporarily attaching your template to your
mounting surface (Fig. E). Then drill your
pilot holes in the four marked dark zones
(ideally in the center of each dark zone) (Fig f).
Figure E Figure F
Do not replace the Bracket Covers at this time.
/