Page is loading ...

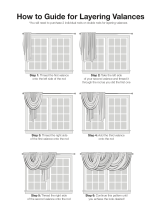
Cord Operated Exterior Sun Shade (with Valance)
Bottom Tube Plug
(BTP09)
Valance (VA10)
Bottom Tube (BT09)
Shade Cloth (SC)
Valance Bracket
(VB09)
Right Valance Cover
(RVC09)
Cord Safety Device
(CSD17)
Note: some parts may be slightly different than shown in this manual. We recommend two (2) people install this shade.
Bungee System
(BUN09)
Part # Description Qty Location
VA10 Valance 1 Pre-installed
SC Shade Cloth 1 Pre-installed
BT09 Bottom Tube 1 Pre-installed
LVC09 Left Valance Cover 1 Pre-installed
RVC09 Right Valance Cover 1 Pre-installed
PB10 Plug Bracket 1 Pre-installed
P10 Plug with Pin 1 Pre-installed
C10 Clutch (with cord) 1 Pre-installed
CB10 Clutch Bracket 1 Pre-installed
CSD17 Cord Safety Device 1 Pre-installed
BTP09 Bottom Tube Plug 2 Pre-installed
VB09 Valance Bracket 2-3 In hardware box
S09 Screw 8 In hardware box
CSDS17 Cord Safety Device Screw 2 In hardward box
BUN09 Bungee System 2 In hardware box
Clutch Bracket
(CB10)
Clutch (w/ cord)
(C10)
Plug (with pin)
(P10)
Plug Bracket
(PB10)
Left Valance Cover
(LVC09)
(Exploded view)
(Exploded view)
Screw
(S09)
Cord Safety Device
Screw (CSDS17)

Step 1: Install the Valance Brackets
BEFORE YOU START
Determine your type of installation. Your
solar shade can be hung from a wall or a
ceiling. See Figures A and B.
Fig A
Fig B
For a wall installation, make sure the plastic tabs on
your Valance Brackets are pointing towards the ground
(Fig E).
For a ceiling installation, make sure the plastic tabs on
your Valance Brackets are pointing out,
towards you (Fig F).
Fig E Fig F
It is very important that your brackets are perfectly aligned with each other (your shade will not install correctly unless your
brackets are perfectly aligned with each other). We recommend using a laser level or the provided template to align the screw
holes.
For wall installations,
you need to allow at
least 1 inch (2.54cm)
above the bracket to
allow the shade to hook
onto the bracket (only
if there is a ceiling that
overhangs the shade).
See Figure C.
at least 1 inch (2.54 cm)
from ceiling
at least 1 inch (2.54 cm)
from wall
Fig D
Fig C
For ceiling installations,
you need to allow at least
1 inch (2.54cm) behind the
bracket to allow the shade to
hook onto the bracket (only
if there is a wall behind the
shade). See Figure D.
Your shade is shipped with a protective lm
to prevent scratching during shipping.
Remove this lm prior to installation.
WALL INSTALLATION CEILING INSTALLATION
WALL INSTALLATION
CEILING INSTALLATION
WALL INSTALLATION CEILING INSTALLATION
Your shade includes a paper template. Use of the template is optional, but recommended. The template is designed to help you
align your pilot holes for your Valance Brackets. To use your template, temporarily adhere the template (using tape, staples, etc.)
to the installation surface. Make sure the template is level, at and unwrinkled before adhering it to your surface. The template
is the full width of your shade; so if the template ts in your installation area, your shade will t as well. Before drilling the pilot
holes, please consider the following:
Your shade includes 2-3 Valance Brackets (depending on the size of your shade), you must install at least two (2) of them.
Install one (1) Valance Bracket near each end of the shade. Note: the Valance Brackets cannot be installed on the extreme
edges of the shade, you will need to allow at least 2 inches (5.08 cm) at the ends of each side. We recommend installing the
brackets on the closest stud to each end of the shade, remembering to allow at least 2 inches (5.08 cm) from each end.
If you are installing a third bracket, install it near the center of the shade.(ideally on a wood stud)
Install the Valance Brackets into wood studs. If wood studs are not available, you will need to use anchors (not included).
See your local hardware store for more information.
1.
2.
3.
4.

Step 2: Install the shade
Install the Cord Safety Device
The Cord Safety Device secures the Cord to reduce the risk of strangulation. The Cord Safety
Device is pre-installed on the cord. To secure the Cord Safety Device, drill two (2) Cord Safety
Device Screws into a wall/post (Fig K). Make sure the cord is tight before you secure the Cord
Safety Device. If a wood stud is not available, you will need to use an anchor (not included). See
your local hardware store for more information. Note: Your Cord Safety Device may look differ-
ent than the one in Figure K. The installation process however, does not change.
This is a very important step, we strongly recommend that you utilize your Cord Safety Device.
Note: if you do not install this device, your cord will not operate your shade properly.
Fig K
For wall installations, rst hook
the back of the Valance on the top
of Valance Brackets (Fig G), then
rotate the shade down and click into
place (Fig H).
Note: you may need to push the
plastic tabs on the Valance Brackets
to help the shade click into place.
Fig H
Fig G
Fig I Fig J
For ceiling installations, rst hook
the back of the Valance on the back
of the Valance Brackets (Fig I),
then rotate the Valance upwards and
click it into place (Fig J).
Note: you may need to push the
plastic tabs on the Valance Brackets
to help the shade click into place.
Your shade includes a two (2) Bungee and Hooks to secure the
bottom of your shade.
To install the Bungee System, start by feeding the Bungee
through the Bottom Tube Plugs located at the end of your Bot-
tom Tube (Fig L).
Then insert the Bungee into the Hook and drill the Hook into a
wall/post using one (1) screw (Fig M).
To prevent fabric stretching/damage, hooks should be installed
directly underneath the Bottom Tube Plugs and so there is equal
tension on each bungee.
Important: your shade should be rolled up during windy condi-
tions. The Bungee System is only effective in light wind.
Install Bungee System
Fig L Fig M
CEILING INSTALLATION
WALL INSTALLATION

To clean your shade, simply rinse with water and soap and scrub with a soft brush. Note: using bleach or an abrasive cleaner
will void your warranty. Roll the shade down to air dry. Your shade should be rolled up during high wind conditions.
303.652.6164 (phone)
Switching Cord to the Left Side of the Shade
If you want to reverse the roll of your fabric, simply roll the shade down completely. After the fabric is completely lowered,
continue rolling the shade.....it will roll itself back up in the opposite direction.
Maintenance
Reversing the roll direction of your shade
Don’t forget to send us your warranty/registration card.
1. Place your shade on the oor, with the front of the Valance towards you.
2. Remove both Valance Covers (RVC09 and LVC09). When removing the Valance Covers, use a blunt object to help remove
the covers. After you have removed the Valance Covers, switch their positions (move the left cover to the right side of the
shade, and move the right cover to the left side of the shade).
3. Next, remove both Brackets (Clutch and Plug) by loosening the screws and set the Brackets on the ground. It is not necessary
to completely remove the screws; you only need to loosen the screws. Do NOT reverse their positions.
4. Remove the Valance (leaving the shade on the ground) and reverse (turnover) the Valance so the front of the Valance is now
facing away from you. You do not need to reverse the shade. You reversed the Valance Covers earlier, so they are now on the
correct side of the Valance.
5. Replace both Brackets and both Valance Covers. IMPORTANT: when replacing the Brackets, be sure to push them in
completely before tightening the screws. The screws should align with the threaded screw holes.
www.shadeinfo.com
Additional information
An instructional video is available on our website (www.Shadeinfo.com) if you need additional help installing your shade.
M1022-E
/