Page is loading ...

Raven Scanner Plus
User Manual

Copyrights and Trademarks
Ethernet is a registered trademark of Xerox Corporation.
Microsoft, Windows, Windows XP, Windows Vista, Windows 7, Windows 8, and
Windows 10 are registered trademarks of Microsoft Corporation in the United States
and/or other countries.
Other product names used herein are for identification purposes only and may be
trademarks of their respective companies. We disclaim any and all rights to those
marks.
Warranty
Hardware Warranty
Machine: The Raven Scanner (“Machine” or “Hardware”); Duration: 1 Year (“Warranty
Period”); Warranty for Machines: Starfish Technologies, LLC dba Raven (“Manufacturer”
or “Raven”) warrants that each Machine is free from defects in materials and
workmanship and conforms to the manufacturer’s published specifications. The
warranty period for each Machine is a specified, fixed period commencing on its date of
purchase, as evidenced by your original or digital sales receipt; Extent of Warranty: In
addition to the limitations and exclusions set forth in the “Disclaimer of Warranties”
below, the warranty does not cover the repair or exchange of a Machine resulting from
misuse, accident, modification, unsuitable physical or operating environment, improper
maintenance or failure caused by a product for which the Manufacturer is not
responsible or for cosmetic defects as long as such defects do not interfere with the
functionality or performance of the Machine. The warranty is voided by removal or
alteration of Machine parts or identification labels; Items not covered by the warranty:
Owner computer operating system, application programs other than Raven software or
hardware configurations; Return Policy: Machines can be returned within 30 days with
proof of purchase (original or digital receipt) in its original packaging. After 30 days
from the original date of purchase, a Machine cannot be returned. A Machine cannot be
returned if it is damaged as a result of misuse, accident, modification, unsuitable
physical or operating environment, improper maintenance or failure caused by a product
for which the manufacturer is not responsible. The return policy is voided by removal or
alteration of machine parts or identification labels.
Disclaimer of Warranties
YOU EXPRESSLY ACKNOWLEDGE AND AGREE THAT USE OF THE RAVEN SOFTWARE
AND HARDWARE IS AT YOUR SOLE RISK AND THAT THE ENTIRE RISK AS TO
1 [email protected] | 1-800-713-9009 | raven.com/support

SATISFACTORY QUALITY, PERFORMANCE, ACCURACY AND EFFORT IS WITH YOU.
EXCEPT FOR THE LIMITED WARRANTY ON MEDIA AND HARDWARE SET FORTH
ABOVE AND TO THE MAXIMUM EXTENT PERMITTED BY APPLICABLE LAW, THE
RAVEN SOFTWARE AND HARDWARE ARE PROVIDED “AS IS”, WITH ALL FAULTS AND
WITHOUT WARRANTY OF ANY KIND, AND RAVEN AND RAVEN’S LICENSORS HEREBY
DISCLAIM ALL WARRANTIES AND CONDITIONS WITH RESPECT TO THE SOFTWARE
AND HARDWARE, EITHER EXPRESS, IMPLIED OR STATUTORY, INCLUDING, BUT NOT
LIMITED TO, THE IMPLIED WARRANTIES AND/OR CONDITIONS OF
MERCHANTABILITY, OF SATISFACTORY QUALITY, OF FITNESS FOR A PARTICULAR
PURPOSE, OF ACCURACY, OF QUIET ENJOYMENT, AND NON-INFRINGEMENT OF
THIRD PARTY RIGHTS. RAVEN DOES NOT WARRANT AGAINST INTERFERENCE WITH
YOUR ENJOYMENT OF THE RAVEN SOFTWARE AND HARDWARE, THAT THE
FUNCTIONS CONTAINED IN THE RAVEN SOFTWARE AND HARDWARE WILL MEET
YOUR REQUIREMENTS, THAT THE OPERATION OF THE RAVEN SOFTWARE AND
HARDWARE WILL BE UNINTERRUPTED OR ERROR-FREE, OR THAT DEFECTS IN THE
RAVEN SOFTWARE AND HARDWARE WILL BE CORRECTED. NO ORAL OR WRITTEN
INFORMATION OR ADVICE GIVEN BY RAVEN OR A RAVEN AUTHORIZED
REPRESENTATIVE SHALL CREATE A WARRANTY. AFTER THE END OF THE
WARRANTY PERIOD, SHOULD THE RAVEN SOFTWARE AND HARDWARE PROVE
DEFECTIVE, YOU ASSUME THE ENTIRE COST OF ALL NECESSARY SERVICING, REPAIR
OR CORRECTION. SOME JURISDICTIONS DO NOT ALLOW THE EXCLUSION OF IMPLIED
WARRANTIES OR LIMITATIONS ON APPLICABLE STATUTORY RIGHTS OF A
CONSUMER, SO THE ABOVE EXCLUSION AND LIMITATIONS MAY NOT APPLY TO YOU.
RAVEN’S LIMITED WARRANTY DOES NOT APPLY TO A RAVEN PRODUCT THAT HAS
BEEN SUBJECTED TO PHYSICAL DAMAGE AFTER PURCHASE, CAUSED, FOR EXAMPLE,
BY CASUALTY, ACCIDENT, ACTS OF GOD OR TRANSPORTATION, INCLUDING (A) BY A
FAILURE TO PROPERLY PACKAGE AND SHIP THE IMAGING PRODUCT BACK TO RAVEN
FOR WARRANTY SERVICE IN ACCORDANCE WITH RAVEN’S THEN CURRENT
PACKAGING AND SHIPPING GUIDELINES, INCLUDING FAILURE TO REPLACE THE
SHIPPING RESTRAINT PRIOR TO SHIPPING, OR BY A FAILURE TO REMOVE THE
SHIPPING RESTRAINT PRIOR TO USE; (B) RESULTING FROM THE USER’S
INSTALLATION, SYSTEM INTEGRATION, PROGRAMMING, RE-INSTALLATION OF USER
OPERATING SYSTEMS OR APPLICATIONS SOFTWARE, SYSTEMS ENGINEERING,
RELOCATION, RECONSTRUCTION OF DATA, OR REMOVAL OF THE PRODUCT OR ANY
COMPONENT (INCLUDING BREAKAGE OF A CONNECTOR, COVER, GLASS, PINS, OR
SEAL); (C) FROM SERVICE, MODIFICATION OR REPAIR NOT PERFORMED BY RAVEN OR
A SERVICE PROVIDER AUTHORIZED BY RAVEN OR BY TAMPERING, USE OF
COUNTERFEIT OR OTHER NON-RAVEN COMPONENTS, ASSEMBLIES, ACCESSORIES,
OR MODULES; (D) BY MISUSE, UNREASONABLE HANDLING OR MAINTENANCE,
MISTREATMENT, OPERATOR ERROR, FAILURE TO PROVIDE PROPER SUPERVISION OR
MAINTENANCE INCLUDING USE OF CLEANING PRODUCTS OR OTHER ACCESSORIES
NOT APPROVED BY RAVEN OR USE IN CONTRAVENTION OF RECOMMENDED
PROCEDURES OR SPECIFICATIONS; (E) BY ENVIRONMENTAL CONDITIONS (SUCH AS
EXCESSIVE HEAT OR OTHER UNSUITABLE PHYSICAL OPERATING ENVIRONMENT),
2 [email protected] | 1-800-713-9009 | raven.com/support

CORROSION, STAINING, ELECTRICAL WORK EXTERNAL TO THE PRODUCT OR FAILURE
TO PROVIDE ELECTRO-STATIC DISCHARGE (ESD) PROTECTION; (F) BY FAILURE TO
INSTALL FIRMWARE UPDATES OR RELEASES AVAILABLE FOR THE PRODUCT AND (G)
BY SUCH OTHER SUPPLEMENTAL EXCLUSIONS PUBLISHED FROM TIME TO TIME
ONLINE AT HTTPS://WWW.RAVEN.COM/WARRANTY.
PURCHASERS OF PRODUCTS FROM FOREIGN DISTRIBUTION CHANNELS MUST SEEK
WARRANTY COVERAGE, IF ANY, THROUGH THE ORIGINAL SOURCE OF PURCHASE.
RAVEN PROVIDES NO LIMITED WARRANTY FOR PRODUCTS THAT ARE PURCHASED
AS PART OF A THIRD PARTY MANUFACTURER’S PRODUCT, COMPUTER SYSTEM OR
OTHER ELECTRONIC DEVICE. ANY WARRANTY FOR THESE PRODUCTS IS PROVIDED
BY THE OEM (ORIGINAL EQUIPMENT MANUFACTURER) AS PART OF THAT
MANUFACTURER’S PRODUCT OR SYSTEM. THE REPLACEMENT PRODUCT ASSUMES
THE REMAINDER OF THE LIMITED WARRANTY PERIOD APPLICABLE TO THE
DEFECTIVE PRODUCT OR THIRTY (30) DAYS, WHICHEVER IS LONGER.
If any provision of this Limited Warranty is legally invalid, the warranty shall endure
except for the invalid provision. This Limited Warranty constitutes the entire agreement
between the parties with respect to the use of the Machine.
IN NO EVENT WILL MANUFACTURER BE LIABLE FOR ANY LOST REVENUE, PROFIT,
DATA OR FOR SPECIAL, CONSEQUENTIAL, INDIRECT, INCIDENTAL OR PUNITIVE
DAMAGES HOWEVER CAUSED AND REGARDLESS OF THE THEORY OF LIABILITY
ARISING OUT OF THE USE OR INABILITY TO USE THE MACHINES EVEN IF
MANUFACTURER HAS BEEN ADVISED OF THE POSSIBILITY OF SUCH DAMAGES. IN NO
EVENT WILL MANUFACTURER’S LIABILITY, WHETHER IN CONTRACT, TORT OR
OTHERWISE, EXCEED THE PRICE PAID BY CUSTOMER.
The laws of your country or state may require a warranty term longer than one (1) year, in which case the
Manufacturer will provide the minimum warranty term required by applicable law.
HOW TO OBTAIN LIMITED WARRANTY SERVICE
Raven Scanners are supplied with information on unpacking, setup, installation and
operation. Careful reading of the materials will answer most of the questions the end
user might have regarding proper installation, operation and maintenance of the
product. However, should additional technical support be required, you may visit our
website at: https://www.raven.com/faq or contact: 1-800-713-9009
In order to properly service you, please be prepared to describe your issue and provide
the Raven account email address, scanner model, serial number and proof of purchase.
For more Raven Scanner information, visit our website at: https://www.raven.com/
3 [email protected] | 1-800-713-9009 | raven.com/support

Safety Information
When using this machine, the following safety precautions should always be followed.
Safety During Operation
In this manual, the following important symbols are used:
● WARNING:
Indicates potentially hazardous situations, which if instructions are not followed, could
result in death or serious injury.
● CAUTION:
Indicates a potentially hazardous situation which, if instructions are not followed, may
result in minor or moderate injury or damage to property.
Important:
Indicates operational requirements and restrictions. Please read and follow these
instructions to ensure a proper operation and to avoid damage to the hardware.
Note:
Indicates further explanation or clarification. Reading this is highly recommended.
● WARNING:
To avoid hazardous electric shock or fire, do not remove any covers or screws other
than
those specified in this manual.
● CAUTION:
✔ Only use the AC adapter provided with the scanner. Use of other AC adapters may
lead to malfunction.
✔ To reduce the risk of fire, use only no.26AWG or larger telecommunication line cord.
✔ Disconnect the power plug by pulling the plug, not the cable.
✔ Do not touch the metal fingers of the ADF pad module. The edges are sharp and
touching them may result in injury.
✔ Keep the space around the AC adapter clear in case you need to quickly unplug the
AC adapter during emergencies.
✔ Damaged wires could cause fire or electrical shock. Keep the power cord straight
and without being twisted, bended, or scraped.
✔ Do not attempt to disassemble the scanner. There is danger of an electrical shock
and opening your scanner will void your warranty.
✔ Be sure not to bump or knock the scanner glass as it is fragile and could break.
✔ Do not subject the scanner to excessive vibration. It may damage the internal
components.
4 [email protected] | 1-800-713-9009 | raven.com/support

Precautions
● Do not install the hardware near heating or air conditioning units.
● Do not install the hardware in a humid or dusty place.
● Place the hardware securely on an even, flat surface. Tilted or uneven surfaces
may cause mechanical or paper-feeding problems.
● Retain the box and packing materials for shipping purposes.
5 [email protected] | 1-800-713-9009 | raven.com/support

Federal Communications Commission (FCC) compliance information
statement
Part 15
This equipment has been tested and found to comply with the limits for a Class B digital
device, pursuant to part 15 of the FCC rules. These limits are designed to provide
reasonable protection against harmful interference in a residential installation.
This equipment generates, uses and can radiate radio frequency energy and, if not
installed and used in accordance with the instructions, may cause harmful interference
to radio communications. However, there is no guarantee that interference will not
occur in a particular television reception (which can be determined by turning the
equipment off and on). The user is encouraged to try to correct the interference by one
or more of the following measures:
● Reorient or relocate the receiving antenna.
● Increase the separation between the hardware and receiver.
● Connect the hardware into an outlet on a circuit different from that to which the
receiver is connected.
● Shielded interconnect cables and shielded power cord which are supplied with
this equipment must be employed with this equipment to ensure compliance
with the pertinent RF emission limits governing this device.
● Consult the dealer or an experienced radio/TV technician for help.
This device complies with Part 15 of the FCC Rules. Operation is subject to the
following two conditions: (1) this device may not cause harmful interference, and (2)
this device must accept any interference received, including interference that may
cause undesired operation.
FCC Caution:
Any changes or modifications not expressly approved by the party responsible for
compliance could void the user’s authority to operate this hardware.
FCC Radiation Exposure Statement:
This hardware complies with FCC radiation exposure limits set forth for an uncontrolled
environment. This hardware should be installed and operated with minimum distance
20cm between the radiator & your body. To maintain compliance with FCC RF exposure
compliance requirements, please avoid direct contact to the transmitting antenna
during
transmitting.
6 [email protected] | 1-800-713-9009 | raven.com/support

Product Safety Guide
Please clearly read all these instructions and follow all instructions and warnings before
installing and using the device.
The following indications are used in this document to obviate any chance of accident
or damage to you and/or the device.
● WARNING
Indicates potentially hazardous situations, which if instructions are
not followed, could result in death or serious injury.
● CAUTION
Indicates a potentially hazardous situation which, if instructions are
not followed, may result in minor or moderate injury or damage to
property.
● WARNING
● Use only the AC power adapter that came with your device. Using any other AC
power adapter could cause fire, electrical shock, or injury.
● Use only the AC power cord and USB cable that came with your device and avoid
abrasions, cuts, fraying, crimping, and kinking. Using any other AC power cord
and USB cable could cause fire, electrical shock, or injury.
● Do not place objects on top of the AC power cord, and do not allow the AC power
adapter or the AC power cord to be stepped on or run over.
● Place the device and its AC power adapter near an electrical outlet where the AC
power adapter can easily be unplugged.
● If you use an extension cord with the device, make sure that the total ampere
rating of the devices plugged into the extension cord does not exceed the cord's
ampere rating.
● Place the device close enough to the computer so that the interface cable can
easily reach between the device and the computer.
● Do not place or store the device or its AC power adapter:
o Outdoors
o Near excessive dirt or dust, water, or heat sources
o In locations subject to shocks, vibrations, high temperature or humidity,
direct sunlight, strong light sources, or rapid changes in temperature or
humidity
● Do not use the device with wet hands.
● Never disassemble, modify, or attempt to repair the AC power adapter, device, or
device option by yourself, except as specifically explained in the device's
documentation. This could cause fire, electrical shock, or injury.
● Do not insert objects into any opening, as they may touch dangerous voltage
points or short-out components. Beware of electrical shock hazards.
● Unplug the device and the AC power adapter, and refer servicing to qualified
service personnel under the following conditions:
o The AC power adapter or plug is damaged.
7 [email protected] | 1-800-713-9009 | raven.com/support

o Liquid has entered the device or the AC power adapter.
o Object has entered the device or the AC power adapter.
o The device or the AC power adapter has been dropped, or the case has
been damaged.
o The device or the AC power adapter does not operate normally (i.e.
appearance of smoke, strange smell, odd noise, etc.), or exhibits a distinct
change in performance
● Unplug the device and the AC power adapter before cleaning.
● CAUTION
● Do not locate the device on rackety or aslope tables. Do not locate the device on
unstable surface. The device may fall down and this may result in injury.
● Do not place heavy objects on the unit. It may cause unbalance and the device
may fall down. This may result in injury.
● Store the AC Power cord/USB cable bundled out of the reach of children to avoid
the risk of injury.
● Keep plastic bags bundled out of the reach of children to avoid the danger of
suffocation.
● If you are not going to use the device for a long period, unplug the AC power
adapter from the electrical outlet.
Disposal of Waste Equipment by Users in Private Union
This symbol on the product or on its packaging indicates that the product cannot be
disposed of with your other household waste. Instead it should be sent to appropriate
facilities for recovery and recycling in an effort to protect human health and the
environment. For more information about where you can drop off your waste equipment
for recycling, please contact your local city office, your household waste disposal
service or the shop where you purchased the product.
8 [email protected] | 1-800-713-9009 | raven.com/support

Getting Started
Introduction
Thank you for purchasing the Raven Scanner Plus. With the internet-connected Raven
Scanner, you can instantly scan single-sided or double-sided document(s) and deliver
the electronic images to various destinations including e-mail addresses, fax, and cloud
services such as Raven Cloud, Dropbox, Google Drive or Evernote. In addition, the
product also allows you to save the scanned image to an inserted USB flash drive.
Package Items
Raven Scanner Plus Automatic Document Feeder Paper
Tray
Power Cord Pad Module Cleaning Cloth Quick Guide
Note:
1. Only use the AC adapter included in the machine. Using other AC adapters may
damage the machine and void the warranty.
2. Please unpack the packing carefully, and check the contents against the
checklist. If any items are missing or damaged, please contact us immediately by
9 [email protected] | 1-800-713-9009 | raven.com/support

Front View
#
Part Name
Function
1
Stacker
Keeps the paper in place. Extend it in case of longer
paper.
2
Panel Unit
ADF cover with the touch panel.
3
Touch Panel
Use this touch panel to operate the scanner.
4
Panel Unit Open Lever
Opens the panel unit. Pull it to open the panel unit when
you need to clear paper jam or clean the scanner.
5
Paper Width Slider
Adjusts the paper width slider for the paper size you are
using.
6
Paper Chute
Helps keep the paper in place. Install the paper chute
before using the scanner.
7
Paper Chute
Extension
Extends to hold longer paper.
8
ADF (Automatic
Document Feeder)
Automatically feeds a stack of documents for scanning.
9
Screen Saver Button
Press to enter the panel screen saver mode. Press again
to wake up the touch panel from power saving.
10
LED Indicator
Indicates the scanner status.
11
LED Indicator
Indicates the scanner status.
12
USB Port
Connect a USB flash drive or other USB storage device.

Rear View
#
Part Name
Function
13
Power Switch
Use this to turn the scanner ON or OFF.
14
Power Receptor
Connects the scanner to a standard AC power
outlet by the included AC adapter.
15
Ethernet Port
Connects the scanner to a port on the
Ethernet hub by the Ethernet cable.

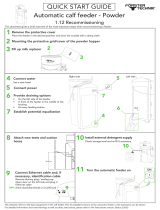
Setting Up Your Scanner
Install the Scanner
1.1 Open the panel unit by pulling the 1.2 Install the paper chute by aligning
lever, and get the paper chute ready. and inserting the tabs of the paper
chute into their slots on the scanner.
1.3 Close the panel unit by pushing
it back down until it snaps back into
place.
12 [email protected] | 1-800-713-9009 | raven.com/support

Connect The Scanner
2.1 Connect one end of the power cable to the power receptacle of the scanner.
Connect the other end to an appropriate power outlet.
● ATTENTION: Please make sure the scanner is turned OFF before you plug or
unplug the scanner power adapter.
2.2 (Optional) To use a wired internet connection, connect one end of your Ethernet LAN
cable to an available port of your Ethernet Hub (router/modem). Connect the other end
to the port marked at the back of the product.
2.3 Switch on the scanner power from the rear of the scanner.
13 [email protected] | 1-800-713-9009 | raven.com/support

Power on and get connected via ethernet cable or your preferred wireless
network.
3.1 Connect to available wireless network 3.2 Or connect to other hidden network.
Sign in to your Raven account. Sign up if you don’t already have an account.
4.1 Sign in to your Raven account or sign 4.2 Welcome screen shows scan
up for free. options and displays quotes for fun.
Scan preview shows pages scanned. You can change upload destination
options.
5.1 On scan preview screen, you can 5.2 You can edit individual pages by
combine/separate files, rearrange pages, clicking on preview thumbnails.
or change file destination.
14 [email protected] | 1-800-713-9009 | raven.com/support

Updating Your Scanner Software
To take advantage of the latest features and enhancements of your Raven Scanner,
periodic updates are required. When connected to the internet, your Raven Scanner will
automatically detect when new updates are available and prompt for installation. Simply
follow the steps below to install the latest update.
1. When prompted that a new update is available, choose “Update”
2. After the update has finished downloading, choose “Install”, then “OK”. If
prompted, choose “Install Manually”
Turning Off Your Scanner
To put your scanner to sleep, simply press the “Zz” button on the front of the scanner.
To power your scanner off entirely, flip the power switch to the off position on the rear
of the scanner.
Adjusting Scanner Settings
Item
Description
Sides
One-sided (Face Up): Choose to scan a single side of your
document with the first page facing up in the feeder.
One-sided (Face Down): Choose to scan a single side of your
document with the first page facing down against the feeder.
Two-sided (Face Down): If you have a double-sided
document, choose to scan both sides of your document with
the first page facing down against the feeder.
Auto-detect: Automatically scan both sides and remove any
blank pages without content.
Color
Color: The original is scanned in full color. This mode is best
for full color originals such as pictures.
Black & White: Colors in the original are scanned as black or
white. This mode is best for text-only originals.
Grayscale: The colors in the original are scanned in black and
white as shades of gray (grayscale). Most common setting.
Scan Type
Separated: Choose to scan each page as its own digital
document.
Combined: Choose to scan all document pages as a single
digital document.
Quality
Excellent: Choose to scan at 600dpi (much slower scanning)
Great: Choose to scan at 400 dpi (slower scanning)
Better: Choose to scan at 300 dpi (slower scanning)
Good: Choose to scan at 200dpi (good for most documents)
15 [email protected] | 1-800-713-9009 | raven.com/support

Destination
Choose one or more destinations where your scanned
documents should be sent.
Raven Cloud: Scan to your Raven Cloud document
management account for searchable filing & organization.
Google Drive: Scan to your Google Drive account (login
required).
SharePoint: Scan to your SharePoint account (login required)
OneDrive: Scan to your OneDrive account (login required)
Dropbox: Scan to your Dropbox account (login required).
Evernote: Scan to your Evernote account (login required).
Box: Scan to your Box account (login required).
Email: Scan to one or more email addresses.
Fax: Scan to a fax number.
USB Drive: Scan to a USB flash drive attached to the side of
the scanner.
Network: Scan to a custom SMB shared drive or folder (setup
required)
Page Preview
Page Preview: Display previews of scanned pages for review
and editing prior to sending to destinations.
No Page Preview: Skip the previews and send directly to
destinations after scanning.
Blank Page Removal
On: Scanned pages that do not contain content (blank) will
be automatically removed from the final document.
Off: Scanned pages that do not contain content (blank) will
be retained as pages in your final document.
Status Display
Always: The scan send status screen will always display until
“OK” is pressed.
Until Success: The scan send status screen will display until
all send statuses are successful, then automatically close.
Scan Brightness
Adjust the brightness of all scans. Note that adjusting the
brightness too much could result in white or black pages.
Scan Contrast
Adjust the contrast of all scans. Note that adjusting the
contrast too much could result in poor image quality.
File Compression
High: high compression, smallest file size
Medium: medium compression, medium file size
Low: low compression, large file size
Operation
Document Loading Tips
Make sure the size and ream weight of your documents are acceptable by the scanner.
Refer to “Specifications” of this guide for more information.
16 [email protected] | 1-800-713-9009 | raven.com/support

To scan multiple documents in a batch from the ADF can increase your work efficiency
and make large scanning tasks easier. The ADF of this scanner accepts a variety of
paper and stationery you may use in your daily work or personal life, such as:
● Normal paper whose size and ream weight meet the requirements stated in
“Appendix A: Specifications” of this guide.
● Notched paper.
● Coated paper (e.g., brochure)
Attention: To prevent paper feeding errors and damages to the ADF unit, strictly follow
the instructions below:
● Remove all small objects e.g., paper clips, pins, staples or any other fasteners
attached, before loading the paper into the ADF.
● Make sure the paper is completely flat with no creased or curled corners.
● Avoid scanning documents with pencil lead and newspaper clippings as they will
make the ADF exposure glass and the inner ADF dirty. If you have to scan such
paper, clean the scanner frequently (refer to “Chapter III. Care and Maintenance”
of this guide for more information).
● DO NOT use the ADF to scan photographic sheets or particularly valuable
document originals; wrinkles or other damages can happen in case of paper
feeding errors.
● DO NOT place paper with wet ink or correction fluid into the ADF. Wait a few
minutes for it to dry.
The following documents types are not designed for the automatic document feeder:
● Paper lighter than 40 g/m2 (12 lb.) or heavier than 157 g/m2 (40 lb.)
● Paper with clips or staples attached
● Paper with inconsistent thickness, e.g., envelops
● Paper with wrinkles, curls, folds, or tears
● Paper with an odd (non-rectangular) shape
● Tracing paper
● Carbon paper, pressure sensitive paper, carbonless paper
● Items other than paper, e.g., cloth, metal foil.
Loading Document(s) in the ADF
Document Feeding
1. Load the stack of documents face down with the top of the
pages pointing into the feeder.
17 [email protected] | 1-800-713-9009 | raven.com/support

2. Verify that the paper guides are aligned with the edges of the stack by sliding the
paper feed guides in the automatic feeder tray.
Feeding Tips
To avoid occasional multi-feeds or paper jams, please fan your
documents and align the top edges before feeding them into the
scanner.
1. Hold both ends of the documents and fan them a few
times.
2. Rotate the documents by 90 degrees and fan them in the
same manner.
3. Align the edges of the documents in a step-like pattern
(see picture).
If you need to scan longer documents, pull out the paper chute
extension and stacker to provide further support for the
documents.
Attention
● DO NOT load more than 50 sheets of paper (70 g/m2, 18 lb.) to the ADF.
● Paper scanned from the ADF must be a minimum of 5.08 x 5.08 cm (2” x 2”, W x
L).
● Make sure there are no gaps between the document stack and the paper-width
slider; otherwise, the scanned images can be skewed.
● Although the documents should be loaded firmly in place ensuring optimum
scanning accuracy, they should never be wedged in so tightly that the process of
feeding them through the scanner is strained.
● Do not load additional paper into the ADF while the unit is feeding and scanning.
18 [email protected] | 1-800-713-9009 | raven.com/support

Scanning a Stack of Document with Various Sizes and Weights
When scanning a batch of documents with different sizes and weights, be sure to follow
the following guidelines to avoid a skewed image or a paper jam:
1. Align the documents TOP EDGE first in the sequence of
paper size from large to small.
2. If two pages are of the same size yet with different
weight, arrange these pages in the sequence of paper
weight from heavyweight to lightweight.
3. Align the edges of the documents by tapping the
bottom of the stack against the table top.
4. Center these pages in the document feeder and make
sure that the edges of page of the largest size slightly
touch the Paper Guide.
19 [email protected] | 1-800-713-9009 | raven.com/support
/