Panasonic KV-S1045C-U User manual

Category
Scanner Transparancy Adapters
Type
User manual

This manual is also suitable for

Panasonic KV-S1045C-U, a high-speed color scanner, offers efficient document management solutions with remarkable scanning speeds and advanced image enhancement features. Ideal for small businesses and home offices, it seamlessly integrates with Windows operating systems.

Panasonic KV-S1045C-U, a high-speed color scanner, offers efficient document management solutions with remarkable scanning speeds and advanced image enhancement features. Ideal for small businesses and home offices, it seamlessly integrates with Windows operating systems.

These instructions contain information on operating the scanner. Before reading these instructions, please read
the installation manual enclosed with this unit.
Please carefully read these instructions and the enclosed installation manual. Keep all documentation in a safe
place for future reference.
Model No.
KV-S1045C
Operating Manual
High Speed Color Scanner
Introduction
Thank you for purchasing a Panasonic High Speed Color Scanner.
About the documentation
The scanner documentation consists of 2 manuals: the Installation Manual and the Operating Manual. In
addition, 3 software reference manuals are included.
Installation Manual
(printed documentation)
The Installation Manual explains the installation method and
procedures.
Operating Manual
(this manual)
The Operating Manual explains the part names, operations, features
and maintenance of the unit.
Software Reference Manuals
(electronic documentation)
PIE Reference Manual
Explains the settings of the PIE (Panasonic Image Enhancement
Technology) features using the ISIS and TWAIN drivers.
RTIV Reference Manual
Explains the features and settings for RTIV (Reliable Throughput
Imaging Viewer). (You can view this manual by clicking the help
button on RTIV.)
User Utility Reference Manual
Explains how to use the User Utility, which is used for scanner
maintenance. (You can view this manual by clicking the help
button on User Utility.)
Abbreviations
Windows
®
refers to the Microsoft
®
Windows
®
operating system (hereafter Windows).
Windows
®
2000 refers to the Microsoft
®
Windows
®
2000 operating system (hereafter Windows 2000).
Windows
®
XP refers to the Microsoft
®
Windows
®
XP operating system (hereafter Windows XP).
Windows Vista
®
refers to the Microsoft
®
Windows Vista
®
operating system (hereafter Windows Vista).
2 Operating Manual
Introduction
Trademarks
Microsoft, Windows, and Windows Vista are either registered trademarks or trademarks of Microsoft
Corporation in the United States and/or other countries.
ISIS and QuickScan Pro are registered trademarks or trademarks of EMC Corporation.
IBM and AT are trademarks of International Business Machines Corporation in the United States, other
countries, or both.
Pentium is a trademark of Intel Corporation in the U.S. and other countries.
Adobe and Reader are either registered trademarks or trademarks of Adobe Systems Incorporated in the
United States and/or other countries.
All other trademarks identified herein are the property of their respective owners.
International ENERGY STAR Program
As an ENERGY STAR
®
Partner, Panasonic has determined that this product meets
the ENERGY STAR guidelines for energy efficiency.
System Requirements
Computer
IBM
®
PC/AT
®
or compatible machine with a CD-ROM drive
CPU
Pentium
®
III, 1 GHz or higher
Operating System
Windows 2000 / Windows XP / Windows Vista
Interface
USB 2.0
Memory
256 MB or higher
Hard Disk
5 GB or more free space is required.
Note
The above system requirements may not satisfy the requirements of all operating systems.
The scanning speed differs depending on the host computer’s operating environment or the application
used.
Due to the slower speed of USB 1.1, it is recommended to use a USB 2.0 interface.
If you connect the scanner to a USB hub, it is not guaranteed to work.
Operating Manual 3
Introduction
Federal Communications Commission Requirements (For United States
only)
This equipment has been tested and found to comply with the limits for a Class B digital device, pursuant to
Part 15 of the FCC Rules. These limits are designed to provide reasonable protection against harmful
interference in a residential installation. This equipment generates, uses, and can radiate radio frequency
energy and, if not installed and used in accordance with the instructions, may cause harmful interference to
radio communications.
However, there is no guarantee that interference will not occur in a particular installation. If this equipment
does cause harmful interference to radio or television reception, which can be determined by turning the
equipment off and on, the user is encouraged to try to correct the interference by one or more of the following
measures:
Reorient or relocate the receiving antenna.
Increase the separation between the equipment and receiver.
Connect the equipment into an outlet on a circuit different from that to which the receiver is connected.
Consult the dealer or an experienced radio/TV technician for help.
The user may find the booklet "Something About Interference" available from FCC local regional offices
helpful.
FCC Warning: To assure continued FCC emission limit compliance, the user must use the recommended
shielded interfacing cable when connecting to a host computer. Also, any unauthorized changes or
modifications to this equipment would void the user's authority to operate this device.
FCC Declaration of Conformity
Trade Name: Panasonic
Model Number: KV-S1045C
Responsible Party: Panasonic Corporation of North America
One Panasonic Way
Secaucus, NJ 07094 U.S.A.
Telephone No.: 1-800-726-2797
This device complies with Part 15 of the FCC Rules.
Operation is subject to the following two conditions:
(1) This device may not cause harmful interference, and
(2) this device must accept any interference received, including interference that may cause undesired
operation.
For FRG Users (For Germany Only)
Machine noise information regulation - 3.GPSGV, the maximum sound pressure level is 70 dB(A) or less,
in conformity with EN ISO 7779.
This device is not intended for use in the direct field of view at visual display workplaces. To avoid
incommoding reflexions at visual display workplaces this device must not be placed in the direct field of
view.
4 Operating Manual
Introduction
Table of Contents
Before You Start .......................................................................................6
For Your Safety .................................................................................................................6
Safety Information (For United Kingdom only) ..............................................................8
Precautions ........................................................................................................................9
Location of Controls ..............................................................................11
Main Unit ..........................................................................................................................11
Operation ................................................................................................13
Turning on the Scanner Power ......................................................................................13
Starting the Scanner Applications Automatically ........................................................14
Setting the event ............................................................................................................14
Preparing Documents .....................................................................................................16
Acceptable Documents ..................................................................................................16
Acceptable cards ............................................................................................................16
Unacceptable Documents ..............................................................................................17
Scanning Documents .....................................................................................................19
Care and Maintenance ...........................................................................22
Clearing Paper Jams .......................................................................................................22
Removing paper jams from the feeding section .............................................................22
Mixed Batch Card Guide .................................................................................................25
Installing the mixed batch card guide .............................................................................25
Using the mixed batch card guide ..................................................................................25
Using Control Sheets ......................................................................................................26
About Printing Control Sheets ........................................................................................27
Cleaning the Scanner .....................................................................................................28
Outside of the Scanner ...................................................................................................28
Inside of the Scanner .....................................................................................................29
Cleaning the Rollers .......................................................................................................30
Cleaning the Scanning glass, Reference area, and Double feed detectors ...................34
Replacement Parts .................................................................................36
Replacement Parts ..........................................................................................................36
Replacing Parts ...............................................................................................................37
Replacing the Rollers .....................................................................................................37
Appendix .................................................................................................42
Troubleshooting ..............................................................................................................42
Repacking Instructions ..................................................................................................45
Specifications ..................................................................................................................47
Index..............................................................................................................49
Operating Manual 5
Table of Contents
For Your Safety
To prevent severe injury and loss of life, read this
section carefully before using the unit to ensure proper
and safe operation of your unit.
This section explains the graphic symbols used
in this manual.
WARNING
Denotes a potential
hazard that could
result in serious
injury or death.
CAUTION
Denotes hazards
that could result in
minor injury or
damage to the unit.
This symbol is used to alert
operators to a specific operating
procedure that must be
performed carefully.
These symbols are used to alert
operators to a specific operating
procedure that must not be
performed.
These symbols are used to alert
operators to a specific operating
procedure that must be
emphasized in order to operate
the unit safely.
For Users
WARNING
Power
The power source voltage of this unit is
listed on the nameplate.
Only plug the unit into an AC outlet with
the proper voltage.
If you use a cord with an unspecified
current rating, the unit or plug may emit
smoke or become hot to the touch.
When you operate this product, the power
outlet should be near the product and
easily accessible.
Connect the AC adaptor firmly to the
power cord, and plug the power cord
firmly into an AC outlet. Otherwise, it can
cause fire or electric shock.
Do not pull, bend, rest objects on, or chafe
the power cord, plug, and AC adaptor.
Damage to the power cord or plug can
cause fire or electric shock.
Do not attempt to repair the power cord,
plug, or AC adaptor. If the power cord or
plug is damaged or frayed, contact an
authorized service representative for a
replacement.
Ensure that the plug connection is free of
dust. In a damp environment, a
contaminated connector can draw a
significant amount of current that can
generate heat, and eventually cause fire
if left unattended over an extended period
of time.
Never touch the plug or AC adaptor with
wet hands.
Danger of electric shock exists.
6 Operating Manual
Before You Start
Before You Start
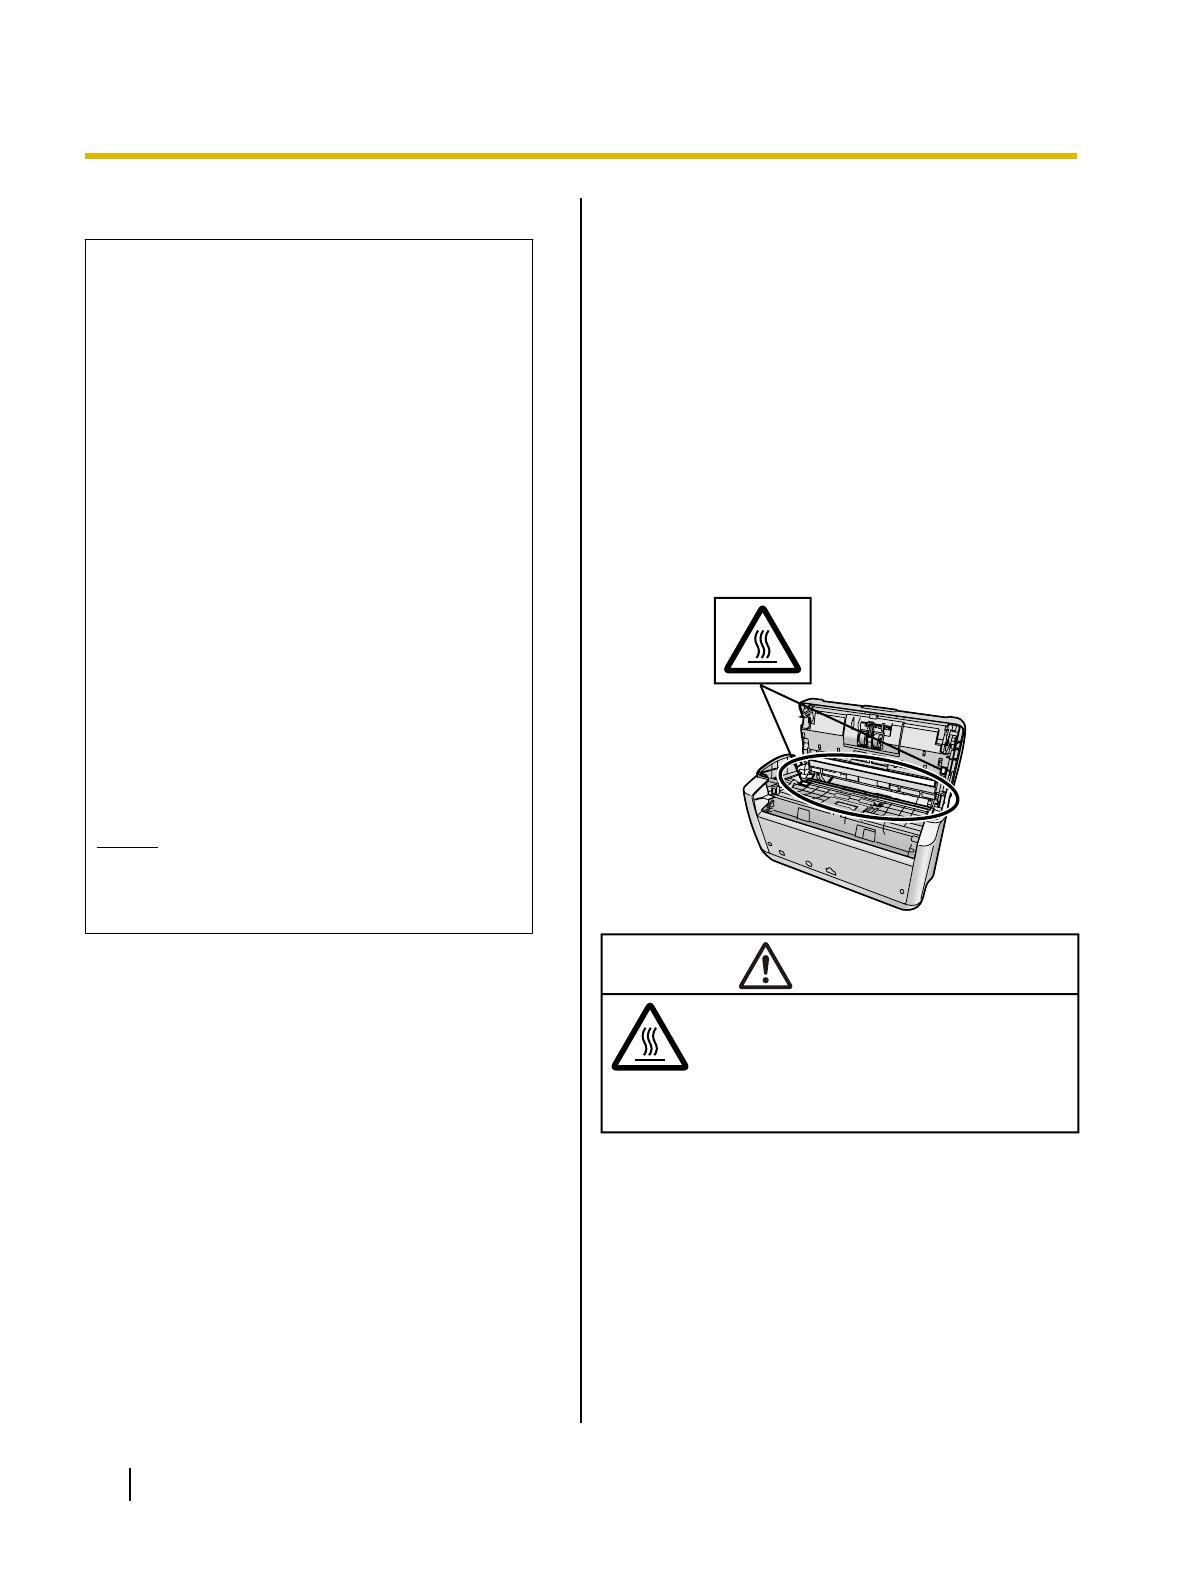
Stop operation immediately if the unit
emits smoke, excessive heat, abnormal
smell, or unusual noise. These conditions
can cause fire or electric shock.
Immediately turn the unit off, and unplug
the power cord, and contact your dealer
for service.
When disconnecting the unit, grasp the
plug instead of the cord. Pulling on a cord
forcibly can damage it, and cause fire or
electric shock.
Operating Safeguards
If metal fragments or water gets into the
unit, turn the unit off, and unplug the unit
immediately. Contact your dealer for
service. Operating the contaminated unit
can cause fire or electric shock.
Do not open covers, and do not attempt to
repair the unit yourself. Contact your
dealer for service.
Do not alter the unit or modify any parts.
Alteration or modification can cause fire or
electric shock.
During thunderstorms, do not touch the
unit, plug and AC adaptor. It may cause
an electric shock.
Roller Cleaning Paper
Do not drink or inhale the roller cleaning
paper fluid including isopropyl alcohol.
The roller cleaning paper may be harmful
to sensitive skin. Please use protective
gloves.
Do not use the roller cleaning paper near
a heater or open flame.
CAUTION
Power
The unit should be used only with the
power cord and AC adaptor enclosed with
the unit.
When the unit is not used over an
extended period of time, switch it off, and
unplug it. If an unused unit is left
connected to a power source for a long
period, degraded insulation may cause
electric shock, current leakage, or fire.
Installation and Relocation
Do not position the unit in a location where
it is unstable.
To prevent fire or shock hazard, do not
expose this unit to rain or any type of
moisture.
Do not place the unit in a hot humid or
dusty environment.
Prolonged exposure to these adverse
conditions may cause fire or electric
shock.
When moving the unit, be sure to unplug
the power cord from the AC outlet. If the
unit is moved with the power cord
attached, it can cause damage to the cord
which could result in fire or electric shock.
Do not use the exit tray hanging out of a
table.
When carrying the unit, do not use the
trays as handles.
Operating Manual 7
Before You Start
Operating Safeguards
If the unit falls down or gets damaged, turn
the unit off, and unplug the power cord.
Otherwise, it may cause fire or electric
shock.
Do not place any liquids or heavy items on
the unit.
Accidental spillage of liquid into the unit
may cause severe damage. If this occurs,
turn the unit off, unplug the power cord,
and contact your dealer for service.
Do not touch the scanning glass or their
surroundings immediately after
continuous scanning.
This area is very hot and can cause burns.
Safety Information (For
United Kingdom only)
This appliance is supplied with a moulded three pin
mains plug for your safety and convenience.
A 5 amp fuse is fitted in this plug. Should the fuse need
to be replaced, please ensure that the replacement fuse
has a rating of 5 amps and that it is approved by ASTA
or BSI to BS1362. Check for the ASTA mark
ASA
or the
BSI mark
on the body of the fuse. And you must refit
the fuse cover when the fuse is replaced. If you lose the
fuse cover, the plug must not be used.
How to replace the fuse:
Open the fuse compartment with a screwdriver and
replace the fuse and fuse cover.
8 Operating Manual
Before You Start
Precautions
Installation
Do not place the unit in direct sunlight, in a cold
draft, or near heating apparatus.
Do not place the unit near apparatus which
generate electronic or magnetic noise.
Protect the unit from static electricity.
Do not move the unit immediately from a cold place
to a warm place. It may cause dew.
CD-ROM
Do not write or stick paper on the front and/or back
of CD-ROM.
Do not touch the data side of the CD-ROM. When
handling the CD-ROM, be careful not to leave
fingerprints or otherwise damage the CD-ROM.
Do not leave the CD-ROM where it is directly
exposed to sunlight or near a heater for extended
periods.
Do not throw or bend the CD-ROM.
Roller Cleaning Paper
Keep the roller cleaning paper out of reach of small
children.
Do not store the roller cleaning paper in direct
sunlight or in a place with a temperature over
40
°C
(104 °F).
Only use the roller cleaning paper to clean the
rollers and scanning glass.
For details about the roller cleaning paper, please
refer to the Material Safety Data Sheet (MSDS).
Please ask your Panasonic sales company about
obtaining the Material Safety Data Sheet.
KEEP AWAY FROM FIRE.
Others
Make sure to remove paper clips and staples from
documents before scanning. Failing to do so can
damage the unit, document, or both.
Do not use thinner, benzine, or cleaners containing
abrasives or surfactants, for cleaning the outside of
scanner.
Plug the power cord into an outlet from which you
can easily unplug it.
Operating Manual 9
Before You Start
Illegal Duplication
It is unlawful to make duplication of certain
documents.
Duplicating certain documents may be illegal in
your country/area.
Penalties of fines and/or imprisonment may be
imposed on those found guilty. The following are
examples of items that may be illegal to duplicate
in your country/area.
Currency
Bank notes and checks
Bank and government bonds, and securities
Passports, licenses, official or private
documents, identification cards, and the like
Copyright materials, or trademarks without
the consent of the owner
Postage stamps, and other negotiable
instruments
This list is not inclusive, and no liability is
assumed for either its completeness or accuracy.
In case of doubt, contact your legal counsel.
Notice
Install your machine near a supervised area
to prevent illegal duplication from being
made.
Security Notice
The management of documents and scanned data is
the responsibility of the user. In particular, pay attention
to the following points.
Make sure you have the same number of pages for
important documents both before and after
scanning, and take care not to leave any pages in
the scanner.
Periodically back up important data.
When having your computer or hard disk serviced,
or when disposing of your computer or hard disk,
completely erase any stored image data.
Caution Labels
HOT SURFACE
DO NOT TOUCH.
The glass in the scanning area becomes very hot.
Exercise care not to touch heated areas, or you may get
burned.
CAUTION
10 Operating Manual
Before You Start
Main Unit
Front
1
2
m
l
j
9
k
3
4
6
7
5
8
Document guides
Door open button
ADF door
Exit tray
Exit extension tray
Exit stopper
Scanning lamps
Start / Stop button
If you set [Wait Key] for "Manual Feed Mode"
*1
in your application software, pushing this key starts
scanning.
During scanning, pushing this key stops scanning.
Security slot (for security cable)
LED (Red)
Shows the scanner’s status. For details, see "About LED" (page 13).
LED (Green)
Shows the scanner’s status. For details, see "About LED" (page 13).
Feed tray
Feed extension tray
*1
For details on "Manual Feed Mode", refer to the RTIV Reference Manual or PIE Reference Manual.
Operating Manual 11
L
o
c
a
t
i
o
n
o
f
C
o
n
t
r
o
l
s
Location of Controls
Rear
6
5
4
7
1
2
3
Mixed batch card guide
Power connector
Power switch
AC adaptor
Power cord
Plugs may vary in shape depending on country/area.
USB cable
USB connector
12 Operating Manual
Location of Controls
Turning on the Scanner Power
1. Press the power switch (A) of the scanner to ON.
The LED (Green) will blink for about 30 seconds, and then it will become steady.
About LED
The status of the scanner can be established by the condition of the two LED indicators shown in the table
below:
Ready
Error
Start / Stop
A
B
A LED (Green)
B LED (Red) Status
ON OFF Ready
ON Blink (Slow) Caution
Blink (Fast) OFF Warming up
*1
Blink (Slow) OFF Sleep
Blink (Slow) Blink (Slow) Caution / Sleep
OFF ON Error
*1
It will take about 30 seconds to initialize the scanner under the following conditions:
Just after turning the power on
After about 2 hours on sleep mode
Over about 5 seconds with the ADF door open
Operating Manual 13
O
p
e
r
a
t
i
o
n
Operation
Starting the Scanner Applications Automatically
The scanner application can be configured to start automatically when pressing the Start / Stop button, and/
or placing documents on the feed tray. To accomplish this, follow the steps below.
Setting the event
1. Click [Start], and then click [Control Panel].
In Windows 2000, click [Start], and then click [Setting] - [Control Panel].
2. Select your scanner in the [Scanners and Cameras], and then display the scanner property dialog box by
right clicking on the scanner icon.
In Windows Vista and Windows 2000, select your scanner in the [Scanners and Cameras Properties],
and then display the scanner property dialog box by clicking [Properties] button.
3. Click the "Events" tab.
4. Select an event in the "Scanner events" list. The selected event activates a scanner application.
The following events can be selected.
"Feeder Loaded" An event occurs when placing documents on the feed tray.
"Start Button"
*1
An event occurs when pressing the Start / Stop button of the scanner.
*1
If the scanner goes into sleep mode, you must press the Start / Stop button twice.
14 Operating Manual
Operation
5. Select the check box of the desired scanner applications corresponding to the selected event in the "Send
to this application" list.
To disable the automatic activation of the scanner applications, set the "Disable device events" check
box to on.
6. Click [OK].
Note
When multiple applications are selected in the "Send to this application" list, the "Choose
Application" dialog box will display, prompting you to select an application in the "Registered
Applications" list. After an application has been selected, it starts. If only one application is selected,
that application will be launched automatically.
In Windows 2000, the "Event on device: KV-S1045C" dialog box will display instead of the "Choose
Application" dialog box.
7. Restart your computer.
Operating Manual 15
Operation
Preparing Documents
Acceptable Documents
The acceptable documents for this scanner are as follows.
Document size:
48–216 mm
(1.9–8.5 in.)
70–2540 mm
(2.8–100 in.)
Paper thickness: 40–209 g/m² (11–55 lb.)
The height of all the documents on the tray should be less
than 7.5 mm (0.3 in.).
This compares to 75 sheets (80 g/m² or 20 lb.) of new
paper.
With the exception of ISO format cards, the minimum
guaranteed feeding length is 70 mm (2.8 in.).
Single paper feeding is recommended for papers
exceeding the legal size length.
Recommended paper: Plain paper
Acceptable cards
ISO format card:
Size: 85.6 x 54 mm (3.4 x 2.1 in.)
Thickness: 0.76 mm (0.03 in.)
Embossed card is also acceptable.
A maximum of 3 cards can be loaded on the feed tray. The height of the total cards (the total thickness including
the embossing on each card) should be less than 5 mm (0.2 in.). Additionally, the embossing on each card
must not get entangled with others.
Use the landscape orientation when scanning an embossed card. If the scanning fails, place the card upside
down, and then try again.
Use the mixed batch card guide (page 25) when scanning mixed media (cards and papers) at the same time.
16 Operating Manual
Operation
Unacceptable Documents
The following types of documents may not scan properly:
Curled, wrinkled or folded documents
Documents must also meet the following conditions
Curl
Feeding direction
Less than
5 mm
(0.2 in.)
Folding
Less than
5 mm
(0.2 in.)
Feeding direction
Carbon paper
Thick or irregular documents such as envelopes
Perforated or punched paper
Non-rectangular or irregularly shaped paper, such as document with tags
Coated paper
Torn or frayed documents
Extremely smooth, shiny paper, or paper that is highly textured
Carbonless paper
Light penetrating documents such as OHP sheet and tracing paper
Do not scan the following types of paper:
Damaged or notched document/card
Documents out of specified size, thickness, and weight
Documents containing hard attachments such as metal or plastic (ex. clips or staples)
Bound or glued documents
Cloth and plastic films
Document with wet ink or cinnabar seal ink
Thermal or photosensitive paper
Photographs
OHP sheets, other plastic films, or metallic sheets
Operating Manual 17
Operation
Notes about documents for scanning
Depending on the paper type, scanning results may be poor when you scan unacceptable documents, or
even documents that should be acceptable.
If a paper jam or double feeding occurs, try scanning again after doing the following:
Clean the rollers and sensors.
Reduce the number of sheets of paper loaded on the feed tray.
Change the scanning resolution.
Notes about double feed detection
This scanner is equipped with an ultrasonic sensor to detect double feeding.
The width of documents that can be detected is A5 or larger (148 mm (5.8 in.)).
18 Operating Manual
Operation
Scanning Documents
Notice
Make sure to remove paper clips and staples from documents before scanning. Failing to do so can
damage the unit, document, or both.
Curled documents may cause a paper jam or damaging the document, therefore, set the document
flat before scanning.
When scanning important documents, confirm that the number of scanned images matches the number
of pages in the document.
Remove documents from the exit tray after they have been scanned.
1. Fan the documents.
Documents that have been stapled together or stacked together (as in a file folder) will need to be
separated.
Fan the stack of documents to separate all the edges.
Hold both ends and bend the documents as shown in the illustration.
To flatten the documents, hold firmly and pull them apart as shown in the illustration.
1
2
3
Repeat these steps as necessary.
Operating Manual 19
Operation
2. Adjust the document guides (A) slightly larger than the actual size of the documents.
3. Carefully align the documents.
The documents feed better when the leading edges are aligned slantwise as shown in the illustration.
1
2
20 Operating Manual
Operation
  • Page 1 1
  • Page 2 2
  • Page 3 3
  • Page 4 4
  • Page 5 5
  • Page 6 6
  • Page 7 7
  • Page 8 8
  • Page 9 9
  • Page 10 10
  • Page 11 11
  • Page 12 12
  • Page 13 13
  • Page 14 14
  • Page 15 15
  • Page 16 16
  • Page 17 17
  • Page 18 18
  • Page 19 19
  • Page 20 20
  • Page 21 21
  • Page 22 22
  • Page 23 23
  • Page 24 24
  • Page 25 25
  • Page 26 26
  • Page 27 27
  • Page 28 28
  • Page 29 29
  • Page 30 30
  • Page 31 31
  • Page 32 32
  • Page 33 33
  • Page 34 34
  • Page 35 35
  • Page 36 36
  • Page 37 37
  • Page 38 38
  • Page 39 39
  • Page 40 40
  • Page 41 41
  • Page 42 42
  • Page 43 43
  • Page 44 44
  • Page 45 45
  • Page 46 46
  • Page 47 47
  • Page 48 48
  • Page 49 49
  • Page 50 50
  • Page 51 51

Panasonic KV-S1045C-U User manual

Category
Scanner Transparancy Adapters
Type
User manual
This manual is also suitable for

Panasonic KV-S1045C-U, a high-speed color scanner, offers efficient document management solutions with remarkable scanning speeds and advanced image enhancement features. Ideal for small businesses and home offices, it seamlessly integrates with Windows operating systems.

Ask a question and I''ll find the answer in the document

Finding information in a document is now easier with AI