Page is loading ...

© Allen Products Company Incorporated, Signal Hill, CA 90755 USA (562) 424-1100 REV.01 04/28/09
PA-010 POLESTAR™ POLE ADAPTER
Installation Instructions
Thank you for selecting the PA-010
Polestar™. This Universal Pole Adapter is designed to
adapts various ALLEN PRODUCTS mounting solutions, to radial vertical surfaces such as
poles, columns, and other structural shapes.
Important:
Mounting and/or rigging loudspeakers requires experienced professionals.
Improperly
installed loudspeakers can result in property damage, personal injury, death
and/or liability to the installing contractor.
Caution:
Due to the wide variety of materials and mounting methods, these instructions assume
that the installing contractor will exercise good judgment in selecting the proper mounting
area and hardware.
As a guide, the installation, when completed should be capable of supporting at least
5 times the actual applied load.
Note to Installer:
When using sign banding tools and straps, refer to and follow the manufacturers specifications &
instructions for proper use of the products.
Follow these instructions for the most efficient and safest mounting results.
Vertical Installation: to install the;
MultiMount™, Socketmount™, Steerables™, U-Bracket
MM-022, MM-120, SM-075-F, SM-075-A, SAS-100-WM, 2-xxxx
Step 1. Attach mounting product to Polestar™:
Match the holes of the selected mount to the holes of the Polestar. Secure the mount (Figure 1) to the matching holes of
the Polestar using the included bolts, washers and nuts. Tighten permanently.
Step 2. Attach Polestar™ to Pole or Column:
Position Polestar into selected mounting area and then follow the banding manufacturer’s instructions. Insert the free end
of each band through the side slots. Trim excess banding if necessary but leave about 8” of excess length to be sure
there is enough material. Do not tighten permanently until the Polestar is secured into its correct position on the pole or
column (Figure 2).
Step 3. Install Speaker:
See MultiMount
™
or U-bracket instruction sheet for installation details.
Horizontal Installation: to install the;
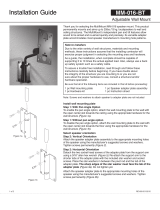
U-Bracket or MultiMount™ MM-008, MM-010, MM-016, 2-xxxx or Paging horns brackets.
Step 1. Attaching Banding to Polestar™:
See step 2 of vertical installation above. Polestar must be fully secured to the pole before applying mounting products.
Secure Polestar permanently.
Step 2a. Attaching MultiMount™ WallPlate(s):
For single MultiMount
™
installation,
install a MultiMount wall plate over the banding straps using included bolts, washers
and nuts. Tighten hardware permanently (Figure 7).
For double MultiMount
™
installation
, install
MultiMount
™
wall plates on the sides of the Polestar plate using included bolts, washers and nuts. Tighten permanently
(Figure 6).

© Allen Products Company Incorporated, Signal Hill, CA 90755 USA (562) 424-1100 REV.01 04/28/09
Figure 2 Figure 3 Figure 4 Figure 5
Figure 1
Figure 6 Figure 7
Figure 8
Figure 9
For triple MultiMount
™
installation
, install MultiMount
™
wall plates on each side of the
Polestar and in the center over the banding straps using included bolts, washers and nuts. Tighten permanently (Figure
6).
Step 2b. Attaching U-Bracket:
Install the Polestar first to the pole or column then install U-Bracket over banding strap
using included bolts, washers and nuts. Tighten permanently (Figure 8).
Step 2c. Attaching Paging horns:
Install the paging horns first to the polestar then install the Polestar/paging horn assembly
to the pole using banding straps (Figure 9).
Step 3. Attach Polestar™ to Pole or Column:
See step 2 of vertical installation above.
Step 4. Install Speaker:
See MultiMount
™
or U-bracket instruction sheet for installation details.
* See U-Bracket data sheet for compatible model
/