Page is loading ...

MM-060
REV00-0825015
1 of 3
Installation Guide
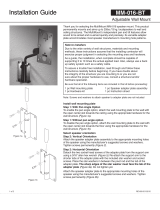
Universal Wall Mount
Before beginning the installation process, rst determine if the mount
will attach to the rear or the bottom panel of the speaker then select the
corresponding instructions below:
Rear Mounted Con guration
Assemble the Pivot U-Bracket to the set of holes closest to the bracket pivot
using the supplied ¼-20 x5” long screws.
Bottom Mounted Con guration
Assemble the Pivot U-Bracket to the set of holes farthest from the bracket
pivot using the supplied ¼-20 x5” long screws.
Step 1: Assemble Tilt Mechanism
Assemble the free end of the threaded pivot bar to the Pivot-U-bracket using
the supplied at head screws and tighten (Figure 3).
Step 2a: Install Wall Plate to Wall
Orient the wall plate with the smaller through hole under the larger hole and
place over the desired wall location. Using a level, mark the mounting holes,
then pre-drill the holes using an undersized drill bit.
Secure the Wall Plate to the wall using the appropriate mounting hardware.
DO NOT INVERT THE WALL PLATE. THE TAB MUST ALWAYS BE ON
THE TOP SIDE.
Caution - If in doubt, consult a hardware specialist in the proper selection
for mounting to the structure
(
Figure 4
)
. If wiring is coming out from the wall,
make sure that it is long enough to go out from the square hole of the wall
mount plate.
The versatile MultiMount™ MM-060 wall mounts loudspeakers weighing up to
60 lbs to walls using the standard four-hole mounting patterns located on both
the back and the bottom panels.
The MM-060 simpli es and speeds up installation while o ering a very
versatile range of mounting and aiming options.
Note to installers
Due to the wide variety of wall structures, materials and mounting
methods, these instructions assume that the installing contractor will
exercise proper judgment in selecting the mounting area and hardware.
As a guide, the installation, when complete should be capable of
supporting 5 to 10 times the actual applied load. Also, always use a back
up safety system such as a safety cable.
To assure a trouble free installation, read through and follow these
instructions carefully before beginning. If you have doubts about
the integrity of the structure you are mounting to or you are not
sure about the proper hardware to use, consult a structural and/or
hardware specialist.
Be sure that all of the following items are included in this kit before proceeding:
1 pc Wall mounting plate 1 pc Speaker adapter assembly
1 pc Hardware kit 1 pc Instruction sheet
Note: Screws and washers to attach speaker to adapter plate are not included
Rear Mounted Con guration
Bottom Mounted Con guration

MM-060
ALWAYS INSTALL SAFETY CABLES
WARNING: Mounting and/or suspension loudspeakers requires experienced
professionals. Improperly installed loudspeakers can result in property
damage, personal injury and/or liability to the installing contractor.
Adaptive Technologies Group
1635 E. Burnett Street | Signal Hill, CA 90755 USA
Ph: 562.424.1100 | Fax: 562.424.3520
www.adapttechgroup.com
REV00-08252015
2 of 3
Installation Guide
Universal Wall Mount
Step 2b: Install Wall Plate to Stud Bridge Plate
Select the optional Stud Bridge Plate (WP-16) to bridge between two structural
wall studs. Install the Stud Plate with the two closer studs oriented on the lower
end of the plate. Secure the Wall Plate directly to the protruding threaded studs
using the provided at washers and nuts (Figure 5).
Step 3: Attach Mount to Speaker
Attach the speaker mount to the selected speaker mounting holes using the
speaker manufacturer’s recommended or supplied hardware (Not included with
the mount). Tighten these fasteners permanently
(
Figure 6 and Figure 7
)
.
Note: If the speaker cabinet does not offer threaded mounting holes, do not install this
mount. Consult the speaker manufacturer for their recommended mounting procedures.
Step 4: Prepare the Wall Plate
Insert the ¼-20x 1.75” screw through the lower hole of the wall mounting
plate. This will act as a landing for the support arm (Figure 8).
Figure 3
Figure 4
Figure 5
Figure 6
Figure 7
Figure 8
Figure 9

MM-060
").$).'3#2%7-!,%
").$).'3#2%7
&%-!,%
REV00-0825015
3 of 3
Installation Guide
Universal Wall Mount
Step 5a: Install Speaker and Mount to Wall Plate
Lift speaker and mount up to the wall mounting plate, feed wire in through the
end of the Support Arm Tube and out through the tube’s upper hole or the end
of the tube by removing the end cap.
Fully insert the support arm into the wall mount plate’s opening, just
above the screw until the tube seats inside the square hole and under the
protruding tab (Figure 9).
Step 5b: Install Speaker and Mount to Wall Plate
Align the side hole of the Support Arm Tube with the through hole of the
Wall plate then insert the supplied binding screw all the way to the other end.
Secure that end with the short threaded binding screw (Figure 10). Tighten
permanently but do not crush the wall mount plate.
Step 5c: Install Speaker and Mount to Wall Plate
Remove the lower side hole screw of the Wall Plate and insert it
through the protruding tab and into the Support Arm Tube. Tighten
permanently (Figure 11).
Step 6: Set the Pan Angle (horizontal)
Rotate the speaker horizontally, right or left, until it is aimed in the
desired direction. Tighten the hex bolt at the bracket pivot permanently
(Figure 12).
Step 7: Set the Tilt Angle
While supporting the weight of the speaker, rotate the tilt control rod
using a wrench until the desired tilt angle is achieved (Figure 13).
Step 8: Strongly Recommended: Install Safety Cable
Attach one end of a safety to the wall structure and the other end to the
speaker. If no attachment is provided on the speaker, consult the speaker
manufacturer for advice on best attachment point and method. Safety cables
sold separately.
Figure 13
Figure 10
Figure 11
Figure 12
/