BARRON CHEX Series City of Chicago LED Steel Exit Sign Installation guide
- Type
- Installation guide

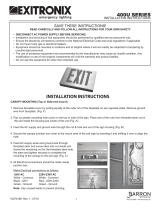
Ceiling or End Mount (Fig. 1 & 2)
1. Slide out the front EXIT glass panel by removing the screw and cover located at
the side of the unit and set aside.
2. Remove the appropriate knockouts from either the top or side of the unit for the
mounting application.
3. Using (2) 1/2“ long 8-32 screws and lock nuts (supplied), attach the canopy.
4. Determine the position and orientation to mount the EXIT sign. Use the semi-round
junction box mounting plate and the remaining (2) 1/2” long 8-32 screws (supplied)
and securely attach the mounting plate to the junction box.
5. Route wires out through the canopy.
6. Make electrical connections: See Electrical Connections section.
7. Secure the unit to the junction box using (2) 1 1/2” long 8-32 screws
(supplied).
Note: If adding a second glass panel, remove the metal backplate and slide
in the desired glass panel.
8. Replace the front glass panel and secure the side cover with the screw
previously removed to complete the installation.
9. Access the battery by removing the screws and cover located on the bottom
of the unit (for battery backup models). Insert the battery connector to the PC
board terminal and replace cover using screws previously removed.
Note: Connect battery only after continuous AC power can be supplied to
the unit.
INSTALLATION INSTRUCTIONS
800.533.3948 • www.barronltg.com
1
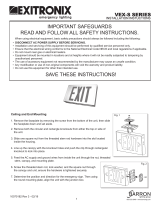
IMPORTANT SAFEGUARDS
READ AND FOLLOW ALL SAFETY INSTRUCTIONS.
When using electrical equipment, basic safety precautions should always be followed including the following:
• DISCONNECT AC POWER SUPPLY BEFORE SERVICING.
• Installation and servicing of this equipment should be performed by qualified service personnel only.
• Ensure that the electrical wiring conforms to the National Electrical Code NEC® and local regulations if applicable.
• Do not mount near gas or electric heaters.
• Do not use outdoors.
• Equipment should be mounted in locations and at heights where it will not be readily subjected to tampering by
unauthorized personnel.
• The use of accessory equipment not recommended by the manufacturer may cause an unsafe condition.
• Any modification or use of non-original components will void the warranty and product liability.
• Do not use this equipment for other than intended use.
• Allow battery to charge for 24 hours before first use.
SAVE THESE INSTRUCTIONS!
CHEX Series
10070214 REV 2 - 05/19
Mount
Plate
Canopy
Fig. 1
Mounting
Plate
Canopy
Fig. 2 Metal backplate

Back mounting (Fig. 3)
(Single-face only)
1. Slide out the front EXIT glass panel by removing the screw and cover located
at the side of the unit and set aside.
2. Using the semi-round mounting plate as a template, mark and drill the desired
holes for mounting to the junction box and remove the center knockout.
3. Route wires through the center knockout.
4. Make electrical connections: See Electrical Connections section.
5. Secure unit to the junction box using (2) 1 1/2” long 8-32 screws (supplied).
6. Replace the front glass panel and secure the side cover with the screw previously removed to complete the
installation.
7. Access the battery by removing the screws and cover located on the bottom of the unit (for battery backup
models). Insert the battery connector to the PC board terminal and replace cover using screws previously
removed.
Note: Connect battery only after continuous AC power can be supplied to the unit.
Electrical Connections
All electrical connections should be made inside the junction box.
Make electrical connections as follows:
Red - 100-300VAC
White - Common
Green - Ground
Note: Cap unused leads to prevent shorting.
Wiring Diagram
INSTALLATION INSTRUCTIONS
800.533.3948 • www.barronltg.com
2
CHEX Series
Red
100~300VAC
White COM
Power
Board
Battery
LED Board
Battery Backup
Red
100~300VAC
White COM
Power
Board
LED Board
AC Only
Fig. 3
Mounting
Plate
10070214 REV 2 - 05/19
-
 1
1
-
 2
2


BARRON CHEX Series City of Chicago LED Steel Exit Sign Installation guide
- Type
- Installation guide
Ask a question and I''ll find the answer in the document
Finding information in a document is now easier with AI
Related papers
-
 BARRON VEX-8 NYC Steel Series Installation guide
-
 BARRON 400U-8 NYC Die-cast Series Installation guide
-
 BARRON SLW Series Architectural Die-cast Installation guide
-
 BARRON NXFX Series NEMA 4X Installation guide
-
 BARRON RL Series LED Rope Light Installation guide
-
 BARRON LED-60 Thermoplastic Series Installation guide
-
 BARRON NXFC Series NEMA 4X Installation guide
-
 BARRON QXEDGP Series Thermoplastic Edge-lit Exit Sign Installation guide
-
 BARRON BAW Series Field Adjustable Optics Installation guide
-
 BARRON AXL-15 Series Multi-purpose Installation guide


Other documents
-
LED LIGHTING WHOLESALE INC GC22 User manual
-
 Exitronix XET-20 Installation guide
-
Lithonia Lighting LXC W 1 RW CH3 EL Installation guide
-
-
-
-
Valor 2100PKN/PKP Installation guide
-
 Quorum International Mykonos 72" Installation Instructions Manual
-
-
Carefree Apex User manual

