Any problems or questions call Regency Ofce Furniture at 1-866-816-9822
IMPORTANT NOTICE:
● Place all wooden parts on a clean and smooth surface such as a rug or carpet to avoid the parts from being scratched.
● Check to be sure that you have all parts and hardware.
● Remove all wrapping materials, including staples & packing straps before you start to assemble.
● Do not tighten all screws/bolts until completely assembled.
● Keep all hardware parts out of reach of children.
● Check every 6 months for loose bolts; tighten as needed.
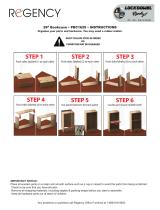
Step 2: Connect base support(L) by inserting the dowel
rods on the ends of base support into the dowel rod holes on
the chair sides(M,H) and use one bolt(B) each side.
Do not tighten bolt all the way!
B61775 (revised 03/17/10) - INSTRUCTIONS
You will need a Phillips head screwdriver for this assembly.
Organize your parts and hardware.
Hardware Components should include: A) 1 Bottle of Glue B) 14 Bolts C) 1 Assembly Key D) 30 Small Wood Screws
E) 14 Wooden Caps F) 8 Small brackets G) 4 Large brackets
Parts include: H) Right Chair Side I) 1 Back Rest J) 2 Chair Frames (Front and Back) K) 1 Seat Cushion
L) 1 Base Support M) Left Chair Side
Step 1: Attach chair frames(J) to each chair side(M,H)
using 8 bolts(B). Be sure that the pre drilled holes on (J)
are facing in and up. Do not tighten bolts all the way!
A B C D E F G
Step 3: Attach back cushion(I) to chair sides(M,H) by
inserting the dowel rod on the side of cushion into dowel rod
holes in the chair sides. Then Use 2 bolts(B) per side to lock
into position. At this time tighten all prior bolts.
B
B
B
B
B
B
B
B
B
B
H
M
J
J
M
H
L
I
MH
H
MJ J
I
K
L