Page is loading ...

Updated 13/DEC/01 BRH
2002 Energy Suspension. All rights reserved.2002 Energy Suspension. All rights reserved.
CC
May not be reproduced, in any form, or by any means,
without the written consent of Energy Suspension.
May not be reproduced, in any form, or by any means,
without the written consent of Energy Suspension.
1131 VIA CALLEJON, SAN CLEMENTE, CA 92673
R
17011
3-27-02
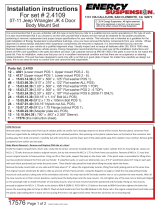
INSTRUCTION SHEET FOR SET #3-4103
Read this instruction sheet thoroughly before initiating any work!
NOTE: When disassembling the body mounts, be sure to note the
number and position of shims that may have been used to align
the body. These shims will have to be reused to retain proper body
alignment.
CAUTION: Remove all the body mount bolts on one side of the
vehicle. Loosen but do not remove all the body mount bolts on
the opposite side of the vehicle. Only raise one side of the vehicle
at a time, lifting the body only high enough to remove/replace the
mounts. Always watch the fan shroud, brake lines, and various
hoses for sufficient clearance when raising the body. When jacking
the body, use a 2x4 or equivalent to spread the weight. Never
place jack faces directly on body panels!
When all mounts and hardware are installed, torque all bolts to
factory specifications.
Position #1
1. Body
2. Factory Sleeve
3. 4059
4. Frame
5. 4011
6. Supplied Washer
Position #2
1. Body
2. Factory Sleeve
3. 4010
4. Frame
5. 4011
6. Supplied Washer
Position #3
1. Body
2. Factory sleeve cut to 3-3/4”
3. 4008
4. Frame
5. 4009
6. Supplied 2” Washer
(Install new bolts at this position)
1
3
2
4
5
6
Revised by NJT
1. Kit comes with 6 conical shaped grommets. Two of which have a larger I.D. than the other 4. The 2 large I.D.
conicals fit the rear cab sleeves only.
2. The rear cab sleeves have to be shortened to a length of 3-3/4”. The two bolts supplied will replace the
O.E.M bolts for the rear mounts only. The majority of these sleeves are heat treated, so cutting them with a
conventional hacksaw may be difficult. Whether they are ground or flame cut, care must be taken on making
a square cut to allow proper contact with the flat washer when final torque is applied. Torue specification is 85
ft. lbs.
3. The center (2) mounts will be slightly taller than the (2) front (core) mounts. You may use your existing
hardware for these four points.
4. The (2) 5” long bolts supplied are not for use on trucks that have body lift blocks. If your truck has a body lift
kit you will need to bolts that are longer than 5”. Example: If you have a 2” body lift, you will need 7”bolts. Bolts
supplied with this kit are grade 8.
Must reuse original hardware
(When specified)
Parts Diagram
(Refer below)
33/4
123
/


