Page is loading ...

For Research Use Only. Not for use in diagnostic procedures.
CLA Identifiler™ Plus andIdentifiler™ Direct
PCR Amplification Kits
USER GUIDE
for Cell Line Authentication
for use with:
SeqStudio™ Genetic Analyzer
3500/3500xL Genetic Analyzer
3730/3730xl DNA Analyzer (48-capillary)
3130/3130xl Genetic Analyzer
for use with:
Microsatellite Analysis Software
GeneMapper™ Software
Catalog NumbersA44660 and A44661
Publication NumberMAN0018857
Revision B.0

Manufacturer:
Life Technologies Holdings Pte Ltd |
Block 33 |
Marsiling Industrial Estate Road 3 |
#07-06, Singapore 739256
Products:
SeqStudio™ Genetic Analyzer
3500/3500xL Genetic Analyzer
3730/3730xl DNA Analyzer
3130/3130xl Genetic Analyzer
Manufacturer:
Life Technologies Ltd |
7 Kingsland Grange |
Woolston, Warrington WA1 4SR |
United Kingdom
Products:
CLA Identifiler™ Plus PCR Amplification Kit
CLA Identifiler™ Direct PCR Amplification Kit
Manufacturer:
Thermo Fisher Scientific Baltics UAB |
V.A. Graiciuno 8, LT-02241 |
Vilnius, Lithuania
GeneScan™ 600 LIZ™ Size Standard v2.0
For descriptions of symbols on product labels or product documents, go to thermofisher.com/symbols-definition.
The information in this guide is subject to change without notice.
DISCLAIMER: TO THE EXTENT ALLOWED BY LAW, THERMO FISHER SCIENTIFIC INC. AND/OR ITS AFFILIATE(S) WILL NOT BE
LIABLE FOR SPECIAL, INCIDENTAL, INDIRECT, PUNITIVE, MULTIPLE, OR CONSEQUENTIAL DAMAGES IN CONNECTION WITH OR
ARISING FROM THIS DOCUMENT, INCLUDING YOUR USE OF IT.
Revision history: Pub. No.MAN0018857
Revision Date Description
B.0 5 July 2022 •Corrected loci for TPOX (“Loci amplified by the kits” on page8.
•Corrected amount of AmpFℓSTR™ Control DNA 9947A (“Contents
and storage— Identifiler™ Pluskit” on page13) .
A.0 26 March 2020 New document for CLA Identifiler™ Plus andIdentifiler™ Direct PCR
Amplification Kits.
Important Licensing Information: These products may be covered by one or more Limited Use Label Licenses. By use of these
products, you accept the terms and conditions of all applicable Limited Use Label Licenses.
TRADEMARKS: All trademarks are the property of Thermo Fisher Scientific and its subsidiaries unless otherwise specified. Dropbox is a
trademark of Dropbox Inc. Uni-Core is a trademark of GE Healthcare Bio-Sciences Corp.
©2022 Thermo Fisher Scientific Inc. All rights reserved.

Contents
■CHAPTER1Productinformation .................................................. 7
Productdescription ............................................................. 7
Related products ........................................................... 7
Dyes used in thekits ........................................................ 8
Loci amplified by thekits .................................................... 8
Standards and controls that are required ...................................... 9
DNA Control 9947Aprofile .................................................. 10
GeneScan™ 600 LIZ™ Size Standardv2.0 ..................................... 11
Allelic ladderprofile ........................................................ 12
Contents and storage— Identifiler™Pluskit ................................... 13
Contents and storage—CLA Identifiler™ Directkit .............................. 14
Required materials notsupplied ................................................. 14
Identifying the presence of contaminating cells in a culture .......................... 15
Instrument and softwarecompatibility ............................................ 15
Workflow ..................................................................... 17
■CHAPTER2Perform PCR: CLA Identifiler™ Plus kit .......................... 18
Guidelines for cell line preparation, extraction, and purification...................... 18
Eect of DNA quantity on results ................................................. 19
Before youbegin ............................................................... 19
Prepare low-TEbuer ...................................................... 19
Thaw reagents (before first use of thekit) ..................................... 19
Prepare the amplification kit reactions ............................................ 20
Number of PCR cycles touse ................................................... 21
PerformPCR .................................................................. 21
■CHAPTER3Perform PCR: CLA Identifiler™ Direct kit ........................ 23
Guidelines for cell line preparation, extraction, and purification...................... 23
Prepare the NUCLEIC-CARD™ matrix withsample ................................. 24
Before youbegin ............................................................... 25
Thaw reagents (before first use of thekit) ..................................... 25
Prepare the amplification reactions ............................................... 26
PerformPCR .................................................................. 27
CLA Identifiler™ Plus andIdentifiler™ Direct PCR Amplification Kits User Guide 3

■CHAPTER4Perform electrophoresis ............................................ 29
Allelic ladder requirements for electrophoresis ..................................... 29
Materials required for electrophoresis ............................................. 30
Set up the instrument for electrophoresis (before first use of the kit) .................. 30
Electrophoresis software setup: SeqStudio™.................................. 30
Electrophoresis softwaresetup: 3500/3500xL ................................. 30
Electrophoresis software setup: 3730/3730xlinstruments ....................... 31
Electrophoresis software setup:3130/3130xl instruments ....................... 31
Capillary to platemapping ...................................................... 31
Prepare samples for electrophoresis .............................................. 34
■CHAPTER5Analyze data with Microsatellite Analysis Software ............. 35
Overview of Microsatellite Analysis Software ...................................... 35
Allelic ladder requirements for CLAdata analysis ................................... 36
Names and versions of settings files used in thissection ............................ 36
Access the Microsatellite Analysis Software and importfiles ......................... 36
Set up the Microsatellite Analysis Software for analysis (before first use of thekit) ...... 40
About importing files into the Microsatellite Analysis Softwaredatabase .......... 40
Workflow: Set up Microsatellite Analysis Software ............................. 40
Check settings file versions on your computer ................................. 41
(If needed) Download newer versions of settings files.......................... 42
Import an MSA settings template (preferred method) ........................... 43
Import individual settings (alternative method) ................................ 45
Select settings and analyze samples in the Microsatellite Analysis Software ........... 49
Review the analysis summary ................................................... 51
Examine low-quality sizing results ................................................ 52
View data collectionsettings ................................................ 52
Examine EPT and rawdata ................................................. 53
Review sizematches ....................................................... 53
Modify sizematches ....................................................... 54
Modify the analysissettings ................................................. 56
Adjust Size Quality Flag ranges .............................................. 56
Examine low-quality genotyping results ........................................... 57
About PQVs (Process Quality Value symbols
Common Callouts and Arrows
1. Copy-paste a callout or arrow to use in this SVG.
Note: If you need more advanced callouts or arrows
use the TechComm_Inkscape_Callout&Arrow_Libary.
3. Delete this text, this rectangle, and unused
callouts, arrows, or other SVG elements
before adding this SVG to the repository.
2. Edit number and/or line-length, as needed.
1 1
1
1
) .................. 57
Review samples with Suspect and Low Quality GQvalues ...................... 57
Review PQVs of samples with Suspect and Low Quality GQ or PQVvalues ....... 59
Export the genotypestable ...................................................... 61
Verify cell line identity using the ATCC database ................................... 62
Contents
4CLA Identifiler™ Plus andIdentifiler™ Direct PCR Amplification Kits User Guide

■CHAPTER6Analyze data with GeneMapper™ Software ..................... 63
Overview of GeneMapper™ Software ............................................. 63
Allelic ladder requirements for CLA dataanalysis ................................... 64
Names and versions of settings files used in thissection ............................ 64
Set up the GeneMapper™ Software for CLA analysis (before first use of the kit) ........ 65
About importing files into the GeneMapper™ Softwaredatabase ................. 65
Workflow: Set up GeneMapper™ Software .................................... 66
Check panel and bin file versions on your computer ............................ 66
(If needed) Download newer versions of panel and bin files..................... 67
Import panel andbins ...................................................... 68
Import the size standard .................................................... 70
Import analysis method .................................................... 71
Import table settings andplot settings ........................................ 72
Create a project and analyze sample files with GeneMapper™ Software .............. 73
Review analyzed results in the sample and genotypestable ......................... 75
Examine low-quality sizing results ................................................ 75
View data collectionsettings ................................................ 75
Examine EPT and rawdata ................................................. 77
Review sizematches ....................................................... 78
Modify sizematches ....................................................... 80
Modify the analysissettings ................................................. 81
Adjust Size Quality Flag ranges .............................................. 81
Examine low-quality genotyping results ........................................... 81
About PQVs (Process Quality Value symbols ) ........................ 81
Review PQVs of samples with Suspect and Low Quality GQ or PQVvalues ....... 82
Display and zoom on sample plots .............................................. 83
Display and zoom genotype plots ............................................... 85
Export the genotypestable ...................................................... 87
Verify cell line identity using the ATCC database ................................... 87
■CHAPTER7Troubleshooting ..................................................... 89
Causes of extrapeaks .......................................................... 89
Stutterdefinition ........................................................... 89
3′ A nucleotide additionpeak definition ....................................... 90
Artifact peakdefinition ..................................................... 90
Stutter peak analysissettings .................................................... 90
Guidelines for troubleshooting and data interpretationCLA .......................... 91
D3S1358 marker shoulder and stutter peak examples (N+1, N–4, andN+4) ........... 93
POP™ polymer-specific artifact examples (N–1 and N+1 shoulderpeaks) .............. 93
D19S433: o-ladder alleles caused by dye pullup ................................. 95
General troubleshooting ........................................................ 95
Contents
CLA Identifiler™ Plus andIdentifiler™ Direct PCR Amplification Kits User Guide 5

■APPENDIXAMaterials required but notsupplied .............................. 98
STR kit materials ............................................................... 98
Sample preparation required materials ............................................ 98
Thermal cycler required materials ................................................ 99
ProFlex™ PCR System ...................................................... 99
Veriti™ ThermalCycler ...................................................... 99
GeneAmp™ PCR System9700 .............................................. 99
Genetic analyzer required materials ............................................. 100
SeqStudio™ Genetic Analyzer .............................................. 100
3500/3500xL Series Genetic Analyzer ....................................... 100
3730/3730xl Series Genetic Analyzer ........................................ 101
3130/3130xl Series Genetic Analyzer ........................................ 102
Analysis software required materials ............................................. 102
GeneMapper™ Software ................................................... 102
Microsatellite Analysis Software ............................................ 102
Miscellaneous required materials ............................................... 103
Plates andtubes ......................................................... 103
Laboratorysupplies ....................................................... 103
■APPENDIXBSafety .............................................................. 104
Chemicalsafety .............................................................. 105
Biological hazardsafety ....................................................... 106
■Documentation and support ...................................................... 107
Relateddocumentation ........................................................ 107
Application notes ............................................................. 108
Index ..................................................................................... 109
Contents
6CLA Identifiler™ Plus andIdentifiler™ Direct PCR Amplification Kits User Guide

Product information
■Productdescription .................................................................... 7
■Required materials notsupplied ........................................................ 14
■Identifying the presence of contaminating cells in a culture ................................ 15
■Instrument and softwarecompatibility ................................................... 15
■Workflow ............................................................................ 17
IMPORTANT! Before using this product, read and understand the information in the “Safety” appendix
in this document.
Product description
The CLA Identifiler™ Plus andIdentifiler™ Direct PCR Amplification Kits are 5-dye, 16-locus short
tandem repeat (STR) analysis kits with 1 sex-discriminating marker. Both kits amplify the same loci
as the AmpFℓSTR™ Identifiler™ PCR Amplification Kit.
The CLA Identifiler™ Plus kit uses genomic DNA.
The CLA Identifiler™ Direct kit uses cells spotted on a NUCLEIC-CARD™ matrix. This kit does not
require DNA extraction or purification.
Features of the kits include:
•Compatible with SeqStudio™, 3500/3500xL, and 3730/3730xl genetic analyzers.
•Compatible with all cell line databasing loci standards and global databasing loci standards.
Cell line authentication using short tandem repeat (STR) analysis kits can be used both for human
sample authentication (HSA) and mixed sample analysis (MSA).
•In HSA, the STR kits can be used to verify the DNA profile of the sample or to perform a quality
check.
•In MSA, the STR kits can be used to deconvolute the presence of multiple contributors in a sample
(chimerism) by identifying more than one DNA genotype in the sample.
Related products
The CLA GlobalFiler™ PCR Amplification Kit is a 6-dye, 24-locus short tandem repeat (STR) analysis kit
with 3 sex-discriminating markers. The kit uses genomic DNA. It provides reduced amplification time
and increased discrimination power compared to the AmpFℓSTR™ Identifiler™ Plus and AmpFℓSTR™
Identifiler™ Direct PCR Amplification Kits.
1
CLA Identifiler™ Plus andIdentifiler™ Direct PCR Amplification Kits User Guide 7

Dyes used in the kits
Dye Color Label
6‑FAM™Blue Samples, allelic ladders, and controls
VIC™Green
NED™Yellow
PET™Red
LIZ™Orange GeneScan™ 600 LIZ™ Size Standard v2.0
Loci amplified by the kits
Locus
designation
Chromosome
location Alleles included in Allelic Ladder Dye label DNA Control
9947A
D8S1179 8 8, 9 10, 11, 12, 13, 14, 15, 16, 17, 18, 19 6-FAM™13, 13
D21S11 21q11.2-q21 24, 24.2, 25, 26, 27, 28, 28.2, 29, 29.2, 30, 30.2,
31, 31.2, 32, 32.2, 33, 33.2, 34, 34.2, 35, 35.2,
36, 37, 38
30, 30
D7S820 7q11.21-22 6, 7, 8, 9, 10, 11, 12, 13, 14, 15 10, 11
CSF1PO 5q33.3-34 6, 7, 8, 9, 10, 11, 12, 13, 14, 15 10, 12
D3S1358 3p 12, 13, 14, 15, 16, 17, 18, 19 VIC™14, 15
TH01 11p15.5 4, 5, 6, 7, 8, 9, 9.3, 10, 11, 13.3 8, 9.3
D13S317 13q22-31 8, 9, 10, 11, 12, 13, 14, 15 11, 11
D16S539 16q24.qter 5, 8, 9, 10, 11, 12,13, 14, 15 11, 12
D2S1338 2q35-37.1 15, 16, 17, 18, 19, 20, 21, 22, 23, 24, 25, 26, 27,
28
19, 23
D19S433 19q12-13.1 9, 10, 11, 12, 12.2, 13, 13.2, 14, 14.2, 15, 15.2,
16, 16.2, 17, 17.2
NED™14, 15
vWA 12p12-pter 11,12, 13, 14, 15, 16, 17, 18, 19, 20, 21, 22, 23,
24
17, 18
TPOX 2p23-2per 6, 7, 8, 9, 10, 11, 12, 13 8, 8
D18S51 18q21.3 7, 9, 10, 10.2, 11, 12, 13, 13.2, 14, 14.2, 15, 16,
17, 18, 19, 20, 21, 22, 23, 24, 25, 26, 27
15, 19
Amelogenin X: p22.1-22.3
Y: p11.2
X, Y PET™X
Chapter1Product information
Product description
1
8CLA Identifiler™ Plus andIdentifiler™ Direct PCR Amplification Kits User Guide

(continued)
Locus
designation
Chromosome
location Alleles included in Allelic Ladder Dye label DNA Control
9947A
D5S818 5q21-31 7, 8, 9, 10, 11, 12, 13, 14, 15, 16 PET™11, 11
FGA 4q28 17, 18, 19, 20, 21, 22, 23, 24, 25, 26, 26.2, 27,
28, 29, 30, 30.2, 31.2, 32.2, 33.2, 42.2, 43.2,
44.2, 45.2, 46.2, 47.2, 48.2, 50.2, 51.2
23, 24
Standards and controls that are required
The CLA Identifiler™ Plus andIdentifiler™ Direct PCR Amplification Kits require the following panel of
standards needed for PCR amplification, PCR product sizing, and genotyping:
•DNA Control 9947A—A positive control for evaluating the eciency of the amplification step and
STR genotyping of the kit allelic ladder. DNA Control 9947A is included in the kit. See “DNA Control
9947A profile” on page10.
•GeneScan™ 600 LIZ™ Size Standard v2.0—Used for obtaining sizing results. This standard, which
has been evaluated as an internal size standard, yields precise sizing results for PCR products. See
“GeneScan™ 600 LIZ™ Size Standard v2.0” on page11.
•Allelic ladder—Developed for accurate characterization of the alleles amplified in each kit. The
allelic ladder is included in each kit and allows automatic genotyping of most of the reported alleles
for the loci in the kit. See “Loci amplified by the kits” on page8 and “Allelic ladder profile” on
page12.
Chapter1Product information
Product description 1
CLA Identifiler™ Plus andIdentifiler™ Direct PCR Amplification Kits User Guide 9

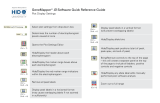
DNA Control 9947A profile
Figure1Control DNA 9947A (1 ng) amplified with the Identifiler™ Pluskit and analyzed on an Applied
Biosystems™ 3130xl Genetic Analyzer
Chapter1Product information
Product description
1
10 CLA Identifiler™ Plus andIdentifiler™ Direct PCR Amplification Kits User Guide

GeneScan™ 600 LIZ™ Size Standard v2.0
Figure2GeneMapper™ Software plot of the GeneScan™ 600 LIZ™ Size Standard v2.0
Chapter1Product information
Product description 1
CLA Identifiler™ Plus andIdentifiler™ Direct PCR Amplification Kits User Guide 11

Allelic ladder profile
Figure3GeneMapper™ Software plot of the Identifiler™ Allelic Ladder
Chapter1Product information
Product description
1
12 CLA Identifiler™ Plus andIdentifiler™ Direct PCR Amplification Kits User Guide

Contents and storage— Identifiler™ Pluskit
The Identifiler™ Pluskit contains sucient quantities of the reagents for 200 reactions at
25μL/amplification.
IMPORTANT! The fluorescent dyes attached to the primers are light-sensitive. Protect the primer mix,
amplified DNA, allelic ladder, and size standard from light when not in use.
IMPORTANT! Do not refreeze kit components after thawing.
Contents Description 200 reaction
(Cat.No. 4427368) Storage
Identifiler™ Plus Master
Mix
Contains enzyme, salts,
dNTPs, carrier protein, and
0.04% sodium azide.
2×1.0mL −25°C to −15°C on receipt.
2°C to 8°C after first use for up to
6 months or up to the expiration
date stated on the kit (whichever
comes first).
Identifiler™ Plus Primer
Mix
Contains forward and
reverse primers to amplify
human DNA targets.
1×1.0mL −25°C to −15°C on receipt.
2°C to 8°C after first use for up to
6 months or up to the expiration
date stated on the kit (whichever
comes first).
Store protected from light.
Identifiler™ Plus Allelic
Ladder
Contains amplified alleles.
See “Allelic ladder profile”
on page12 for information.
1×50.0µL −25°C to −15°C on receipt.
2°C to 8°C after first use up to the
expiration date stated on the kit.
Store protected from light.
AmpFℓSTR™ Control
DNA 9947A
Contains 0.1ng/µL human
female 9947A genomic DNA
from cell line in 0.05%
sodium azide and buer.[1]
See “DNA Control 9947A
profile” on page10 for
information.
1×300.0µL −25°C to −15°C on receipt.
2°C to 8°C after first use up to the
expiration date stated on the kit.
[1] DNA Control 9947A is included at a concentration that is appropriate for use as an amplification control (that is, to provide confirmation of
the capability of the kit reagents to generate a profile of expected genotype). It is not designed for use as a DNA quantification control. If you
quantify aliquots of Control 9947A, the concentration may differ from the labeled concentration.
Chapter1Product information
Product description 1
CLA Identifiler™ Plus andIdentifiler™ Direct PCR Amplification Kits User Guide 13

Contents and storage—CLA Identifiler™ Direct kit
The Identifiler™ Direct kit contains sucient quantities for 200 reactions at 25μL/amplification.
IMPORTANT! The fluorescent dyes attached to the primers are light-sensitive. Protect the primer mix,
amplified DNA, allelic ladder, and size standard from light when not in use.
IMPORTANT! Do not refreeze kit components after thawing.
Contents Description 200 reaction (Cat.No.
4427368) Storage
Identifiler™ Direct Master
Mix
Contains enzyme, salts,
dNTPs, carrier protein, and
0.04% sodium azide.
2×1.25mL −25°C to −15°C on receipt.
2°C to 8°C after first use for up to
6 months or up to the expiration
date stated on the kit (whichever
comes first).
Identifiler™ Direct Primer
Mix
Contains forward and
reverse primers to amplify
human DNA targets.
2×1.25mL −25°C to −15°C on receipt.
2°C to 8°C after first use for up to
6 months or up to the expiration
date stated on the kit (whichever
comes first).
Store protected from light.
Identifiler™ Direct Allelic
Ladder
Contains amplified alleles.
See “Allelic ladder profile”
on page12 for information.
1×50.0µL −25°C to −15°C on receipt.
2°C to 8°C after first use up to the
expiration date stated on the kit.
Store protected from light.
AmpFℓSTR™ Control
DNA 9947A
Contains 0.1ng/µL human
female 9947A genomic DNA
from cell line in 0.05%
sodium azide and buer[1]
See “DNA Control 9947A
profile” on page10 for
information.
1×50.0µL −25°C to −15°C on receipt.
2°C to 8°C after first use up to the
expiration date stated on the kit.
[1] DNA Control 9947A is included at a concentration that is appropriate for use as an amplification control (that is, to provide confirmation of
the capability of the kit reagents to generate a profile of expected genotype). It is not designed for use as a DNA quantification control. If you
quantify aliquots of Control 9947A, the concentration may differ from the labeled concentration.
Required materials not supplied
See Appendix A, “Materials required but not supplied”.
Chapter1Product information
Required materials not supplied
1
14 CLA Identifiler™ Plus andIdentifiler™ Direct PCR Amplification Kits User Guide

Identifying the presence of contaminating cells in a culture
One objective of cell line authentication is to determine whether a cell line is contaminated with
unrelated cells. Because contaminating cells are likely to have a dierent STR profile than the parent cell
line, use of CLA STR kits is a useful tool to flag the presence of contamination.
In a mixture of cell lines, the final DNA profile reflects the genomic makeup of all cells present.
Therefore, data must be examined carefully.
•One peak at a locus could represent:
–Homozygous parent cell DNA
–Homozygous parent cell and homozygous contaminating cell DNA
–Homozygous parent cell DNA and a deletion at the locus for contaminating cell DNA
•Two peaks at a locus could represent:
–Heterozygous parent cell DNA
–Both cell types homozygous for dierent loci
–Both cell types heterozygous for the same loci
The interpretation of aberrant peaks at a single locus can be challenging and ambiguous. However, with
the analysis of 16 loci and 1 sex-discriminating marker in the CLA Identifiler™ Plus andIdentifiler™ Direct
PCR Amplification Kits, it can be possible to identify distinct peaks that clearly point to the presence
of a contaminating cell line, even if the genomic makeup of the contaminating cell line is not fully
discernible.
Instrument and software compatibility
Instrument
type Compatible model
Thermal
cyclers
•ProFlex™ 96‑well PCR System (Cat.No.4484075)
•ProFlex™ 2×96‑well PCR System (Cat.No.4484076)
•ProFlex™ 3×32‑Well PCR System (Cat.No.4484073)
•Veriti™ 96‑Well Thermal Cycler (Cat.No.4479071)
•GeneAmp™ PCR System 9700, 96-Well Silver (Cat.No.N8050001)
•GeneAmp™ PCR System 9700, 96-Well Gold-Plated (Cat.No.4314878)
The kit is not optimized for use with:
•ProFlex™ 2 × Flat PCR System (Cat.No.4484078)
•ProFlex™ 2×384‑well PCR System (Cat.No.4484077)
•Veriti™ Fast 96‑Well Thermal Cycler (Cat.No.4375305)
• GeneAmp™ PCR System 9700 with the aluminium 96-well block (Cat.No. 4314879)
Chapter1Product information
Identifying the presence of contaminating cells in a culture 1
CLA Identifiler™ Plus andIdentifiler™ Direct PCR Amplification Kits User Guide 15

(continued)
Instrument
type Compatible model
Genetic
analyzers
•SeqStudio™ Genetic Analyzer v1.1.4 or later
•3500/3500xL Genetic Analyzer with any of the following:
–3500 Data Collection v3.3 Software (Windows™ 10 operating system)
–3500 Data Collection v3.1 Software (Windows™ 7 operating system)
•3730/3730xL DNA Analyzer (48-capillary recommended) with any of the following:
–Data Collection v5 Software (Windows™ 10 operating system)
–Data Collection v4 Software (Windows™ 7 operating system)
Note: The 48-capillary array is recommended for the 3730xl instrument. The close proximity
of capillaries in the 96-capillary array can introduce cross-talk between capillaries and
interfere with data interpretation.
•3130/3130xL DNA Analyzer with Data Collection Software v4
Analysis
software
•Microsatellite Analysis Software (accessible from apps.thermofisher.com)
•GeneMapper™ Software v6 Software (Windows™ 10 operating system)
•GeneMapper™ Software v5 Software (Windows™ 7 operating system)
Chapter1Product information
Instrument and software compatibility
1
16 CLA Identifiler™ Plus andIdentifiler™ Direct PCR Amplification Kits User Guide

Workflow
Perform PCR
If you are analyzing a cell suspension, see:
Chapter 2, “Perform PCR: CLA Identifiler™ Plus kit”
If you are spotting a cell suspension on a
NUCLEIC-CARD™ matrix, see:
Chapter 3, “Perform PCR: CLA Identifiler™ Direct
kit”
▼
Perform electrophoresis, see:
“Electrophoresis software setup: SeqStudio™” on page30
“Electrophoresis software setup: 3500/3500xL” on page30
“Electrophoresis software setup: 3730/3730xl instruments” on page31
“Electrophoresis software setup: 3130/3130xl instruments” on page31
▼
“Prepare samples for electrophoresis” on page34
▼
Analyze data, see:
Chapter 5, “Analyze data with Microsatellite Analysis Software”
Chapter 6, “Analyze data with GeneMapper™ Software”
Chapter1Product information
Workflow 1
CLA Identifiler™ Plus andIdentifiler™ Direct PCR Amplification Kits User Guide 17

Perform PCR: CLA Identifiler™ Plus
kit
■Guidelines for cell line preparation, extraction, and purification............................ 18
■Eect of DNA quantity on results ....................................................... 19
■Before youbegin ..................................................................... 19
■Prepare the amplification kit reactions ................................................... 20
■Number of PCR cycles touse .......................................................... 21
■PerformPCR ......................................................................... 21
Guidelines for cell line preparation, extraction, and
purification
Follow your standard laboratory operating protocol and consider the following guidelines:
•The required DNA input amount is 1 ng of genomic DNA extracted from cells.
•If a cell line is to be used for research and the identity is unknown, expand the cell line before use.
•Follow cell culture best practices.
•Handle cell lines under quarantine conditions if the cell line identity is unknown.
•One T-25 flask (for attached cells) or a 125 mL Erlenmeyer (for suspension) provides enough
material for DNA extraction.
•Obtain cells at an early passage.
•Continue growing cells. Consider quarantine until the STR identification is available. After obtaining
the STR identification, proceed with preparing freeze stocks or continued use of the cells for
additional experiments.
•Clean the work surface area thoroughly.
•Prepare samples one at a time.
•Clearly label samples with cell line information.
•Extract, purify, and quantify the DNA, see www.thermofisher.com/gdnaprep.
2
18 CLA Identifiler™ Plus andIdentifiler™ Direct PCR Amplification Kits User Guide

Eect of DNA quantity on results
The required DNA input amount is 1.0ng for 29-cycle PCR or 500pg for 30-cycle PCR.
If too much DNA is added to the PCR reaction, the increased amount of PCR product that is generated
can result in:
•Fluorescence intensity that exceeds the linear dynamic range for detection by the instrument
(“o-scale” data).
O-scale data is a problem because:
–Quantification (peak height and area) for o-scale peaks is not accurate. For example, an allele
peak that is o-scale can cause the corresponding stutter peak to appear higher in relative
intensity, thus increasing the calculated percent stutter.
–Multicomponent analysis of o-scale data is not accurate. This inaccuracy results in poor
spectral separation (“pull-up”).
•Incomplete +A nucleotide addition.
To address these issues, reamplify the sample using less DNA.
If too little DNA is added to the PCR reaction, the total number of allele copies added to the PCR is
extremely low and unbalanced amplification of the alleles can occur because of stochastic fluctuation.
Before you begin
Prepare low-TE buer
For optimal results, we recommend using low-TE buer for sample preparation. Prepare it as described
in this procedure or buy it from Teknova (Cat.No.T0223).
1. Mix together:
•10 mL of 1 M Tris-HCl, pH8.0
•0.2 mL of 0.5 M EDTA, pH 8.0
•990 mL glass-distilled or deionized water
Note: Adjust the volumes accordingly for specific needs.
2. Aliquot, then autoclave the solutions.
3. Store the aliquots at room temperature.
Thaw reagents (before first use of the kit)
Thaw the master mix and primer mix.
IMPORTANT! The fluorescent dyes attached to the primers are light-sensitive. Protect the primer set,
amplified DNA, allelic ladder, and size standard from light when not in use.
IMPORTANT! Thawing is required only during first use of the kit. After first use, reagents are stored at
2°C to 8°C and do not require subsequent thawing. Do not refreeze the reagents.
Chapter2Perform PCR: CLA Identifiler™ Plus kit
Eect of DNA quantity on results 2
CLA Identifiler™ Plus andIdentifiler™ Direct PCR Amplification Kits User Guide 19

Prepare the amplification kit reactions
IMPORTANT! The fluorescent dyes attached to the primers are light-sensitive. Protect the primer set,
amplified DNA, allelic ladder, and size standard from light when not in use.
1. Vortex the master mix and primer mix for 3 seconds. Before opening the tubes or bottles, remove
droplets from the caps by centrifuging the tubes briefly or tapping the bottles on the bench.
2. Pipette the required volumes of components into an appropriately sized, clear (non-colored),
polypropylene tube:
Reaction component Volume per reaction
Master mix 10.0µL
Primer mix 5.0µL
Note: The allelic ladder is not a sample. Do not include it in PCR.
Note: Include volume for additional reactions to provide excess volume for the loss that occurs
during reagent transfers.
3. Vortex the reaction mixture for 3seconds, then centrifuge briefly.
4. Dispense 15 µL of reaction mixture into each reaction well of a MicroAmp™ Optical 96-Well
Reaction Plate or each MicroAmp™ tube.
5. Adjust the sample input amount and volume if needed:
•If total sample input amount is >1.0ng for 28cycles or >500 pg for 29 cycles, dilute with
low-TE buer to achieve a 10-μL input volume.
•If total input volume is <10 μL, adjust the volume with low-TE buer to achieve a 10-μL input
volume.
6. Prepare samples as shown in the following table, then add them to the appropriate well or tube
(final reaction volume is 25µL).
Sample 28‑cycle protocol 29‑cycle protocol
Negative control 10μL of low‑TE buer 10μL of low‑TE buer
Test sample 10 µL of DNA (1.0 ng input amount) 10 µL of DNA (0.5 ng input amount)
Positive control 10μL of control DNA (0.1ng/μL) 10μL of control DNA (0.1ng/μL)
7. Seal the MicroAmp™ Optical 96-Well Reaction Plate with MicroAmp™ Clear Adhesive Film or
MicroAmp™ Optical Adhesive Film, or cap the tubes.
8. Amplify the samples.
IMPORTANT! See “Instrument and software compatibility” on page15 for a list of optimized
thermal cyclers.
Chapter2Perform PCR: CLA Identifiler™ Plus kit
Prepare the amplification kit reactions
2
20 CLA Identifiler™ Plus andIdentifiler™ Direct PCR Amplification Kits User Guide
/