Page is loading ...

Introduction
These mounting instructions describe the steps necessary for
mounting a supported SonicWall
®
SonicWave 224w access point using
a Standoff Mounting Plate. See the SonicWall SonicWave 224w Quick
Start Guide for additional information on installation and configuration
of the SonicWave 224w.
Included Hardware
The Standoff Mounting Plate hardware includes the plate itself along
with two (2) mounting screws and two (2) anchors.
Standoff Mounting Plate Information
The SonicWave 224w Standoff Mounting Plate, SKU 02-SSC-1005,
is supported for use with the following platforms:
• 01-SSC-2127 SonicWave 224w
• 01-SSC-2128 SonicWave 224w INTL
• 01-SSC-2129 SonicWave 224w JAPAN
Installing the Standoff Mounting
Plate
The SonicWave 224w comes with a standard mounting plate that is
designed to be mounted over an existing wall junction box. With the
Standoff Mounting Plate, you can also mount your SonicWave 224w
using a plate designed specifically for installations with only external
wire sources available. The Standoff Mounting Plate leaves a larger gap
between the desired mounting surface and the SonicWave. This plate is
necessary for some locations as it allows for additional space for
external cable routing.
Standoff Mounting Plate
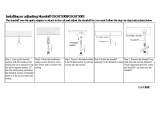
To attach the alternate mounting plate to the wall or ceiling:
1 After determining the best location for your SonicWave 224w,
place the smooth side of the mounting plate against the wall and
with a pencil, mark the location of the two screw holes.
2 Set the plate down and drill two pilot holes at the marked
locations. For a wooden wall, use a drill bit that is slightly smaller
than the provided screws. For drywall, use a drill bit that
accommodates the size of the anchors.
3 For drywall, screw the anchors into the pilot holes.
4 Place the mounting plate against the wall with the holes lined up
on the marks or anchors.
5 Using the provided screws and a screwdriver, securely attach the
mounting plate to the wall.
Installing the SonicWave 224w
This section describes how to connect the PoE and network cables and
then attach the SonicWave 224w to the Standoff Mounting Plate.
The access point is powered by a Power over Ethernet (PoE) device.
SonicWall recommends using CAT5e Ethernet cables to connect the
devices.
To connect the SonicWave 224w to a PoE and the network:
1 Thread the required power and Ethernet cables through the plate’s
left or right side panels.
2 Using an Ethernet cable, connect the Data in port on the PoE
Injector to an existing WLAN zone interface on the firewall or to an
unused interface to be configured later in SonicOS.
3 Using a second Ethernet cable, connect the Data and Power Out
port on the PoE injector to the LAN1/PoE IN port on your
SonicWave 224w.
Refer to your PoE Installation Guide for more information.
Alternatively, insert the Ethernet cable wires into the
corresponding punch down blocks and use a 110 punch down tool
to secure the wires. See the SonicWave 224w Quick Start Guide
Ports section for pin-out information.
4 Plug the power cord of the PoE Injector into an appropriate power
outlet.
5 Wait up to two minutes for the LAN LED on the SonicWave 224w to
illuminate. This indicates an active connection.
6 Optionally connect a second Ethernet cable or wires to the Pass
Through port or punch down blocks.
7 While carefully arranging the cabling for clearance, line up the
holes on the back of the SonicWave with the two tabs on the
Standoff Mounting Plate and click it into place. Using the lock
screw on the left side, finger-tighten the screw to secure the
SonicWave to the plate.
CAUTION: An 802.3at compliant PoE injector or PoE enabled
switch is required to provide power to each SonicWave 224w.
To maintain power to the SonicWave 224w, the maximum
length of CAT5e cable from the PoE device to the SonicWave
224w is 100 meters (333 feet).
NOTE: You can also access the SonicWave’s wiring connections
from the top or bottom of the Standoff Mounting Plate.

Copyright © 2018 SonicWall Inc. All rights reserved.
SonicWall is a trademark or registered trademark of SonicWall Inc. and/or its affiliates in the
U.S.A. and/or other countries. All other trademarks are property of their respective owners.
The information in this document is provided in connection with SonicWall Inc. and/or its
affiliates' products. No license, express or implied, by estoppel or otherwise, to any
intellectual property right is granted by this document. SonicWall Inc. and/or its affiliates do
not make any commitment to update the information contained in this document. For more
information, visit http://www.sonicwall.com/legal.
SonicWall SonicWave 224w Standoff Mounting Plate Installation Guide
Updated - December 2018
232-004658-50 Rev A
Legend
WARNING: A WARNING icon indicates a potential for property damage,
personal injury, or death.
CAUTION: A CAUTION icon indicates potential damage to hardware or loss of
data if instructions are not followed.
IMPORTANT, NOTE, TIP, MOBILE, or VIDEO: An information icon indicates
supporting information.
SonicWall
®
SonicWave
224w Standoff
Mounting Plate
Installation Guide
/