Page is loading ...

INSTALLATION INSTRUCTIONS
P 847•244•1234 www.barclayproducts.com
3/23/09
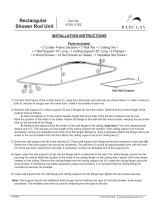
Parts Included
• 2 Corner Pieces • 1 Back Bar (No Inserts) • 1 Front Bar with Grey Inserts • 1 56” Riser Pipe • 2 #331 D-Rod Loops • 1 30” Ceiling Support •
• 1 10” Wall Support • 1 #191-S Code Spout • 2 #300 Flanges • 8 Wall Screws • 2 Small Set Screws • 8 Set Screws •
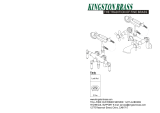
Cat. No.
4198
Code Rectangular
Shower Unit
Tools Needed
• Pencil • Drill & Bits • Measuring Tape • Wrench • Level • Screwdriver •
Installing Code Spout
1. Before beginning any work be sure to shut off the water supply.
2. Apply teflon tape to ends of both the hot and cold supply nipples.
Place valve body through holes in tub. Thread the large locknuts
onto the other ends of the nipples and secure the shower set to the tub.
Assembling Shower Unit
1. Connect both halves of the curtain frame (1) using the ceiling tees and wall tees as shown above. In order to insure a solid fit, the
tees fit snugly over the frame tube. Install 4 set screws in each tee.
2. Remove wall support (6), ceiling support (3) and 2 flanges (4) from the carton. Determine the correct length of the support rods as
follows:
A. Hold one flange (4) to the wall approximately 6’ 3” up from the inside of the tub and centered over the tub. Mark the position
of the holes to be drilled. Fasten the flange to the wall with the wood screws, keeping the set screw hole on the top side of the flange.
B. Measure the distance from the center of the wall flange to the ceiling. Important: From this measurement deduct one 1/2”.
This will give you the length of the ceiling support rod needed. If the ceiling support rod must be shortened, cut the non-threaded end
of the rod to the length desired by using a hacksaw. Attach the flange with a set screw to the non-threaded end and then attach the
ceiling support rod to the ceiling tee (2).
3. Screw the wall support rod (6) to the wall tee (5). Place wall support into flange previously mounted on wall (see 2A). Determine if the
wall support rod should be shortened. The wall tee (5) should be approximately even with the front rim of the tub when viewed from
the side. If necessary, cut the non-threaded end of the support rod.
4. Again, place the wall support rod (6) into the flange which is attached to the wall. The ceiling flange should now be touching the
ceiling. Mark the location of the holes of the ceiling flange on the ceiling with a pencil. Drill holes where marked on the ceiling.
Remove the ceiling flange from the ceiling support rod (3). Install the ceiling flange using the wood screws. If necessary use plastic
expansion plugs (not provided). It is important that the ceiling flange be mounted as securely as possible.
5. Insert wall support rod into wall flange and ceiling support rod into flange then tighten the set screws securely.
6. Insert riser pipe through wall support tee (5). The headless set screw is used for attaching the riser pipe to the tee.
7. Assemble riser pipe to the riser coupling assembly on the spout by tightening the coupling nut. After hand tightening, fasten securely
by using a wrench.
/