
GATES
Installation Tips
Planning
• Priortoconstruction,checkwithyourlocalregulatoryagencyforspecialcoderequirementsinyourarea.
• Contactyourutilitysuppliertolocateandmarkundergroundlines.
• Carefulplanningandmeasuringofyourfenceprojectisessential,asmovingpostsaftertheconcretesetsisextremelydifficult.
Digging Post Holes
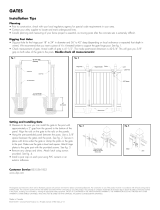
• Digpostholeforthehingepost18”to24”indiameterand36”to42”deep(dependingonlocalordinanceorexpectedfrostdepthin
winter).Werecommendthatyouinsertapieceof4x4treatedlumbertosupportthegatehingepost.Seefig.1.
• Checkmeasurementofgate.Actualwidthofgateis41-1/2”.Theinsidepost-to-postdimensionis42-3/4”Thiswillgiveyou5/8”
gaponbothsidesofthegatetotheposts.Double-check all measurements!
Setting and Installing Gate
• Measuretobesureyoucaninstallthegatetothepostwith
approximatelya2”gapfromthegroundtothebottomofthe
panel.Aligntherailsonthegatetotherailsonthepanels.
• Hangthepre-assembledpanelbetweentheposts.Usea5/8”
spacerbetweenthegatesandtheposts.Seefig.2.Securein
placewithshimsunderthegateorclampthejambonthegate
tothepost.Makesurethegateislevelandsquare.Attachhinge
platestothegatepostwiththeprovidedscrews.Seefig.3.
• Removeanyclampsandshims.Attachlatchusingscrews
provided.Seefig.4.
• InstallapostcaponeachpostusingPVCcementoran
exterioradhesive.
Customer Service877-463-8379
www.verandavinylfencing.com
Thediagramsandinstructionsshownareforillustrationpurposesonlyandarenotmeanttoreplacealicensedprofessional.Anyconstructionoruseoftheproductmustbeinaccordancewithalllocalzoningand/or
buildingcodes.Theconsumerassumesallrisksandliabilityassociatedwiththeconstructionoruseofthisproduct.Theconsumerorcontractorshouldtakeallnecessarystepstoensurethesafetyofeveryoneinvolved
intheproject,including,butnotlimitedto,wearingtheappropriatesafetyequipment.EXCEPTASCONTAINEDINTHEWRITTENLIMITEDWARRANTY,THEWARRANTORDOESNOTPROVIDEANYOTHER
WARRANTY,EITHEREXPRESSORIMPLIED,ANDSHALLNOTBELIABLEFORANYDAMAGES,INCLUDINGCONSEQUENTIALDAMAGES.
MadeinCanada
©2010-2011UniversalForestProducts,Inc.Allrightsreserved.5784Gate_4/11
fig. 3
fig. 4
fig. 1
fig. 2

PUERTAS
Consejos de instalación
Planificación
• Antesdecomenzarlaconstrucción,compruebeconsuagenciareguladoralocalcualquierrequisitoespecialensuárea
• Contácteseconlascompañíasdeserviciospúblicosparalocalizarymarcarlaslíneassubterráneas.
• Esesencialunaplanificaciónymedicióncuidadosadesucerca,puestoquemoverlospostesdespuésdequeelconcretosehaasentado
esextremadamentedifícil.
Excavación de huecos para postes
• Excavehuecosparapostesabisagradosde18pulgadasa24pulgadasdediámetroyde36pulgadasa42pulgadasdeprofundidad
(dependiendodelareglamentacióndeconstrucciónlocalodelaprofundidaddeescarchaqueseespereenelinvierno).Recomendamos
queinserteunapieza4x4pulgadasdemaderatratadaparasoportarlabisagradelapuertaenelposte.VealaFig.1
• Compruebelamedidadelapuerta.Eltamañorealdelapuertaesde41-1/2pulgadasdeancho.Ladimensióninternadeposteaposte
esde42-3/4pulgadas.Estoledaráunaaperturade5/8depulgadaalosdosladosdelapuertahastaelposte.¡Compruebe dos
veces todas las medidas!
fig. 3
fig. 4
fig. 1 fig. 2
Colocación e instalación de la puerta
• Midaparaasegurarsequepuedeinstalarlapuertaalposte
conunespaciodeaproximadamente2pulgadasdesdeel
suelohastalaparteinferiordelpanel.Alineelasbarandil
lasdelapuertaconlasbarandillasdelospaneles.
• Cuelgueelpanelpreensambladoentrelospostes.Use
unespaciadorde¾depulgadaentrelaspuertasylos
postes.VealaFig.2.Asegureensusitioconcuñasdebajo
delapuertaosujetelajambadelapuertaalpostecon
unaabrazadera.Asegúresequelapuertaesténiveladay
encuadrada.Sujetelasplacasdelabisagraalpostedela
puertaconlostornillosprovisto.VealaFig.3.
• Quitecualquierabrazaderaocuñas.Sujeteelpestillo
usandolostornillosprovistos.VealaFig.4.
• InstaleunamoldurasobrecadaposteusandocementoPVC
ounadhesivoparausoexterior.
Customer Service877-463-8379
www.verandavinylfencing.com
Losdiagramaseinstruccionesenestefolletosonsoloconfinesilustrativosynoreemplazanaunprofesionalcertificado.Cualquierconstrucciónousodeesteproductodebeestardeacuerdocontodosloscódigos
localesdeplanificaciónurbanay/oconstrucción.Elconsumidorasumetodoriesgoyresponsabilidadasociadosconlaconstrucciónousodeesteproducto.Elconsumidorocontratistadebetomartodoslospasos
necesariosparagarantizarlaseguridaddetodoslosinvolucradosenelproyecto,incluyendoperonolimitándosealusodelequipoapropiadodeseguridad.EXCEPTOCOMOSEINDICAENLAGARANTÍA
LIMITADAESCRITA,UNIVERSALCONSUMERPRODUCTS,INC.NOOFRECENINGUNAOTRAGARANTÍA,SEAEXPRESAOIMPLÍCITA,YNOSERÁRESPONSABLEDENINGÚNDAÑO,INCLUSODE
DAÑOSCONSIGUIENTES.
©2010-2011UniversalForestProducts,Inc.Todoslosderechosreservados.5784Gate_4/11
HechoenCanadá
-
 1
1
-
 2
2
Ask a question and I''ll find the answer in the document
Finding information in a document is now easier with AI
in other languages
Related papers
-
 Veranda 181989 Operating instructions
-
 Veranda 131171 Installation guide
-
 Veranda 153582 Operating instructions
-
 Veranda 144771 Operating instructions
-
 Veranda 153149 Installation guide
-
 Veranda 116059 Installation guide
-
 Veranda 238593 Operating instructions
-
 Veranda 118680 Installation guide
-
 Veranda 359464 Operating instructions
-
 Veranda 359464 Operating instructions


