Page is loading ...

Pegatha Aluminum Baluster
Round and Square
Installaon Instrucons 2015 V1.0
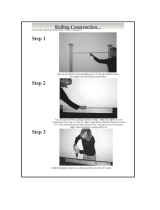
Step #1 – Measure and Cut Railings
Measure the distance between your posts and
note the length.
Use your measurement and mark your top and
bottom rails.
Use a miter saw to cut your rails to the deter-
mined length.
Check all local building codes before you begin!
www.pegatha.net
Step #2 – Determine Baluster Locations
Lay your top and bottom rail next to each other
and mark the center of your rails.
Mark the baluster locations 4 1/2” on center
along both railings. This will allow for 3 3/4” spac-
ing between the balusters.
Apply stain, paint or other finish to the railings
and posts.
Step #3 – Install Baluster Connectors
Locate the previously made marks on your rail-
ings and begin installing the Pegatha baluster con-
nectors.
Be sure not to over tighten your baluster con-
nectors which could cause the screw to become
loose over time.
Double check that your spacing meets local build-
ing codes.
Step #3 – Install Balusters & Rails
Install your bottom rail between your posts.
Install each baluster by lightly tapping them into
place. (use a block of wood to support the rail
while tapping balusters into place).
Install your top railing onto the balusters. Use
pipe clamps if necessary to squeeze the two rails
together.
/