Page is loading ...

Rear Upper Control Arms
Instruction Manual for '18 to Current Wrangler (JL) Part No. 16400-1951
KIT CONTENT LIST:
- Adjustable Rear Upper Control Arms
INSTALLATION BY A CERTIFIED MECHANIC IS STRONGLY ENCOURAGED.
PROFESSIONAL ALIGNMENT IS REQUIRED.
READ ALL SAFETY MESSAGES AND UNDERSTAND ALL INSTRUCTIONS AND PROCEDURE
NOTICES BEFORE ATTEMPTING TO INSTALL OR USE THIS PRODUCT. FAILURE TO INSTALL
OR USE THIS PRODUCT CORRECTLY MAY RESULT IN INJURY OR DEATH!
REQUIRED TOOLS:
Safety Glasses
21mm Socket
Rachet
Large Adjustable Wrench
21mm Wrench
Torque Wrench
Jack / Jack Stands
WARNING

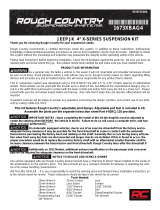
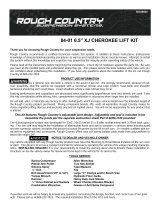
Put on safety glasses. Park the vehicle on a level surface. Set the parking brake and chock the wheels. Use jack
stands and remove the wheels for easier access. Locate the bolts at each end on the upper control arms. Using two
21mm wrenches or combination of 21mm socket and ratchet and wrench, remove each bolt and carefully remove the
control arm. (Fig. 1 & 2) Retain factory bolts, nuts and flag nuts for reuse.
STEP 1
STEP 2
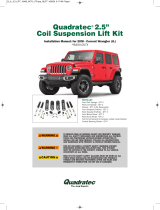
Set the Lynx Adjustable Control Arms to the factory
length or to the desirable length based on your lift height.
We recommend that you preset the length of the lower
control arms. The length is measured from the center of
the bushing to the center of the bushing at the other end.
The final length should be adjusted by a professional to
get the correct amount of castor with an alignment.
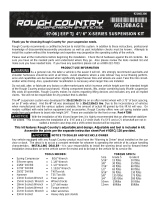
Install the new control arms with the bushing at the axle
mount. Note the placement of the factory mounting flag
bolts removed during Step 1. (Fig. 3)
FIG 1 FIG 2
3
FIG 3
STEP 3
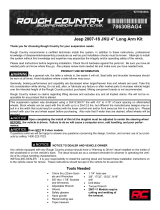
The flag bolt for the upper frame mount should be carefully placed up and through the frame cutout. (Fig. 4) Attach
the adjustable point at the frame mount using the factory bolt from Step 1 (Fig. 5). Once the vehicle is on the ground
and at ride height, tighten the factory control arm bolts to 125 ft-lbs. Once final length adjustments are made, tighten
the jam nut bolt to 80 ft-lbs. Repeat steps for opposite side of vehicle.
FIG 4 FIG 5
/