Page is loading ...

Safety
When dealing with any type of construction project it is necessary to
wear appropriate safety equipment to avoid any risk of injuries.
NewTechWood recommends but is not limited to the following safety
equipment when handling, cutting, and installing the UltraShield
QuickDeck: gloves, a respiratory protection, long sleeves, pants, and
safety glasses.
Tools
Standard woodworking tools may be used. It is recommended that all
blades have a carbide tip.
Environment
A clean, smooth, flat, and strong surface is needed to install
UltraShield QuickDeck correctly. Please check with local building
codes before ever installing any type of decking. If installation does
not occur immediately UltraShield needs to be put on a flat surface at
all times. Never ever should it be put on a surface that isn’t flat.
Layout
Before installing the UltraShield QuickDeck always make sure that you
are installing it on a clean smooth flat surface as shown in Diagram 1.
The UltraShield QuickDeck cannot be installed on places such as dirt,
soil, or raised structure it must be laid out on a flat solid surface.
UltraShield
TM
QuickDeck Installation Instructions
!"#$%#&'(
!"#$%#&')
(

UltraShield
TM
QuickDeck Installation Instructions
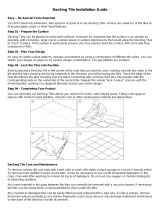
Installation
The UltraShield QuickDeck is relatively easy to
install using its four side interlocking base
making it very user friendly. Each side has two
male and female connectors that connect to an
adjacent tile, these connectors are circled in red
in Diagram 2.
Installing Tiles:
1. Place the first tile in a corner or flush along
the edge of the area you will be installing as
shown in Diagram 3.
2. Next, take another tile and determine which
type of pattern/style you like to do. Vertical is
shown in Diagram 4 and horizontal is show in
Diagram 5.
Protip: Mix around the different styles
(vertical and horizontal) to give your deck a
unique look.
3. Now take the second tile and align the
connectors up with the first tile as shown in
Diagram 6.
4. Then attach the first two connectors into each
other as shown in Diagram 7. You might need
to lift up on one of the tiles to get a better
grip.
5. Finally, attach the last two connectors and
push down to lock everything into place as
shown in Diagram 8.
6. Repeat steps 1-5.
Continued on the Next Page
!"#$%#&'*
!"#$%#&'+ !"#$%#&',
)

UltraShield
TM
QuickDeck Installation Instructions
!"#$%#&'- !"#$%#&'.
!"#$%#&'/
*

UltraShield
TM
QuickDeck Installation Instructions
Installation (Cont.)
Removing Tiles:
1. If a tile needs to be removed the best way to
go about it is to first have one hand grip one
tile’s edge and the other to be on the adjacent
tile as shown in Diagram 9.
2. Next with the gripping the tile pull up towards
your body while the other hand pushes down
on the adjacent tile as shown in Diagram 10.
3. Continue to pull with the gripped hand until
finally all connectors are separated from the
adjacent tile as shown in Diagram 11.
!"#$%#&'0
!"#$%#&'(1 !"#$%#&'((
+

UltraShield
TM
QuickDeck Installation Instructions
Cutting
Cutting the UltraShield Quick is simple and
quick just remember when cutting that you need
a carbide tip blade.
Corners/Edges
1. First measure the corner/edge that will need
to be cut as shown in Diagram 12.
2. Next, take the piece and redraw the measured
area that you will be cutting onto the
QuickDeck.
3. Then, take your QuickDeck and cut either with
a circular saw, table saw, hand saw, or jigsaw.
Always remember to use a carbide tip blade
on these tools as shown in Diagram 13 & 14.
The final piece we cut for this corner is shown
in Diagram 15.
Note: Before cutting always turn the Quick
Deck over and make sure that the cut lines
you have marked on the QuickDeck do not
cross over any screws on the back. Never
ever should you be cutting through the
screws. If your lines cross over these screws
first unscrew the screws and then cut the
QuickDeck.
4. Now, take the QuickDeck and sand down the
sides of the cuts to make them smooth as
shown in Diagram 16.
5. Finally, put the finished piece in its corner/
edge as shown in Diagram 17.
6. Repeat steps 1-5 for any other corners/edges.
!"#$%#&'()
!"#$%#&'(*
,

UltraShield
TM
QuickDeck Installation Instructions
!"#$%#&'(+ !"#$%#&'(,
!"#$%#&'(-
!"#$%#&'(.
-

UltraShield
TM
QuickDeck Installation Instructions
.
/