Page is loading ...

Interlocking Tile Installation Guide
Easy – No Special Tools Required
You don't need any adhesives, tiles spacers or grout or to lay interlocking Tiles. Unless you need to cut the tiles to fit around pipes, posts or other fixed features,
everything you need for a quick and easy installation is included in each Interlocking Tile box. You just need to ensure that the surface is as smooth as possible,
with no bumps or surface depressions that would allow the Decking Tiles to "rock" in place.
Step 01 - Prepare the Surface
Interlocking Tiles can be placed on most hard surfaces. However it's important that the surface is as smooth as possible, with no bumps, large cracks, uneven
areas or surface depressions that would allow the Decking Tiles to "rock" in place. If the surface is particularly uneven, you may need to level the surface with some
patching compound or filler. We do not recommend the installation of Inter locking Tile on bare ground.
Step 02 - Plan Your Design
It's easy to create unique patterns, designs and borders by using a combination of different tile styles. You can sketch your design on paper to try various design
combinations. The possibilities are endless!
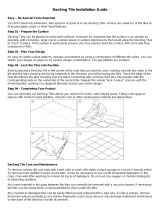
Step 03 - Lock the Tiles into Position
Start by placing an Interlocking Tile in the corner of the area that you want to cover, making sure the two sides of the tile with the tabs showing are facing outwards
in the direction you will be laying the tiles. Place the edge of the next tile without the tabs showing over the black connecting tabs so these tabs lock into position
with the corresponding slots on the underside of the second tile. Repeat this simple "lock in place" process with the remaining tiles, working in a diagonal direction
across your entire design.
Step 04 - Completing Your Project
You can generally avoid cutting Interlocking Tiles where you need to fit around fixed objects, odd shaped areas or against walls simply by filling in the gaps or
spaces with medium sized pebbles, volcanic rock or other landscaping material.
Installation Tips and Tricks
Although the installation of our Interlocking Tiles is very straightforward and trouble-free, there are a few simple tips and techniques that we have learned over
the years that can help make installation even easier.
Please wear gloves when laying the interlocking tile to protect your hand from pinching by the tiles.
The using temperature of the interlocking tile is from -25℃ to +60℃, please do not use the interlocking tile in the temperature higher or lower than this.
If you're not quite sure of the design that you would like to have with your Interlocking Tiles, lay some tiles in the pattern that you think you might like. without
actually clicking them in place together. This will save you time and effort "un-clicking" the Interlocking Tiles if you decide later to choose a different design
pattern. Once you are set on the design that you like. just snap your tiles in place!
When you first start laying the tiles, you will find it much easier to start your design and installation by working outwards from one corner in a triangular
manner. Do this in such a way that you are consistently expanding the size of the triangle as you lay the tiles. This will help make your installation even easier
and more consistent!
If you're planning to install the Interlocking Tiles in an area that is bordered by walls on two sides, we recommend that you don't place the tiles directly against
the boundary walls. unless you are positive that the walls are perfectly at right angles to each other. If the angle of the two walls is less than 90° (which is often
the case), then you'll have a minor alignment issue if you have not planned for an appropriate gap against one of the walls. This is not a major issue, but by
planning ahead you can make your easy installation even easier!
We recommend that you leave a small gap against any boundary wall during your installation to allow for any possible slight expansion of the plastic base due to
temperature or climate variations.
If you are installing the Interlocking Tiles on a patio, balcony or rooftop with open sides, we recommend that you start laying the tiles from the outside of the
decking area and work inwards towards the wall of the house.
If your Interlocking Tile design has a gap of less than one tile's width against an inside wall or around a fixed object, one alternative to cutting a tile to fit is to fill
the gap with pebbles, volcanic rock, bark or any other landscaping material. The creative possibilities are endless!
For an interesting design feature, consider leaving out a few tiles and fill the space with other design accents, like pebbles or colored rock. You can mix and match
for endless variety!
Interlocking Tile Care and Maintenance
To remove surface dirt, just wipe with a wet cloth or wash with water using a sponge or a brush if heavily soiled. To remove more stubborn marks on the tiles, it
may be necessary to use a mild household detergent. In this case, rinse well after washing to remove all traces of detergent. Do not use any oxygen or chlorine
detergents or bleaching solutions.
Any loose material in the gaps between the tiles can normally be removed with a vacuum cleaner. If necessary, the tiles can be hosed down or disassembled to
clean under the tiles.
Any cracked or damaged tiles can be easily lifted out and replaced with a new one. If a tile is broken, remove the broken pieces promptly as any broken fragments
could cause injury or may damage waterproof membranes on the base of the balcony or patio (if present).
The separation of the tile from the base can be occurred when consistently using the Interlocking Tile under extremely high temperature (higher than the using
temperature). Please remove the old glue dot and use the new resin glue (which can buy from the stores) to re-adhere the base and the tiles together.
/