Page is loading ...

Deck Tile Installation Instructions
Getting Started
Deck Tiles are easy and fast to install without the use of
tools. They are ready for immediate outdoor use and can be
installed directly on top of a hard level surface. For best
results, install directly over existing, level concrete surfaces
or existing decking. Some movement between tiles is
necessary to ensure easy installation.
Step 1:
Plan the layout. Measure the area that will be covered. Each
box contains six 12in. x 12in. deck tiles covering an area of
roughly six square feet. For example, a standard 12ft. by
16ft. deck surface (192 sq. ft.) would require approximately
32 boxes.
Step 2:
Thoroughly clean the existing surface before laying the deck
tiles.
Step 3:
Choose a starting point for installation - it is recommended
to begin by placing one tile in a corner.
Step 4:
Continue building outward by connecting each tile together
in the desired pattern and shape. Tiles connect to one
another by placing the connecting pegs from the bottom
edge of a tile into the connecting loops on the bottom edge
of another tile.
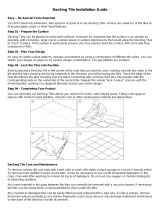
Pattern Samples
Step 5:
If cutting is desired, remove screws that are close to a cut
line prior to cutting. Use a jigsaw or circular saw with a sharp
carbide blade to cut and trim tiles to fit any remaining space
until the desired surface is covered. This can also be done to
trim off unused plastic connecting loops from the edge of
the tile.
Mix Pattern Mix Pattern
Vertical Horizontal
Pattern
Uniform Pattern
/