Page is loading ...

Phone: (800) 435-
ALAN
(2526)
Fax: (877) 333-
ALAN
(2526)
Email: [email protected]
www.
ALAN
mfg.com
Wireless Thermostat Installation Instructions
Made in USA
Model T200WL01
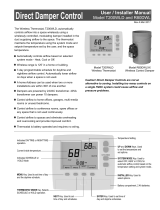
Applications
Automatic control of airflow based on
temperature setpoint.
Features
Set the temperature best suited for
your comfort and the thermostat will
adjust the airflow to insure the space
is not overcooled or overheated.
Over-conditioned airflow is automatically
redirected to spaces that need it.
Use the Nighttime feature to
automatically reduce airflow at night.
Automatically lower airflow on days
the facility is closed.
Manual or 7-day programmable
operation.
Battery operated. Requires no wiring.
Large, backlit LCD display.
Operation
Sensor
Dampers
Airflow Control
Zones
Addresses
Schedule Mode
Hold Mode
System Modes
LCD Backlight
Wireless Control
Automatically controls airflow based on temperature
setting, space temperature and supply air temperature.
Temperature sensor at the WCD damper senses heating or cooling calls.
WCD Dampers/
A80-WL Wireless
Actuator
100% to 0% or minimum airflow set by mechanical stop on the actuator.
1 zone can control up to 32 different dampers.
32 different addresses for different departments, groups or floors.
Programmable start and stop times for daytime operation using
automatic airflow control based on temperature setting.
Automatic airflow control based on temperature setting 24/7.
Off or Auto. In Auto, airflow is controlledby
temperature
setting.
In Off, the airflow is reduced to the preset Off level.
The LCD backlight is turned on whenever a key is pressed.
Uses 915MHz ISM band with proprietary protocol.
Indoorrangeisover100feet.
Battery Powered
Dimensions
Uses two AA batteries.
5.00 x 4.50 x 1.00 inches (LWD)

Phone: (800) 435-
ALAN
(2526)
Fax: (877) 333-
ALAN
(2526)
Email: [email protected]
www.
ALAN
mfg.com
2
Operation
The thermostat communicates with the wireless damper
actuator via an RF wireless data link. It monitors the space
temperature and the setpoint temperature and sends data to
the damper telling it how many degrees the space temperature
is above or below the temperature setting.
The actuator has a temperature sensor that monitors the
supply air temperature to determine if the HVAC system is or
has been calling for heating or cooling. The damper then
opens or closes proportional to the temperature differential it
received from the thermostat.
The thermostat periodically adjusts the airflow. The interval
can be set from 5 to 30 minutes. The change in airflow can be
set to either 8% or 16% per degree of temperature differential.
Energy Savings
The wireless thermostat and damper are used to automatically
control airflow to maintain a comfortable temperature and
eliminate the annoying overcooling and overheating found in
many work areas, offices, restaurants and other spaces.
Excess airflow that caused the overcooling or overheating is
automatically redirected to areas that need it and the
thermostat is satisfied sooner, resulting in less operating time
for the HVAC system.
The thermostat has an Off position that can shut the airflow
down when the office or space is not being used and provide
even greater energy savings. The night setback feature works
the same way and provides added energy savings.
Improved Comfort
The WCD Damper actuator has a Close position limit that can
be used to insure a minimum airflow even when the thermostat
tries to fully close the damper. The minimum Close position
can be set from about 50% closed to fully closed.
This should be used when a large number of WCD Dampers
are used with the same HVAC system to insure that static
pressure does not damage the ducts.
See the Installation Instructions supplied with the WCD
Damper for setting the Close position limit.
Mechanical Bypass
1
Close Cam
Set Screw
Cam Cover
Hold the sub-base with one hand, press the case as shown
below and pull the bottom of the thermostat from the sub-base.
Press here to release
case from sub-base.
Before Installation
Remove the Sub-base
2
The thermostat can be installed on any interior wall
approximately 5 feet above the floor. To insure accurate
reading of the space temperature, the thermostat should not be
in direct sunlight.
Install the sub-base using two #8 or #6 sheet metal screws
with wall anchors where required. Level the thermostat for
appearance.
Installing the Sub-Base
3
Slide the battery cover off and
install two AA lithium or alkaline
batteries. Install the batteries
with the positive terminals to
the right as shown. Replace
the battery cover.
Installing the Batteries
4

Phone: (800) 435-
ALAN
(2526)
Fax: (877) 333-
ALAN
(2526)
Email: [email protected]
www.
ALAN
mfg.com
Installer options can be accessed by pressing and holding the
unmarked key below the System key for seven seconds. The
LCD will display Option 01 for setting the Zone number.
Press or hold the Next key to advance to the next option. The
LCD will advance to Option 11 and return to Option 01. Press
the Cancel key to exit the option selections. Press the Enter
key to save all options in non-volatile flash ram.
Option Description
Zone number
Range
Range
Range
Range
Range
Range
Range
Range
Range
Range
1 to 32
1 to 32
o
1 to 5 F
o
60 to 90 F
o
55 to 80 F
0 to 100%
0 to 100%
0- 8%/F 1-16%/F
5 to 30 minutes
0- On with key
Default
1
1
na
o
1 F
o
80 F
o
65 F
50%
50%
0- 8%/F
10 minutes
On with key stroke
Address number
Program Damper with Zone
and Home address
Dead-band Differential
Update interval
LCD back-light control
High setpoint limit
Low setpoint limit
Damper factor
Night airflow
Off airflow
01
02
03
04
05
06
07
08
09
10
11
Accessing the
Installation Options
5
3
If only one wireless thermostat is used in the installation, the
default Zone 01 and Home 01 can be used. Skip to setting
Option 04. If multiple wireless thermostats are used, each
thermostat and module have to be programmed with a unique
Zone number. The first thermostat can use the factory set
Zone 01 and Home 01 address.
Use the Up and Down keys to set the Zone number for the
other thermostats. The Zone number can be set from 1 to 32.
Press the Next key to
advance to the next option.
Press the Enter key if no
more options are to be
changed. Or press the
Cancel key to exit the
option sequence and return
to normal operation.
Option
Zone
CANCEL NEXT
ENTER
Option 01 Setting Zone Number
Default= 01
601
The Home address is used to distinguish between installations
that are less than 500 feet away. This allows neighbors,
different departments or floors to use the wireless thermostats
and not interfere with each other. Skip to Setting Option 04 if
no other user groups are nearby.
Use the Next key to select Option 02. Use the Up and Down
keys to set the Home number for this thermostat. The Home
number can be set from 1 to 8. If multiple departments are
installing wireless thermostats, each department should use a
different Home number to insure a WCD Damper in another
department is not inadvertently changed.
Option
Home
CANCEL NEXT
ENTER
Setting Home Number
Default= 01
602
After selecting the Zone and Home numbers for the
thermostat, the same address must be set into the WCD
Damper actuator. First press the Program key on the actuator.
The actuator will accept a new address for thirty seconds. The
LED will alternately blink red and green while it is waiting for a
new address. Wireless damper actuators are shipped with
default address Zone=1 and Home=1.
Programming Wireless Damper
6
03
The LCD display for Option 03 is shown below. Press the
Enter key to send the new address to the WCD Damper
actuator. The damper will now only respond to the thermostat
with the same address.
Option
Zone
CANCEL NEXT
ENTER
Press switch to enable
programming Zone
and Home number.
COM
24VAC
GND
VP
TS

Phone: (800) 435-
ALAN
(2526)
Fax: (877) 333-
ALAN
(2526)
Email: [email protected]
www.
ALAN
mfg.com
The difference between the setpoint and room temperature
must exceed the deadband temperature before the thermostat
makes an adjustment to the airflow. If the deadband is set for 1
degree, the room temperature must be more than 1 degree
warmer or cooler than the setpoint temperature before the
damper position is changed
Use the Next key to select
Option 04 and use the Up
and Down keys to set the
Deadband Temperature.
Range is 1 to 5 degrees.
Press the Enter key to save
the setting.
Option
CANCEL NEXT
ENTER
Setting Deadband Temperature
Default= 1 Degree
604
4
The Update Time Interval determines how often the thermostat
sends data to the wireless damper actuator. Shorter times will
use more battery life and provide faster response to
temperature changes. The default setting of 10 minutes is a
good compromise in battery life and responsiveness.
Use the Next key to select
Option 05. Use the Up and
Down keys to set the
Update Time from 5 to 30
minutes. Press Enter to
save the setting.
Set Update TimeInterval
Default= 10 Minutes
605
Option
CANCEL NEXT
ENTER
The LCD uses LEDs to light the display. Battery operated
thermostats light the LCD is only when a key is pressed.
Option 06 is set to 00 and cannot be changed.
Use the Next key to
advance to Option 07.
Option
CANCEL NEXT
ENTER
Set LCD Lighting
Default= On with Key
606
The High Setpoint Limit is the highest setpoint temperature the
user can set.
Use the Next key to select
Option 07. Use the Up and
Down keys to set the High
Setpoint Limit. The limit
can be set from 60 to 90
degrees.
Set High Setpoint Limit
Default= 80 Degrees
607
Option
CANCEL NEXT
ENTER
The Low Setpoint Limit is the lowest setpoint temperature the
user can set.
Set Low Setpoint Limit
Default= 65 Degrees
608
Option
Zone
Home
CANCEL NEXT
ENTER
Use the Next key to select
Option 08. Use the Up and
Down keys to set the Low
Setpoint Limit. The limit
can be set from 55 to 80
degrees.
The WCD Damper position is adjusted proportional to the
differential between setpoint and room temperatures. The
Damper Factor is the percent change in damper position or
airflow for one degree of temperature differential.
Use the Next key to select
Option 09. Use the Up and
Down keys to select 8% or
16% change in damper
position per degree in
temperature differential.
Press the Enter key to save
the selection.
Option
CANCEL NEXT
ENTER
Set Damper Factor
Default= 8%/Degree
609
The Nighttime Airflow is the airflow level that is automatically
set when using the scheduled nighttime setback. The lower
airflow will reduce energy consumption.
Use the Next key to select
Option 10. Use the Up and
Down keys to set the
Nighttime Airflow from 0 to
100%. Press Enter to save
the setting.
Option
CANCEL NEXT
ENTER
Set Nighttime Airflow
Default= 50%
610
The OffAirflow is the airflow level that is automatically set when
the System is set to Off. The lower airflow reduces energy
consumption.
Use the Next key to select
Option 11. Use the Up and
Down keys to set the Off
Airflow from 0 to 100%.
Press Enter to save the
setting.
Set OFF Airflow Level
Default= 50%
611
Option
CANCEL NEXT
ENTER
/