Page is loading ...


2 | Ottobock Avantgarde CV/CS/CLT

Foreword1 5..............................................................................................................................................................
Application2 5...........................................................................................................................................................
Intended Use2.1 5.......................................................................................................................................
Special features of Avantgarde CLT2.1.1 5........................................................................................................
Indications2.2 5...........................................................................................................................................
Contraindications2.3 6.................................................................................................................................
Necessary qualifications2.4 6........................................................................................................................
Safety3 6....................................................................................................................................................................
Explanation of Warning Symbols3.1 6.............................................................................................................
General safety instructions3.2 6.....................................................................................................................
Safety instructions for assembly3.3 6..............................................................................................................
Name plate3.4 7..........................................................................................................................................
Delivery4 7.................................................................................................................................................................
Scope of supply4.1 7....................................................................................................................................
Options4.2 7...............................................................................................................................................
Storage4.3 7...............................................................................................................................................
Preparation for Use5 8............................................................................................................................................
Tools required5.1 8......................................................................................................................................
Assembly5.2 8.............................................................................................................................................
Adjustments6 9.........................................................................................................................................................
Prerequisites6.1 9........................................................................................................................................
Special features of the Avantgarde CLT6.2 9...................................................................................................
Adjustment of the rear wheel6.3 9..................................................................................................................
Adjustment of horizontal rear wheel position6.3.1 10...........................................................................................
Adjustment of the rear wheel adapter position in the frame6.3.1.1 10.......................................................................
Adjustment of the shock absorber in the frame6.3.1.2 11........................................................................................
Adjustment of the seat height and seat angle6.3.2 12..........................................................................................
Adjustment in the rear wheel adapter 6.3.2.1 12....................................................................................................
Adjustment in the Shock Absorber6.3.2.2 13........................................................................................................
Adjustment of the track width at the fitting (additional adjustment)6.3.3 13.............................................................
Adjustment of the rear wheel camber6.3.4 13.....................................................................................................
Adjustment of the 0°/2°/3°/4° rear wheel camber6.3.4.1 14....................................................................................
Adjusting the Caster Wheels6.4 14................................................................................................................
Adjustment of the front wheel journal angle6.4.1 14............................................................................................
Repositioning the front wheel6.4.2 15................................................................................................................
Adjusting the Brakes6.5 16...........................................................................................................................
Adjusting the Knee Lever Wheel Lock6.5.1 16...................................................................................................
Adjusting the Braking Force of the Drum Brake6.5.2 17......................................................................................
Adjustment of the backrest6.6 17...................................................................................................................
Adjustment of the backrest height6.6.1 17.........................................................................................................
Adjusting the Back Angle6.6.2 18.....................................................................................................................
Adjusting the push handles6.6.3 18..................................................................................................................
Adjusting the back/seat upholstery6.7 19........................................................................................................
Adjustment of the backrest cover6.7.1 19..........................................................................................................
Seat cover Standard/Business6.7.2 19..............................................................................................................
Seat cover adaptable6.7.3 20...........................................................................................................................
Adjustment of the footrests/foot brackets/foot supports6.8 20............................................................................
Adjustment of the lower leg length6.8.1 21.........................................................................................................
Footrests/foot brackets on Avantgarde CS/CLT6.8.1.1 21......................................................................................
Footrests/foot brackets on Avantgarde CV6.8.1.2 21.............................................................................................
Folding footrest with automatic length adjustment 6.8.1.3 21..................................................................................
Footrest for short lower leg lengths6.8.1.4 22.......................................................................................................
Table of contents
Ottobock | 3Avantgarde CV/CS/CLT
Table of contents

Amputation leg rest6.8.1.5 22.............................................................................................................................
Adjustment of the support angles6.8.2 22..........................................................................................................
Angle-adjustable foot supports with locking joint6.8.2.1 22.....................................................................................
Angle-adjustable foot brackets6.8.2.2 23..............................................................................................................
Amputation leg rest6.8.2.3 23.............................................................................................................................
Adjustment of the side panels6.9 24...............................................................................................................
Adjusting the armrest height on desk side panels6.9.1 24....................................................................................
Adjustment of the Standard Side Panel and Clothing Protector6.9.2 24.................................................................
Installing/Adjusting the Anti-Tipper6.10 25........................................................................................................
Installing the vertical accessory mount6.10.1 25...................................................................................................
Installing the anti-tipper6.10.2 26........................................................................................................................
Adjustment of the anti-tipper6.10.3 27.................................................................................................................
Installing/Adjusting the Safety Belt6.11 28........................................................................................................
Handover7 28............................................................................................................................................................
Final check7.1 28........................................................................................................................................
Transport to the customer7.2 28....................................................................................................................
Handover7.3 28...........................................................................................................................................
Maintenance/Repair8 29.........................................................................................................................................
Disposal9 29.............................................................................................................................................................
Disposal information9.1 29............................................................................................................................
Information on re-use9.2 29...........................................................................................................................
Legal Information10 29..............................................................................................................................................
Liability10.1 29..............................................................................................................................................
CE Conformity10.2 29....................................................................................................................................
Warranty Terms and Conditions10.3 30............................................................................................................
Technical Data11 30...................................................................................................................................................
4 | Ottobock Avantgarde CV/CS/CLT
Table of contents

1 Foreword
INFORMATION
Date of the last update: 2013-08-12
► Please read this document carefully.
► Follow the safety instructions.
INFORMATION
Missing instructions for use or service manuals can be downloaded from the homepage at www.ottobock.com.
Missing instructions for use can also be ordered directly from the manufacturer's service department (see back
cover or inside back cover for addresses).
Initial adjustments to the product were made according to the order form. Nevertheless, fine adjustment may be
required and settings may have to be made according to the medical conditions or the user's requirements.
These instructions for use provide the information necessary for adjusting the settings. This work should be closely
coordinated with the user.
Please note the following:
• The instructions for use (qualified personnel) are intended only for qualified personnel and remain with them.
• The operation of the product and functionality of the options are described in the instructions for use (user).
These instructions for use must be given to the user.
• Children and youths must be instructed in the use of the product by you or an attendant using the instructions
for use (user).
• The manufacturer recommends checking the product settings regularly in order to assure an optimum fit over
the long term. A review is required every six months for children and youths in particular.
• The installation and retrofitting of all optional components are generally described in the service manual.
2 Application
2.1 Intended Use
The wheelchair is intended solely for everyday indoor and outdoor use by people who are unable to walk or have a
walking impediment and can be operated by the patient or another person.
The wheelchair may only be used with the options listed in the product order form.
Ottobock assumes no liability for combinations with medical devices and/or accessories from other manufacturers
not included in the modular system.
2.1.1 Special features of Avantgarde CLT
In the welded version, the Avantgarde CLT has a welded fitting for mounting of the rear wheel and a welded back
rest. In this weight-saving version, the rear wheel and backrest height cannot be subsequently adjusted. Further
more, installation of certain options (e.g. anti-tipper) is not possible.
For these reasons, this wheelchair version is intended only for experienced users with sporting ambitions who,
thanks to their physiological capabilities, are able to handle the wheelchair proficiently. Before supplying this ver
sion, the user should be examined intensively for suitability (adequate physiological capabilities).
2.2 Indications
The broad range of equipment options and the modular design allow the wheelchair to be used by people who are
unable to walk or have a walking impediment, for example due to:
• Paralysis (paraplegia, tetraplegia)
• Loss of limbs (leg amputation)
• Defects or deformation of the limbs
• Joint contractures or damage
• Neurological and muscular diseases
• Disorders such as cardiac or circulatory insufficiency, equilibrium disturbances or cachexia as well as geriatric
patients who still have usable residual strength in the upper limbs.
The wheelchair was designed in particular for individuals who are generally able to move around actively and
freely in the wheelchair.
Ottobock | 5Avantgarde CV/CS/CLT
Foreword

2.3 Contraindications
In view of the wide variety of setting options (e.g. active/passive settings), this wheelchair type is suitable for all
user groups.
In certain versions and with certain settings, however, the wheelchair tends to tip backwards due to its design.
This is an intentional feature designed to enable users with the corresponding physical prerequisites to manoeuvre
quickly and nimbly. Users lacking the necessary physical or psychological prerequisites must not be supplied with
such versions/settings.
Due to its dimensions, this wheelchair type should not be used for small children.
2.4 Necessary qualifications
The installation and adjustments described below may only be carried out by qualified personnel.
3 Safety
3.1 Explanation of Warning Symbols
WARNING
Warnings regarding possible risks of severe accident or injury.
CAUTION
Warnings regarding possible risks of accident or injury.
NOTICE
Warnings regarding possible technical damage.
3.2 General safety instructions
WARNING
Lack of instruction
Risk of falling, tipping over due to lack of knowledge
► Instruct the user or the attendant in the proper use of the product when handing it over.
CAUTION
Use of unsuitable tools
Pinching, crushing or damaging the product
► When working, use only tools that are suitable for the conditions at the workplace and whose proper use
ensures safety and health protection.
NOTICE
Tipping or falling of the product
Damage to the product
► When you work on the product, secure it so that it cannot tip over or fall over.
► Use a clamping device to secure the product for all work at a workbench.
NOTICE
Use of unsuitable packaging
Damage caused by transport in the wrong packaging
► Use only the original packaging for delivery of the product.
3.3 Safety instructions for assembly
CAUTION
Incorrect fitting of the rear wheels
Risk of falling or tipping due to wheels coming loose
► After every assembly, check the proper mounting of the rear wheels. The wheel axles must be securely locked
in the fitting.
6 | Ottobock
Safety
Avantgarde CV/CS/CLT

CAUTION
Modified diameters/mounting positions of the wheels
Risk of falling of tipping of the user due to locking wheels
► Modification of the size and position of the front wheels and of the rear wheel size can lead to wobbling of the
front wheels at higher speeds. If modification is necessary, ensure proper horizontal alignment of the wheel
chair frame (see chapter "Adjustment of the rear wheel", "Adjustment of the front wheel").
CAUTION
Incorrect installation of the anti-tipper/missing anti-tipper
Risk of the user tipping to the rear
► Depending upon the settings of the chassis, the centre of gravity, the back angle and the experience of the
user, the use of an anti-tipper may be necessary.
► For a small wheelbase and a backrest that is tilted far back, an anti-tipper may need to be installed on both
sides, depending upon the user's experience.
► Verify that the anti-tipper has been installed and adjusted properly. Find the appropriate position with the
assistance of a helper.
3.4 Name plate
Label Meaning
A Type designation
B Manufacturer article number
C Maximum load capacity (see section "Technical Data")
D Manufacturer information, address, country of origin
E Serial number, manufacturing date
F European Article Number (Global Trade Item Number)
G Read the instructions for use before using the product.
H CE marking – product safety according to EU guidelines
The name plate is located on the cross-
brace.
I Only for Avantgarde CLT: the product has not been approved
by the manufacturer for use as a seat in a wheelchair accessible
vehicle
See the instructions for use (user) for additional warning labels
4 Delivery
4.1 Scope of supply
The wheelchair is delivered preassembled, folded and with the rear wheels removed packed in a crate.
The following items are included in the delivery:
• preassembled wheelchair
• 2 rear wheels
• footrests
• instructions for use (qualified personnel), instructions for use (user).
INFORMATION
Only provide the instructions for use (user) to the user.
Seat cushions are not included and must be ordered separately.
4.2 Options
The functionality and operation of the options are described in more detail in the instructions for use (user).
All of the available options/accessories are listed on the order form.
4.3 Storage
The wheelchair must be stored in a dry place.
Ottobock | 7Avantgarde CV/CS/CLT
Delivery

The ambient temperature must be maintained between -10 °C and +40 °C during transportation and storage.
During extended storage, the knee lever wheel lock on wheelchairs with PU tyres must be released since tyre
deformation may otherwise result.
INFORMATION
Tyres contain chemical substances that can react with other chemical substances (such as cleaning agents,
acids, etc.).
5 Preparation for Use
5.1 Tools required
The following tools are required to make fine adjustments/settings:
• hex keys in sizes 3 – 5 mm
• ring and open-ended wrenches in sizes 10, 19 and 24
• socket wrenches in sizes 10 and 19
• Phillips-style screwdriver, size 2
• flat screwdriver, size 3
• torque wrench (measurement range 5 – 50 Nm)
5.2 Assembly
CAUTION
Exposed pinch points
Risk of crushing or pinching the fingers
► When folding the wheelchair out or together, only grip by the specified components.
CAUTION
Incorrect fitting of the rear wheels
Risk of falling or tipping due to wheels coming loose
► After every assembly, check the proper mounting of the rear wheels. The wheel axles must be securely locked
in the fitting.
INFORMATION
For details of weights of the individual parts, see chapter "Technical Data".
1) Push the rear wheels into the fitting. It must not be possible to pull off the wheel shafts when the button is
released.
2) Loosen the safety strap.
3) Fold the wheelchair open.
4) Fold the footrest(s) down. When using a single-panel footrest, be sure the support of the footplate is locked
into the receiver.
5) Place the cushion onto the seat.
8 | Ottobock
Preparation for Use
Avantgarde CV/CS/CLT

6 Adjustments
6.1 Prerequisites
WARNING
Incorrect settings
Risk of falling, tipping over or improper user posture due to incorrect settings
► Adjustments may be carried out only by qualified personnel.
► Only the settings described in these instructions for use may be carried out.
► Settings may only be changed within the allowable adjustment ranges; otherwise, the stability of the product
may be impaired (see this chapter and the chapter "Appendixes"). If you have questions, contact the manu
facturer's service (see back cover for addresses).
► Only conduct tests in the presence of an assistant.
► Unless expressly described, you may not change any settings with a person sitting in the product.
► Secure the user against falling out during all tests.
► Before testing setting changes with the user seated, firmly tighten all screw connections.
► Check for safe function before delivering the product.
CAUTION
Unsecured screw connections
Risk of pinching, crushing, tipping over, falling of user
► After all adjusting/readjusting work, retighten the mounting screws/nuts firmly. Observe any torque settings
which may be specified.
► Any time you loosen a screw connection with thread lock, replace it with a new screw connection or secure
the old screw connection with medium strength thread locker (e.g. Loctite 241
®
).
CAUTION
Improper use of self-locking nuts
Risk of the user falling or tipping over
► Always replace self-locking nuts with new self-locking nuts after disassembly.
Fine adjustments and setting changes to match the concrete physical and mental condition of the user should
always be made in the user's presence.
All parts of the product should be cleaned thoroughly before adjustments are made.
6.2 Special features of the Avantgarde CLT
Lightweight construction was strictly applied in the design of the Avantgarde CLT ultra-light active wheelchair. This
necessitates the greatest possible care during adjustment.
In particular the tightening torques for the bolts of high-strength aluminium alloy must be strictly observed (see
table).
Bolt diameter (mm) Maximum torque for aluminium bolts (Nm)
6 5.5
8 13
Before the first assembly or re-use of the aluminium bolts, inspect the threads for damage. We recommend that
new aluminium bolts are used at each (re-)assembly.
Use a liquid bolt locking compound on the aluminium bolts (e.g., Loctite 241
®
).
6.3 Adjustment of the rear wheel
CAUTION
Lack of fine adjustment of the rear wheel
Risk of falling or tipping of the user
► Check the standard adjustments of the wheelchair for stability against tipping and function of the rear wheels.
Avoid any extreme settings.
Ottobock | 9Avantgarde CV/CS/CLT
Adjustments

CAUTION
Incorrectly adjusted wheelbase
Risk of falling or tipping of the user
► Please note that with the rear wheel in the front position and with an unfavourable body position, the user may
tip backwards even on level ground.
► Use an anti-tipper for inexperienced users and with extreme settings of the rear wheel.
► Be sure to position the rear wheels towards the rear for transfemoral amputees. That improves the stability of
the wheelchair.
INFORMATION
Changing the rear wheel position can also change the angle between the front caster head and the ground.
However, this must be approx. 90°. The knee lever wheel lock also has to be readjusted.
INFORMATION
The rear wheel adapters are marked with the letters L/R for installation on the correct sides:
► L = Install adapter on left side in travel direction
► R = Install adapter on right side in travel direction
6.3.1 Adjustment of horizontal rear wheel position
The horizontal rear wheel position is changed by moving the rear wheel adapter or the shock absorber horizontally
in the frame. This has the following effects:
Position of rear wheel Effects
Move to rear
• Larger wheelbase
• Larger turning circle
• Greater stability of the wheelchair
• Wheelchair is harder to tip backwards when crossing obstacles
• Position recommended for inexperienced users
Move forwards
• Smaller wheelbase
• Less load on castor wheels = greater manoeuvrability
• Less stability of the wheelchair
• Wheelchair is easier to tip backwards when crossing obstacles
NOTE: An anti-tipper can be installed if necessary.
• Position recommended only for experienced users
6.3.1.1 Adjustment of the rear wheel adapter position in the frame
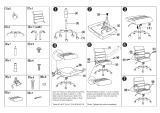
The rear wheel adapter can be adjusted horizontally to 7 positions (see Fig.70).
Adjusting the horizontal position of the rear wheel adapter
1) Loosen and remove the Allen head bolts with lock rings (see Fig.1, item 1).
2) Push the rear wheel adapter to the desired position (see Fig.2).
3) Insert the lock rings and tighten the Allen head screws to 7 Nm (see Fig.1, item 1).
→ Once changed, the left and right rear wheel adapter must have the same horizontal position on the frame.
10 | Ottobock
Adjustments
Avantgarde CV/CS/CLT

1 2
Rotating the rear wheel adapter and adjusting its horizontal position
From position E, the rear wheel adapter must be rotated (see Fig.70) in order to be able to adjust the position of
the rear wheel adapter further forwards (for very active settings).
1) Loosen and remove the Allen head bolts with lock rings (see Fig.1, item 1).
2) Turn the rear wheel adapters 180° about their own axis and swap them over (see Fig.3):
→ Rear wheel adapter L = left side (see Fig.4, item1) goes on the right side.
→ Rear wheel adapter R = right side (see Fig.4, item2) goes on the left side.
3) Push the rear wheel adapter to the desired position (see Fig.5).
4) Insert the lock rings and tighten the Allen head screws to 7 Nm (see Fig.6).
3 4
5 6
6.3.1.2 Adjustment of the shock absorber in the frame
The shock absorber can be continuously adjusted in the horizontal direction in the frame.
1) Loosen the clamping bolts on the half cups of the shock absorber top and bottom (see Fig.7, item 1).
2) Move the shock absorber. Use the bores in the frame for orientation (see Fig.8, item 1).
3) Tighten the clamping screws to 8 Nm (see Fig.8, item 2).
→ Once changed, the left and right shock absorber must have the same horizontal position on the frame.
Ottobock | 11Avantgarde CV/CS/CLT
Adjustments

7 8
6.3.2 Adjustment of the seat height and seat angle
The seat height and the seat angle are adjusted by moving the fitting (wheel axle mounting) vertically in the rear
wheel adapter. This has the following effects:
Position of rear wheel Effects
Move upwards
• The higher the rear wheel position, the more the seat surface is tilted to
the rear
• Wheelchair is easier to tip backwards when crossing obstacles
• The change in the centre of gravity results in a lower, more stable seat
position in the wheelchair
• The seat height can be further adjusted in combination with a height
adjustment of the caster wheels.
Move downwards
• The lower the rear wheel position, the less the seat surface is tilted to the
rear
• Wheelchair is harder to tip backwards when crossing obstacles
• The seat height can be further adjusted in combination with a height
adjustment of the caster wheels.
6.3.2.1 Adjustment in the rear wheel adapter
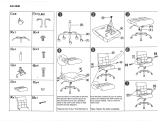
The rear wheel can be installed at 12 height positions in the rear wheel adapter.
1) Loosen the nuts on both sides of the fitting (see Fig.9, see Fig.10).
2) Pull the camber washers apart until the fitting can be moved (see Fig.11).
3) Push the fitting together with the nuts and camber washers to the desired position.
4) Pay attention to the following when tightening the fitting (see Fig.11):
→ Position the teeth of the camber washers offset from one another.
→ Position the groove of the camber washers as parallel and upright as possible.
5) Insert the spirit level holder into the groove (see Fig.12, item 1).
6) Insert the spirit level and align the camber washers upright (see Fig.12, item 2).
7) Tighten the nuts on both sides of the fitting to 50 Nm.
→ After adjusting, the left-hand and right-hand fittings must have the same horizontal position in the frame.
12 | Ottobock
Adjustments
Avantgarde CV/CS/CLT

9 10
11 12
6.3.2.2 Adjustment in the Shock Absorber
The rear wheel can be installed at 3 height positions on the shock absorber.
1) Loosen the nuts on both sides of the fitting (see Fig.13, item 1).
2) Remove and change the installation position of the fitting.
3) Before installing the fitting, position the camber washers offset from one another (for 0° wheel camber; see
Fig.13, item 2).
4) Tighten the nuts to 50 Nm.
→ Once changed, the left and right fitting must have the same vertical position on the shock absorber.
13
6.3.3 Adjustment of the track width at the fitting (additional adjustment)
After loosening the mounting nuts, the fitting position can be adjusted inwards or outwards. This allows the dis
tance of the rear wheel to the side panel to be continuously adjusted.
6.3.4 Adjustment of the rear wheel camber
The rear wheel camber is adjusted by exchanging the camber washers in the fitting (wheel axle mounting). This has
the following effect:
Ottobock | 13Avantgarde CV/CS/CLT
Adjustments

Position of rear wheel Effect
Wheel camber 2°/3°/4°
• Wheelchair becomes more manoeuvrable, turns faster and tips less easily
to the side
• Seat angle to the rear increases
• Increased rolling resistance
0° position
• Narrow track, excellent straight ahead running
• Low rolling resistance
6.3.4.1 Adjustment of the 0°/2°/3°/4° rear wheel camber
The Avantgarde modular system provides a rear wheel adapter which can be used to set the rear wheels at differ
ent camber angles (0°, 2°, 3° and 4°, for CLT welded in position: 0° and 2.5°).
1) Remove the outer mounting nut of the fitting.
2) Pull the fitting out of the rear wheel adapter.
3) Remove the front/rear camber washers (see Fig.14) and replace with new camber washers (see Fig.15). The
respective wheel camber angle is engraved in the camber washer.
4) Pay attention to the following when tightening the fitting (see Fig.11):
→ Position the teeth of the camber washers offset from one another.
→ Position the groove of the camber washers as parallel and upright as possible.
5) To correct the toe angle, insert the spirit level holder into the groove (see Fig.17, item 1).
6) Insert the spirit level and align the camber washers upright (see Fig.17, item 2).
7) Tighten the nuts on both sides of the fitting to 50 Nm.
→ After adjustment, the camber of the left and right rear wheels must have the same angle.
14 15
16 17
6.4 Adjusting the Caster Wheels
6.4.1 Adjustment of the front wheel journal angle
When the rear wheels have been adjusted for the user, the castor journal angle must be adjusted at the castor
wheel adapter.
The threaded axle in the caster wheel adapter should be perpendicular to the ground to ensure optimum rolling
behaviour of the wheelchair. The caster wheel adapter permits a continuous adjustment of this angle.
14 | Ottobock
Adjustments
Avantgarde CV/CS/CLT

1) Remove the protective cap.
2) Slightly loosen the Allen head screw on the eccentric (see Fig.18).
3) Slightly loosen the Allen head screws on the inside of the frame (see Fig.19).
4) Position the spirit level (see Fig.20, item 1).
5) Adjust the caster angle to 90° with a wide flat screwdriver. The spirit level must be in the centre position to do
so (see Fig.20, item 2).
6) Tighten the Allen head screw on the eccentric to 8 Nm (CLT: 5.5 Nm) (see Fig.21).
7) Tighten the Allen head screws on the inside of the frame to 23 Nm (CLT: 13 Nm).
→ The threaded axle on both caster wheel adapters must be positioned vertically.
18 19
20 21
6.4.2 Repositioning the front wheel
INFORMATION
Observe the seat height table in the "Technical Data".
The height of the seat front is adjusted via the row of holes in the fork and via the front wheel diameter.
1) Loosen the nut of the screw shaft (see Fig.22).
2) Remove the screw shaft and spacers (see Fig.23).
3) Remove the front wheel.
4) Insert the screw shaft with the 1st spacer bush offset (see Fig.24, item 1).
5) Install the front wheel.
6) Push on the 2nd spacer bush (see Fig.25, item 1).
7) Tighten the nut of the screw shaft to 8 Nm.
→ After adjusting, the left and right front wheel must have the same vertical position in the front wheel fork.
Ottobock | 15Avantgarde CV/CS/CLT
Adjustments

22 23
24 25
6.5 Adjusting the Brakes
6.5.1 Adjusting the Knee Lever Wheel Lock
CAUTION
Insufficient braking of the knee lever wheel lock
Risk of accidents, falling
► Check the air pressure of the rear wheels and the correct setting of the knee lever wheel lock. The correct
tyre pressure is printed on the tyre. For rear wheels, the minimum air pressure is 7bar.
► Only use original rear wheels with a verified maximum radial and lateral run-out of 0.5mm.
CAUTION
Lack of instruction in the use of the "folding" knee lever wheel lock
Risk of accident, falling due to loss of functionality
► Instruct the user how to correctly operate the "folding" knee lever wheel lock. Incorrect operation could lead
to a loss of functionality due to the wheel lock being released.
► The correct operation is shown in the instructions for use (user).
► In particular, practise the correct sequence when braking:
→ First, apply the knee lever wheel lock.
→ Then, fold away the wheel lock lever.
This adjustment must be made after the rear wheel has been repositioned or during fine adjustment.
1) Loosen the Allen head bolts in the slide block on the underside of the frame (see Fig.26).
2) The knee lever wheel lock is continuously adjustable in the slotted hole. When the wheel lock is disengaged the
gap between the tyre and wheel lock bolt may not exceed 5mm (see Fig.27).
3) Tighten the Allen head screws.
→ After adjustment the left and right knee lever wheel locks must both have the same braking force.
16 | Ottobock
Adjustments
Avantgarde CV/CS/CLT

26
5 mm
27
6.5.2 Adjusting the Braking Force of the Drum Brake
INFORMATION
Note that the drum brake shows sufficient braking force only when the manual brake lever is locked in the 2nd
ratchet position.
To achieve an optimum braking effect, the braking force is adjusted at the adjustment screw (see Fig.28, item 2).
• Increase the braking force: Back off the adjusting screw.
• Reduce the braking force: Screw in the adjustment screw.
1) Loosen the counter nut (see Fig.28, item 1) and back off the adjustment screw until a scraping noise can be
heard when the rear wheel is rotated.
2) Screw in the adjustment screw (see Fig.28, item 2) until the scraping noise at the rear wheel disappears and
the wheel runs freely.
3) Tighten the counter nut (see Fig.28, item 1) until the adjustment screw is fixed.
→ The braking force of both rear wheels must be adjusted equally.
28
6.6 Adjustment of the backrest
6.6.1 Adjustment of the backrest height
The backrest height is adjustable by 10 cm. The backrest tube integrated into the rear frame allows the backrest
height to be adjusted in steps of 2.5 cm.
1) Remove the side panels.
2) Remove the lower mounting screw(s) (depending on the version) from the rear frame (see Fig.29).
3) Remove the mounting screw for the desk side panel bracket (see Fig.30).
4) Adjust the desired backrest height.
5) Tighten the removed Allen head screws to 7 Nm.
→ Both backrest tubes must be adjusted to the same height.
Ottobock | 17Avantgarde CV/CS/CLT
Adjustments

29 30
6.6.2 Adjusting the Back Angle
CAUTION
Missing anti-tipper
Risk of tipping of the user to the rear
► If the back is tilted far to the rear and in the case of a short wheelbase, 2 anti-tippers (one on each side) must
be mounted and in a functional position; in the case of a long wheelbase, at least one anti-tipper must be
mounted and in a functional position.
► Check that the anti-tipper is securely attached.
When using a backrest with angle adjustment, the backrest angle can be adjusted from -9° to +15° in 6° steps to
meet the needs of the user.
When using a backrest with angle adjustment in combination with desk side panels, the back angle can only be
adjusted from -6° to +15°.
1) Loosen the mounting bolt (Allen head screw).
NOTICE! Ensure that the mounting bolt is loosened enough to avoid damage to the ratchet mechan
ism.
2) Carry out the adjustment in the same way on both sides.
3) Tighten the mounting screw.
31
6.6.3 Adjusting the push handles
The height of the push handles of the wheelchair (height-adjustable push handle: see Fig.32; telescoping push
handle: see Fig.33) can be adjusted to make pushing easier for the attendant.
1) Release the clamping lever.
2) Adjust the height of the push handle.
3) Lock the clamping lever securely.
→ Both push handles must be adjusted to the same height.
18 | Ottobock
Adjustments
Avantgarde CV/CS/CLT

32 33
INFORMATION
The use of desk side panels and height-adjustable/removable push handles limits the lowest height setting of the
push handles.
6.7 Adjusting the back/seat upholstery
6.7.1 Adjustment of the backrest cover
INFORMATION
A well-adjusted backrest provides lasting comfort for the wheelchair user and reduces the risk of secondary dam
age and pressure zones. Do not create too much pressure.
INFORMATION
Ensure that the user's pelvis is positioned as far back in the wheelchair as possible, i.e. between the backrest
tubes.
The backrest cover can be adjusted in segments to the needs of the user.
1) Remove the backrest upholstery.
2) Open the Velcro fasteners of the backrest bands.
3) Fasten the backrest bands together with the desired tension using the Velcro fasteners.
4) Fit the backrest upholstery again and fix with the Velcro fasteners.
34
6.7.2 Seat cover Standard/Business
1) Remove the seat cushion.
2) Pull off the protective cap (see Fig.35).
3) Pull the seat cover out of the cross-brace (see Fig.36).
4) Loosen the Velcro fastener on the underside of the seat cover (see Fig.37).
5) Pull the seat cover tauter.
6) Close the Velcro fastener.
Ottobock | 19Avantgarde CV/CS/CLT
Adjustments

7) Push the seat cover onto the cross-brace.
8) Push on the protective cap.
9) Unfold the wheelchair. The cross-brace must be seated fully in the support guides.
35 36
37
6.7.3 Seat cover adaptable
1) Remove the seat cushion.
2) Release the seat support from the Velcro fastener on the upper side of the seat cover (see Fig.38).
3) Open the Velcro fasteners of the backrest bands (see Fig.39).
4) Fasten the backrest bands together with the desired tension using the Velcro fasteners.
5) Fix the seat support to the upper side of the seat cover with the Velcro fastener (see Fig.38).
6) Fit the seat cushion.
38 39
6.8 Adjustment of the footrests/foot brackets/foot supports
The foot supports are the supporting surfaces for the feet.
Their distance from the seat surface influences sitting stability. The height adjustment acts on the pelvis and ischial
bones. The angle of the foot supports should permit a comfortable ankle position.
20 | Ottobock
Adjustments
Avantgarde CV/CS/CLT
/