PROCEDURE:
REMOVE CONTENTS FROM BOX. VERIFY ALL PARTS ARE PRESENT. READ INSTRUCTIONS
CAREFULLY BEFORE STARTING INSTALLATION.
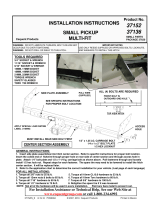
1. Locate the mounting holes in the frame cross member behind the rear bumper, (Figure 1).
2. Carefully unwrap the Receiver Hitch. Line up the holes in the Hitch with the cross member.
3. Attach the Hitch to the cross member with the included (4) 12mm x 110mm Hex Bolts, (8) 12mm Flat
Washers and (4) 12mm Nylon Lock Nuts, (Figures 2 & 3). NOTE: Insert the Hex Bolts from the front of
the cross member through the back. Leave hardware loose at this time.
4. Select the 4-Pin Wire Harness Bracket, (Figure 2). Remove the Flat Washer and Lock Nut from the
driver/left outer end of the Receiver Hitch. Slide the Harness Bracket over the end of the Hex Bolt,
(Figures 2 & 4). Reuse the Flat Washer and Lock Nut to secure the Bracket to the Hitch.
5. Center and adjust the Receiver Hitch and fully tighten all hardware.
6. Attach the trailer harness to the Trailer Connection Tab, if installed, (Figure 5).
7. Do periodic inspections of the installation to make sure that all hardware is secure and tight.


