Page is loading ...


CONTENTS
General
Data
and
Specifications
...........
;.. . . . . . . . . . . . . . . . . . . . . . . . . . 2
License
Data.
. . . . . . . . . . . . . . . . . . . . . . . . . . . . . . . . . . . . . . . . . . . . . . . . . . . . . . . 3
Front
Wheel
Suspension.
. . . . . . . . . . . . . . . . . . . . . . . . . . . .. . . . . . . . . . . . . . .
..
4·6
\
Axle
-
Rear
. . . . . . . . . . . . . . . . . . . . . . . . . . . . . . . . . . . . . . . . . . . . . . . . . . . . . . . . 6
Brakes
-
Manual.
......
....
...........
;
...........................
. . 7·12
Power
- Bellows
Type
......
..
.. ..
..
.......................
12·18
Piston
Type
.......
.
.....
.
.........
...
...........
97·104
Cooling
System
.........
...
... ...
...........
.........
...............
19·20
Electrical
System
. .
..................................................
21·44
Engine
.................
.
..
....
....................................
. 45·53
Fuel
and
Exhaust
Systems
............
...
...
..
......
..................
54·58
Frame.
Springs
and
Shock
Absorbers
...
. .
..................
.
.........
59-62
PowerFlite
Transmission
.............................................
62·68
Universal
Joints
and
Propeller
Shaft.
. . . . . . . . . . . . . . . . . . . . . . . . . . . . . . . . . .
69
Wheels
and
Tires. . . . . . . . . . . . . . . . . . . . . . . . . . . . . . . . . . . . . . . . . . . . . . . . . . .
69
Body
and
Sheet
Metal.
. . .
...
...........
.....
........
.....
...
.
.......
70-77
Lubrication
...
.
.......
.....
...
......
.......
.............
....
........
78-79
Radio
..........
..
.....
.......................
.
.....................
79·82
Heater
.............
........
..
. . .
.........................
.....
.....
83-92
Air
Conditioning
................................................
.
...
92·96

PRELIMINARY
FOR
1956
CHRYSLER
CAR
S
This
manual
contoins
advance
service information for
the
proper
servicing
of
the
1956
Chrysler
Cars.
It covers
changes
in
design
,
improvements
and
new
methods
for
ser
vicing.
The preliminary manual must
be
used
in
conjunction with the 1955 Chrysler Service Manual
0· 15431
in
order
to obtain
full
service cov
erage.
In
order
to use this preliminary manual
with
the
service
manual
0-15431,
the
corresponding
and
superseding
car
models must
be
understood. The supersedence of these models
is
as follows:
Chrysler
Windsor
v-a
,
.....
.. . .
Chrysler
New
Yorker
V-B
. .
.......
. . .
Custom
Imperial
Crown
Imperial
....
.
...........
. . .
1955
C·67 (S.Cy!.)
C·6S (S·Cy!.)
C·69
(S.Cy!.)
C·70
(S·Cy!.)
1956
C·71
C·72
C·73
C·70
The service tools referred to
in
this Manual
are
available
through the Miller Manufacturing
Company,
5919
Tireman Avenue, Detroit 4, Michigan, U.S.A., unless otherwise specified.
Extro copies of this Service Manual
are
available
at
$1.50
each, under
part
number
D·
15470.
Order
from Chrysler Sales Division, Detroit
31
, Michigan.
CHRYSLER
SALES
DIVISION
Chrysler
CorporatIon
DETROIT
31,
MICHIGAN
CIo,.,oIe.
Co,po,otion
, .
........
,10.
'i~'"
'0
mClle
<IoCln~
..
ill
d.li~1I
CI,
'CI
mol.
addi,iClIII
/0
0'
imp'o"
.......
,.
ill
i
l.
p,adud
wi/Ioowl
impo.ill~
allY
ob/i~alioll'
upon
ilulf
10
ill"oll
IIo,m all
ill
p,odw<1I p,."i,
..
,.ly
manufo<lw,.d
.
D.15'(70-
15M
-
ES
S 9·5S
lITHO
IN
U.
S.
A.

GENERAL DATA AND SPECIFICATIONS
(1956
CHRYSLER CARS)
C·71 C·72
ChrYlier
Chrysltr
C·70
Windsor New Y
aTka
C·73
CTown
Item
Body
Style
V·B
V·B
ImperiaJ
Im
pniui
Wheel
Base
FouT Door
Sedun
126 126
1
33
....
(Inches)
Convcrlihle Coupe
126
126
... . ....
Special
Four
D
oo
r
(Hard
T
op)
126 126
133
....
Newport ( Hard T
op)
126
126
133
....
St. Regis
(liartl
Top
)
126 126
... .
....
Town
lind
Countr
y Wagon
126
126
.
,'
.
· '
..
8
Pa~nger
Sedan and Limousine
.
,'
.
....
. ... 149.5
Tr
ead (Fronl -
Four D
oo
r Sedan 60.4 60.4 61.3 ....
Inches)
Convertible Cou
pe
60.4 60.4 ... .
..
..
Special Four Door
(Hard
T
op)
60.4 60.4
61.3
.,'
.
New!'ort (Hard
Top
)
60.4 60.4 61.3 ....
St. Regis ( H
ar
d Top)
... . 60.4 ... . ....
Town and Country Wagon
61.3 61.3
..
, .
....
8
Pa
ssenger Sedan lind Limousine . ..
. , ' .
. .
..
61.3
Tread (Rear -
Four
Door Sedan
59.6 59.6 60.4 ....
Inches)
eo""erti
hl
e
COll
pe 59.6 59.6
. " .
....
Special
Four
Door (H
ar
d
Top)
59.6
59.6 60.4
....
Newport (Hard To
p)
59.6
59.6
60.'
· ...
St. Regis
(Hard
To!))
..
. . 59.6
..
. .
..
..
Town and Coun!ry Wllgon
60.4 60.4
...
.
· ...
8 Passenger Sedan and
Li
mousine
....
... .
....
6O.B
I.ength with
Four
Door Sedan
220.4
221.2 229.6
..
..
Bumper
Converti
bl
e Coupe
223.4 224.2
..
. .
..
..
Special Four Door (H
ll
rd T
op)
223.4 224.2
229.6
....
N!:wport (Hard
Top
)
223.4 224.2
229.6
....
SI. Regis
(Hard
Top)
..
. . 224.2 . ...
....
Town and Country Wagon
219.5
220.3
..
. .
....
8 Passenger Sedan
II
EUJ Limousine
...
. . . .
.... 243.6
Width with
Four
Door Sedan
78.8
81.0 78.8 ....
BUm
l
)e
r
Convertible Coupe
78
.8
81.0 ... .
....
Special
Four
Door
(Hard
T
op)
78.8 81.0
78.8
·
..
Newport (
Hard
Top
)
78.8
81.0
78.8
....
St. Regis (Hard
Top
)
....
81.0
..
. .
.
...
To
wn
lind Counlry Wagon
79.1
81.0
...
.
... .
8 Passenger Seuan
and
Limousine
....
....
. ... 79.1
Rf'ar Axle Ratio
Four
Do
or Sedan
3.73
.
..
. ... .
....
with 3·Speed
Converti
hl
e Co
Ulle
3.73 ... .
... .
....
Transmission Special Four Door (I-lard T
op)
3.73 ... .
... .
. ...
Newport (
Hur
d
Top
)
3
.7
3 ....
..
. .
.
...
S
I.
R
egi.'!
(Hard
TOI)
....
... .
. .
..
'"
.
Town and Country Wagon
3.73
. . . .
... .
... .
Rellr Axle Ratio
F
our
Door
Seda
n
3.54
3.36
3.36
....
with
PowcrFlite
Co
nv
ertible
(o
UII
C
3.54
3.36
..
..
..
, '
Special Four Door
(Hard
T
op)
:t54
3.36
3.36
....
Newport (H
ar
d
Top)
3.54
3.36
3.36 ....
SI. Regis (Hard
Top
)
, . . .
3.36
...
.
. ...
Town and Cou
ntr
y Wagon
3.73
3.54
..
..
.
...
8 Pa
s!;C
nger Sedan and Limousine
....
. ...
. .
..
3.54
Tir
e
Sile
Four Door Sedan
7.60xI5
8.00xIS*
8.20xlS
....
Convertilile Coulle
7.60x15 8.00xl!'.;*
...
.
....
Special
FOUT
Door
(Hard
T
op)
7.
60xl
S
B.OOx15*
...
.
·
.,
.
Newport (
Hard
Top)
7.60x 15 8.ooxl.1*
8.20x 1
.1
..
. ,
SI. R
egiM
(l
iar
d
Top
)
... .
1l.00xI5*
.
..
.
.
..
.
Town alld Country Wagon
7.60x I5
A.20x1S
...
,
....
8
Passenger
Sedan
and Limousine
....
. ...
. .
..
8.20xI
5**
*8.00x I5
Spec
ial High Speed on
(·72
.300
.... Special High Speed
Tir
es
2
--
--
-

LICENSE DATA
The
following method
of
numbering
vehicles
and
their
engin
es
ma
n
ufactured
in
the
Detroit
and Los Angeles
production
pl
ants
will be used
on
the
1956 Models.
For
Detroit
built
cars
the
vehicle numbers
will be revised
as
follows:
Chrysler
Windsor
V-S
Chrysler
New Yorker V-8
Imperial
and
Crow
n I
mpe
r
ial
IV
56 1001
N 56 1001
C 56 1001
-
----'Ii
l\'1odel
-
Year Bu
ilt--------
-
-'
Serial
Number-----------'
The
engine
number
will be revised
as
follows:
Chrysler
Windsor
V-S
Chrysler
New
Yorker
V-8
WE
56 1001
NE56
1
001
Imperial
and
Crown
Imperial
C E 56 1001
MOdel
___
_ _
___
...J
l
Denotes
Engine---------'
Year
Built
-
----------'
Seria
l
Nurnber-----
- - -
--...J
For
Los
Angeles
built
cars
the
vehicle
num-
bers
will be revised
as
follows:
Chrysler
Windsor
V-8
IV
56 L 1001
Chrysler
New
Yorker
V-S N 56 L 1001
Los Angeles IdentifieaUon
~
,
3
VEHICLE NUMBER
V&H.Cl..C
NO
"'00000000
~
-
--
.
~
-
Fig. 1
~
Vehicle Number
The
vehicle
number
is
stamped
on a metal
plate
attached
to
the
left
front
door body hinge
post.
as
shown
in
Figure
L
ENGINE NUMBER
r
Fig. 2 - Engine Number
The
engine
number
is
stamped
on a boss on
the
top
front
of
the
cylinder block
just
back
of
the
waier
pump,
as
shown
in
Figure
2.
BODY NUMBER
Fig. 3 - B
ody
Number
The
body
number
is
stamped
on a
plate
at-
tached
to
the
body in
engine
compartment,
as
shown
in
Figure
3.

/FlmNG
r
PIN
~"Al
~BUS
H ING
~
-SEAL
T SCREW
lOCKWASHER
NUT
/ BUSHING
;;!'
STRAP
BUMPER
•
SCREW
LOCKW
AS
H
ER
j
SUPPCOl !
,
-"
\
flmNG
~
~~;.
~;;~~~~
;tP!N----UNU
T'
J .
'1'0
SHOCK
ABSORBER
MOUNTlNG----{j
lOCKWASHER
SCREW
-----..~
Fig. 1 - Front Wheel Suspension (
Di
sassembled View)
4
l'
PlUG
PLUG
SEARING
SEAL
--..
---

FRONT SUSPENSION SYSTEM
The
1956
Chrysler
Models will
continue
to
fea-
ture
the
Hi
gh-
Roll
Center
front
suspension sys-
tem
introduced
on
the
1955 MOdels. Oriftow
shock
absorbers,
soft
acting
front
and
Tear
sp
ring
s
are
used
to
improve
the
riding
comfort
and
other
functional
qualities
of
the
suspension
syste
m.
The
sLee
ring
knuckle,
sleering
knuckle sup-
port
and
steering
arm
have
been redesigned
to
acco
mm
odate
the
center
plan
e
brake
assembly
FiJ::"ure
1.
These
new
parts
are
not
interchange-
able
with
the
parts
used
in
the
1955 Models,
The
king
pin
thrust
bearing
is
now
located
at
the
upport
su
pp
ort
face
o(
th
e
steering
knuckle.
When
s
ervicing
the
stee
ring
knuckle
and
king
pins,
the
thrust
bearing
should be
assemb
led
with
the
thrust
side
of
the
bearing
down to-
wards
the
steering
knuckle
and
the
king
pin
"0"
rings
should be
properly
positioned to in-
su
re
retaining
the
lubricant
in
the
king
pin
and
bearing
assembly.
Damaged
steering
knuckles
or
arms
should be
replaced.
DO
NOT
attempt
to
straighten
or
weld.
FRONT SPRING LEVELING
MEASUREMENTS
With
equal
pressure
in
tires
and
the
ca
r on a
level floor,
with
only
weight
of
car
on
springs
(no
passengers
in
cur),
measure
the
distance
from
(1oor
to
center
of
grease
fitting
in
forward
bushing
of
lower
control
arm
bar,
as
shown
at
"At>
in
Figure
2.
Then
measure
from
floor
to
center
of
lower control a
rm
pin,
as
indicated by
"B".
The
measurement
"A"
may be
either
high
-
er
or
lower
than
"B".
In
the
followi
ng
table. a
"
plus"
meallS
that"
A"
is
higher
than
"B"
and
a
"minus"
means
that
"A"
is lower
tha
n
"B".
The
table
shows
the
limits
f
or
satisfactory
spring
heights
(between
which
"A"
may
be
eith
er
higher
or
lower
than
"B")
for
vario
us
models.
5
~
; I
, I
A
49)(719
Fig. 2 -
Che
cking Front Spring Height
A - Firs!
mu.ur"one,,!
tI
-
S«ond
m(UUfelll~f"
Front
spring
heights
for
the
1956
Chrysler
Models
are
as
follows:
C-71
Sedans
and
Coupes + 1 inch
to
-0
inch
C-71
Town
and
Country
Wagon
+11/.~
inch
to
+%.
inch
C-72
Sedans
and
Coupes + 1 inch
to
- 0
inch
C-
72
Town
and
Country
Wagon +
11
/4
inch
to - 0 inch
C~73
Sedans
and
Coupes + 1 inch
to
-0
inch
C-7
0-8
Passenger
Sedans
+ 1l,4 inch to
-
Y.J.
inch
C-70
Limousine
+ 1
1,4
inch
to
-i,4
inch
C-72-300
Sedan
+ 1 inch to - 0 inch
Obtain
these
"plus"
or
"minus"
figures,
as
the
case
may
be, on both
right
and
left
sides
of
the
car
and
compare
them
with
each
other.
If
the
two
figures differ by
more
than
V4-
inch, check
both
sp
rings
for
correct
installation
at
top
and
bottom. Look up
into
the
center
of
each
spring
t.o
make
sure
that
the
top
coil completely
sur-
rounds
the
pilot
flange in
the
frame
front
cross-
member. Also feel along
the
b
ott
om coil
to
the

end
of
the
coil
and
make
sure
that
it
indexes
correctly
with
lowest
point
of
the
spring
seat
ramp.
1f
the
two
spr
i
ngs
are
correctly
installed
and
the
"plus"
or
"minus"
figures on
right
and
left
sides
are
still
different
from
each
other
by
more
tha
n
'/.
~
inch,
correction
can
be
made
by
use
of
space
rs,
which
should be placed
between
spring
seat
and
sile
ncer
at
top
of
spring.
Each
spacer
will
raise
car
approximately
%
of
an
inch. No
more
than
two
such
spacers
should be used
with
anyone
spring.
If
more
than
two
space
rs
are
required,
replace the
spring.
Coil
springs
are
identified by
the
part
numbers
near
the
end
of
coils.
The
part
number
will also
indicate
n definite
step
in
relation
to
car
height,
the
higher
the
number
the
higher
the
car
will be
raised.
Car
hei
ght
can
be
changed
approximately
% inch by
using
a
lower
or
hig-her
part
number.
For
example, if a
spring
with
two
mnrk
s replaces a
spring
of
the
same
part
number
having
three
marks,
the
car
height
on
that
side
will be
increased
approximately
%
inch.
NOTE: Whenevel' the
h'ont
or 1'ear springs are
t'eplaced, the headlights shvuld
always
be re-
focussed.
Refer
to
your
1955
Service
Manual
D-15431
for
refocussing
instructions
and
for
the
service
procedure
s
covering
the
1956
Front
Suspension
System.
REAR AXLE
The
rear
axles
used on
the
1956 Models
are
of
the
same
design
as
used on
the
1955 Models.
They
are
of
the
semi-fl
oating
type
with
hypoid
drive
gear
and
pinion.
C-71
Models
equipped
with
standa
rd
3.speed
transmiss
ion use
an
8
1
;"
drive
gear
set
and
2
pinion differential.
C-7J
Models equipped
with
PowerFlite
transmissions
use
an
8i,4 inch
drive
gear
set
with
a 4
pinion
differentiaL
The
C-72. C-73, C-70, C-72-300
and
C~71
Models
equipped
with
power
package
and
C-
71
Town
and
Country
W;\gons axe equipped \vith
an
8%
inch
drive
gear
set
and
a 4
pinion
dif-
ferential.
LUBRICATION
Lubrication
specifications
remain
the
same,
as
shown
in
the
1955
Service
Manual
under
Rear
Axle
Data
and
Specifications
with
the
following
exception.
Model
C-71 T
own
and
Country
Wagon
and
Power
Packag
e
equipped
cars
will
have
a refill
capacity
of
3Y:!
pints.
This
is
shown
as
3i,4
pints
in
the
1955
Service
Manual.
For
the
balance
of specifications
and
service
procedure
refer
to
the
Rear
Axle
Section
in
your
1955
Service
Manual.
TIGHTENING REFERENCE
foot
·Pounds
Axle
Shaft Nuts
.......
. 145 (mi
nimum
)
Brake
SUVIXIrt
Plut
e to Hous
ing
Mounting
Boh
Nuts.............
.
....
.
......
.
..
.
........
35
Differential Carrier to
Axle
Hou
sing
Bolt
Nuts........................
.
..
.
...
.
..
. . . . .
..
. 45
Rear
Axle
Drive Geur
Boh
N
uts
.....
...................
.
.......................
.
.....
40
Differential Bearing
Cap
Bolts
.....
...........
.
•......
•
.............•......•.........
•
90
Pinion Shaft Companion Flange
Nut
C-?l
__
.
240
.mini
mum}
C·72, C·73, C·70 and C·72.300
...
. .
....
..•......
250 (mini
mum)
6
--
-
--

BRAKES
SPECIFICATIONS
(CENTER PLANE BRAKES)
Drum
Diameter
.......•......•
.
..•
..
•..
.
Lining:
Type
Attachment
Width
..............
.
.•...
_,_
....••..
Thil
:KneS!
...................
.
••....
• .
Brake Shoe Hcturn Tension
......
.....
.
Using Fish Scale H
oo
ked at Toe of Shoe
.....
Brake Penal Free Play
(inches)
......
.
....
.
Wheel Cylinder Bore:
Front - Upper and Lower
..
Rear
.......
.
...................
. .
..
.
Master
Cylinder
Bore
........
.
Pi
ston
Clcarllnce:
Master ann Wheel
Cy
l
inder.
.......
.
DESCRIPTION
Center
Plane
brakes
are
of
the
d
rum
type, with
floating shoes mounted between two plates
lo-
cated
on
the
center
plane of the linings (Figs.
land2)
,
With
the
wheel cylinders mounted in the
same plane,
braking
forces
are
transmitted
equally across
the
width of the lining, giving
uniform
pressure
against
the
drum
at
all times.
The web of the shoe is calibrated in depth, so
that
when
the
brakes
are
applied, equal pres-
sures
are
also applied to
the
brake
drums
along
the
entire
length
of
the
lining.
7
All
Model3
Center
Pl
ane
~
Fl
oating Shoe)
H
rdra
ul
ic
12"
Molded Asbestos
Cydebond
70
Ibs.
±
Sib
s.
@
2:y,
(I"
J nstalled Length
35
10 451bs. r
equired
to break
con
tact
between shoe and push rod
Yc/'
to %"
1
%"
I ',k"
1%"
.003" to .006
5"
The new
Ce
nter
Plane brakes have more re-
serve, less fade and more lining
area
than
the
brakes
previously used, and because of
the
lower
unit
pressure
(reducing
peak
temperature),
as-
sures
more stable
braking
under
extreme
con-
ditions
an
d longer life.
BRAKE ASSEMBLIES
The shoes
are
n
ot
anchored
but
are
held in po-
sition by
the
brake
shoe
return
springs. One end
of each
spri
ng
is
hooked
in
the
loop of
the
re-
turn
spring
links.
The
other
end engages
the
web of
the
shoe.

BR AKE S
HIELD
SUPPORT
SPRING
LINK
RE T
UR
N
SPRI NG
LOWER
WHEEL
BRAKE
CYLINDER
5S
X
710
CONNECTING
TU
BE
UPPER W
HEEL
BRAK E CY
LINDER
ADJUSTING
" "
SPRING GUIDE
Fig
. 1 - Center Plane Brake A
ss
embly (Right Front)
RETURN
SPRING
ANCHOR
BRAI<E
SHOE
SUPPORT
PLATE
BR
A
KE
SHIEL O
SPRING
LINK
WH
EEL
BRAKE
CYLINDER
ADJUST
I
NG
CAM
S'lX7
11
SPRING
GUIOE
Fig
. 2 - Center Plane Brake Assembly (Right Rear)
8
----

I
I
~
An
an
chor
pin
in the s
upp
ort
plate
assembly
holds
the
s
pring
link
in a fixed position
at
one
end.
The
ot
her
end of
the
link is positioned by
the
brake
shoe
adjusting
cam,
thereby
provid-
ing a
constant
loaded
sp
ring
length.
Side
r
attle
and
twisting
of
the
shoe
is
con-
trolled
by
the
spring
guide,
which
maintains
a
constant
sp
ring
pre
ssu
re
against
the
side
of
the
web
of
the
shoe holding
the
shoe
against
the
suppo
rt
plate.
Th
e
sp
rin
g
guide
also helps
to
eliminate
brake
noise.
BmD"
SC
REW
56x69
Fig. 3 -
Wheel
Cylinder (Front) (Sectionol View)
WHEEL CYLINDERS - FRONT
Tw
o wheel
cylinders
of
the
single
piston
lype
(Fig.
3)
are
attached
to
the
s
upport
plate
as-
sembly
.
The
location of
the
cylinders
is
such
that
when
brakes
are
applied,
self-energizing
action affects both
front
and
rear
shO€s of
the
front
brake
when
the
vehicle is
traveling
for-
ward.
The
front
sh
oe
pivots in
the
bottom
of
the
suppo
rt
plate
ancl
the
rear
shoe pivots
at
the
top.
Each
shoe is
actuated
by
it
s own wheel
cylin
der
.
The
two
cy
linder
s
are
connected by
a connector tube.
WHEEL CYLINDER - REAR
Ea
ch
rear
brake
assembly
uses
one
wheel cy
l-
inder
of
the
double-acting
type
(Fig.
4).
Both
shoes pivot in
the
bollom
of
the
support
plate
and
are
actuated
by
the
wheel cylinder,
causing
the
shoes
to
operate
in oppo
sition
to
each
other.
9
(YLiND'"
BOOT
56x4B
Fig. 4 -
Wheel
Cylinder (
Re
or) (Seclionol Vie
.....
)
Because
of
this
arrangement
,
self-energizing
action is e
ff
ective on
the
rear
brake
front
shoe
when
the
vehicle is
tr
aveling
forward
and
ef-
fective on
the
rear
shoe when
traveling
in re-
verse.
CENTER PLANE
BRAK
ES
SERVICE PROCEDURES
REAR BRAKE DISASSEMBLY
Brake
Shoe
Removal
Block
brake
pedal
to
prevent
downward
move-
ment
of
the
pedal.
Fig. 5 - Removing Broke
Shoe
Return
Spring Wi
lh
Tool
C·3462

Raise
car
and
remove wheel,
hub
and
drum
assembly,
using
puller (Tool C-845)
to
remove
drum
assembly.
In~ert
Tool C-3462
in
the
inner
suppor
t plate
hole
with
the
tool
cam
slot
engaging
the
spring
hook
(Fig.
5).
Turn
the
tool handle to
disengage
s
pring
from
return
spring
link,
then
turn
han-
dle in
the
opposite
direction
to
release
the
s
pring.
Remove both
springs
in
this
manner.
CAUT
ION:
Do
not use
bmkc
Sl)ring plien; as
damage to lining will result.
Fig.
6 - Removing Broke Shoe Guide Spring
Turn
brake
shoe
guide
s
pring
retainer
1j.~
turn
and
remove
(Fig.
6).
NOTE:
The
lip
on
end
0/
.m1"in!J
is
/01'
correct
positionin!J on oute,·
support
plate.
Fig.
7 -
Rem
oving Broke
Shoe
from Support Plate
10
Slide shoes
from
support
plate
assembly
(Fig.7).
Support
Plate
Re
moval
With
the
brake
shoes
removed;
remove
the
two
screws
and
lockwashers which secu
re
wheel cyl-
inder
to
support
plate
assembly.
Fig. 8 - Removing Broke Shoe Support plate
Remove
the
five
nuts
and lockwashcrs
that
retain
the
brake
shoe
support
plate
to
the
brake
suppo
rt
and
remove
the
brake
shoe
support
plate
(Fig.
8).
Wheel
Cylin
de
r Removal
With
the
brake
shoes
and
brake
shoe
support
plate
removed, disconnect
brake
fluid line
at
wheel
cylinder
and remove wheel cylinder.
NOTE:
Wheel cylinder disassembly,
1·eeo1Hli-
tioning, and aS$embly
a~·e
the same as outlined
in
the 19.55 Ch1·ysler Service Manual, D-1.5431.
REAR BRAKE ASSEMBLY
Assemble wheel cylinder on bl'ake shoe
support
plate.
Install
screws
and
lockwashers
finger
tight.
Assemble
the
brake
shoe
support
plate
:t;;;;embly
to
the
brake
support.
NOTE:
Be
sW'e
the brake
adjusting
cam
rub-
ber
dust
washers
are
in
place and
in
good con-
dition be/ore installing the
bmke
SUPP01"t
plate
assembly.
Theu
washe1'S are located between
the suppo,·t plate and the
umke
fJacking plate.
Tighten
support
plate
"crews
to
35 foot-
pounds
and wheel
cylinder
sc
rew
s
to
20 foot·
pounds.
Connect
brake
fluid line
to
wheel cyl-
inder.
----
--
•
I
I
•

,
NOTE:
The brake shoe
support
plate
1.3
serv·
iced as a complete assembly.
Brake
Shoe Installation
Position
brake
shoes in
the
support
plate. Make
sure wheel
cyUnder push rods properly engage
toe
end
of
shoes
and
that
shoes are
in
aUqnment
-
see
"Brake Shoe Aliqnment."
If
shoes have to
be
relined,
refer
to "Replacement of
Brake
Lining."
Fig. 9 - Installing Brake
Shoe
Return
Springs
with
Tool
C-3462
Install
the
brake
shoe
return
springs
using
tool C·3462
(Fig.
9).
Check tension of springs. Tension should be
70 pounds, plus
or
minus 5 pounds, installed
length.
This
can also
be
checked by hooking a
fish scale
at
toe of shoe and pulling shoe away
from
the
wheel cylinder. Scale should read 35
to 45 pounds before contact is broken between
web of shoe and wheel cylinder push rod.
NOTE:
Long end
of
brake
return
springs
mu
st
be hooked
in
shoes, otherwise brake noise
1v
ill
be encountered due to coil
of
springs contacting
shoes.
Install the
brake
shoe guide
sp
rin
gs, making
sure
positioning lip of
spring
engages
the
hole
in
the
support
plate (Fig_
6)_
Loosen
adjusting
cams and install hub,
drum
and wheel assemb
ly
.
Bleed
brake
system, refill
master
cylinder
to
proper
level and
adjust
brakes,
as
outlined
under
"Adjustment
of
Brakes."
11
FRONT BRAKE DISASSEMBLY
Brake Shoe Removal
Perform
the
operations
outlined
under
"Rear
Brake
Shoe Removal."
Support
Plate
Removal
With
the
brake
shoes removed, disconnect
th~
connector
tube
between
the
two
cylinders. Dis·
connect
the
flexible
brake
hose
at
the
upp
er
wheel cylinder and remove
the
wheel cylinder
mounting screw and lockwas
her
at
rear
of
brake
shield.
CAUTION:
Do
not
allow b
mke
fl
uid
to come
in
contact lv
ith
the
brak
e lining, either from.
dripping or
from
contact w
ith
soiled hands .
Remove
the
fo
ur
support
plat
e mounting
boits,
nut
s, and lock
wa
s
her
s and remove the
suppo
rt
plate.
Wheel
Cylinder
Removal
The
wheel cylinders can
be
removed
after
the
flhoes and
support
assembly
are
removed.
FRONT BRAKE ASSEMBLY
Place the wheel cylinder
int
o
po
sition in the
support
plate
as
sembly. Position
support
pl
ate
on the
brake
shield and install cylinder m
ount
·
ing screw !lnd lock washer,
but
do
not tighten.
NOTE:
Be
su
re the b
mk
e adjll
st
ing c
ant
rubber
dust
w ashe1
·s
an
: in place
a-nd
in g
oo
d condition
before installing the
SUPPO?'t
plate assembly.
Install the
four
support
plate bolts, loc
k·
washers, and nuts.
Tighten
to 35 foot-pounds
and
the
wheel cylinder mounting screw to
20
foot-pounds.
Install wheel cylinder
tube
and flexible
brake
hose.
Tighten
all connections securely.
Install
brake
shoes,
as
outlined
under
"R
e
ar
Brake Shoe
Installation."
BRAKE SHOE ALIGNMENT
To insure maximum
braking
effort, the
entir
e
length and width of the lining
must
contact
the
drum
upon
brake
application,
Examination
of
the
used lining will disclose
if
the shoe is out of
alignment. Misaligned shoes can
not
be
co
r-
rected by grinding and should be discarded.
The
brake
shoe suppo
rt
plate
as
sembly shou
ld
also
be
checked;
if
sprung
or damaged, replace
with a new
support
assembly.

BRAKE LINING REPLACEMENT
The
cyclebond
ing
procedure
remains
the
same
as
previously covered in
bulletins
and
the
1954
and
1955
Chrysler
Service
Manuals,
except
for
the
use
of
a
wider
band
on
the
clamping
fixture
for
the
2
Vt
inch
wide
lining.
and
an
increa
se
of
25
percent
on
clamping
force.
NOTE:
It
is
vet'Y importa.nt that the equipment
manufacturcl"s instructions be cUt"clully ob-
served t01-
cUI'ing
time, temperature. and clamp-
ing
preSS1.0"C
(loa
psi),
depending
on
the
type
of
equipment
u.~ed.
GRINDING BRAKE LINING
NOTF::
Bmke
shoe
grindi?lg
mu.~t
be
done
with
the brake shoes removed /t'om vehicle.
Use
the
following
steps
for
proper
grinding
of
brake
shoe
lining.
(1) Mea::;ure
the
drum
dia
me
ter
with
an
ac-
curate
micrometer.
Drum must not exceed
.004
inch
out-of-
round
al
any
poinl
in
the
drom.
(2)
The
drum
diameter
is
then
trnns
ferred
to
the
grinding
m
achine
and
the
lining is
ground
to
the
specified
clearance
of
.010
to
.024 inch below
drum
diam
eter.
BRAKE ADJUSTMENT
NOTE: Wh
eneve1·
brakes have been relined or
new shoe assemblies installed,
always apply the
brake pedal
prior
to
adjusting the
b1"akes.
This
action causes the brake shoes
to
center them-
selves
in
the brake
d7"1tm
and assist
in
the ad-
justment.
Front Brake
Adju
stment
Turn
each
adjusting
cam
(Fig. 10) on
both
front
brakes
in
the
dire
ction
of
fo
rward
wh
eel
rotalion
(Fig.
11)
until
shoe
lining
is solid
against
drum
and wheel is locked.
Turn
adjust-
ing
cams
slowly in the oppos
ite
direction
(each
cam
a little
at
a
time)
until
no
dra
g is felt.
Rear
Brake
Adju
s
tment
The
rear
brake
adjustment
procedure
is
the
same
as
outlined
for
previ
ous shoe-type
brakes.
The
forwa
rd
r
ear
wheel shoe
adjusting
cams
are
rotated
in
the
direction
of
forward
wheel
rotation.
Th
e
rear
wheel shoe
udjusting
cnms
are
rotated
in
the
dir
ect
ion
of
rever
se
wheel
rotation
(
Fi
g.
11).
12
Fig.
10 - Adjusting Broke Shoe At
(om
LEFT
FR
ONT
f6\
\U
LEFT
REAR
U
~~l(
70B
RIGHT
FRONT
(0\
~
RIGHT REAR
C)
Fig.
11
- Adjusting Front
and
Rear Brake Shoes
(Orientation Diagram)
(As
Viewed Benealh Vehicle)
BRAKE
POWER
UNIT
A
neW,
non-rea
ct
i
ona
ry pedal a
ss
i
st
type
brake
boo
sle
r (bellows
type)
with
co
mplete new
brake
linkage
will be used in Models C-71, C-72,
C-73,
C-70
and
C-72-300.
DESCRIPTION
Th
e new bellows
type
boost
er
unit
is
an
oval-
shaped
air
vacuum
bellows
mounted
on
the
en-
gine
side
of
the
dash
panel
and
is connected
me
chanica
ll
y
to
the
brak
e pedal
linkage
through
the
power
unit
push
rod,
as
shown in
Figur
e 12.
Through
the
vacuum
s
ource
connection, vac-
uum
from
the
intake
manifold
is
admitted
to
the
a
ir-vacuum
bellows
(during
brake
applica-
tion )
thro
u
gh
the
vacuum
valve.
Air
(atm
osphe
re)
ente
rs
the
unit
through
the
built-in a
ir
cleaner
and
is r
egulat
ed by
the
air
valve.
The
valve ope
rating
rod, which is
controlled by
the
br
ake
pedal,
co
ntrols
the
oper·
ation
of
the
a
ir
valve
and
s
pring.
The
bellows
•
1
l
•

~
I
I
POWER LEVER
PIN
DASH
PANEL
POWER
UN
IT
MASTE
R
CY
LIN D
ER
POWER
BRAKE
TRIGGER
PIVOT
STEERING
CO
LUMN
56x33
WIN
D
SH
IELD
INS
TR
UM
E
NT
PANEL
PEDAL MOUNTING
BRA
CKET
PO
WER
UNiT
PU
SH R
OD
PEDAL
TRIG
GER
ARM
POWER
BRAKE
ADJUSTING
SCREW
PED
AL
RE
~
rU
"
N
SPR ING
o
o
~~~:;;;;;;;;;::""""'..::::~
POWER BRAK E
PEDAL
SHAFT
/'
POWER LEVER
PUSH
MA
S
TER
CYLINDER
PUS
H
ROD
ACCE
L
ER
ATOR
PED
AL
Fig.
12
-
Pow
er
Unit
and
l i
nkag
e
Instoll
at
io
n
13

return
spring
assures
complete extension of
the
bellows whenever the brakes
are
not
being ap-
plied.
In
the
released position,
the
bellows is filled
with
air
(atmosphere).
The
power produced by
the
unit
is developed when vacuum removes
the
air
from the bellows and causes the bellows to
contract
(due to continued atmospheric pres-
sure
on
the
outside of the bellows).
When application of
the
brakes
begins,
air-
vacuum pow
er
developed in the power
unit
is
applied
through
the
shaft
and yoke assembly
to the
brake
pedal. In
this
way, contraction of
the
bellows
assist
s
in
applying the brakes.
The design of
the
unit
is such
that
even
though the power
unit
performs much of the
work necessary to apply the brakes, the
oper-
ator'
s control of
the
brak
ing process is complete
and
he
lo
ses none of
the
brake
"fee
l.
"
Although
there
is a mechanical
contact
be-
tween the power
unit
and the
brake
linkage
through
the push rod and yoke assembly,
this
contact exists only when the power
unit
is
assisting
in a
brake
application. Therefore,
if
there
is a loss of vacuum,
as
with a stalled en-
VACUUM
VALVE"
CLOSED
AIR VALVE
OP
"
N'~
gine, the
brake
pedal is free to move, com-
pletely independ
ent
of
the
power
unit.
OPERATION
Relea
sed
Position
In
this
position the
air
valve is open and
air
(atmosphere) is freely
admitled
to
the
air-
vacuum bellows
(Fig.
13). The vacuum valve is
closed,
preventing
evacuation of
air
from
the
bellows. The air valve
spring
pressure
tends to
close
the
air valve.
but
th
e
brake
pedal pull-
back s
pring
pre
ssure
(transmitted
through
linkage
to
the valve
operating
rod) overcomes
the
air
val
ve
spr
ing
pressure
and
tends to keep
the
air
valve in
an
open (released) position,
ther
eby
maintaining
atmospheric
pressure
in-
side
as
well
as
outside the air-vacuum bellows.
A
pplied
Position
When
pressure
is applied to the
brake
pedal,
re
st
r
aint
on
the
air
valve
spring
is removed and
the
air
valve is closed by
spring
pressure
(Fig.
14).
Co
ntinued movement of
the
air
valve, due
to
air
valve
spring
pressure, will overcome the
vacuum valve
spring
pre
ssure
and open
the
/,,",'.YAC'UU'"
BELLOWS
VACUUM
56
x
30
Fig. 13 - Power
Unit
in
"Releored" Position
14
-
---
4
I
I
•

TO
SOURCE
AIR
INL.ET,
VACUUM
VALVl'_
OPEN
AIR VALVE
CLOSED
TO
VA,cmUM SOURCE
AIR
INL,ET,
VACUUM
VA
.
LVE,_
CL<:6ED
AIR
VAJ_VE---
CLOOED
__
~ffi·VACUVM
BELLOWS
VACUU M
~
Am
56 K
31
Fig.
14
- Power Unit
in
"Applied" Position
_"Ali'·\'A(JU1JM
BELLOWS
t:
".
I
VACUUM
56
}(
32
Fig. 15 ~ Power Unit
in
"Poised" Position
15

vacuu
m valve.
With
atmosphere
closed off
and
vacuu
m
transmitted
into
the
chamber,
the
bel-
lows
contract,
applying
power
to
the
brake
pedal
linkage
through
the
pull yoke.
The
amount
of
power
applied
to
the
linkage
by
the
power
unit
is in
direct
proportion
to
the
amou
nt
of
pressure
applied
at
the
brake
pedaL
This
power
assist,
is, in effect, a multiplication
of
the
operator's
pedal
pressure.
Poised Position
As
the
operator's
pedal
pressure
is
varied
to
suit
his
braking
requirements,
t
he
power
sup-
plied
by
the
unit
varies
in
proportion.
At
any
point
during
brake
application
or
release
(whe
re
the
ope
rator
assumes
a
holding
posi-
tion)
the
unit
immediately
becomes
"p
oised,"
ready
to
respond
to
further
appli
cation
or
to
release
(Fig.15).
In
the
poised
position,
both
the
air
and
vacuum
valves
are
closed
and
a
status
quo
is
m
ainta
ined in
the
air
-
vacuum
bellows.
A
further
applying
mo
veme
nt
of
the
pedal
will
cause
fu
rther
air
evacuation
of
the
bellows
to
add
power
to
application
. As
pedal
pressur
e
is
released,
the
ai
r
va
lve will open
proportion-
ately
to
admit
air
to
th
e bellows.
At
any
point
between
a
fully
released
and
a
fully
applied
position,
the
unit
will
insta
ntl
y
become
"poise
d"
whenever
the
operator
holds
a cons
tan
t p
edal
pressure.
PISTON TYPE - POWER UNIT
The description. operation.
disassembly
and
asse
mbly
of
the piston
type
power
brake
unit
can
be
found
on
page
97,
SERVICE PROCEDURES
(Bellows
Type
and
Piston
Type
Power
Brake
Units)
Removal
of
Power Unit
Place
a wood
wedge
between
the
power
brake
lever
and
the
forward
edge
of
the
triangular
hole in
the
pedal
bracket,
as
shown
in
Fi
gur
e
J
6.
This
will
prevent
the
trigger
arm
from
ex-
tending
beyond
the
e
xt
re
mitie
s of
the
br
acket.
16
,
Fig. 16 - Removing
or
Installing
Power
Brake
Unit
(Bellows Type Shown)
.VOTE:
I f pedal
linkage
is allolC€(l to
extend
tllI'ollgh
the
hole
in
dash panel I he trigge?'
ann
may
be damaged.
Disconnect
vacuum
hose
at
power
unit.
Remove
complete
power
unit
and
bracket
as
-
.s
embl
y
by
removing
the
fo
ur
hex
nuts
and
lockwashers.
C~lreful1y
withdraw
unit
from
dash
panel,
as
s
hown
in
Figure
16.
.VO
TE:
Use cat'e to p1'Cvent loss
of
lIY/011
bush-
ings
011
pe<iul
linkoge
n'oss
pin.
Installation
of
Power Unit
Po!;ition
power
unit
on
dash
pa
nel of vehicle so
th
at
its
axis
inclines
down
to
ward
front
of car,
as
illustrated
in
Fig
u
re
s 12
and
16.
N
OTE:
As
yoke passes
through
dash panel
be
s//'
J"e
that
it
engages pedal
linkage
conectly
by
.sliding ove1'
nylon
bushings
011
tile
power
Make
lever cross pin,
Repla
ce
the
four
hex
nuts
and
lockwashers.
Tighten
securely amI r
emove
wedge
from
pedal
bracket.
REMOVAL OF PEDAL LINKAGE FROM
PEDAL
BRACKET
(POWER UNIT INSTALLED)
Remove
brake
pedal
return
sp
ring
and
ma
ste
r
cylinder
push
rod
end
pin,
Remove
power
brake
pedal
lever
shaft
.
,.j
!
1
1

..
I
I
GAUGE
GAUGE
CENTER
LINE
Fig. 17 - Power Broke Trigger
Arm
Adjustments
R
otate
pedal
linkage
assembly
counter
-clock-
wise
while
carefully
withdrawi
ng
power
lever
cross
pin
from
booster
unit
yoke.
NOTE:
Pedal
is
slotted
to
provide
clearance
for
removal
of
brake
pedal
assembly.
PEDAL LINKAGE ADJUSTMENTS
If
the
power
brake
pedal
assembly
was
re-
moved
for
serv
i
cing,
the
following
ben
ch
te
sts
and
adju
s
tment
s
must
be
made
pri
or
to
instal-
lation
of
linkage
assembly
on
vehicle:
Pe
dal
Tri
qqe
r
Ad
justment
Install
gauge,
Tool C·350S,
on
power
lever
cross
pin,
positioning
cente
r lines on
gauge
,
as
shown
in
Figure
17.
Po
s
ition
power
brake
adjusting
s
crew,
as
shown
in
illustration
"A"
(Fig.
17).
Using
II
screwdriver,
\vedge
the
power
brake
pedal
pivot
to
the
rear
side
of
hole
in
power
lever
until
the
power
brake
adju
s
ting
s
crew
co
llar
is
completc
·
ly co
mpressed
and
metal·to-metal
contact
is
made.
With
gauge
ins
talled
and
adjusting
s
crew
col-
lar
compre
ssed,
the
outer
curved
s
urfllce
of
the
trigger
arm
mu
st
contact
the
inner
circle
of
the
gauge,
that
is,
the
distance
between
the
center
line
of
the
power
brake
lever
cross
pin
and
the
outer
curved
s
urface
of
the
power
brake
pedal
trigger
arm
mu
st be .640
inch,
plus
or
minus
.
005
inch.
17
If
position
of
trigger
arm
does
not
conf
o
rm
to
thi
s
specification,
adju
s
tment
is
made
by
turning
power
brake
adju
s
ting
screw
until
tri
g.
ger
al·m
outer
surface
is
in
alignm
e
nt
with
in-
ner
cil·cle
of
gauge,
as
s
hown
in
Figure
17 (il-
lus
tration
"A").
After
corr
e
ct
s
etting
ha
s
been
made
,
tight
en
adjusting
screw
s
ecurely.
Ch
ecking
C
oncentrici
ty of T
rigqe
r
Ann
Install
gauge,
To
ol
C·350
8, on
power
le
ver
cr
oss
pin.
With
wedge.
or
screwdriver,
removed
and
the
tri~ger
arm-to-po\ver
brake
lever
cros
s
pin
dimen
sion
adju
s
ted
correctly,
the
outer
curv
ed
surface
of
the
trigger
arm
must
be co
nce
ntric
with
the
power
brake
lever
pin
at
a .730 inch
radius
from
the
center
line to
the
lever
pin.
that
is,
the
outer
curved
s
urface
of
the
tri
gger
arm
mu
st
contact
the
outcr
circle
of
the
gauge
within
confines
of
the
angle
scribed
on the
gauge.
Refer
to
Figure
17,
illustration
"E".
NOTE:
If
pedal
assembl
y is clamped i n vise,
it
I{'
ill
be
nec
e!l.'l
ary
to m
ovc
pOII
:el"
lever
(by
hand
)
Lo
locate
trigg
c
l'
ar m
on
outer
ciTcle
of
gau.ge.
If
po
s
ition
of
trigger
arm
does
not
mcet
thi
s
requirement,
the
trigger
arm
can
often
be ca re-
full'y
bent
to
bring
within
specification.
In
ca
scs
where
trigger
arm
i.s
"out"
an
excessive
amoun
t,
the
cntire
trigger
arm
a
ss
embly
must be re-
lensed.
Tf
11
new
trigger
arm
a
sse
mbly
is
in_
stalled,
the
.640
inch.
plus
or
minus
.005
in
ch.
dimension
mu
st
be
rechecked
.

Adjusting
Fo
r
Max
im
um
Perfo
nn
an
ce
If
th
e
above
adjustments
are
correctly
made,
satis
factory
brake
booster
performance
s
hould
be
obta
ined
. Ho
wever
,
due
to
variations
within
th
e bra
ke
boos
ter,
additi
o
na
l
adjustment
may
occas
io
na
lly be
necessary
to
elminate
the
fol-
lowing
co
nditi
ons :
If
the
pedal
pr
eRs
ure
releases
slowly,
adju
st
by
rota
tin
g
pow
er lev
er
adju
s
tment
screw
in
a
c
ounter-clockw
i
se
directi
on
(Fig.
17).
A
ti
me
delay
(no
ted
during
a
fast
b
rake
ap-
plicati
on) c
an
mlUally be co
rrect
ed
by
makin
g
a
clo
ckwise
a
dju
s
tmen
t on
th
e
adjus
t ing
screw
.
Sh
ould
the
pedal
vibrate
(boo
s
ter
chatter),
mak
e a
counter-clockw
i
se
adj
usting
s
crew
ad-
just
ment.
NOT
E:
Rota
tion
of ad
justment
s
crew
sh
ould
IJe
limit£d
to"*
90° ab o
ut
original
.'1
et
ti
ng.
Assembly
of
Pedal
Linkage
In
Pedal
Br
acket
CAUT
IO
N:
Us e
ex
trem e ca
re
du ri
ng
assembly
or
han
dling
of
th
e
linkag
e, as the
pO
lV
er
brake
pedal
tri
gg er a1
'm
is
easily dam.aged.
After
rein
st
alling
brake
pedal
linkage
in
pedal
bracke
t,
a woo
den
wedge
should
be
placed be-
twee
n t
he
po
wer
brake
lever
and
the
forward
edg
e of
th
e
triangular
hole
in
the
pedal
bracket
(if
po
wer
uni
t
has
been
rem
o
ved)
(Fig.
16).
This
will
prev
e
nt
the
tr
igger
arm
from
extend-
ing
be
yo
nd
the
extremities
of
the
bracket.
Lubrication
Except
for
an
occasiona
l
few
drops
of
SAE
10
Eng
ine Oil on
the
power
brake
lever
pin
bush-
ings
,
the
b
rake
pedal
linkage
requires
no
fur-
th
er
lub
rication.
The
po
wer
unit
will r
equire
no
lubrication
und
er
normal
us
e.
If
the
unit
is dis
assembled
fO!'
o
verhaul
or
repair.
all s
eal
and
"0"
rings
and
ce
rtain
ot
her
parts
mus
t be
suitably
coated
wit
h silicone
gr
e
ase
before
assembly.
Pedal
Free-Pl
ay
Adjustment
Aft
er
the
master
cylinder
, bo
oster,
and
pedal
link
age
are
completel
y
installed
(and
the
wood-
en
wedge
removed
-
if
used),
a
free-play
ad-
jUstme
nt
check
should
be
made
at
no
vacuum
(e
ng
ine s
topped)
as
follows:
In
se
rt
blade
of
a
screwdriver
between
rubber
collar
of
the
po
wer
brake
trigger
pivot
and
the
power
brake
lever,
forcing
them
apart.
18
NOTE:
/f
the
bmk
e pedal
and
the
po
wer
bmke
lever are
not
w edged
apar
t, a false fr ee -pl
ay
s
etting
(w
hich
includes boost
c'
)'
valve
tra
vel)
win lie
rn
c
a..~
u1"
ed
at
the
pad
erld
of
the
pedal.
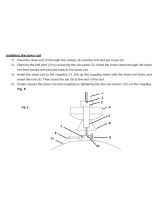
Check
free-play,
with
linka
ge
in
thi
s position,
by
pushing
lightly
at
the
pad
end
of
the
brake
pedal
(Fig.
18)
.
Pedal
free-pla
y s
hould
be
be-
tw
e
en
~~2
and
1
/8
inch.
If
pedal
free-pla
y
movement
does
not
corne
wit
hin
th
e
required
limits,
adju
s
tment
is
made
by len
gt
hening
or
shortening
the
push
rod
as
required.
Al
t
ernate
Method
of
Measuring
Pe
d
al
Fr
ee-
Pl
ay
Remo
ve
mast
er
cylinder
push
rod
end
pin
.
Us
ing
li
ght
finger
pressure,
move
pURh
rod
forward
until
contact
is
made
with
master
cyl-
inder
piston.
A
tt
empt
to
insert
the
push
rod e
nd
pin
through
the
power
level'
and
push
rod
end
hole.
If
the
push
rod
must
be pulled
ba
ck
to
allow
pa
ss
age
of
t
he
push
rod
end
pin,
free-pla
y
is
present.
If
the
push
rod
must
be
pushed
further
into
the
master
cylinder,
to allow
pas
s
age
of
push
rod
end
pin,
the
re
is
no
free-play
and
an
ad-
justment
must
be
made
at
the
push
rod.
Fig. 18 -
Ch
ecking Pedal Free-Play
----
I
/