Page is loading ...

Family of Brands – ILX Lightwave
®
• New Focus™ • Ophir
®
• Corion • Richardson Gratings™ • Spectra-Physics
®
QSOPS-A, Rev A 02/25/2016
s
Oriel
®
Arc Lamp
Power Supplies
Quick Start Guide
OPS-A150, OPS-A500

OPS-A
Arc Lamp Power Supplies
Page 2
1 GENERAL INFORMATION ......................................................................................... 3
1.2 GENERAL WARNINGS ............................................................................................................. 4
1.3 ELECTRICAL HAZARDS ........................................................................................................... 5
1.4 FIRE HAZARDS ......................................................................................................................... 5
1.5 LAMP HANDLING ...................................................................................................................... 5
1.6 LIGHT HAZARDS ...................................................................................................................... 5
2 INTRODUCTION .......................................................................................................... 6
2.1 ARC LAMP COMPATIBILITY .................................................................................................... 6
3 SYSTEM SETUP.......................................................................................................... 7
3.1 ITEMS INCLUDED WITH SYSTEM ........................................................................................... 7
3.2 UNPACKING .............................................................................................................................. 8
3.3 CHOOSING A LOCATION ......................................................................................................... 8
3.4 POWER SUPPLY CONNECTIONS ........................................................................................... 9
3.4.1. Front Panel Controls/Connections ............................................................................ 9
3.4.2. Rear Panel Controls/Connections........................................................................... 10
3.5 INITIAL START-UP SCREEN .................................................................................................. 13
4 INTERLOCK CABLES/CONNECTIONS TO LAMP HOUSINGS .............................. 14
4.1 CONNECTION TO A Q SERIES TYPE HOUSING ................................................................. 16
4.2 CONNECTION TO A RESEARCH LAMP HOUSING .............................................................. 16
4.3 SAFETY INTERLOCK.............................................................................................................. 17
5 POWER AND CURRENT OPERATION MODES ...................................................... 17
5.1 POWER OPERATION MODE ................................................................................................. 17
5.2 CURRENT OPERATION MODE ............................................................................................. 20
6 OPS-A SERIES OVERVIEW ..................................................................................... 22
CONTACTING ORIEL INSTRUMENTS ........................................................................ 23
LIST OF FIGURES
Figure 1 OPS-A Power Supply Front Panel Connections. ............................................................................ 9
Figure 2 OPS-A Power Supply Rear Panel Connections. .......................................................................... 10
Figure 3 The LCD display of the OPS-A Model Power Supply. .................................................................. 13
Figure 4 The output connector on the rear panel of the OPS-A150/OPS-A500 Power Supply for interface
with Oriel Lamp Housing. The 70050 (Black) and 70051 (Grey) Lamp Housing Interconnection Cables
are also shown. ........................................................................................................................................... 15
Figure 5 The electrical connector on a 60025 DC Arc Lamp Interface Kit for use with an OPS-A Model
Power Supply. ............................................................................................................................................. 16
Figure 6 The electrical connector on an Oriel Research Lamp Housing for use with an OPS-A Model
Power Supply. ............................................................................................................................................. 16
Figure 7 The Interlock Open and warning symbol indicator of the power supply indicates a cable is
disconnected and/or the lamp housing is open. ......................................................................................... 17

OPS-A
Arc Lamp Power Supplies
Page 3
1 GENERAL INFORMATION
Thank you for your purchase of this OPS power supply from Oriel Instruments.
Please carefully read the following important safety precautions prior to unpacking and operating this
equipment. In addition, please read the complete User’s Manual for additional important notes and
cautionary statements regarding the use and operation of the system.
1.1 SYMBOLS AND DEFINITIONS
WARNING
Situation has the potential to cause bodily harm or death.
CAUTION
Situation has the potential to cause damage to property or equipment.
ELECTRICAL SHOCK HAZARD
Hazard arising from dangerous voltage. Any mishandling could result
in irreparable damage to the equipment, and personal injury or death.
EUROPEAN UNION CE MARK
The presence of the CE Mark on Newport Corporation equipment
means that it has been designed, tested and certified as complying
with all applicable European Union (CE) regulations and
recommendations.
NOTE:
Additional important information the user or operator should consider.
Please read all instructions that were provided prior to operation of the system.
The safety of any system incorporating the OPS power supply is the sole responsibility of the assembler
of the systems.
If the equipment is used in a manner not specified by Newport Corporation, the protection provided by the
equipment may be impaired.
If there are any questions, please contact Oriel Instruments or the representative through whom the
system was purchased prior to use.

OPS-A
Arc Lamp Power Supplies
Page 4
1.2 GENERAL WARNINGS
Read all warnings and operating instructions for this system prior to setup and use.
Do not use this equipment in or near water.
To prevent damage to the equipment, read the instructions in the equipment manual for proper
input voltage.
This equipment is grounded through the grounding conductor of the power cord.
Route the power cord and other cables so they are not likely to be damaged.
Disconnect power before cleaning the equipment.
Do not use liquid or aerosol cleaners; use only a dry lint-free cloth.
Lock out all electrical power sources before servicing the equipment.
To avoid explosion, do not operate this equipment in an explosive atmosphere.
Qualified service personnel should perform safety checks after any service.
If this equipment is used in a manner not specified in this manual, the protection provided by this
equipment may be impaired.
To prevent damage to equipment when replacing fuses, locate and correct the problem that
caused the fuse to blow before re-applying power.
Do not block ventilation openings.
Do not use or store flammable liquids near the power supply.
Do not position this product in such a manner that would make it difficult to disconnect the power
cord.
Use only the specified replacement lamp.
This product should only be powered as described in the manual.
Do not remove the cover for normal usage.

OPS-A
Arc Lamp Power Supplies
Page 5
1.3 ELECTRICAL HAZARDS
Make all connections to or from the power supply with the power off. There may be dangerous voltage
present at the output terminals.
Tighten all lamp housing interconnect cable connections to prevent arcing.
There are no user serviceable parts inside the power supply. Do not use the power supply without its
cover in place. Lethal voltages are present inside.
1.4 FIRE HAZARDS
Lamps are extremely hot during operation, and for several minutes after being shut off. Keep flammable
objects away from the lamp and lamp housing.
Each compatible Newport brand lamp housing is equipped with a condenser lens. The re-focused output
of this lens can cause ignition of flammable targets including but not limited to walls, certain chemicals.
Use only the line cord supplied with the power supply. A substitute line cord may not be rated for high
current.
1.5 LAMP HANDLING
Read all information and warnings provided with lamp.
Never touch any lamp or the reflector’s inner surface with bare fingers or other contaminates. Skin oil or
other substances can burn into the lamp envelope during operation and negatively affect the lamp’s
performance and lifetime.
Always wear appropriate gloves and impact-resistant goggles when handling any lamp. Avoid any
mechanical strain during handling. Do not operate the lamp without all housing panels in place.
Lamps become very hot after only a few minutes of operation (up to 150°C) and remain quite hot for at
least 10 to 15 minutes after being turned off.
Do not run the lamp at more than 10% above its current or power rating. Lamp lifetime will decrease
dramatically.
1.6 LIGHT HAZARDS
These lamps produce considerable ultraviolet and infrared radiation. Avoid excessive exposure of the
eyes or skin to radiation from these lamps.
Utilize protective eyewear and gloves when operating these lamps.

OPS-A
Arc Lamp Power Supplies
Page 6
2 INTRODUCTION
2.1 ARC LAMP COMPATIBILITY
Newport Corporation offers all the components required to assemble a complete illumination system. The
minimum components include a lamp, lamp housing, power supply, and possibly a socket adapter. The
table below explains which components are compatible with each other to create an illumination system.
OPS-A150 Lamp Compatibility Table
Power
Supply
Lamp
Lamp Rating,
Description
Compatible Oriel Lamp Housings
Q Housing
[Socket Adapter]
Research
Lamp Housings
[Socket Adapter]
OPS-
A150
6282
Hg 50 W
60000 Housing
with
60025 Interface Kit
[60013]
66901, 66902, 66904, 66905,
66912, 67001, 67005
[66158]
6251NS
Xe 75 W
60000 Housing
with
60025 Interface Kit
[60014]
66901, 66902, 66904, 66905,
66912, 67001, 67005
[66150]
6263
Xe 75 W
(OZONE FREE)
60000 Housing
with
60025 Interface Kit
[60014]
66901, 66902, 66904, 66905,
66912, 67001, 67005
[66150]
6247
Xe 75 W
(HIGH STABILITY)
n/a
66901, 66902, 66904, 66905,
66912, 67001, 67005
[66148]
6257
Xe 100 W
(OZONE FREE)
60000 Housing
with
60025 Interface Kit
[60014]
66901, 66902, 66904, 66905,
66912, 67001, 67005
[66150]
6254
Xe 150 W
(UV ENHANCED)
n/a
66901, 66902, 66904, 66905,
66912, 67001, 67005
[66151]
6255
Xe 150 W
(OZONE FREE)
n/a
66901, 66902, 66904, 66905,
66912, 67001, 67005
[66151]
6256
Xe 150 W
(OZONE FREE,
SMALL ARC)
n/a
66901, 66902, 66904, 66905,
66912, 67001, 67005
[66152]

OPS-A
Arc Lamp Power Supplies
Page 7
3 SYSTEM SETUP
3.1 ITEMS INCLUDED WITH SYSTEM
Oriel Instruments provides lamp interconnection cables with the lamp housing. The power supply
includes the following items:
Power Supply
Power Cord
Quick Start Guide
OPS-A500 Lamp Compatibility Table
Power
Supply
Lamp
Lamp Rating,
Description
Compatible Oriel Lamp Housings
Q Housing
[Socket
Adapter]
Research
Lamp Housings
[Socket Adapter]
OPS-
A500
6283NS
Hg 200W
n/a
66901, 66902, 66904, 66905,
66912, 67001, 67005
[66144]
6289
HgXe 200W
n/a
66901, 66902, 66904, 66905,
66912, 67001, 67005
[66169]
6290
HgXe 200W
(OZONE FREE)
n/a
66901, 66902, 66904, 66905,
66912, 67001, 67005
[66169]
6259
Xe 300W
n/a
66901, 66902, 66904,
66905, 67001, 67005
[66160]
6258
Xe 300W
(OZONE FREE)
n/a
66901, 66902, 66904,
66905, 67001, 67005
[66160]
6286
Hg 350W
n/a
66901, 66902, 66904,
66905, 67001, 67005
[66161]
6285
Hg 500W
n/a
66901, 66902, 66904,
66905, 67001, 67005
[66162]

OPS-A
Arc Lamp Power Supplies
Page 8
3.2 UNPACKING
Remove all items from the shipping containers and verify each item is accounted for. The system is
carefully packaged to minimize the possibility of damage during shipment. Inspect the shipping boxes for
external signs of damage or mishandling. Inspect the contents for damage.
If any item is missing or damaged, immediately contact Oriel Instruments or the Newport representative
from whom the system was purchased. It is suggested to save the packaging material and shipping
container, in case the equipment needs to be relocated at a future date.
When handling this power supply, hold it from underneath the housing. Never use any knobs, buttons or
cables to carry or locate the power supply.
WARNING
Do not attempt to operate this equipment if there is evidence of
shipping damage or there is suspicion that the equipment will not
operate correctly. Damaged equipment may present hazards.
3.3 CHOOSING A LOCATION
Choose an installation location where the power requirements can be met for the system. Be sure power
is not applied to the system until the setup has been completed.
The environment should be that of a typical laboratory atmosphere, without excessive humidity and
contaminants in the air. Do not allow the ventilation holes on the power supply to be blocked. Air should
be able to circulate freely around the unit.
Once the connections have been made to the back of the power supply, the unit can be operated by
using the controls located on the front panel. Ensure that the final location allows for ease of access to all
front panel functions.

OPS-A
Arc Lamp Power Supplies
Page 9
3.4 POWER SUPPLY CONNECTIONS
3.4.1. Front Panel Controls/Connections
Figure 1 OPS-A Power Supply Front Panel Connections.
A. USB. The USB connector on the front panel is used to install firmware and LCD GUI updates to the
power supply. Any firmware updates, please visit OPS-A power supply product page.
B. Horizontal menu buttons. These four horizontal menu buttons are for using setting and monitoring
various features of the power supply:
a. Lamp Operating Mode
b. Manual/Timed Shutter Control, Display Features
c. Saving/loading particular setups.
C. SHUTTER. This button is for manual control of an electronic TTL input shutter. When pressed, the
shutter will open/close.
D. Vertical menu buttons. These four vertical menu buttons are for navigating settings for each feature
associated with pressing the horizontal menu buttons of the power supply.
E. CLEAR. The CLEAR button is for exiting the feature menu currently displayed on the LCD screen.
This button is also used to clear any error messages that are displayed.

OPS-A
Arc Lamp Power Supplies
Page 10
F. LAMP. The LAMP button is for manual control of the lamp. When pressed, the lamp will ignite/power
down.
G. Control knob. The control knob is for setting the parameters specific to each power supply feature.
H. POWER. This is the AC mains power switch. In the ON position as shown in Figure 2, AC power will
be switched into the main circuitry of the power supply. There is no output from the power supply
until the manual or external command to supply power to the lamp is received with the interlock
condition satisfied.
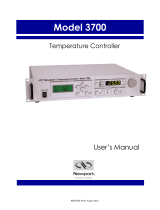
3.4.2. Rear Panel Controls/Connections
Figure 2 OPS-A Power Supply Rear Panel Connections.
A. AC IN. Before powering up the system for the first time, it is suggested to have a qualified electrician
verify the wall socket to be used with the power supply meets the requirements for operation as noted.
The line voltage requirements for the OPS power supplies are as follows:
A dedicated power line or line isolation may be required in certain locations, as the electronics contained
in the instrument are sensitive to static electricity and radiated electromagnetic fields. Operation of the
system near intense pulsed sources (lasers, Xenon flash lamps, etc.) may compromise performance.
Before making any electrical connections, verify the power switch is in the OFF position for the OPS.
Model
Input Rating
OPS-A150
95 to 264 VAC, 47 to 63 Hz
OPS-A500

OPS-A
Arc Lamp Power Supplies
Page 11
Connect the power cord to the back of the OPS before plugging it into an AC electrical outlet.
ELECTRICAL SHOCK HAZARD
To avoid electric shock, connect the instrument to a properly earth-
grounded, 3-prong receptacle only. Failure to observe this precaution can
result in severe injury or death.
Never attempt to open the power supply. These models do not contain any
user serviceable parts. Failure to follow this warning can result in severe
injury or death.
B. RS232. The RS232 connector located on the rear panel of the power supply allows for external
control of the power supply from a Windows based PC. The Command Set for RS232 control is in
Appendix B of this manual.
C. USB. The USB connector located on the rear panel of the power supply is for providing an alternative
external control method to RS232. The Command Set for USB control is in Appendix B of this manual.
D. OUTPUT 1. The interconnection cables between the lamp housing and power supply are noted in the
table below. A safety interlock feature does not allow the lamp to start if the cable or cables are not
connected. Never alter these cables and do not use if they appear to be damaged. Fully tighten all
connections between the lamp housing and the power supply to prevent arcing.
ELECTRICAL SHOCK HAZARD
When operating the power supply above 60 V, a significant electrical shock
risk is present. Before operating the power supply, please inspect the
Lamp Housing Interconnection cable and confirm the cable is securely
connected to the power supply and lamp housing. Failure to observe this
precaution can result in severe injury or death.
CAUTION
Do not turn on the power supply until the lamp has been installed and all
connections have been made to the power supply and lamp housing.
Model
Lamp Type
Lamp Housing Interconnection Cable(s)
OPS-A150
Hg
Oriel model 70051 (Grey)
OPS-A150
Xe
Oriel model 70050 (Black)
OPS-A500
Hg
Oriel model 70051 (Grey)
OPS-A500
Xe, Hg(Xe)
Oriel model 70050 (Black)

OPS-A
Arc Lamp Power Supplies
Page 12
WARNING
When the Lamp On button is depressed, the lamp will begin emitting light.
Do not press the Lamp On button until the output flange is directed in such a
way that people, animals and equipment will not be harmed by the light.
If there are any questions or concerns, contact Oriel Instruments or the regional sales representative for
Newport.

OPS-A
Arc Lamp Power Supplies
Page 13
3.5 INITIAL START-UP SCREEN
Upon powering up the OPS-A Model Power Supply the following screen will appear on the power supply’s
LCD:
Figure 3 The LCD display of the OPS-A Model Power Supply.
A. The main section of the LCD screen displays the desired parameter as selected by the user and will
be used for menu navigation.
B. This portion of the LCD screen displays a “Ready” status indicating the power supply and related
components (lamp, lamp housing, cable(s)) are prepared for lamp ignition, or displays “Interlock
Open,” indicating a problem with the system setup. Similar error messages such as “Cooler Not
Ready” when using the LIK-LMP Light Intensity Controller kit and “Function Not Available” may also
be displayed here. The meaning of these error messages and troubleshooting techniques are
explained in the relevant portions of this manual.
C. Lamp Mode. The operating mode as designated by the user will be displayed by this indicator.
D. Shutter. The setting of the shutter, manual or timed, as designated by the user will be displayed
here.

OPS-A
Arc Lamp Power Supplies
Page 14
E. Display. Pressing the horizontal menu button under this icon will reveal the vertical menu listing the
display options available by the OPS-A Model Power Supply.
F. Setup. Pressing the horizontal menu button under this icon will allow the user to Save and Load
preferred settings, reset the amount of hours the OPS-A has been recording for the current lamp in
use, and access other functions of the power supply. More details on the functions accessible with
the menu button under this icon are explained throughout this manual.
G. Shutter Indicator. This icon displays the open/close status of the shutter.
H. Lamp Indicator. This icon displays the ignition status of the lamp.
I. This icon will display either a Check Mark, indicating lamp housing connections and lamp housing
door are properly secured, or an Exclamation Point, indicating the connections and/or door previously
referenced need to be re-examined for secure connection(s)
4 INTERLOCK CABLES/CONNECTIONS TO LAMP HOUSINGS
A lamp interconnection cable must be purchased for use with an arc lamp housing, based on the type of
lamp being utilized. Replacement cables may also be purchased if needed. Interconnection cables are
available on Newport.com.
Model
Lamp Type
Lamp Housing Interconnection Cables (6 foot,
12 foot or 20 foot lengths)
Cable Color
OPS-A150
Hg
Oriel model 70051, 70048 or 70049
Grey
OPS-A150
Xe
Oriel model 70050, 70046 or 70047
Black
OPS-A500
Hg
Oriel model 70051, 70048 or 70049
Grey
OPS-A500
Xe, Hg(Xe)
Oriel model 70050, 70046 or 70047
Black
For arc lamps rated 450 W and greater, the OPS-A1000 and OPS-A1600 power supplies are required for
operation. Lamp powers of this magnitude require both the black 70050 and grey 70051 Interconnection
Cables on the rear panel of the power supply and Research Lamp Housing. Connect these cables as
directed by the labels on the both the rear panel of the power supply and Research Lamp Housing listing
which cable number and cable color to connect to the respective connector.

OPS-A
Arc Lamp Power Supplies
Page 15
Figure 4 The output connector on the rear panel of the OPS-A150/OPS-A500 Power Supply for
interface with Oriel Lamp Housing. The 70050 (Black) and 70051 (Grey) Lamp Housing
Interconnection Cables are also shown.
If a replacement cable is needed, please contact Oriel Instruments. Oriel Instruments can only guarantee
that the OPS Power Supply will meet performance specifications and be operated safely if lamp housing
interconnection cables provided by Oriel Instruments as listed in the table on the previous page are used.
The use of a lamp housing interconnection cable provided by a third party vendor or made on the user’s
end could damage the power supply and lamp housing and pose an electrical shock risk to the user.

OPS-A
Arc Lamp Power Supplies
Page 16
4.1 CONNECTION TO A Q SERIES TYPE HOUSING
For connecting the OPS-A Series Power Supply to a Q Series Type Housing, use the proper cable to suit
the type of DC arc lamp used as designated in the table on the previous page and the Arc Lamp Interface
with Ignitor that has been coupled to the housing. Connect this 5 pin connector on the 60025 Arc Lamp
Interface Kit to the input connector under the label OUTPUT 1 on the rear panel of the power supply.
Figure 5 The electrical connector on a 60025 DC Arc Lamp Interface Kit for use with an OPS-A
Model Power Supply.
4.2 CONNECTION TO A RESEARCH LAMP HOUSING
For connecting the OPS-A Series Power Supply to a Research Lamp Housing, use the proper cable to
suit the type of DC arc lamp used as designated in the table on the previous page and the label fixed to
the Research Lamp Housing. Connect this 5 pin connector on the Arc Lamp Interface Kit to the input
connector under the label OUTPUT 1 on the rear panel of the power supply.
Figure 6 The electrical connector on an Oriel Research Lamp Housing for use with an OPS-A
Model Power Supply.

OPS-A
Arc Lamp Power Supplies
Page 17
4.3 SAFETY INTERLOCK
Newport’s Oriel Power Supplies have a safety interlock feature which must be satisfied before the power
supply will power the lamp and which, if broken during operation, will disable the power supply.
Overheating of the housing or accidental opening of the door will automatically shut down the power
supply. If the Interlock Open and alert symbol shown below appear on the LCD interface on the power
supply during operation, it is recommended that all connection cables be connected for loose connections
and the door of the lamp housing be confirmed as completely closed and secured.
Figure 7 The Interlock Open and warning symbol indicator of the power supply indicates a cable is
disconnected and/or the lamp housing is open.
5 POWER AND CURRENT OPERATION MODES
5.1 POWER OPERATION MODE
In power mode, the lamp is operated at a constant power setting. As the voltage cannot be changed, the
current is raised or lowered to maintain the power at the same level. As the lamp ages, the radiant output
decreases. As an IR emitter ages, its resistance may double. However, the lamp life is prolonged.

OPS-A
Arc Lamp Power Supplies
Page 18
1. Press the horizontal menu button under the Lamp Mode icon on the LCD display until the text under
Lamp Mode reads power as shown in the figure above. Upon reaching the Constant Power mode
option, the vertical menu for setting the lamp operating power (Pset) and maximum power to be
supplied to the lamp (Pmax) will appear as shown above.
2. To adjust the Pset and Pmax, press the vertical menu button next to each parameter. A red bullet in
the box indicating that particular parameter can be changed will appear. That parameter can now be
changed by rotating the knob to the right of the vertical menu buttons. Be aware that Pmax cannot be
changed when the lamp is ignited.
Note. If using a lamp purchased from Newport Corporation, set Pset to the desired operating
power. Pmax is typically set at 10% higher than the lamp rating. If not using a lamp purchased
from Newport Corporation, it is best to follow operation power and maximum power supply
guidelines determined by the lamp manufacturer.
3. Press CLEAR to clear the vertical menu from the screen and observe the desired operating parameter
in real time while the lamp is being operated. The lamp is now ready for ignition.

OPS-A
Arc Lamp Power Supplies
Page 19
If the “Warning Imax Setting” message appears on the screen as shown below while the power supply is
being operated in Power Mode, this indicates that the Imax setting in Current Mode is set too low for the
lamp to reach the desired Pset.
If this error message appears, power down the lamp. Then, change Lamp Mode to Current Mode as
described in the next section. Increase the Imax parameter while staying safely within the lamp’s
maximum input current specification. Return to Power Mode and ignite the lamp. The power supply will
now be able to supply enough current to the lamp to reach the desired Pset.

OPS-A
Arc Lamp Power Supplies
Page 20
5.2 CURRENT OPERATION MODE
In current mode, the lamp is operated at a constant current setting. As the voltage cannot be changed,
the power is raised or lowered to maintain the current at the same level. As the lamp ages, the power is
increased. This results in greater optical output which to some extent may help compensate for a
darkening lamp envelope. However, the lamp life is reduced due to the increase in power.
1. Press the horizontal menu button under the Lamp Mode icon on the LCD display until the text under
Lamp Mode reads Current as shown in the figure above.
2. Upon reaching the Constant Power mode option, the vertical menu for setting the lamp operating
current (Iset) and maximum current to be supplied to the lamp (Imax) will appear as shown on the next
page.
3. To adjust the Iset and Imax, press the vertical menu button next to each parameter. A red bullet in the
box indicating that particular parameter can be changed will appear. That parameter can now be
changed by rotating the knob to the right of the vertical menu buttons. Be aware that Imax can only be
changed when the lamp is not ignited.
/