Extron electronics PoleVault Digital System User manual

Type
User manual
1
IMPORTANT:
Go to www.extron.com for the complete
user guide, installation instructions, and
specifications before connecting the
product to the power source.
PVS 407D • Setup Guide
The Extron PVS 407D is a seven input, one HDMI
output switcher with a built-in audio amplier and
a 4-port Ethernet switch. The PVS 407D is part of
the PoleVault
®
, PlenumVault
®
, and WallVault
®
Digital Systems, and is used in conjunction with
the Extron PVT digital series of transmitters and Extron speakers. The PVS 407D accepts HDMI and high resolution (RGB)
video and audio signals. The RGB input is digitized at the PVT input wallplate. In addition, the switcher has dedicated ports for
connecting the optional VoiceLift
®
system and a Page Sensor unit for facility communications.
NOTE: For full installation, configuration, connector wiring, and operation details, see the PVS 407D User Guide, available at
www.extron.com
Installing and Cabling the PVS 407D Switcher
The PVS 407D may come already pre-mounted within the Extron PMK 560 Projector Mount Kit and the PVM 220 PlenumVault
Mount Kit.
However, if the switcher is not pre-mounted, follow the steps in the system installation guide, supplied with the complete
PoleVault, PlenumVault, or WallVault System. Alternatively, follow the steps in the relevant setup guide for the mounting kit
(PMK 560, PVM 220, WMK 160, or USFM 100). Connect the cables to the switcher as shown in gure1 and detailed on page 2.
ATTENTION:
The PoleVault signal transmission method is specific for PVS 405D switchers working with PVT digital wallplates. DO
NOT connect the input ports to an MTP system or to an Ethernet/LAN or data transmission system.
La méthode de transmission du signal PoleVault est spécique pour les sélecteurs PVS405D qui fonctionnent avec les
plaques murales PVT numériques. Ne PAS connecter les ports d’entrée à un système MTP ou à un système Ethernet/
LAN ou de transmission de données.
NOTES:
The PVS 407D can receive signals from PVT wallplates located up to 150 feet (45 meters) away.
RJ-45 termination must comply with the TIA/EIA T 568A or 568B wiring standards for all connectors. The same standard
MUST be used at both ends of all cables (see the PoleVault System Installation Manual for details). The cables supplied
with the Extron PoleVault system are terminated to the TIA 568B standard.
Extron XTP DTP 24 twisted pair cable is required for optimal performance.
13
24
DO NOT
GROUND
OR SHORT
SPEAKER
OUTPUTS
4/8
Ω
HDMI
HDMI
1/2
SIG LINKSIG LINK
3/4
5
6
INPUTS
OUTPUT
AUDIO OUT
PVS 407D
AMPLIFIED AUDIO OUT
PAGING
SENSOR
PVT IN PVT IN
L
R
AUX
OVER PVTREMOTE
VOICELIFT
LAN
INPUT 7
+V
L
R
RS-232
Tx Rx
IR
SGG
CLASS 2 WIRING
LAN
3A MAX
POWER
12V
LR
Audio Output
to Speakers
Red Positive (+)
Black Negative (-)
Speaker
wire color
PVS terminal
(left and right)
Supplied PVS
Switcher External
Power Supply
(12 VDC, 4 A, or
12 VDC, 4.2 A)
4-port 10/100 Ethernet Switch
Connect as follows:
1. TCP/IP network
2. MLC controller
3. Optional network device
4. Optional network device
Power Connector
HDMI/RGB
PVT HD RGB
HDMI or RGB video/audio,
Inputs 1/2 and 3/4,
1 XTP DTP 24 cable with RJ-45 connectors
VGA IN
AUDIO IN
AUDIO IN
HDMI IN
e
MLC Plus 100
RS-232 input
MLC Plus 100 rear panel
Ground (Gnd)
Transmit (Tx)
Receive (Rx)
Transmit (Tx)
Receive (Rx)
White Rx on RS-232 port
Violet Tx on RS-232 port
Drain wire Ground (G)
Black PVS Power Supply (–)
Red PVS Power Supply (+)
MLC
wire color
To PVS terminal
A
Aux Audio
Input 5
C
Aux
Input
D
VoiceLift
Receiver
E
HDMI Output to
Display Device
HDMI
Connector
G
Line Out
Output
(Audio)
Paging
Sensor
Input
+V
F
H
I
L
IR control
SG
K
M
HDMI Input
Sources,
Inputs 5 and 6
HDMI
Connector
B
Connect to the
same power supply
used by the PVS Switcher.
NOTES:
• If you use cable that has a drain wire, tie the drain wire
to ground at both ends.
• You must connect a ground wire between the MLC
and PVS.
J
Ground
+12 VDC input
Tx Rx
G
Tx Rx
G
12
C
GCV
GS
POWER
12V
x.xA MAX
COM 1 COM 2 VOLIR
GIN
D IN RELAYS
Figure 1. PVS 407D Switcher Connections
1
LAN 1 LAN 3
LAN 2 LAN 4
PVS 407D
POLEVAULT SWITCHER
AUDIO LEVEL ADJUST
INPUTS
1
2
SELECT
CONFIG
R
PEAK
NORMAL
SIGNAL
3
4
5
AUX
AUDIO
PEAK
NORMAL
SIGNAL
VOICELIFT
PAGING
SENSOR
INPUT
LR
DO NOT
GROUND
OR SHORT
SPEAKER
OUTPUTS
4/8
Ω
- - A MAX
POWER
12V
HDMI
HDMI
1/2
SIG LINKSIG LINK
3/4
5
6
INPUTS
OUTPUT
AUDIO OUT
PVS 407D
AMPLIFIED AUDIO OUT
PAGING
SENSOR
PVT IN PVT IN
L
R
AUX
OVER PVTREMOTE
VOICELIFT
LAN
INPUT 7
+V
L
R
RS-232
Tx Rx
IR
SGG
6
7
CLASS 2 WIRING
LAN
PVS 407D
POLEVAULT SWITCHER
AUDIO LEVEL ADJUST
INPUTS
1
2
SELECT
CONFIG
R
PEAK
NORMAL
SIGNAL
3
4
5
AUX
AUDIO
PEAK
NORMAL
SIGNAL
VOICELIFT
PAGING
SENSOR
INPUT
6
7
LAN 1 LAN 3
LAN 2 LAN 4
DO NOT
GROUND
OR SHORT
SPEAKER
OUTPUTS
4/8
Ω
HDMI
HDMI
1/2
SIG LINKSIG LINK
3/4
5
6
INPUTS
OUTPUT
AUDIO OUT
PVS 407D
AMPLIFIED AUDIO OUT
PAGING
SENSOR
PVT IN PVT IN
L
R
AUX
OVER PVTREMOTE
VOICELIFT
LAN
INPUT 7
+V
L
R
RS-232
Tx Rx
IR
SGG
CLASS 2 WIRING
LAN
- - A MAX
POWER
12V
LR
2
PVS 407D • Setup Guide (Continued)
Step 1 — Connect A/V inputs
A
HDMI or RGB video and audio inputs — Using the included XTP DTP cables (see the cable Notes on page 1),
connect the PVT HD RGB or PVT HDMI input wallplates to these two RJ-45 female connectors (inputs 1 through 4). Input
sources can be four HDMI with embedded or analog audio, or two HDMI and two high resolution computer video and audio
sources, or a combination. The front panel input selection button cycles through inputs 1 through 4 as required.
NOTE: Each PVT input wallplate supports two input sources. A maximum of two PVT input wallplates can be connected
to the PVS 407D.
B
HDMI inputs — Connect up to two HDMI inputs (such as Apple TV or an Extron ShareLink Collaboration Gateway) to these
two female HDMI connectors (inputs 5 and 6). The front panel input selection button selects inputs 5 and 6 as required.
C
Audio input — Input 7 is a dedicated, audio-only input for an auxiliary, stereo, line-level analog audio signal from an output
source such as an iPod device or an MP3 player. Connect the cable from the source to this 5-pole captive screw connector.
The connector can be wired as balanced or unbalanced (see the PVS 407D User Guide for the method).
NOTE: Input 7 is audio only. No video signals are supported on this input.
D
Aux input — Connect an auxiliary, line level, audio device to this 3-pole captive screw connector. It can be wired for balanced
or unbalanced mono audio. Aux audio can be configured to duck program audio or to be mixed with program audio (inputs 1
through 7).
E
VoiceLift receiver connection — Connect an optional Extron VoiceLift Microphone receiver to this RJ-45 connector for use
with a VoiceLift Microphone system.
F
Paging sensor input — Connect an optional Extron Priority Page Sensor (part numbers 70-1064-01 or 70-619-01) to this port
to enable program audio interruptions during paging system broadcasts.
Step 2 — Connect A/V Outputs
G
HDMI output — Connect an HDMI capable display to this female HDMI connector.
H
Audio Out (line level) — Connect an external Extron audio amplifier, a recording/podcasting device, or an assistive listening
system to this port. It can be configured via RS-232, front panel USB, or TCP/IP for fixed or variable audio output (default is
variable). It can be wired for balanced or unbalanced signals (see the PVS 407D User Guide for instructions).
I
Amplified Audio Out — Connect speakers to each channel marked “L” and “R” (left and right) using the supplied black 4-pin,
5 mm connector. Wire red to positive, black to negative. Each channel is rated for 25 W at 4 or 8 ohm loads.
If using more than one 8 ohm speaker per channel, connect them in parallel.
ATTENTION:
DO NOT tie L and R outputs to each other or to ground as it will short the outputs and damage the amplifier.
Ne reliez pas les sorties L et R entre elles et/ou à la terre: les sorties seraient être court-circuitées et l’amplificateur
endommagé.
13
24
DO NOT
GROUND
OR SHORT
SPEAKER
OUTPUTS
4/8
Ω
HDMI
HDMI
1/2
SIG LINKSIG LINK
3/4
5
6
INPUTS
OUTPUT
AUDIO OUT
PVS 407D
AMPLIFIED AUDIO OUT
PAGING
SENSOR
PVT IN PVT IN
L
R
AUX
OVER PVTREMOTE
VOICELIFT
LAN
INPUT 7
+V
L
R
RS-232
Tx Rx
IR
SGG
CLASS 2 WIRING
LAN
3A MAX
POWER
12V
LR
1
3
2
4
DO
N
OT
G
R
O
UND
O
R
S
H
O
RT
PEAKER
O
UTPUT
S
4/
8
Ω
HDM
I
HDMI
1/
2
S
I
G
LINK
S
I
G
LINK
3/
4
5
6
INP
U
T
S
O
UTPU
T
AU
DI
O
OUT
P
V
S
407
D
A
MPLIFIED AUDI
O
O
U
T
P
A
G
IN
G
S
ENSOR
P
VT IN PVT IN
L
R
AUX
VO
I
C
ELIFT
INPUT
7
+V
L
R
C
LA
SS
2 WIRIN
G
LAN
3A MAX
P
O
WE
R
12
V
L
R
NOTES:
You must connect a ground wire between the MLC and PVS.
• If you use cable that has a drain wire, tie the drain wire to
ground at both ends.
G
Ground
+12 VDC input
Connect to the same power supply
used by the PVS Switcher.
MLC Plus 100 rear panel
Tx Rx
G
Tx Rx
G
12
C
GCVGS
POWER
12V
x.xA MAX
COM 1 COM 2 VOLIR
GIN
D IN RELAYS
RS-232
Ground (Gnd)
Transmit (Tx)
Receive (Rx)
Transmit (Tx)
Receive (Rx)
Tx
Rx
IR control
S
Ground
G
IR Out
Rx
Tx
Projector
Ground
RS-232
IR control
RS-232
P
O
1
2
x.
x
Extron
DISPLAY
ON
PC
VIDEO
OFF
LAPTOP
MUTE
VOLUME
E
x
t
r
on
DISPLA
Y
O
N
PC
VIDE
O
O
F
F
LAPTOP
MUTE
V
O
L
U
M
E
MLC Plus 100 Front Panel
With Faceplate
Figure 2. MLC Plus 100 to PVS 407D Connection
2
3
Step 3 — Connect Remote Control, IR, and LAN Connectors
J
Remote (RS-232/MLC) control port — Connect a cable between this port and an MLC MediaLink Controller
(see figure2 on the previous page). The PVS switcher can be controlled via an RS -232 connection directly from a host
computer, a control system, or a MediaLink
®
Controller (MLC). The MLC provides remote control of input switching and
volume. The RS-232 protocol is 9600 baud, 8-bit, 1-stop bit, no parity, and no flow control (see the MLC Plus 50/100/200
User Manual for full details).
NOTE: The PVS 407D PoleVault switcher may also be Ethernet controlled from control systems and MediaLink controllers
that support this option.
13
24
DO NOT
GROUND
OR SHORT
SPEAKER
OUTPUTS
4/8
Ω
HDMI
1/2
SIGLINKSIG
3/4
5
6
INPUTS
OUTPUT
AUDIO OUT
PVS 407D
AMPLIFIED AUDIO OUT
PAGING
SENSOR
PVT IN PVT IN
L
R
OVER PVTREMOTE
VOICELIFT
LAN
INPUT 7
+V
L
RS-232
Tx Rx
IR
SGG
CLASS 2 WIRING
LAN
3A MAX
POWER
12V
LR
PVT IN PVT IN
Included power supply is used for both
PVS 407D and MLC Plus 100.
1
3
2
4
DO
N
O
T
G
R
O
UND
O
R
S
H
O
RT
S
PEAKER
O
UTPUT
S
4/
8
Ω
HDMI
1
/2
S
S
I
G
G
LINK
S
I
G
3/
4
5
6
I
NPUT
S
OU
TP
U
T
A
U
DI
O
OUT
PV
S
407
D
AMPLIFIED A
U
DI
O
OU
T
PA
G
IN
G
S
EN
SOR
PVT I
N
PVT I
N
L
R
O
VER PV
T
VO
I
C
ELIFT
INP
U
T
7
+V
L
IR
S
G
C
LASS 2 WIRIN
G
LAN
L
R
PVT IN
PVT I
N
PVT IN
N
N
I
T
T
T
V
VT
V
V
P
P
P
P
PVT IN
PVT I
N
PVT IN
V
P
PV
P
P
MLC Plus 100 rear panel
Tx Rx
G
Tx Rx
G
12
C
GCVGS
POWER
12V
x.xA MAX
COM 1 COM 2 VOLIR
GIN
D IN RELAYS
Figure 3. Power Supply Connections to PVS 407D and MLC Plus 100
NOTE: To power the MLC Plus 100, wire it directly to the power supply the switcher uses (see figure2 and gure 3 above).
K
IR control port — Connect the wiring from the IR Out port on rear of the MLC to this connector. IR signals on this connector
are passed to the connected PVT wallplate for control of devices, such as Blu-ray or DVD players.
NOTE: The IR control feature is only applicable for PVT wallplates that support IR pass through, such as the PVT HDMI
and PVT HDMI RGB.
L
Ethernet connectors — Connect LAN cables to these four ports for 10/100 Ethernet connectivity as follows:
1. TCP/IP network (owner furnished), 2. MLC MediaLink controller, 3-4. Optional network devices.
Step 4 — Connect power
M
DC power connector — When all other cables have been connected, plug the cable with the orange captive screw connector
(provided with the power supply) from the 12 VDC power source into this receptacle (see figure3) and apply power. The front
panel power LED and an input LED illuminates when the switcher is receiving power.
NOTE: Use only the supplied 12 V, 4 A or 12 V, 4.2 A power supply for this switcher. The PVS 407D power supply can
support a typical system: for example, a PVS 407D, 2 PVT Wallplates, 2 or 4 speakers, an MLC Plus 100, and a
VoiceLift Microphone system.
Front Panel Overview
PVS 407D
POLEVAULT SWITCHER
AUDIO LEVEL ADJUST
INPUTS
1
2
SELECT
CONFIG
R
PEAK
NORMAL
SIGNAL
INPUT
3
4
7
AUX
AUDIO
PEAK
NORMAL
SIGNAL
VOICELIFT
PAGING
SENSOR
5
6
CD
E
F
GH IJ KL
AB
Figure 4. Front Panel Features
A
Power indicator LED — This LED lights green when power is supplied, and amber when in power save mode.
B
Device Reset button — Pressing this inset button resets the switcher to default settings (see the PVS 407D User Guide for
reset mode details).
3
4
4
68-2776-50
Rev. C
08 19
© 2015-2019 Extron Electronics — All rights reserved. www.extron.com
All trademarks mentioned are the property of their respective owners.
Worldwide Headquarters: Extron USA West, 1025 E. Ball Road, Anaheim, CA 92805, 800.633.9876
For information on safety guidelines, regulatory compliances, EMI/EMF compatibility, accessibility, and related topics, see the
Extron Safety and Regulatory Compliance Guide on the Extron website.
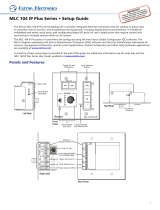
C
Front panel mini USB configuration port — Connect a computer to this mini USB port (cable not supplied) for device
configuration and upgrading the firmware.
D
Input selection button and
E
LEDs (1 through 7) — This button selects and switches inputs, and the LEDs indicate which
input is active (current input LED lights green).
F
Aux input LED — This LED indicates when the aux input is active for input level adjustment.
G
Audio input adjustment buttons and
H
level LEDs — These buttons adjust the level of the audio for the selected input. The
associated LEDs (peak, normal, and signal) indicate the active audio level.
I
VoiceLift input adjustment buttons and
J
level LEDs — These buttons adjust the VoiceLift (microphone) input level. The
associated LEDs (peak, normal, and signal) indicate the active audio level.
K
Paging sensor sensitivity adjustment buttons and
L
status LED — These buttons adjust the sensitivity of the page
sensor to interrupt program audio during facility broadcasts. The status LED illuminates when a broadcast is detected.
Front Panel Operation and PVS 407D Switcher Configuration
For full details on front panel operation and switcher conguration, see the PVS 407D User Guide, and the MLC Plus 50/100/200
User Guide. For VoiceLift and page sensor installation and operation details, refer to the VoiceLift System User Guide and the
Priority Page Sensor Kit Installation Instructions. All these are available online at www.extron.com.
Front Panel Operation
1. To change inputs, press the Select button
D
to sequentially cycle through inputs 1 through 4 (video and audio), 5 and
6 (HDMI inputs), and input 7 (audio only). The LEDs
E
(inputs 1 through 7) indicate which input is active. The Aux input is
selectable for configuration only. To do this, press and hold the Select button
D
for 3 seconds until the Aux LED lights.
2. To adjust audio input levels, select an input, then press the audio input adjustment buttons
G
in 1 dB steps
(-18 to +24 dB, default 0). The LEDs
H
indicate the signal level status (not volume).
3. To adjust VoiceLift microphone level, use VoiceLift input adjustment buttons
I
to change the input level in 1 dB steps
(-18 to +24 dB, default 0). The LEDs
J
indicate mic input signal levels.
NOTE: On initial switcher power-up, the output volume level is automatically adjusted to 80%.
4. To adjust paging sensitivity, press the Paging Sensor buttons
K
to increase or decrease sensitivity as desired.
The status LED
L
illuminates when an announcement from the paging system is detected.
The Extron Priority Page Sensor Kits (PPS 35 or PPS 25) are optional accessories and can be purchased separately.
Configuration
The switcher can be congured and controlled via a host computer or other device (such as a control system) attached to the
front panel USB port, the rear panel LAN port, the rear panel RS-232 remote port, or by a MediaLink Controller (MLC).
The connected control device (host) can use Extron Simple Instruction Set (SIS
) commands or the Product Conguration
Software (PCS) program.
See the PVS 407D User Guide for SIS commands and conguration details.
See the embeded help le in the Product Conguration Software (PCS) for conguration methods using PCS.
The software and device User Guides and Instructions mentioned in this guide can be found at www.extron.com.
NOTE: The factory congured password for all accounts on this device have been set to the device serial number. If the
switcher is reset, the password reverts to the default, which is no password.
  • Page 1 1
  • Page 2 2
  • Page 3 3
  • Page 4 4

Extron electronics PoleVault Digital System User manual

Type
User manual

Ask a question and I''ll find the answer in the document

Finding information in a document is now easier with AI