Emerson 1F86U-42WF Installation guide
- Category
- Thermostats
- Type
- Installation guide
This manual is also suitable for

Professional Contractor
INSTALLATION GUIDE
37-7498

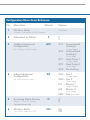
Exit Next
Setup Indoor
Exit Next
Wireless Setup
Connect
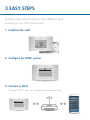
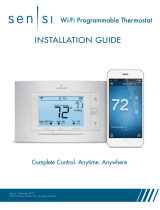
3 EASY STEPS
1. Install on the wall
2. Configure for HVAC system
3. Connect to Wi-Fi
Connect Wi-Fi now or homeowner connects later
Installing Sensi thermostat isn’t that different than
installing a non Wi-Fi thermostat.

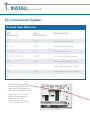
Terminal Cross Reference
Old Sensi Conventional
thermostat... thermostat…
RC RC* Power for cooling
RH, R RH* Power for heating
C, X, B** C Common wire
W, W1, W/E W/E 1st stage indoor heat
W2 W2 2nd stage indoor heat
Y, Y1 Y 1st stage outdoor cool
Y2 Y2 2nd stage outdoor cool
G G Fan
* If the old thermostat has
separate RC and RH wires,
clip the RC/RH jumper on
the back of the thermostat.
** Label “B” as “C” only if
the old thermostat also
had a wire on “O”.
If there is no wire on
“O” – label the wire “B”.
Back of new thermostat
1. INSTALL on the wall
For Conventional Systems

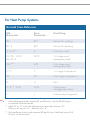
Terminal Cross Reference
Old Sensi Heat Pump
thermostat… thermostat…
RC RC* Power for cooling
RH, R RH* Power for heating
C, X, B** C Common wire
W, W1, W/E, W/E 1st stage aux/
Aux/E, E emergency heat
W2*** W2 2nd stage aux/
emergency heat
Y, Y1 Y 1st stage compressor
Y2 Y2 2nd stage compressor
G G Fan
O, B**, O/B O/B Heat pump
changeover valve
L L Heat pump diagnostic
* If the old thermostat has separate RC and RH wires, clip the RC/RH jumper
on the back of the thermostat.
** Label “B” as “C” only if the old thermostat also had a wire on “O”.
If there is no wire on “O” – label the wire “B”.
*** On Heat Pump systems with separate W2 and E wires, label both wires W/E
(2 wires on one terminal).
For Heat Pump Systems

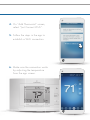
Exit Next
Setup Indoor
Exit Next
Setup Indoor
Room Temperature
Set To
Heat Off Cool Auto On On Off
Exit Next
Wireless Setup
Connect
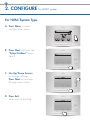
2. CONFIGURE for HVAC system
For HVAC System Type
A. Press Menu to enter
configuration menu.
B. Press Next until you see
“Setup Outdoor” menu
item 3.
C. Use Up/Down Arrows
to change settings.
Press Next to continue
through menu items.
D. Press Exit
when you’re finished.

Configuration Menu Items Reference
No. Menu Item Default Options
1 Wireless Setup — Connect
Connects Thermostat to Wi-Fi network
2 Fahrenheit or Celsius F F
C
3 Outdoor Equipment AC2 AC1 - Conventional
Configuration Cooling 1
For Cooling or Heat Pumps (Single Stage)
AC2 - Conventional
Cooling 2
(Two Stage)
HP1 - Heat Pump 1
(Single Stage)
HP2 - Heat Pump 2
(Two Stage)
AC0 - No Cooling
4 Indoor Equipment EL2 GA1 - Gas 1
Configuration
(Single Stage)
For Gas or Electric Heat
GA2 - Gas 2
(Two Stage)
EL1 - Electric 1
(Single Stage)
EL2 - Electric 2
(Two Stage)
FAN - Fan (No Heat)
5 Reversing Value Position O O
Selects “O” or “B” Setting B
For heat pumps only
6 Wireless Radio ON On
Turns Wi-Fi Radio On/Off Off

Swipe screen to unlock
PM
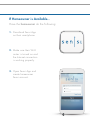
3. CONNECT to Wi-Fi
In order to connect to the homeowner’s Wi-Fi,
you will need the following:
The homeowner’s Wi-Fi
router access information.
If the homeowner is not available or does not want
to connect at this time, go to the last 2 pages.
Before You Begin
Access to the homeowner’s
smartphone.

Have the homeowner do the following:
If Homeowner is Available...
1. Download Sensi App
on their smartphone.
2. Make sure their Wi-Fi
router is turned on and
the Internet connection
is working properly.
3. Open Sensi App and
create homeowner
Sensi account.

4. On “Add Thermostat” screen,
select “Just Connect Wi-Fi”.
5. Follow the steps in the app to
establish a Wi-Fi connection.
6. Make sure the connection works
by adjusting the temperature
from the app screen.

Technical Support
TECHNICAL SUPPORT
888-605-7131
sensicomfort.com
The Sensi logo is a trademark of Emerson Electric Co.

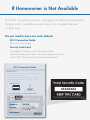
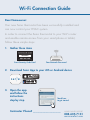
The Wi-Fi connection process is designed so that any homeowner
familiar with a smartphone and router can complete the step
on their own.
You just need to leave two items behind:
Wi-Fi Connection Guide
(tear out next page)
Security Code Card
(included in the box with the thermostat)
Insert the Security Code Card into the pre-cut slots
in the Wi-Fi Connection Guide leave-behind.
If Homeowner is Not Available
XXXXXXXX
Dear Homeowner:
Your new Sensi thermostat has been successfully installed and
can now control your HVAC system.
In order to connect the Sensi thermostat to your Wi-Fi router
and enable remote access from your smartphone or tablet,
follow these simple steps:
Wi-Fi Connection Guide
1. Gather these items
Contractor Phone# ____________________
3. Open the App
and follow the
instructions
step by step.
2. Download Sensi App to your iOS or Android device
HOMEOWNER SUPPORT
888-605-7131
sensicomfort.com
Sensi Security Code Card
Touch here
to get started.
Your Network Password
XXXXXXXX
Contractor Phone# ____________________
3. Open the App
and follow the
instructions
step by step.
HOMEOWNER SUPPORT
888-605-7131
sensicomfort.com
Touch here
to get started.

XXXXXXXX
Dear Homeowner:
Your new Sensi thermostat has been successfully installed and
can now control your HVAC system.
In order to connect the Sensi thermostat to your Wi-Fi router
and enable remote access from your smartphone or tablet,
follow these simple steps:
Wi-Fi Connection Guide
1. Gather these items
Contractor Phone# ____________________
3. Open the app
and follow the
instructions
step by step
2. Download Sensi App to your iOS or Android device
HOMEOWNER SUPPORT
888-605-7131
sensicomfort.com
Sensi Security Code Card
Touch here
to get started.
Your Network Password
-
 1
1
-
 2
2
-
 3
3
-
 4
4
-
 5
5
-
 6
6
-
 7
7
-
 8
8
-
 9
9
-
 10
10
-
 11
11
-
 12
12


Emerson 1F86U-42WF Installation guide
- Category
- Thermostats
- Type
- Installation guide
- This manual is also suitable for
Ask a question and I''ll find the answer in the document
Finding information in a document is now easier with AI
Related papers
-
Emerson ST55 User manual
-
-
Sensi 1F87U-42WF Owner's manual
-
Sensi 1F96U-42WFB / 1F96U-42WF Owner's manual
-
Sensi ST55 Owner's manual
-
Sensi 1F95U-42WF User manual
-
 Emerson Thermostats ST75 User manual
-
 Sensi Sensi ST75 Installation guide
-
Emerson White Rodgers Sensi Smart Thermostat Pro Installation guide
-


Other documents
-
 Sensi ST55 User manual
-
Canon 7950A525 Datasheet
-
 Emerson Thermostats ST75W Installation guide
-
Sensi 1F96U-42WF User manual
-
Sensi Smart thermostat User manual
-
 Sensi 1F76U-22WFB Series Lite Smart Thermostat Installation guide
-
Sensi ST76 Series User manual
-
Sensi ST75W User manual
-
 Emerson Thermostats ST75W User guide
-


