Xpelair DX200 User manual

Type
User manual
Guarantee
UK: This fan is guaranteed against defects for 3 years from the date of purchase.
Xpelair reserve the right to repair or replace the fan.
Keep your purchase receipt.
Any problems, contact the address below.
Outside UK: See International section below.
Technical Advice & Service
UK - Xpelair have a comprehensive range of services including:
Free technical advice Help-Desk from Engineers on all aspects of ventilation.
Free design service, quotations and site surveys.
Outside UK: See International section below.
Please ask for details on:
Tel +44 (0) 8709 000430
Fax +44 (0) 8709 000530
Also at the address below
Head Office – UK Sales Office and Spares
Applied Energy Products Ltd, Morley Way, Peterborough, PE2 9JJ, England
Tel: +44 (0) 1733 456789
Fax: +44 (0) 1733 310606
Sales/Spares Hotline: +44 (0) 8709 000420
Sales/Spares Faxline: +44 (0) 8709 000520
Web: http://www.xpelair.co.uk
International
Guarantee – Contact your local distributor or Xpelair direct
Technical advice and Service - Contact your local Xpelair distributor.
567-2066-02
Revision A
GB
F
D
NL
N
S
I
GR
a
Xpelair
Condensation Control Fans
CF20 Pull Cord
CF20T Pull Cord/Timer
Remote Switched Centrifugal Ducted Fans
DX200 Remote Switch
DX200T Remote Switch/Timer
Installation and operating instructions
Please retain for end user’s future reference
ES
Tilbehør
For å forenkle installasjonen og
spare tid, kan det være at din
installasjon krever noe av
tilbehøret som er listet opp
nedenfor:
WD100 Vegg-gjennomføring
CFWG100 Vegg-gitter
FDA Utstyrspakke med
plant kanaladapter
XCT100 Kondensavskiller
DGW/B Gitterluke for
luftutskiftning
SP100 Muffeplate
XAA Luftadapter for mur
VC10 Avtrekksdeksel
WT10 Kanalavslutnings-sett
XF/FM Plan rørkanal
(plast/metall)
(plast 234 x 29 mm
metall 230 x 25 mm)
VK10 Veggventil-sett
FD100 Fleksibel rørkanal
WDC5 Snekkeskrue-klips
XCMK Sett for montering i
himling
XBP In-line
tilbakeslippsklaff
EFT Lettmontert
avslutnings-sett
GMK Sett for montering i
vindu
PDXGF Fettfilter
Nedenfor er det listet opp enkelte
reservedeler som er tilgjengelige.
Se baksiden på denne trykksaken
for bestillingsinformasjon:
41520SK Monterings-sett
(komplett)
41528SK Rund muffe (komplett)
41731SK Motor (DX200)
41733SK Motor (CF20/CF20T/
DX200T)
41782SK Kretskort-komponent
(DX200T)
41735SK Kretskort-komponent
(CF20)
41736SK Kretskort-komponent
(CF20T)
41737SK Frontdeksel kompl.
med mottrykksplate
(DX200)
41738SK
Frontdeksel kompl. med
mottrykksplate (DX200T)
41739SK
Frontdeksel kompl. med
mottrykksplate
(CF20/CF20T)
41740SK Innfatningsprofil
(komplett)
41741SK
Snorbryter-komponent
(CF20/CF20T)
41742SK Viftehjul (komplett)
Tillbehör
I listan nedan hittar du hjälpmedel
som kan vara av nytta under
installationen:
WD100 Väggtrumma
CFWG100 Väggaller
FDA Adaptorsats för
planmontering
XCT100 Kondensavledare
DGW/B Luftregleringsgaller
SP100 Mufförbindningsplatta
XAA Adapter
VC10 Ventilhuv
WT10 Avspänningssats
XF/FM Planmontering
(plast/metall)
(plast 234 x 29 mm)
(metall 230 x 25 mm)
VK10 Väggventilsats
FD100 Flexibel
ledningsdragning
WDC5 Skruvdriftsklämmor
XCMK Takmonteringssats
XBP Svart reglerventil
EFT Avspänningssats
GMK Glasmonteringssats
PDXGF Smörjningsfilter
I listan nedan hittar du
reservdelar. Du hittar
beställningsinformation på denna
bruksanvisnings baksida:
41520SK Fastsättningssats
(komplett)
41528SK Mufförbindning
(komplett sortiment)
41731SK Motor (DX200)
41733SK Motor (CF20/CF20T/
DX200T)
41782SK PCB-montering
(DX200T)
41735SK PCB-montering
(CF20)
41736SK PCB-montering
(CF20T)
41737SK Främre skydd med
skärm (DX200)
41738SK Främre skydd med
skärm (DX200T)
41739SK
Främre skydd med
skärm (CF20/CF20T)
41740SK Ramformning
(komplett sortiment)
41741SK Dragsnöresmontering
(CF20/CF20T)
41742SK Fläkthjul (komplett
sortiment)
Accessori opzionali
Per un’installazione più facile e
veloce, potrebbero essere
necessari alcuni degli accessori
sottoelencati:
WD100 Condotto per parete
CFWG100 Grata per parete
FDA Kit adattatore per
condotto piatto
XCT100
Pozzetto di
intercettazione della
condensa
DGW/B Grata dello sportello di
ricambio aria
SP100 Piastra di imbocco
XAA Adattatore per mattoni
traforati
VC10 Cappottatura di
ventilazione
WT10 Kit di terminazione
condotti
XF/FM Condotti piatti
(plastica/metallo)
(plastica 234 x 29mm,
metallo 230 x 25mm)
VK10 Kit di ventilazione per
parete
FD100 Condotti flessibili
WDC5 Fermagli a vite senza
fine
XCMK Kit di montaggio al
soffitto
XBP Otturatore in linea del
tiraggio di ritorno
EFT Kit di terminazione di
facile montaggio
GMK Kit per il montaggio su
vetro
PDXGF Filtro antigrasso
Qui di seguito sono elencati alcuni
dei ricambi disponibili. Per
informazioni su come ordinarli,
consultare la quarta di copertina:
41520SK Kit di fissaggio (kit
intero)
41528SK Imbocco a bicchiere
circolare (intera
gamma)
41731SK Motorino (DX200)
41733SK Motorino (CF20/
CF20T/DX200T)
41782SK Gruppo PCB
(DX200T)
41735SK Gruppo PCB (CF20)
41736SK Gruppo PCB (CF20T)
41737SK Coperchio anteriore
completo di
diaframma (DX200)
41738SK Coperchio anteriore
completo di
diaframma (DX200T)
41739SK Coperchio anteriore
completo di
diaframma
(CF20/CF20T)
41740SK
Modanatura della
cornice
(intera gamma)
41741SK
Gruppo cordicella
(CF20/CF20T)
41742SK
Girante (intera
gamma)
Συµπληρωµατικές Επιλγές
Γι α γρήγρη και εύκλη
εγκατάσταση, η εγκατάσταση
σας µπρεί να ρειαστεί µερικά
απ τα Συµπληρωµατικά πυ
αναέρνται πι κάτω:
WD100 Αγωγς τίυ
CFWG100 Κιγκλίδωµα τίυ
FDA Πρσαρµγέας
επίπεδυ αγωγύ
XCT100 Ατµπαγίδα
DGW/B Κιγκλίδωµα πρτας
ανανέωσης αέρα
SP100 Πλάκα ύσµατς
XAA Πρσαρµγέας
τύλυ αέρα
VC10
Κάλυµµα αεραγωγύ
WT10 Σύνλ αγωγύ
τερµατισµύ
XF/FM Επίπεδς αγωγς
(πλαστικ/µέταλλ)
(Πλαστικ 234  29 λστ.
Μέταλλ 230  25 λστ.)
VK10 Σύνλ αεραγωγύ
τίυ
FD100 Εύκαµπτς αγωγς
WDC5 Κλιπ ιειδύς
κίνησης
XCMK
Σύνλ τπθέτησης
σε ταάνι
XBP Φράτης
πισθδρµικύ
ρεύµατς in-line
EFT Σύνλ
τερµατισµύ
εύκλης εαρµγής
GMK
Σύνλ τπθέτησης
γυαλιύ
PDXGF Φίλτρ γράσυ
Πι κάτω αναέρνται µερικά
απ τα διαθέσιµα ανταλλακτικά.
Συµυλευθείτε την πίσω ψη
τυ παρντς υλλαδίυ για
λεπτµέρειες παραγγελίας:
41520SK Σύνλ στερέωσης
(λκληρ σύνλ)
41528SK Κυκλικ ύσµα
41731SK Μτέρ (DX200)
41733SK
Μτέρ (CF20/CF20T/
DX200T)
41782SK
Σύνλ PCB (DX200T)
41735SK Σύνλ PCB (CF20)
41736SK
Σύνλ PCB (CF20T)
41737SK
Μπρστιν κάλυµµα
συνδευµεν απ
εκτρπέα (DX200)
41738SK Μπρστιν
κάλυµµα
συνδευµεν απ
εκτρπέα (DX200T)
41739SK
Μπρστιν κάλυµµα
συνδευµεν απ
εκτρπέα (CF20/CF20T)
41740SK υτ πλαίσι
(λκληρη σειρά)
41741SK Σύνλ κρδνιύ
τραήγµατς
(CF20/CF20T)
41742SK Στρεί
(λκληρη σειρά)
N S I GR
For speed and ease of Installation, your installation may require some of the
Ancillaries indicated in “Ancillary Options”.
If installing on a wall (surface mounting)
1. Mark on the wall the centre of the duct hole A.
2. Use this centre to cut an opening through the wall 117mm dia, with a slight
fall to the exterior.
3. Fit the wall duct (WD100), not supplied, and mortar into place.
If installing on a wall (flush mounting)
1. Mark on the wall the centre of the duct hole A, and drill a pilot
hole through both walls at a slight downward angle.
2. Use the centre to mark a rectangular hole for the inner wall using the
dimensions
A.
3. Cut the rectangular hole through the inner wall.
4. Go outside and cut a 117mm-diameter hole in the outer wall using the small
hole as the centre.
5. Measure the wall thickness.
Cut the wall duct (WD100), not supplied, so that it is 64mm less than the
wall thickness.
If installing in a ceiling (surface mounting)
This method requires a space above the ceiling, such as a loft or attic, to provide
access for 100mm internal diameter ducting.
1. Mark on the ceiling the centre of the duct hole A, avoiding ceiling joists and
buried cables etc.
2. Cut a 117mm-diameter hole using the marked centre.
If installing in a ceiling (flush mounting)
For 100mm diameter ducting:
1. Mark a rectangular hole using the dimensions
B.
2. Cut the hole, avoiding ceiling joists and buried cables etc.
For flat ducting:
This fan can be installed within a 47mm void without the circular spigot
7
(Fig.E). Flat ducting adapter kit (FDA) available.
Preparing the fan for installation
1. Remove the front cover 2 (Fig.C)
2. Fit the foam tape
!™ supplied around the circular spigot 7 (Fig.E).
3. Remove the electrical cover
5 (Fig.E). The impeller can be removed to
ease access (if required). This is a "push-on/pull-off" assembly.
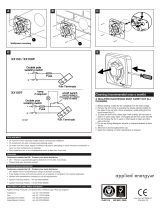
Setting the fan speed
DX200T / CF20 / CF20T Only (Fig.D)
4. The correct condensation control speed (CF20/CF20T) or operating speed
(DX200T) should be selected to suit the room size in which the fan is to be
installed. Slide the switch
X to the required position. Please note that the
fan is factory set to “Position 2”.
5. Switch Position Size / Room Volume (m
3
)
1 Large (34 and above)
2 Medium (28 – 34)
3 Small (less than 28)
Setting the trickle speed
DX200T / CF20 / CF20T Only (Fig.D)
6. The fan can be set so that it provides constant trickle extraction. Slide the
switch
Y to the required position. Please note that the fan is factory set to
“Position 0”.
7. Switch Position Setting
0Trickle extraction OFF
ITrickle extraction ON
Setting the time delay start
DX200T / CF20T Only (Fig.D)
8. The fan can be set so that there is a 2-minute delayed start to its
operation when used with an external on/off switch. Slide the
switch
Z to the required position. Please note that the fan is
factory set to “Position 0”.
Switch Position Setting
0Time delay start OFF
ITime delay start ON
Mounting the fan on a wall or ceiling (surface mounting)
1. Place the ducting into the hole and align to the required position. If wall
mounting, ensure that the ducting slopes down and away from the fan
2. Mark the positions of the three fixing holes
A in Fan box 6 (Fig.E).
3. If wall mounting, drill three holes 5.5mm diameter for wall plugs (supplied).
If ceiling mounting
B , use appropriate fasteners (not supplied).
4. Cut out the cable inlet hole, if required, in the surround
0 and slit the cable
grommet. Slide the surround
0 over the fan box 6.
5. Pass the electrical cables into the fan box
6 through the rear cable inlet
hole and surround, and re-fit the cable grommet.
Ensure that cable grommet is in place and a tight fit.
6. Offer the fan box 6 up to the wall or ceiling. Ensure the circular spigot 7
enters the ducting.
7. Fix the fan box
6 to the wall using screws 8 or to the ceiling using
appropriate fasteners (not supplied).
If mounting in a wall (flush mounting)
The surround 0 is not required. Fit the ducting to the circular spigot 7.
If the hole size is as recommended:
1. Assemble the three fan body clamps 9 to the fan box 6 using screws 8.
2. Slit the cable grommet. Pass the electrical cables into the fan box
6
through the cable inlet hole and cable grommet.
Ensure cable grommet is in place and a tight fit.
3. Offer the fan box 6 up to the wall.
4. Tighten up the three screws
8 until the fan is clamped to the inner wall.
The fan body clamps
9 will rotate to an automatic stop position. DO NOT
OVERTIGHTEN
.
If the hole size is larger than recommended i.e.: larger than the flange on the
fan box
66
(Mostly relating to “retro-fit” installations):
1. The fan body clamps ARE NOT suitable. Construct a wooden frame of
INTERNAL dimensions 203 x 233mm. Depth should be at least 50mm. Fit the
1. READ ALL THESE INSTRUCTIONS & WARNINGS FULLY BEFORE COMMENCING INSTALLATION.
2. INSTALLATIONS AND WIRING MUST CONFORM TO CURRENT IEE REGULATIONS (UK), LOCAL OR APPROPRIATE
REGULATIONS (OTHER COUNTRIES). IT IS THE INSTALLER’S RESPONSIBILITY TO ENSURE THAT THE APPROPRIATE
BUILDING CODES OF PRACTICE ARE ADHERED TO.
3. A QUALIFIED ELECTRICIAN MUST SUPERVISE ALL INSTALLATIONS.
4. THESE APPLIANCES ARE INTENDED FOR CONNECTION TO FIXED WIRING
5. CHECK THAT THE ELECTRICAL RATING SHOWN ON THE FAN MATCHES THE MAINS SUPPLY.
6.
WARNING: THESE APPLIANCES MUST BE EARTHED.
7. SITE AWAY FROM DIRECT SOURCES OF HEAT (I.E.: GAS COOKERS OR EYE-LEVEL GRILLS) AND NOT WHERE
AMBIENT TEMPERATURES ARE LIKELY TO EXCEED 50˚C.
8. WHEN THE FAN IS INSTALLED IN A ROOM CONTAINING A FUEL BURNING APPLIANCE, PRECAUTIONS MUST BE TAKEN TO
AVOID THE BACKFLOW OF GASES INTO THE ROOM FROM THE OPEN FLUE OF THE FUEL BURNING APPLIANCE.
9. ENSURE THAT ALL RELEVANT SAFETY PRECAUTIONS (CORRECT EYE PROTECTION AND PROTECTIVE CLOTHING
ETC) ARE TAKEN WHEN INSTALLING AND MAINTAINING THIS FAN.
10. GENERAL GUIDANCE FOR SITING THE FAN SEE “FIG. G”. ALWAYS SITE FAN AS HIGH AS POSSIBLE
11. IF ANY SECTION OF THE DUCTWORK IS POSITIONED HIGHER THAN THE FAN A CONDENSATION TRAP (XCT100) MUST
BE FITTED AS CLOSE AS POSSIBLE TO THE FAN.
GB
IMPORTANT
Ancillary Options
For speed and ease of
Installation, your installation may
require some of the Ancillaries
listed below:
WD100 Wall Duct
CFWG100 Wall Grille
FDA Flat Duct Adaptor Kit
XCT100 Condensation Trap
DGW/B Air Replacement Door
Grille
SP100 Spigot Plate
XAA Air Brick Adaptor
VC10 Vent Cowl
WT10 Termination Ducting
Kit
XF/FM Flat Ducting
(Plastic/Metal)
(Plastic 234 x 29mm
Metal 230 x 25mm)
VK10 Wall Vent Kit
FD100 Flexible Ducting
WDC5 Worm Drive Clips
XCMK Ceiling Mounting Kit
XBP In-Line Back Draught
Shutter
EFT Easy Fit Termination
Kit
GMK Glass Mounting Kit
PDXGF Grease Filter
Listed below are some of the
spares available. See back page
of this booklet for ordering details:
41520SK Fixing kit (Entire kit)
41528SK Circular Spigot (Entire
Range)
41731SK Motor (DX200)
41733SK Motor (CF20/CF20T/
DX200T)
41782SK PCB Assy (DX200T)
41735SK PCB Assy (CF20)
41736SK PCB Assy (CF20T)
41737SK Front Cover c/w Baffle
(DX200)
41738SK Front Cover c/w Baffle
(DX200T)
41739SK Front Cover c/w Baffle
(CF20/CF20T)
41740SK Surround Moulding
(Entire Range)
41741SK Pull cord assembly
(CF20/CF20T)
41742SK Impeller (Entire
Range)
Accessoires en option
Pour une installation rapide et
facile, il est préconisé de se munir
des accessoires figurant sur la
liste ci-dessous :
WD100 Conduit mural
CFWG100 Grille murale
FDA Kit d'adapteur de
conduit plat
XCT100 Trappe de
condensation
DGW/B Grille de porte de
remplacement d’air
SP100 Plaquette pour ergot
XAA Adaptateur de brique
perforée
VC10 Capuchon d’évent
WT10 Kit de terminaison de
conduit
XF/FM Conduit plat
(Plastique/Métallique)
(Plastique 234 x 29 mm
Métallique 230 x 25 mm)
VK10 Kit pour évent mural
FD100 Conduit flexible
WDC5 Colliers à serrage par
vis sans fin
XCMK Kit pour montage au
plafond
XBP Obturateur de
refoulement en
ligne
EFT Kit de terminaisons à
encliqueter
GMK Kit de pose sur une
vitre
PDXGF Filtre de graisse
Liste de quelques pièces de
rechange : Pour la commande,
prière de se reporter à la dernière
page de cette notice :
41520SK Kit de fixation (Kit
complet)
41528SK Ergot circulaire
(gamme complète)
41731SK Moteur (DX200)
41733SK Moteur (CF20/CF20T/
DX200T)
41782SK Carte imprimée
(DX200T)
41735SK Carte imprimée
(CF20)
41736SK Carte imprimée
(CF20T)
41737SK Couvercle avant avec
chicane (DX200)
41738SK
Couvercle avant avec
chicane (DX200T)
41739SK
Couvercle avant avec
chicane (CF20/CF20T)
41740SK Moulure de cadre
(gamme complète)
41741SK
Ens. interrupteur à
cordon (CF20/CF20T)
41742SK Hélice (gamme
complète)
Zubehör
Die unten aufgeführten Produkte
unterstützen eine schnelle und
problemlose Installation:
WD100 Wandrohr
CFWG100 Wandgitter
FDA Flachrohr-Adapter
XCT100 Kondensationsfalle
DGW/B Luftaustauschtürgitter
SP100 Zapfenplatte
XAA Luftziegel-Adapter
VC10 Lüftungskappe
WT10 Bausatz für
Rohrabbruch/
Rohrabschluss
XF/FM Flachrohr
(Kunststoff/Metall)
Kunststoff 234 x 29 mm,
Metall 230 x 25 mm
VK10 Bausatz für
Wandlüftungs
FD100 Flexibles Rohr
WDC5 Schneckenantriebs-
klemmen
XCMK Bausatz für
Deckenmontage
XBP In-Line-
Durchzugsklappe für
die Rückseite
EFT „Easy Fit" Bausatz für
Rohrabbruch/
Rohrabschluss
GMK Bausatz für
Glasmontage
PDXGF Fettfilter
Unten aufgeführt sind einige
Ersatzteile. Auf der Rückseite
dieses Hefts finden Sie
Einzelheiten über die Bestellung:
41520SK
Befestigungsbausatz
(gesamter Bausatz)
41528SK Rundzapfen
(gesamtes Sortiment)
41731SK Motor (DX200)
41733SK Motor (CF20/CF20T/
DX200T)
41782SK Flachbaugruppe
(DX200T)
41735SK Flachbaugruppe
(CF20)
41736SK Flachbaugruppe
(CF20T)
41737SK Frontabdeckung C/W
Ablenkung (DX200)
41738SK Frontabdeckung C/W
Ablenkung (DX200T)
41739SK
Frontabdeckung C/W
Ablenkung (CF20/CF20T)
41740SK Einfassungsform
(gesamtes Sortiment)
41741SK Zugschnur
(CF20/CF20T)
41742SK Gebläserad
(gesamtes Sortiment)
Accessoireopties
Voor snelheid en gemak van
installatie is het mogelijk dat u
sommige van de onderstaande
accessoires nodig heeft.
WD100 Muurdoorvoer
CFWG100 Muurrooster
FDA Adapterkit voor plat
kanaal
XCT100 Condensaatvanger
DGW/B Deurrooster voor
luchtverversing
SP100 Luchtinlaatplaat
XAA Adapter voor
gaatsteen
VC10 Uitlaatkap
WT10 Muurdoorvoerset
XF/FM Plat kanaal
(plastic/metaal)
(Plastic 234 x 29mm
Metaal 230 x 25mm)
VK10 Muuruitlaatset
FD100 Flexibele slang
WDC5 Schroefdraadklemmen
XCMK Plafondmontagekit
XBP Gealigneerde
achterste tochtklep
EFT
Gemakkelijk te
monteren aansluitingset
GMK Glasmontagekit
PDXGF Oliefilter
Hieronder vindt u een lijst van
verkrijgbare reserveonderdelen.
Verwijs naar de achterste pagina
voor het bestellen ervan.
41520SK Montageset (volledig
set)
41528SK Ronde luchtinlaat
(volledige reeks)
41731SK Motor (DX200) **
41732SK Motor (DX200T) **
41733SK Motor (CF20/CF20T/
DX200T)
41734SK PCB montage
(DX200T)
41735SK PCB montage (CF20)
41736SK PCB montage
(CF20T)
41737SK Bovendeel
ventilatorhuis met
schermplaat (DX200)
41738SK Bovendeel
ventilatorhuis met
schermplaat (DX200T)
41739SK Bovendeel
ventilatorhuis met
schermplaat
(CF20/CF20T)
41740SK Lijstwerk voor
montageplaat
(volledige reeks)
41741SK Trekkoordmontage
(CF20/CF20T)
41742SK Rotor (volledige
reeks)
GB
F D NL
wooden frame into the internal wall and make good the hole.
2. Offer the fan box
6 up to the wall.
3. Screw the fan box
6 to the wooden frame using the slots in the flange
(screws not supplied).
If mounting in a ceiling (flush mounting)
1. The surround 0 is not required.
2. Insert the fan box
6 into the hole and mark four positions using the slots in
the flange
B.
3. Remove the fan box
6 from ceiling and fit the four ceiling clips (supplied)
over the edge of the hole, so that the clips align with the marks on the ceiling
B.
4. Drill 4 pilot holes into the ceiling through the hole of each clip, ensuring not to
damage the clip.
5. Fit the ducting to the circular spigot
7.
6. Offer the fan box
6 up to the ceiling.
7. Slit the cable grommet. Pass the electrical cable into the fan box
6 through
the front cable inlet hole.
Ensure cable grommet is in place and a tight fit.
8. Using the screws (Fig.B), fix the fan box flange to the ceiling clips.
Terminating the ducting
Fit an outer grille (such as CFWG100, not supplied in the DX200/DX200T)
to the outer wall. For ceiling mounting, use appropriate ancillaries (not
supplied).
Wire the electrical connections
WARNING! THIS APPLIANCE MUST BE EARTHED
1. Isolate the electricity supply and remove all fuses.
The terminal block will accept cable up to 1.5mm
2
2. Use a double-pole isolating switch with a minimum contact gap of 3mm in
both poles.
3. Use suitably rated 3-core or 4-core cable dependant on application.
4. Remove the retaining screws of the terminal cover, if still in position.
5. Wire the fan as shown in
F using the cable clamp provided. Check fan
model to diagram.
DX200: “LH” =Live (High Speed)/ “LL” = Live(Low Speed)
6. Replace the terminal cover
5 and fasten the retaining screws.
7. See section on
“User adjustments” if you wish to use settings other than
those that have been factory set.
8. Refit the front cover(Fig.
C).
Connect the cable from the isolating switch to electrical supply wiring, and
re-check installation.
10. Refit fuses before turning on electricity supply.
11. For fixed wiring circuits, the protective fuse for the appliance must not
exceed 5A.
For Australia Only
CF20
– Connection to the supply - flexible 3-core cable with 3 pin plug top for
insertion into an approved 10A wall mounted surface switch with at least 3mm
clearance between contacts.
ALL OTHERS – Permanently connected to the supply and a remote switch controls
operation. They should be directly wired to the supply through an approved 10A wall
mounted surface switch with at least 3mm clearance between contacts.
User adjustments
Before making any adjustments, isolate the fan completely from the mains
supply, check specification below to see which features apply to your fan.
1. Remove the front cover and replace after adjustment (Fig. C)
DX200
There are no user adjustments for this fan.
DX200T
1. The timer over-run period can be adjusted between approximately 30
seconds and 20 minutes. Use an electrician’s screwdriver and turn screw “T”
(Fig.
D), clockwise to increase time, anti-clockwise to decrease. (Factory
preset to approximately 10 minutes)
CF20
1. The humidity setting is adjustable between approximately 50% and 90%
relative humidity. Use an electrician’s screwdriver, and turn screw “RH”
(Fig.
D), clockwise to increase the relative humidity setting and anti-clockwise
to decrease. (Note: the fan is more sensitive at 50% RH than at 90% and is
factory preset to approximately 70%).
CF20T
1. The timer over-run period can be adjusted between approximately 30
seconds and 20 minutes. Use an electrician’s screwdriver and turn screw “T”
(Fig.
D), clockwise to increase time, anti-clockwise to decrease.
2. The humidity setting is adjustable between approximately 50% and 90%
relative humidity. Use an electrician’s screwdriver, and turn screw “RH”
(Fig.
D), clockwise to increase the relative humidity setting and anti-clockwise
to decrease. (Note: the fan is more sensitive at 50% RH than at 90%).
Using the fan
DX200
Operate the fan using the external on/off switch. Repeat to switch off.
The fan speed is pre-set by the installer to either high or low speed. (If a change
over switch has been installed then the user can switch between high speed and
low speed.)
DX200T
Operate the fan using the external on/off switch. Repeat to switch off.
When the switch is turned off, the fan continues to operate for the selected over-
run timer period. Top
Light “I” is lit when the external on/off switch is switched on.
The fan speed is pre-set by the installer to either high, medium or low speed.
Time delay start feature on or off
This is set by the installer to provide a 2-minute time delay start when the fan is
switched on using the external on/off switch.
CF20 / CF20T
Switched Operation
The fan can be wired with a separate on/off switch. Fan operates at condensation
speed when switched on. Top
“Light I” is lit when the separate on/off switch is
switched on. When switched off, the fan will continue to operate if the humidity level
exceeds the set level.
CF20T only: When switched off, the fan continues to operate
at condensation speed for the adjustable timer over-run period.
Condensation Operation
The fan operates at condensation control speed, when the relative humidity
exceeds the set level, and turns off when the humidity drops.
Boost Operation
The integral pull cord switch switches the fan to run at high speed. Bottom “Light
II”
is lit when the fan is operating at high speed.
Note: If the separate on/off switch and integral pull cord are both on, then
Lights “I”
and “II”
will both be lit and the fan will run at high speed.
CF20T only
Time delay start feature on or off
This is set by the installer to provide a 2-minute time delay start when the fan is
switched on using a separate on/off switch.
Cleaning
Before cleaning, isolate the fan completely from the mains supply
Only clean the external surface of the fan, using a damp lint free cloth.
Do not use strong detergents, solvents or chemical cleaners
Allow fan to dry thoroughly before use.
Apart from cleaning, no other maintenance is required.
Key See Diagram
E
1. Baffle Plate
2. Front Cover
3. Impeller
4. Fixing Screws
5. Terminal Cover
6. Fan Box
PLEASE LEAVE THIS LEAFLET WITH THE FAN FOR THE BENEFIT OF THE
USER
7. Circular Spigot
8. Clamp screws and wall plugs - 3 off
9. Fan Body Clamps – 3 off
10. Surround
11. Ceiling Screws 25mm long 4 off (Diagram
B)
12. Foam Tape
  • Page 1 1
  • Page 2 2
  • Page 3 3
  • Page 4 4
  • Page 5 5
  • Page 6 6
  • Page 7 7
  • Page 8 8
  • Page 9 9
  • Page 10 10
  • Page 11 11
  • Page 12 12
  • Page 13 13
  • Page 14 14
  • Page 15 15
  • Page 16 16

Xpelair DX200 User manual

Type
User manual

Ask a question and I''ll find the answer in the document

Finding information in a document is now easier with AI