Page is loading ...

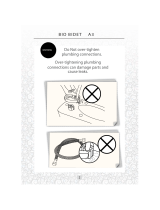
Installation
During installation
Firmly fix the fixing nuts so that the product is not loosened from the toilet.
Installation position
The bidet is a product installed inside a bathroom, so make sure to choose a spot where water does not
splash on the product.
After installation
Avoid direct sunlight to prevent damages to the toilet seat.
Cold water pipe
Make sure to connect it to the cold water pipe.
(If connected to the hot water pipe, the filters and hoses can get damaged.)
When installing a remote controller
Install the remote controller next to the bidet.
Before attaching double-sided tapes on the remote controller holder, make sure to remove dust and foreign
substances from the surface.
How to replace remote controller battery
Insert a coin or driver into the groove and turn it CCW to make one turn, then the screws will be loosened
and the battery cover will be removed.
Then, replace the batteries (1.5 V AAA, 3 batteries) and fix the screws again.
Turn the screw CW to seal the hole.
*
Be careful not to lose the screws by mistake.
NOTE
Consult with a Coway technician for the detailed installation method to ensure optimal performance of the product.
- Service center : 1-800-285-0982
Be Careful!
30
03 MAINTENANCE

EN
03 Maintenance
Remove existing toilet seat
Install product
NOTE
As the bidet should be installed on the toilet, ensure that water is not splashed onto the bidet.
Remove the existing toilet seat ❶ and
seat cover ❷ by removing the fixing nuts.
Turn off the main water supply valve ❶ and
separate the existing water tank hose ❷.
NOTE
Keep the removed toilet seat in a shaded location to
prevent it from being damaged.
Connect the rubber packing, 3/8” T-shaped
connector and water tank hose in this order
to the existing 3/8” water pipe.
Please connect the bidet hose to the T-shaped
connector.
If your T-shaped connector does not fit to
your bathroom water pipe because the size
is ½”, please use ½” conversion bolt and nut
after connecting them to the 3/8” T-shaped
connector as you can see in the image.
Bidet hose
Water pipe
Water tank
hose
T-shaped
connector
Conversion nut
(with packing)
T-shaped connector
(with packing)
Conversion bolt
(with packing)
31

Installation
Install product
Align the back of the bidet to the installation
plate and push the bidet backwards. Hold the
bidet with both hands and push it backwards
until it clicks into place. To adjust the installation
plate, loosen anchor nuts underneath the toilet
and slide the bidet forward or backwards for the
right position. After that, tighten anchor nuts to
hold in place.
DANGER
Check if the bidet moves to the left or right. If it moves,
fasten the fixing nuts again.
Please connect the T-shaped connector or
T-shaped connector with ½” conversion bolt
and nut to the water supply pipe first.
If the water supply pipe does not fit or the
pipe type is rigid, please connect the 7/8”
conversion bolt and nut to the 3/8” T-shaped
connector as you can see in the image.
Place the fixing slider over the installation plate
on the toilet, insert the fixing bolts, and fasten
the nuts so that the installation plate is fixed.
Toilet tank
Cold water
supply line
Conversion bolt
(with packing)
T-shaped connector
(with packing)
Conversion nut
(with packing)
32
03 MAINTENANCE

EN
03 Maintenance
Open the main water supply valve.
Connect the bidet hose to the side of the bidet.
Make sure that the bidet hose is firmly connected.
If the main water supply valve is opened when the hose
is not connected properly, the bidet hose may become
separated and cause water to splash, resulting in injury.
살균
DANGER
Take care that the bidet hose is not excessively bent by
twisting it.
CAUTION
-
Make sure to use a grounded electrical outlet. In the case of a short circuit, grounding prevents electric shock or injury.
- Make sure to use a dedicated electrical outlet with grounding terminals.
- If using an extension cord is unavoidable, use one with grounding terminals for 120 V~, 60 Hz or higher.
- Failure to properly install this product or to properly check for leaks may cause damage to the property.
In these instances, Woongjin Coway will not be held responsible for any damages.
Go to www.cowaymega.com/instructions for installation and maintenance video instructions.
Connect the power cord to the electrical outlet.
Grounded
Outlet
Grounding Pin
33

Installation
Install remote controller
Before attaching the bracket, thoroughly wipe
the attachment areas with a dry cloth.
Attach the bracket onto the wall and press
the middle area with hands for more than 10
seconds.
Depending on the wall type, you can install using
the supplied screws and anchor mounts or use
the provided double stick tape on the back of the
remote wall mount.
Make sure the remote mount is fully secured with
either method so that it does not fall and damage
the remote control.
NOTE
If the anchors are not mounted, remote controller
bracket may fall from the wall.
NOTE
- If the anchor bolts are not mounted, remote
controller and bracket may fall from the wall.
- Any caused damage by not using bolts corresponds
to users’ responsibility, not product defect.
34
03 MAINTENANCE

EN
03 Maintenance
Cautions for keeping remote controller
Example of correct use
Example of incorrect use
Caution for falling of the remote controller :
When mounting the remote controller, make sure to push
it in from the front to the rear.
35
/