Page is loading ...

Bidet
• This product can not be used if the voltage is different from that
mentioned in the rating plate.
• For your safety and proper use of the product, please read this
User’s Manual before use.
• Warranty card is included in this User’s Manual.
BA07-R/E
1014692 BA07 »ç¿ë¼³¸í¼- ¹ÌÁÖÇâ_(08.09.10).indd 1 2008-09-10 ¿ÀÀü 11:35:34

2
FEATURES
1. WIDE function
Users can select the degree of the cleansing water spreading
directly as the wanted step from the strong force of the flowing
water to the softly spreading water.
2. Special function for the customer’s convenience
- Power saving mode : Helps lower the utilities bill.
- Seat sensor lock mode : In seat sensor lock mode, as rear
cleansing, front cleansing, and air dryer will not work without the
user sitting on the seat, it prevents the operating malfunctions due
to children’s unintended button inputs.
3. Self-diagnostic function
In the case there is an abnormality in the product function, the
indicators on the control panel blink to indicate the abnormality.
4. Nozzle position adjustment
The user can adjustment the nozzle position back and forth
according to his own body shape (See P.12).
5. Nano silver ceramic MF filter
With the MF filter applied to the bidet, you can always cleansing
with the filtered clean water.
6. Cleanliness strengthening function
- As the rear cleansing nozzle and the front cleansing nozzle
are separated, it is a hygienic.
- It keeps the nozzle cleanly through an automatic nozzle
cleaning after using the rear cleansing/front cleansing function.
Self test
Nano silver
ceramic balls
MF filter
Front
Cleansing
Rear
Cleansing
Twin Nozzle
1014692 BA07 »ç¿ë¼³¸í¼- ¹ÌÁÖÇâ_(08.09.10).indd 2 2008-09-10 ¿ÀÀü 11:35:39

3
Coway
FEATURES / CONTENTS
DEAR CUSTOMERS
CONTENTS
FOR INFORMATION
SAFETY INFORMATION . . . . . . . . . . . . . . . . . . . 4
Electrical Safety . . . . . . . . . . . . . . . . . . . . . . . . 4
Installation Safety . . . . . . . . . . . . . . . . . . . . . . 5
Operation Safety . . . . . . . . . . . . . . . . . . . . . . .
5
Others . . . . . . . . . . . . . . . . . . . . . . . . . . . . . . . . .
7
PARTS NAME
. . . . . . . . . . . . . . . . . . . . . . . . . . . . 8
HOW TO USE
KEEP IN MIND . . . . . . . . . . . . . . . . . . . . . . . . . . . 11
PREPARATIONS
. . . . . . . . . . . . . . . . . . . . . . . . .12
OPERATION/INDICATION PART
. . . . . . . . . .13
HOW TO USE . . . . . . . . . . . . . . . . . . . . . . . . . . . .
16
For Rear Cleansing . . . . . . . . . . . . . . . . . . . .
16
For Front Cleansing
. . . . . . . . . . . . . . . . . . . 17
MAINTENANCE
INSTALLATION . . . . . . . . . . . . . . . . . . . . . . . . . . 18
Uninstallation Existing Toilet Seat
. . . . . 19
Installation the Product
. . . . . . . . . . . . . . . 19
CLEANING METHOD
. . . . . . . . . . . . . . . . . . . .21
Nozzles . . . . . . . . . . . . . . . . . . . . . . . . . . . . . . .
21
Product Body . . . . . . . . . . . . . . . . . . . . . . . . .
21
Uninstallation the Product
. . . . . . . . . . . . 22
MAINTENANCE
. . . . . . . . . . . . . . . . . . . . . . . . .23
Freezing Protection Function . . . . . . . . . .
23
FILTER REPLACEMENT METHOD . . . . . . . . .
24
OTHERS
TROUBLESHOOTING . . . . . . . . . . . . . . . . . . . . 25
SPECIFICATION
. . . . . . . . . . . . . . . . . . . . . . . . .27
WARRANTY CARD . . . . . . . . . . . . . . . . . . . . . . .
30
- Please keep the User’s Manual where it can be readily reached or found -
Thank you for using our Coway Bidet.
Please read this User’s Manual to use and maintain the product correctly.
If you encounter a problem while using the product, you may solve the problem referring to the
User’s Manual. As this manual contains the product warranty card, please keep it in a safe place.
1014692 BA07 »ç¿ë¼³¸í¼- ¹ÌÁÖÇâ_(08.09.10).indd 3 2008-09-10 ¿ÀÀü 11:35:42

4
SAFETY INFORMATION
If not observed,
serious injury or
even death may
occur as a result.
If not observed,
serious physical
injury or property
damage may occur
as a result.
If not observed, minor
physical injury or
property damage
may occur as a result.
Danger Warning Caution
Electrical Safety
Do not use a damaged
power cord or plug, and
loose outlet.
Otherwise, electric shock or fire
may occur as a result.
Please connect the power
plug to a dedicated
grounded electrical outlet.
Otherwise, electric shock or fire
may occur as a result.
Do not carry the unit by its
power cord.
Otherwise, electric shock or fire
may occur as a result.
Do not touch the power plug
with a wet hand.
Otherwise, electric shock or fire
may occur as a result.
Do not forcefully bend the
power cord or put it under
a heavy object to prevent
it from being damaged or
deformed.
Otherwise, electric shock or fire
may occur as a result.
Do not connect and pull out
the power plug repeatedly.
Otherwise, electric shock or fire
may occur as a result.
If the electric outlet is wet,
carefully unplug the unit
and let the electric outlet
completely dry before
subsequent use.
Otherwise, electric shock or fire
may occur as a result.
Unplug the product before
repair, inspection, or parts
replacement.
Otherwise, electric shock or fire
may occur as a result.
Remove any dust or water
off in the pin and contacts of
the power plug.
Otherwise, electric shock or fire
may occur as a result.
Do not plug into an outlet
that is being used by several
other appliances. Use an
electrical outlet dedicated.
Otherwise, fire may occur as a
result.
When you don’t use for a
long time, close the main
water supply valve and
unplug.
Otherwise, electric shock or fire
may occur as a result.
Do not attempt to repair or
modify the power cord at
your discretion.
Otherwise, electric shock or fire
may occur as a result.
Be careful to keep this safety information.
Please read this information to prevent property loss and ensure your safety.
After drying
completely
Unplug before
the repair
A/S
1014692 BA07 »ç¿ë¼³¸í¼- ¹ÌÁÖÇâ_(08.09.10).indd 4 2008-09-10 ¿ÀÀü 11:35:48

5
For Information
In the case the power cord is
damaged, do not replace the
cord yourself. Call Service
Center to have it replaced.
Otherwise, electric shock or fire
may occur as a result.
Installation Safety
Do not install near a heating
device.
Otherwise, fire may occur as a
result.
Avoid installing the product
in places where the air is
damp, dust is accumulated,
or water drops.
Otherwise, electric shock or fire
may occur as a result.
Do not place or use the
inflammable gases, nor the
flammable materials near
the product.
Otherwise, electric shock or fire
may occur as a result.
Use tap water as a main
water.
Industrial water or gray water, if
used as main water, may cause skin
damage or diseases.
Don’t connect the main
water to the warm water
pipe.
Otherwise, malfunctions or
accidents may occur as a result
(Make sure to connect to cold tap
water pipe).
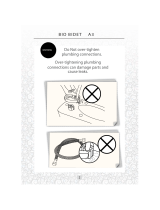
After installation, make sure
to check the water supply
connections for leaks.
Rubber packing should be applied
to the connection hose.
Do not install the bidet in a
location exposed to direct
sunlight.
Otherwise, deformation or
discoloration may occur as a result.
Operation Safety
If the steam cleaner
produces a strange noise,
flaming smell, or smoke,
immediately unplug from
the electrical outlet and call
our Service Center.
Otherwise, electric shock or fire
may occur as a result.
Do not insert a wire or sharp
object in any gap of the
product or the warm air
outlet.
Otherwise, electric shock, fire, or
product damage may occur as
a result.
SAFETY INFORMATION
|
Electricity Safety
|
Installation Safety
|
Operation Safety
Danger Warning Caution
A/S
Don’t use!
Industrial water
or gray water
Tap water
Don’t connect!
Warm water pipe
Cold water
A/S
1014692 BA07 »ç¿ë¼³¸í¼- ¹ÌÁÖÇâ_(08.09.10).indd 5 2008-09-10 ¿ÀÀü 11:35:56

6
SAFETY INFORMATION
Operation Safety
Do not place an electric
heater near the product
or dispose of any flamed
material such as lit cigarettes
in the toilet.
Otherwise, fire or product
deformation may occur as a result.
Do not place any containers
with water, medicine, food,
small metallic objects, or any
flammable material on the
top of the product.
In the case foreign material gets
inside the product, electric shock,
fire, product damage may occur
as a result.
Do not use the product
where excessive moisture
exists or do not splash water
on the product.
Otherwise, electric shock or fire
may occur as a result.
Do not use the product if it is
not working properly.
Please unplug immediately,
and call our service center after
closing the main water supply
valve.
Electric shock or fire may occur
as a result.
Do not block the air dryer
outlet with a hand.
Otherwise, burns or fire may occur
as a result.
Please turn off the main
water supply valve when you
replace the filter.
Otherwise, electric shock or
product damage may occur as
a result.
For children, the elderly, and
those who cannot adjust the
temperature themselves or
with sensitive skin, set the
warm water temperature
and seat temperature to
“Low.”
Otherwise, low temperature burns
may occur as a result.
“Low emperature burns”:
It means burns inflicted by
contacting temperatures 40 ºC
or lower for an extended period
of time.
Do not use the bidet’s
control panel as a support or
forcefully press it down.
Otherwise, product damage or
malfunction may occur as a result.
Do not stand or place a
heavy object on the seat
cover.
Otherwise, product damage or
malfunction may occur as a result.
Don’t open/close the seat
cover severely or lean.
Otherwise, product damage or
malfunction may occur as a result.
It is opened and closed slowly
as ‘Soft seat open and close’
methods.
A/S
Please turn off
when you replace
the filter
1014692 BA07 »ç¿ë¼³¸í¼- ¹ÌÁÖÇâ_(08.09.10).indd 6 2008-09-10 ¿ÀÀü 11:36:08

7
For Information
SAFETY INFORMATION
|
Operation Safety
|
Others
Exercise caution not to have
urine touch nozzles, air dryer
outlet, or outside surface of
the product.
Otherwise, bad smell or
malfunction may occur as a result.
If the product is not to be
used for a long time, pull
out the power plug from the
electrical outlet, close the
main water supply valve,
and drain the water in the
water tank.
(See P.22)
Others
While taking a shower or
cleaning the bathroom, pull
out the power plug from the
electrical outlet and exercise
caution not to have water or
detergent splashed on the
bidet.
Otherwise, electric shock or fire
may occur as a result.
In the case foreign material
gets inside the product, pull
out the power plug from the
electrical outlet, turn off the
main water valve, and call the
Coway Service Center.
Don’t separate the bidet
body and the bidet seat.
Otherwise, electric shock, fire, or
product damage may occur as
a result.
Do not disassemble, repair,
or modify the product at
discretion.
Otherwise, electric shock, fire, or
product damage may occur as
a result.
Don’t pull out the bidet
hose or the connection hose
severely.
Otherwise, leaks or malfunction
may occur as a result.
Unplug the system before
you clean it and do not
splash water directly on the
bidet or don’t use thinner,
or benzene, chemicals, or
hydrochloric acid detergent.
Otherwise, metal parts may
corrode or the bidet body may
have discoloration or scratch as
a result.
Use soft cloth or sponge to
clean the bidet when you clean.
Danger Warning Caution
This product is exclusively for use in a bathroom. Do not use the product for other
purposes not specified in the User’s Manual (for abnormal use not intended by the
manufacturer).
Tips
Benzene, thinner, alcohol
1014692 BA07 »ç¿ë¼³¸í¼- ¹ÌÁÖÇâ_(08.09.10).indd 7 2008-09-10 ¿ÀÀü 11:36:18

8
PARTS NAME
Dimensions
The toilet dimensions must be within those shown below.
Do not install this product on a toilet that does not meet these dimensional requirements.
Round type
133.3 mm
(5.25 inch)
376.7 mm
(14.8 inch)
490 mm
(19.3 inch)
400 mm
(15.7 inch)
197.2 mm
(7.76 inch)
133.3 mm
(5.25 inch)
406.7 mm
(16 inch)
490 mm
(19.3 inch)
402.5 mm
(15.9 inch)
199 mm
(7.83 inch)
Elongate type
133 mm (5.2 inch)
~ 206 mm (8.1 inch)
Distance of
fixing hall
1014692 BA07 »ç¿ë¼³¸í¼- ¹ÌÁÖÇâ_(08.09.10).indd 8 2008-09-10 ¿ÀÀü 11:36:25

9
For Information
Front
Rear
PARTS NAME
Seat cover
Precautions sticker
Nozzle
Bidet seat
Indication part/
operation part
T-shaped connector
Bidet hose
Tap water pipe
Water tank hose
Body
Main water supply valve
Power plug
Product sticker
Nano silver ceramic MF filter
Drain hole
1014692 BA07 »ç¿ë¼³¸í¼- ¹ÌÁÖÇâ_(08.09.10).indd 9 2008-09-10 ¿ÀÀü 11:36:29

10
PARTS NAME
Installation Material
Grounding
This product must be grounded, in the event of an electrical short circus, ground reduces the risk of electrical
hazards by providing an escape wire for the electric current. The power cord has grounding wire and a three-
blade grounding plug (shown below). Do not use an adapter with the product’s power plug, or use any other
methods to connect the plug to an improperly configured outlet. The Power source to which the product
connected must be 120 V, 60 Hz with an minimum current rating of 10 A. The outlet must be properly
installed and grounded, and have three slot receptacle (shown bellows). If it is necessary to use an extension
cord, use only a three wire extension cord that has a three-blade grounding plug. The extension cord must be
rated 120V, 10A.
Improper use of the grounding plug can result in a risk of electric shock.
2 pc of Fixing screws
2 pc of Fixing rubbers
2 pc of Fixing washers
2 pc of Fixing nuts
Fixing plate,
2 pc of Fixing
sliders
Bidet hose
T-shaped
connector
Nano silver
ceramic MF
filter
Rubber
packing
Grounding
pin
Grounding
outlet
1014692 BA07 »ç¿ë¼³¸í¼- ¹ÌÁÖÇâ_(08.09.10).indd 10 2008-09-10 ¿ÀÀü 11:36:34

11
For Information
PARTS NAME / KEEP IN MIND
KEEP IN MIND
Connect the power.
Turn on by connecting the power plug to the electrical outlet and pressing the
power selection button on the control panel. The bidet works normally only
when the electricity is connected.
Open the main water supply valve.
The main water must be supplied to operate the bidet normally.
Check whether the product is in power saving mode
before use.
- When there isn’t a seat sensor sensing and a button operation, if you set
the power saving mode.
· After passing about 1 minute : The warm water/seat temperature
setting becomes as a ‘Low’ status.
· After passing about 30 minutes : The product is switched to the power
saving status when the indicator in the control panel is putted out.
- In the power saving mode, the power indicator is turned off. Press any
button to switch the product to the waiting mode and then use the bidet.
- If the power indicator is not turned on when a button is pressed on the
control panel, as the power is turned off, please turn on the power before use.
This product is for 120 V~ 60 Hz only.
Please connect the power plug to a dedicated grounded
electrical outlet for 120 V~ 60 Hz .
Tips
1014692 BA07 »ç¿ë¼³¸í¼- ¹ÌÁÖÇâ_(08.09.10).indd 11 2008-09-10 ¿ÀÀü 11:36:38

12
PREPARATIONS
After installation
Please check whether the water leaks or not in the connection part
of the T-shaped connection pipe. You must insert the rubber packing
between the T-shaped connection pipe, the water pipe, and the
water tank hose.
Periodic filter replacement
It is important to replace the filter periodically for the clean rinsing.
If the filter is overused beyond its service life, the filter performance
deteriorates, resulting in cleansing water that is not filtered properly.
Please keep the filter replacement cycle.
Filter replacement cycle : Every 4 months
If the bidet has not been used for a long time
When you don’t use the product for a long time, use it after replacing
the filter and cleaning the products such as an air dryer outlet, a
nozzle, a seat according to each cleaning methods (See P.21).
This product is for 120 V~ 60 Hz only.
Please connect the power plug to a dedicated grounded
electrical outlet for 120 V~ 60 Hz .
Tips
Remove the protective film from the control panel before use.
Tips
1014692 BA07 »ç¿ë¼³¸í¼- ¹ÌÁÖÇâ_(08.09.10).indd 12 2008-09-10 ¿ÀÀü 11:36:42

13
How To Use
PREPARATIONS / OPERATION/INDICATION PART
OPERATION/INDICATION PART
Indication Part/Operation Part
Indication part Operation part
Seat temperature
adjustment indicator
WIDE function selection
indicator
Water pressure/air dryer
temperature adjustment
button
Water pressure/air dryer
temperature indicator
Rear cleansing function
selection button
WIDE function selection
button
Air dryer function selection
button
Front cleansing function
selection button
1
6
2
3
4
1
2
3
4
5
7
8
9
10
11
12
Warm water temperature
adjustment indicator
Nozzle position button
Seat temperature
adjustment button
Warm water temperature
adjustment button
Move function selection
button
Power selection button
Stop button
Nozzle cleaning button
1014692 BA07 »ç¿ë¼³¸í¼- ¹ÌÁÖÇâ_(08.09.10).indd 13 2008-09-10 ¿ÀÀü 11:36:46

14
OPERATION/INDICATION PART
Indication Part
1
Water pressure/air dryer temperature adjustment indicator
If you press the water pressure/the air dryer temperature adjustment button, the indicator is turned
on in the step1
step2step3 order.
It is used as the water pressure adjustment indicator when you operate the rear cleansing/front
cleansing function, and it is used as the air dryer temperature adjustment indicator when you
operate the drying function.
2
WIDE function selection indicator
When you press the wide function selection button, indicator is turned on (Straight line (Green)Step1
(Orange)Step2(Red)).
3
Warm water temperature adjustment indicator
When you press the warm water temperature adjustment button, the temperature lamp is turn on
(L(Green)M(Orange)H(Red)Off ).
4
Seat temperature adjustment indicator
When you press the seat temperature adjustment button, the temperature lamp is turn on. (L(Green)
M(Orange)H(Red)Off).
Operation Part
1
Stop button
Stops all operating functions.
2
Nozzle position button
Use when you want to adjustment the nozzle position during the operation of the rear cleansing/
front cleansing function. When you press the nozzle position button, you can adjust the nozzle
position as 5 steps.
3
Rear cleansing function selection button
Use it to select the desired rear cleansing function.
4
Front cleansing function selection button
Use it to select the desired cleansing function for woman.
5
Water pressure/air dryer temperature adjustment button
If you press the water pressure/the air dryer temperature adjustment button, the temperature lamp is
turned on as the step1step2step3 order.
6
Air dryer function selection button
Use it to select the desired air dryer function. It helps dry the wet after using the rear cleansing/front
cleansing function.
1014692 BA07 »ç¿ë¼³¸í¼- ¹ÌÁÖÇâ_(08.09.10).indd 14 2008-09-10 ¿ÀÀü 11:36:48

15
How To Use
OPERATION/INDICATION PART
Operation Part
7
WIDE function selection button
Use it if you want to control the water ejection range when you use the cleansing function. You can
select the range of the force of the flowing water of 3 steps as straight line
step1step2 using
wide function selection button. Whenever you press the button, the indicator of the selected current
ejection range is turned on.
8
Move function selection button
Use it to select the desired move function. When you press the move function selection button, as the
nozzle is moved back and forth while you operate the rear cleansing/front cleansing function, you
can clean the more widen areas.
9
Nozzle cleaning button
Use it when you want to clean the nozzle.
If you press the nozzle cleaning button, as the nozzle come forth and stop, you can clean
conveniently (See P.21).
10
Warm water temperature adjustment button
Use it when you want to adjustment the warm water temperature. When you press the warm water
temperature adjustment button, you can adjust the water temperature(LMHOff ).
11
Seat temperature adjustment button
Use it when you want to adjustment the seat temperature. When you press the seat temperature
adjustment button, you can adjust the seat temperature(L
MHOff ).
12
Power selection button
Use it to turn the product ON/OFF. When you press the power selection button during the front
cleansing/rear cleansing function operating, the operating function is stopped and it is switched to
the standby status.
1014692 BA07 »ç¿ë¼³¸í¼- ¹ÌÁÖÇâ_(08.09.10).indd 15 2008-09-10 ¿ÀÀü 11:36:50

16
HOW TO USE
For Rear Cleansing
Rear cleansing
Sit on the seat and press the rear cleansing function selection button on the
remote control.
- The cleansing water is ejected for about 1 minute and then automatically
stopped.
- An automatic nozzle cleaning is performed for about 5 seconds after
cleansing when the nozzle retracts itself.
Adjust the nozzle position by pressing the nozzle position button.
Press the wide function selection button to adjust the desired water
ejection range.
If the rear cleansing function selection button is pressed again while in
cleansing operation, additional rear cleansing starts again for another 1
minute.
While in cleansing, users can adjust the water temperature, water pressure,
and nozzle position according to their preference.
Move
Press the move function selection button on the control panel.
- The nozzle moves back and forth, providing a wider range of cleansing.
It will be worked continuously while the cleansing function is operated.
You can adjust the nozzle position by pressing the nozzle position
button.
To stop the move function, press the move function selection button again.
Air dryer
Press the air dryer function selection button on the remote control.
- Warm air blows for about 2 minutes to dry the wet part.
If you wipe out the wet before turning on the air dryer function, you can
finish drying faster.
You can adjust the air dryer temperature by pressing the water pressure/air
dryer buttons.
If the air dryer function selection button is pressed again while in drying
operation, additional drying starts again for another 2 minutes.
If the air dryer function selection button is pressed while in cleansing
operation, the cleansing function is stopped and drying starts immediately.
Stop
If you want to stop the operation in use, press stop button.
- It stops all operating functions.
The air dryer function is stopped in 2 seconds after the stop button is
pressed.
1014692 BA07 »ç¿ë¼³¸í¼- ¹ÌÁÖÇâ_(08.09.10).indd 16 2008-09-10 ¿ÀÀü 11:36:54

17
How To Use
HOW TO USE
|
For Rear Cleansing
|
For Front Cleansing
For Front Cleansing
Front cleansing
Sit on the seat and press the front cleansing function selection button on the
remote control.
- The cleansing water is ejected for about 1 minute and then automatically
stopped.
- An automatic nozzle cleaning is performed for about 5 seconds after
cleansing when the nozzle retracts itself.
Adjust the nozzle position by pressing the nozzle position button.
If the front cleansing function selection button is pressed again while in
cleansing operation, additional front cleansing starts again for another 1
minute.
While in cleansing, users can adjust the water temperature, water pressure,
and nozzle position according to their preference.
Move
Press the move function selection button on the control panel.
- The nozzle moves back and forth, providing a wider range of cleansing.
It will be worked continuously while the cleansing function is operated.
You can adjust the nozzle position by pressing the nozzle position
button.
To stop the move function, press the move function selection button
again.
Air dryer
Press the air dryer function selection button on the remote control.
- Warm air blows for about 2 minutes to dry the wet part.
If you wipe out the wet before turning on the air dryer function, you can
finish drying faster.
You can adjust the air dryer temperature by pressing the water pressure air
dryer buttons.
If the air dryer function selection button is pressed again while in drying
operation, additional drying starts again for another 2 minutes.
If the air dryer function selection button is pressed while in cleansing
operation, the cleansing function is stopped and drying starts immediately.
Stop
If you want to stop the operation in use, press stop button.
- It stops all operating functions.
The air dryer function is stopped in 2 seconds after pressing the stop
button.
1014692 BA07 »ç¿ë¼³¸í¼- ¹ÌÁÖÇâ_(08.09.10).indd 17 2008-09-10 ¿ÀÀü 11:36:59

18
INSTALLATION
Installing the product
Tighten the fixing screws firmly so that the bidet body won’t be shaky on
the toilet.
Product installation place
As the bidet is installed on the toilet, please install not to have water
splashed on the bidet.
After installation
Keep the removed existing toilet seat in a shaded place to prevent its
damage.
Cold water pipe
Make sure to connect the bidet to cold water pipe (If the product is
connected to warm water pipe, the filter and hoses of the bidet may be
damaged).
To maintain the optimal product performance, consult a Coway engineer for
detailed installation methods.
There may be some water remaining inside the filter which was used to test the
product during the inspection process at the factory.
- The remaining water does not mean that the product was previously used.
Tips
TipsKeep the
existing toilet
seat in the shaded
place
Warm
water
1014692 BA07 »ç¿ë¼³¸í¼- ¹ÌÁÖÇâ_(08.09.10).indd 18 2008-09-10 ¿ÀÀü 11:37:05

19
Maintenance
INSTALLATION
|
Uninstallation Existing Toilet Seat
|
Installation the Product
Uninstallation Existing Toilet Seat
1. Remove the fixing nuts of the existing seat and
separate the existing toilet seat
1
and the seat cover
2
.
Keep the removed seat and seat cover in a shaded place.
Installation the Product
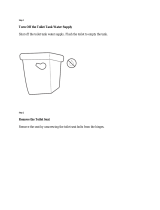
1. Turn off the main water supply valve
1
and separate
the existing water tank hose
2
.
2. Connect the rubber packing, T-shaped connector,
and water tank hose in order to the existing tap water
pipe.
Please connect the bidet hose to the T-shaped connector.
Please insert the rubber packing between the water pipe and the
T-shaped connectior necessarily. Firmly rotate the nuts below and
on top of the T-shaped connector to the end clockwise.
3. Please connect MF filter to the product body.
Please assemble by rotating the MF filter on the filter holder in
the lower left side of the bidet body.
If the MF filter is assembled completely, as the bidet may not
function normally, please be careful.
4. Put the fixing plate and the fixing slider on the bidet
as the figure. Insert the fixing screw to the filter
holder, push the fixing rubber and the fixing washer,
and tighten the fixing nuts.
Tighten the fixing screws firmly so that the bidet body won’t be
shaky on the toilet. Users may fall off the seat and get injured.
1014692 BA07 »ç¿ë¼³¸í¼- ¹ÌÁÖÇâ_(08.09.10).indd 19 2008-09-10 ¿ÀÀü 11:37:10

20
INSTALLATION
Installation the Product
5. Please install by adjusting the rear of the body to the
fixing plates and pushing the product back.
6. Connect the T-shaped connector and the connected
bidet hose to the bidet body.
Please shorten the bidet hose as soon as possible. If the bidet
hose is long, it may cause noises.
7. Open the main water supply valve.
8. Connect the power plug to the electrical outlet.
Make sure to use a grounded electrical outlet. In the case of short
circuit, grounding prevents electric shock or injury.
Make sure to use a dedicated electrical outlet with grounding
terminals.
If it is unavoidable to use an extension cord, use one with
grounding terminals for power rating of 250 V, 7 A or higher.
Grounding
terminals
1014692 BA07 »ç¿ë¼³¸í¼- ¹ÌÁÖÇâ_(08.09.10).indd 20 2008-09-10 ¿ÀÀü 11:37:13
/