Page is loading ...

INSTALLATION
Check Water Supply Line
Check the water supply line that connects the toilet tank fill valve to the water
shuto valve at the wall. If it is a rigid pipe, you will need to purchase a flexible
water supply hose to replace it before installing the PureSpa. The length of the
hose may vary and the top connection size should be 7/8” Ballcock to connect to
the T-valve that you will install under the toilet tank and the bottom connection will
vary (most common are 3/8” and 1/2” female compression).
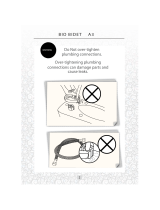
IMPORTANT
Please be advised that the provided
Cold Water T-Valve should be
installed at the Fill Valve under the
toilet tank, and NOT at the cold water
supply coming from the wall.
Note: the Hot Water T-Valve will be
installed at your hot water supply
under your bathroom sink.
If you do not have access to the Fill
Valve under the toilet tank, contact
Brondell Customer Service at
888.542.3355. We may be able to
guide you through the process.
BEFORE INSTALLATION
6
Check the size of the hot water supply connection (most likely under the sink/wash
basin). This needs to be a ⁄” connection for our T-valve to install.
Note: if the connection is a ½” connection, you will need to purchase the following
reducing adapter available online and at many plumbing hardware stores:
Reducing Adapter, ½” Female NPT x 3/8” Male Compression.

INSTALLATION (cont.)
7
3. Connect 7/8” T-Valve to Water Supply Line and
Fill Valve Under Toilet Tank.
a. Install the 7/8” T-valve with one or both of the
large rubber washers to the incoming water
connection on the bottom of your toilet tank.
b. Connect the cold water supply line coming
from the wall to the bottom of the T-valve.
Step 3a
Step 3b
1. Remove existing toilet seat
a. Lift hinge covers and use flathead or Phillips
head screwdriver to remove the mounting
bolts. Alternatively, you may need to loosen
mounting bolts underneath the seat.
b. Remove the toilet seat and set the seat,
mounting bolts and hardware aside.
CONNECTING THE COLD WATER SUPPLY
Step 1b
Step 2c
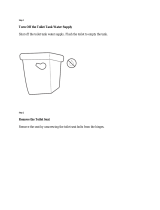
2. Turn o water supply valve and flush toilet
a. Turn o water supply at the wall to stop flow
of water.
b. Flush toilet and hold down handle to
completely empty toilet tank.
c. Disconnect water supply hose from the fill
valve under the toilet tank.

IMPORTANT
If you are only connecting the cold water supply,
you must install the Hot Water Supply Cap
(provided - see Page 3) over the hot water
connection on your PureSpa (see diagram).
Failure to connect or cap the hot water supply will
result in leaking during use.
After installing hot water cap, proceed to "Installing
the Bidet Attachment" on Page 10.
If you wish to also connect your hot water supply,
then proceed to "Connecting the Hot Water
Supply" on Page 9.
4. Connect Bidet Hose to T-Valve
a. Connect one end of the braided metal cold
water bidet hose to the remaining open side
of the installed T-valve.
Step 4a
8
CONNECTING THE COLD WATER SUPPLY (cont.)

INSTALLATION (cont.)
9
4. If it hasn't been removed already, unscrew the
Pressure Cap covering the Pressure Connector.
a. Slide the Pressure Cap over the open end of
the of Hot Water Flex Tubing with the inside
threads facing towards the open end.
1. Connect the hot water supply
a. Locate the hot water supply line in your bathroom under your sink/washbasin
and turn the water supply valve all the way o.
b. Drain the hot water line by turning on the sink tap on the hot setting until no
more water comes out.
c. Disconnect hot water supply hose to sink from
shut o valve. You may have to use a 3/8”
compatible wrench or a similar tool
(not supplied).
Note: there may be some residual water in
the hose, use a small container or towel to
catch any residual water.
2. Install the Hot Water ⁄" T-valve and the small
rubber washers as needed onto the hot water
shut o valve under the sink.
3. Reconnect hot water supply line to open end
(top) of T-valve.
Step 1c
Step 4a
Steps 2 and 3
CONNECTING THE HOT WATER SUPPLY

10
1. Install Bidet Attachment on Toilet
a. Place bidet attachment on the toilet so the
nozzle is as close to the back of the toilet
bowl as it will go. This will vary by toilet.
Step 1a
c. Slide the Pressure Cap down until the cap
meets the Pressure Connector. Screw the
Cap onto the T-Valve until secure and tight.
Caution: Do not over-tighten the Pressure
Cap. You will risk damaging the tubing.
Step 4c
b. Push the Hot Water Flex Tubing over the
Pressure Connector.
Step 4b
CONNECTING THE HOT WATER SUPPLY (cont.)
INSTALLING THE BIDET ATTACHMENT
IMPORTANT: Be sure to slide the Hot Water
Flex Tubing over the Pressure Connector until
the tubing slides past the “lip” of the pressure
connector and it cannot go any further.

11
INSTALLATION (cont.)
INSTALLING THE BIDET ATTACHMENT (cont.)
2. Connect Cold Water Bidet Hose to Bidet Attachment
a. Connect the open end of bidet hose to the Cold connection on the back of
the bidet attachment.
Note: If you have already installed the Hot Water Supply Cap over the hot water
supply on your PureSpa, Skip to Step 3 on Page 12. Otherwise continue with the
installation at the top of Page 12.
Step 2a
b. Make sure the adjustable brackets line
up with the holes in the toilet fixture. You
may need to move the adjustable brackets
accordingly to line up properly.
c. Replace the toilet seat on top of bidet
attachment and secure using original toilet
seat hardware. Make sure to tighten so that
the bidet attachment and seat do not move.
Step 1b
Step 1c

12
INSTALLING THE BIDET ATTACHMENT (cont.)
d. Hold the Pressure Connector up against the
hot water inlet on the bidet attachment. Slide
the Pressure Cap along the tubing and screw
the Cap onto the hot water inlet until the
Pressure Connector is secure.
b. Slide the Pressure Cap over the open end of
the of Hot Water Flex Tubing with the inside
threads facing towards the open end.
c. Push the Pressure Connector into the open
end of the of Hot Water Flex Tubing with the
washer facing out.
IMPORTANT: Be sure to slide the Hot Water
Flex Tubing over the Pressure Connector until
the tubing slides past the “lip” of the pressure
connector and it cannot go any further.
Step 2d
3. Turn on Water Supply & Check for Leaks
a. Open the main water supply valve slowly and check for leaks.
b. Wait 5-10 minutes, check again and if there are no leaks continue.
Note: If there is any leaking, check all rubber washers and make sure all water
connections are tight and secure. If necessary, you can use plumbers tape for
any leaking connections.
Step 2b
Step 2c
/