INSTALLATION AND MAINTENANCE MANUAL OF WALL-MOUNTED CONVECTORS
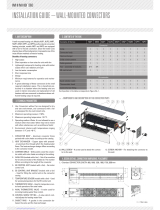
Take the convector out of its package, remove the front panel, and then measure and transfer to
the wall the location of assembly spots of the back casing.
The distance of convector to floor level and its distance to the window level should be both no less than
10 cm.
After preparation of holes and insertion of wall plugs hang the back casing and the heat ex-changer
on the wall. Secure all fastening screws tightly.
The next step is the hydraulic connection of exchanger with central heating installation –
make sure that the connectors were correctly counter-locked.
The convectors central heating flow piping is to be connected to the thermostatic valve installed on
the upper connector of convector.
After completed hydraulic works put on the front panel and fasten the fastening screw that hold it from
underneath. The convector assembly is completed with the screwing in the TRV head onto the valve,
and with assembly of the decorative grille.
Wireless head can be installed instead of the thermostatic head.
Wall-mounted convector should not be covered by furniture, drapes or another interior finish
elements.
At least once a year, prior to the heating season, the convector should be cleaned from the dust in
the exchanger. Precise cleaning is possible after removing the front casing panel, or in case of the
convectors, after removal of the decorative grille.