Page is loading ...


NB1 User Guide YML780 Rev1
2 www.netcomm.com.au
Contents
Overview................................................................................................................................5
NB1 Package Contents ...................................................................................................6
Minimum System Requirements ......................................................................................7
Do I need a Micro filter? .................................................................................................8
LED Indicators .................................................................................................................9
Back Panel Ports ...........................................................................................................10
Restoring Factory Defaults ............................................................................................11
Default Settings .............................................................................................................12
LAN (Management) ..................................................................................................12
WAN (Internet) .........................................................................................................12
Modem Access .........................................................................................................12
Connecting your NB1 ..........................................................................................................13
Configuring your NB1 ..........................................................................................................14
Computer Hardware Configuration .....................................................................................16
Windows® XP PCs ........................................................................................................16
Windows 2000 PCs .......................................................................................................16
Windows Me PCs ..........................................................................................................16
Windows 95, 98 PCs .....................................................................................................17
Advanced Settings .............................................................................................................18
Setup .............................................................................................................................19
Setup>LAN Configuration ........................................................................................20
Interfaces ............................................................................................................20
Configuring LAN Groups ....................................................................................21
IP Settings ..........................................................................................................21
Services ..............................................................................................................23
WAN Setup>New Connection ..................................................................................24
PPPoE Connection Setup Fields .................................................................24
PPPoE Connection Setup .............................................................................26
PPP Settings .................................................................................................26
PVC (Private Virtual Circuit) Settings ...........................................................28
PPPoA Connection Setup ..................................................................................29
Static Connection Setup .....................................................................................30
DHCP Connection Setup ....................................................................................31
Bridge Settings ...................................................................................................31
WAN Setup>Modem ................................................................................................32
Logout ................................................................................................................33
Advanced .......................................................................................................................34
Advanced>UPnP ......................................................................................................35
Advanced>SNTP ......................................................................................................36
Advanced>SNMP .....................................................................................................38
Advanced>IPQoS ....................................................................................................40
QoS Setup Page ......................................................................................................40
Rules Configuration Page ........................................................................................41

YML780 Rev1 NB1 User Guide
www.netcomm.com.au 3
Traffic Queuing Configuration ..................................................................................42
Queue Priorities: .................................................................................................42
Configuration: .....................................................................................................42
En-queuing Policy ....................................................................................................42
Configuration: .....................................................................................................42
De-queuing Policy ....................................................................................................42
WRR Queue Scheduler for Medium and Low priority queues ............................43
Configuration: .....................................................................................................43
Low Latency Queue (Fragmentation and Interleaving) for Voice Traffic ............43
TOS-to-Priority Mapping .....................................................................................43
Advanced>Port Forwarding .....................................................................................45
More about Port Forwarding ...............................................................................45
Well-know and registered Ports .........................................................................46
Easy Port Forwarding: Applying Pre-Defined Rules ...........................................47
DMZ Settings ......................................................................................................48
Advanced Port Forwarding: Creating Custom Rules ..........................................49
Adding Custom Rules to Applied Rules List .......................................................50
Advanced>IP Filters .................................................................................................51
Advanced>Bridge Filters ..........................................................................................53
Enable/Disable Bridge Filtering ..........................................................................53
Create Bridge Filter Rules ..................................................................................53
Edit or Delete Bridge Filter Rules .......................................................................54
Hidden Bridge Filter Rules .................................................................................54
Advanced>Multicast .................................................................................................55
Advanced>Static Routing .........................................................................................56
Configuring Static Routing: .................................................................................56
Advanced>Dynamic Routing ....................................................................................57
Advanced>Access Control .......................................................................................58
Tools ..............................................................................................................................59
Tools>System Commands .......................................................................................60
Tools>User Management .........................................................................................61
Tools>Update Firmware ...........................................................................................62
Tools>Ping Test ........................................................................................................63
Tools>Modem Test ...................................................................................................64
Tools>Log out ...........................................................................................................65
Status .............................................................................................................................66
Status>Network Statistics ........................................................................................67
Status>Connection Status .......................................................................................68
Status>DHCP Clients ...............................................................................................69
Status>Modem Status ..............................................................................................70
Status>Product Information .....................................................................................71
Status>System Log ..................................................................................................72
EasyConfig ....................................................................................................................73
Help ...............................................................................................................................74

NB1 User Guide YML780 Rev1
4 www.netcomm.com.au
Appendix A: Specification ...................................................................................................75
ADSL/ATM SUPPORT ..................................................................................75
ENCAPSULATION SUPPORT .....................................................................75
NETWORK SUPPORT .................................................................................75
VoIP ..............................................................................................................75
SECURITY ....................................................................................................76
MANAGEMENT SUPPORT ..........................................................................76
HARDWARE .................................................................................................76
PLATFORM SUPPORT ................................................................................76
LED INDICATORS ........................................................................................76
Appendix B: Cable Connections .........................................................................................77
RJ-45 Network Ports .....................................................................................................77
Straight and crossover cable configuration ...................................................................78
Straight-Through Cabling .........................................................................................78
Cross-Over Cabling ..................................................................................................78
RJ11 connector and cable .............................................................................................79
605 to RJ-11 adapter .....................................................................................................79
Appendix C: Glossary .........................................................................................................80
Appendix D: Registering your NetComm Product ..............................................................88
Contact Information .......................................................................................................88
Appendix E: Legal & Regulatory Information .....................................................................89
Customer Information ....................................................................................................89
Product Warranty ...........................................................................................................89
Limitations of Warranty ..................................................................................................90

YML780 Rev1 NB1 User Guide
www.netcomm.com.au 5
Overview
Thank you for purchasing the NetComm NB1 ADSL/ADSL2 Modem Router. Net-
Comm brings you the Next Generation of ADSL technology with ADSL-2*, which
boosts ADSL’s performance, improves interoperability, and supports new applica-
tions, services and deployment conditions.
NetComm’s implementation of ADSL-2* and ADSL-2+* ensures that the NB1 oper-
ates with existing ADSL services while delivering optimal performance in all modes
of operation. Powered by the latest ADSL-2* TI chipset, NetComm’s NB1 increases
downstream data rates by up to 50% (12Mbps) and 100% (25Mbps) for ADSL2
Plus* mode ensuring that you can surf the net or down load your files quicker than
ever before.
Security is a key issue with Broadband users and NetComm’s NB1 does not leave
you exposed. Employing the latest Active Firewall technology, the NB1 checks every
packet of data that comes in ensuring your defences are rock-solid against hackers,
unauthorised entries, probes and even Denial of Service attacks. What’s more, the
NB1 is equipped with a VPN pass-through feature allowing you to use a standard
VPN client for Point-to-Point communication even while your Firewall is active.
The NB1 delivers the connection versatility needed to cater for today’s ADSL users.
You can simply attach the NB1 to a single PC via the Ethernet port. Alternatively,
should you wish to share your Internet connection, the NB1 is equipped with an
in-built Router which will support multiple PCs with the addition of device such as a
NetComm 5- or 8-port Network Switch.
The NB1’s Port Forwarding and UPnP functions have made it easier for today’s Inter-
net users to configure and setup the myriad of Network Port Rules needed by Inter-
net applications such as On-Line Gaming, Peer-To-Peer file sharing and Messenger
services to operate. NB1 has a number of pre-configured rules for several games,
just click on the game you wish to play on-line and the rest is done for you.
Added to this, the NB1 introduces a QoS (Quality of Service) feature that gives you
control over which types of outgoing data are given priority by the router. With QoS
you can tailor your router settings to ensure that you can keep gaming or browsing
even though your upstream bandwidth may be saturated by applications such as
Peer-To-Peer file sharing.
* Your ISP must support and provide you with an ADSL-2 or ADSL-2+ service for these features to be available. This
product will operate as a standard ADSL Modem Router when an ADSL-2 service is not available.
This reference manual assumes that the reader has an installed Ethernet card in the computer to be connected and
has basic to intermediate computer and Internet skills. However, basic Computer Networking, Internet, and Firewall
technology information is available from the NetComm Web site. See www.netcomm.com.au.
Note that due to the fact that the NB1 is an adaption of the NB5 multi-port router, several functions belonging to
the NB5 including LAN Groups are still represented by screens in the NB1 firmware. These screens to not have a
corresponding function in this model which will be noted in the manual where applicable.


YML780 Rev1 NB1 User Guide
www.netcomm.com.au 7
Minimum System Requirements
Before continuing with the installation of your NB1, please confirm that you comply
with the minimum system requirements.
• Pentium® MMX 233MHz
• A CD-ROM Drive
• Ethernet card installed with TCP/IP Protocol
• OS independent for Ethernet
• Web Browser support:
• Microsoft Internet Explorer 5.0 (or later versions)
• Netscape® Navigator 4.0 (or later versions)
• Most popular browsers

NB1 User Guide YML780 Rev1
8 www.netcomm.com.au
Do I need a Micro filter?
Micro filters are used to prevent common telephone equipment, such as phones,
answering machines and fax machines, from interfering with your ADSL service. If
your ADSL enabled phone line is being used with any other equipment other than
your ADSL Modem then you will need to use one Micro filter for each phone device.
Splitters may be installed when your ADSL line is installed or when your current
phone line is upgraded to ADSL. If your telephone line is already split you will not
need to use a Microfilter - check with your ADSL service provider if you are unsure.
Each micro filter is connected in-line with your telephone or fax machine so that all
signals pass through it. Telephones and/or facsimiles in other rooms that are using
the same ex tension will also require Microfilters. The following diagram gives an
example of connecting your ADSL Modem/Router using a Microfilter.

YML780 Rev1 NB1 User Guide
www.netcomm.com.au 9
LED Indicators
The LED Indicators are located on the front of the unit, they are green in colour,
except the Power LED which is red. The meanings are as follows:
Label Status Indicates
Power On Power is on.
Off Power is off.
ADSL On A valid ADSL connection.
Flashing An active WAN session.
PPP Flashing Trying to authenticate with ISP’s PPP
server.
On PPP link is up.
Off No PPP link available.
Ethernet Flashing Flashes when data is being sent or re-
ceived on the Ethernet (LAN)
connection.
On Indicates a link to your LAN or Network
card is active.
Off Indicates no link to your LAN.

NB1 User Guide YML780 Rev1
10 www.netcomm.com.au
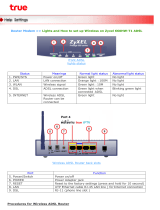
Back Panel Ports
Power Connect the Power Adapt0r that comes with your package.
Ethernet 1 x 10/100 Base-T Ethernet jack (RJ-45) to connect to your Ethernet
Network card or Ethernet Hub / Switch.
Reset To reset your ADSL Router to factory default settings. (All custom-
ised settings that you have saved will be lost!)
Please refer to the section below on how to use the
reset function.
ADSL Telephone jack (RJ-11) to connect to your
Telephone Wall Socket (ADSL line).
RJ11 for ADSL
connection to
telephone line
4 x RJ-45
Ports for 10/100
Ethernet LAN
Reset
factory
defaults
Power jack
for AC power
adaptor
Rear Panel of the NB1

YML780 Rev1 NB1 User Guide
www.netcomm.com.au 11
Restoring Factory Defaults
This feature will reset the Modem to its factory default configuration. Occasions may
present themselves where you need to restore the factory defaults on your modem.
Typical situations are:
• You have lost your username and password and are unable to login to the mo-
dem.
• You have purchased the modem from someone else and need to reconfigure the
device to work with your ISP.
• You are asked to perform a factory reset by a member of the NetComm Support
staff.
In order to restore your modem to its factory default settings, please follow these
steps:
• Ensure that your Modem is powered on (for at least 10 seconds).
• Use a paper clip or a pencil tip to depress the reset button for ten seconds and
release. At this point, the reset is in progress. Do not power off the unit at this
point.
• When indicator lights return to steady green, reset is complete. The default set-
tings are now restored. The entire process takes about 45 seconds to complete.
• Once you have reset the modem to its default settings you will be able to access
the device's configuration web interface using http://192.168.1.1 with username
'admin' and password 'admin'.

NB1 User Guide YML780 Rev1
12 www.netcomm.com.au
Default Settings
LAN (Management)
Field Setting Details
Static IP Address: 192.168.1.1
*
Subnet Mask: 255.255.255.0 *
Default Gateway: blank
WAN (Internet)
Field Setting Details
User Name: username@isp
Password: ****
Protocol: PPPoE
VPI: 8
*
VCI: 35 *
IP Address: 192.168.1.1 *
Subnet Mask: 255.255.255.0 *
Default Gateway: 0.0.0.0 *
Modem Access
Field Setting Details
User Name: admin
Password: admin
* Default Setting. Although in most cases you will not be required to alter
these default settings for your NB1, your ISP may identify specific settings
to enable connection to their service. Please refer to your ISP or Network
Administrator for further information.

YML780 Rev1 NB1 User Guide
www.netcomm.com.au 13
Connecting your NB1
The NB1 is connected via an Ethernet cable.
To connect to your NB1, you will need to have an available Ethernet Port present on your
Computer/Notebook or on your network hub or switch.
1. Connect your NB1 to either a computer directly or a network hub or switch using
a CAT5 ethernet cable.
2. Connect the power pack to the ADSL Modem and switch on the power switch.
3. Ensure that there is a ETHERNET link light on the NB1.
4. Ensure that the computer you intend to use has an IP address in the same sub-
net as the NB1 ADSL Modem. (e.g. the NB1’s default IP is 192.168.1.1 - your
computer should be on 192.168.1.100 or similar.) If you have DHCP enabled on
your computer, the NB1 will assign your computer a suitable IP address.
5. Ensure that your computer has a LAN link light.
6. Connect one end of the ADSL phone line to the NB1 ADSL port and the other
end to the ADSL-enabled line wall socket.

NB1 User Guide YML780 Rev1
14 www.netcomm.com.au
Configuring your NB1
You will need to log directly into the configuration page of the modem and configure
the basic settings for your Internet connection. Your ISP should provide you with the
necessary information to complete this step.
The settings that you most likely need to change to access the Internet are grouped onto
a single EasyConfig page.
To configure your modem follow the steps below:
Note: Ensure that your PC is setup as a DHCP client. Refer to the Computer
Hardware Configuration section for instructions on how to set this up with
different Operating Systems.
1. Insert the CD into your CD-ROM drive. An autorun screen will appear. Click on
Con fig ure Modem.
(Alternatively, if the CD-ROM is not available, you can open a web
browser and type http://192.168.1.1 in the location bar to access the
modem’s EasyConfig setup screen directly.)
2. The login page will be displayed. Enter the modem’s username and password.
The default username is admin.
The default password is admin.
Click on Log In.
3. The EasyConfig page will be displayed.

YML780 Rev1 NB1 User Guide
www.netcomm.com.au 15
4. Check with your ISP what Protocol your modem needs to use to connect to the
Internet. If unsure, leave the default selection of PPPoE.
5. In the User ID field, enter the Username that your ISP has provided. In the
password field, enter the password that your ISP has given you.
Note: If your ISP has provided you with Static addressing details you will need
to access the Advanced Settings of your modem to configure these. Please
refer to the section on Advanced Settings in this manual for instructions.
6. The default VPI / VCI settings for most connections is 8 / 35 in Australia. Do not
change these unless your ISP has instructed you to do so.
7. Click on the Apply button to save the settings you have entered. The modem will
automatically reboot. Refresh the web page after 20 seconds.
8. If the settings you entered were correct and you have an ADSL connection es-
tablished the Status light will change to green.
9. You should now be able to access the Internet with a web browser, email client
or other Internet application.
10. If the status light remains red after 45 seconds and you have refreshed your
web page several times, check the following:
• ADSL Link light on your modem is solid green; If not, you do not have an
ADSL connection established. Contact your ISP who will assist in resolving
this.
• If you have a solid green light on your modem for the ADSL Link, but you
can’t access the Internet, check that the username / password you entered
are correct and try again;
• If the above two suggestions don’t resolve the issue, please contact your ISP;
TIP: To test your Internet connection while the modem is attempting to apply
the settings, you can open a DOS prompt (Start > Run > cmd) and execute
a continual ping command to a public server’s IP address on the Internet.
Once you receive a reply from the server you know that you are connected.
This can take up to 30 seconds. e.g: c:/ ping 210.0.111.111 -t

NB1 User Guide YML780 Rev1
16 www.netcomm.com.au
Computer Hardware Configuration
This section provides instructions for configuring the TCP/IP (Network) settings on your
computer to work with your Modem. These steps are only required if you are having
trouble accessing your Modem.
Windows® XP PCs
1. In the Windows task bar, click the Start button, and then click Control Panel.
2. Click on Network & Internet Connections icon. (Category mode only).
3. Click the Network Connections icon.
4. In the LAN or High-Speed Internet window, right-click on the icon corresponding
to your network interface card (NIC) and select Properties. (Often, this icon is
labelled Local Area Connection).
5. The Local Area Connection dialog box displays with a list of currently installed
network items. Ensure that the check box to the left of the item labelled In-
ternet Protocol (TCP/IP) is checked. Select Internet Protocol TCP/IP and
click on Properties.
6. In the Internet Protocol (TCP/IP) Properties dialog box, click the radio button
labelled Obtain an IP address automatically. Also click the radio button la-
belled Obtain DNS server address automatically.
7. Click OK twice to confirm your changes, and close the Control Panel.
Windows 2000 PCs
First, check for the IP protocol and, if necessary, install it:
1. In the Windows task bar, click the Start button, point to Settings, and then
click Control Panel.
2. Double-click the Network and Dial-up Connections icon.
3. In the Network and Dial-up Connections window, right-click the Local Area
Connection icon, and then select Properties.
4. In the Local Area Connection Properties dialog box, select Internet Protocol
(TCP/IP), and then click Properties
5. In the Internet Protocol (TCP/IP) Properties dialog box, click the radio
button labelled Obtain an IP address automatically. Also click the radio button
labelled Obtain DNS server address automatically.
6. Click OK twice to confirm and save your changes, and then close the Control
Panel.
Windows Me PCs
1. In the Windows task bar, click the Start button, point to Settings, and then
click Control Panel.
2. Click on View All Control Panel Options.
3. Double-click the Network icon.
4. The Network Properties dialog box displays with a list of currently installed
network components. If the list includes Internet Protocol (TCP/IP), then the
protocol has already been enabled. Skip to step 10.
5. If Internet Protocol (TCP/IP) does not display as an installed component, click
Add…
6. In the Select Network Component Type dialog box, select Protocol, and
then click Add…

YML780 Rev1 NB1 User Guide
www.netcomm.com.au 17
7. Select Microsoft in the Manufacturers box.
8. Select Internet Protocol (TCP/IP) in the Network Protocols list, and then click
OK. You may be prompted to install files from your Windows ME installation CD
or other media. Follow the instructions to install the files. If prompted, click OK
to restart your computer with the new settings.
Next, configure the PC to accept IP information assigned by the modem:
9. Follow steps 1 – 4 above..
10. In the Network Properties dialog box, select TCP/IP, and then click Properties.
If you have multiple TCP/IP listings, select the listing associated with your net-
work card or adapter.
11. In the TCP/IP Settings dialog box, click the radio button labelled Obtain an
IP address automatically.
12. Click OK twice to confirm and save your changes, and then close the Control
Panel.
Windows 95, 98 PCs
First, check for the IP protocol and, if necessary, install it:
1. In the Windows task bar, click the Start button, point to Settings, and then
click Control Panel.
2. Double-click the Network icon.
3. The Network dialog box displays with a list of currently installed network
components. If the list includes TCP/IP, and then the protocol has already been
enabled. Skip to step 9.
4. If TCP/IP does not display as an installed component, click Add… The Select
Network Component Type dialog box displays.
5. Select Protocol, and then click Add… The Select Network Protocol dialog box
displays.
6. Click on Microsoft in the Manufacturers list box, and then click TCP/IP in the
Network Protocols list box.
7. Click OK to return to the Network dialog box, and then click OK again. You
may be prompted to install files from your Windows 95/98 installation CD. Follow
the instructions to install the files.
8. Click OK to restart the PC and complete the TCP/IP installation.
Next, configure the PCs to accept IP information assigned by the Modem:
9. Follow steps 1 – 3 above.
10. Select the network component labelled TCP/IP, and then click Properties. If
you have multiple TCP/IP listings, select the listing associated with your network
card or adapter.
11. In the TCP/IP Properties dialog box, click the IP Address tab.
12. Click the radio button labelled Obtain an IP address automatically.
13. Click OK twice to confirm and save your changes. You will be prompted to re-
start Windows.
14. Click Yes.
Note: For detailed information regarding the advanced features of this prod-
uct, refer to the Advanced Settings sections.

NB1 User Guide YML780 Rev1
18 www.netcomm.com.au
Advanced Settings
To access the Advanced Settings of your modem you click on the Advanced Settings
link on the EasyConfig web page. To access this page, enter http://192.168.1.1 and
login with username ‘admin’ and password ‘admin’.

YML780 Rev1 NB1 User Guide
www.netcomm.com.au 19
Setup
Click the Setup tab.
The Setup screen allows you to change current settings for your LAN (Local Area
Network), Ethernet Switch and WAN (Wide Area Network). You can also create new
connection profiles.

NB1 User Guide YML780 Rev1
20 www.netcomm.com.au
Setup>LAN Configuration
Click on the LAN Configuration link under the Setup menu to configure your Local
Area Network settings.
Interfaces
This section displays the available interfaces on your modem that have yet to be
configured. The default setting is to have all interfaces in LAN group 1.
Note: The interface is based on the related NB5 product which allows for LAN
groups, however in the case of the NB1 only one LAN group is possible.
Click on Configure to configure LAN settings.
/