
WATER BOWL FEATURE
INSTALLATION INSTRUCTIONS
SAVE THESE INSTRUCTIONS FOR FUTURE REFERENCE
IMPORTANT SAFETY INFORMATION: READ AND FOLLOW ALL INSTRUCTIONS
Save these instructions. Leave manual with homeowner after installation.
Improper installation, adjustment, alteration, service, or lack of maintenance can cause injury or property damage. Read
the installation, operating, & maintenance instructions thoroughly before installing or servicing this equipment.
®

2
1. PRODUCT DETAILS
MATERIAL
• Water bowls are constructed of 14 gauge 316 stainless steel or 16 gauge copper
• All bowls are fully TIG welded
• Stainless steel and copper have dierent characteristics and maintenance requirements. For details see section F.
BONDING LUG
• All water bowls come with a bonding lug on the back.
• This is a grounding lug used to ground the water bowl.
INLET: All water bowls are manufactured with a 1 ½” NPT female inlet on the bottom.
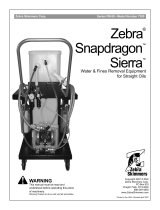
2. DIMENSIONS
• Bottom measurement is equal to 1/2 bowl width (Ex: 24” bowl has 12” base).
• Main body length and width are equal measurements.
FIGURE 1
A. SPECIFICATIONS
SPILLWAY LIP SIZE (L)
24" 28" 32" 36"
10" WIDE 11" WIDE 12" WIDE 14" WIDE
L
2
"
4.3"
L
2
"
4.3"

3
1. MOUNTING SURFACE
• Bowls should always be installed on a solid, level surface
• The PVC pipe will hold the water bowl in place. Water and ll material will also weigh the bowl down, but a
construction adhesive can also be used for extra security.
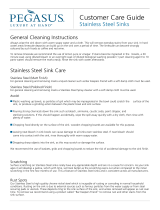
2. PLACEMENT & CENTERING
• Install a 1.5” PVC water line in column or mounting surface, in the center of the water bowl.
• EXTENDED LIP MODELS: Locate so that the lip of the water bowl fully extends into the pool or body of water.
• Center of bowl should be maximum of half the water bowl diameter from the edge
• EXAMPLE: For 24in water bowl, center of bowl can be a maximum of 12in (half bowl width) from the edge of the
water. (Fig 2a)
• SEAMLESS LIP MODELS: Locate so that the body of the bowl extends over the edge of the pool
• Center of bowl should be positioned to leave 2-3 inches of bowl overhang over the edge
• EXAMPLE: For 24in water bowl, center of bowl can be a maximum of 9in (3 inch clearance) from the edge of the
pool. (Fig 2b)
FIGURE 2a FIGURE 2b
B. INSTALLATION
24IN BOWL (EXTENDED)
MAX 12IN
24IN BOWL (SEAMLESS)
MAX 9 IN

4
D. PLUMBING
1. PLUMBING INSTALLATION
a. RECOMMENDED PLUMBING
• Use multiple pumps when installing multiple water features.
• The dedicated pump should be plumbed with a minimum of 2” PVC pipe.
• VGB compliant suction covers must be used.
• A lter strainer is recommended between the pump and the water bowl.
b. PLUMBING CONNECTION
• Water bowls have a 1 ½” female threaded inlet in the bottom center.
• About two inches above the inlet inside the bowl is a “hat bracket” that slows the water coming up from the water
line to minimize turbulence. This also helps prevent bowl media from falling back into the pipe.
c. BALANCING THE FLOW
• A 3-way valve is recommended after the pump to allow the ow to be regulated between the water bowl and the
pool return. The recommended location for this valve is after the lter near the equipment pad. (Fig 3)
• When plumbing two or more water bowls, follow all of the previous instructions with the addition of a 2-way ball
valve for each water feature. The valve is necessary to balance the water ow between the units. (Fig 4b)
• The dedicated pump should be plumbed with a minimum of 2” PVC pipe.
PUMP
3-WAY VALVE
SUCTION LINE
SEPARATE RETURN
TO POOL
WATER
BOWL
FILTER/STRAINER
FIGURE 3

5
D. PLUMBING
E. FILL MEDIA
• Bowls can be optionally lled with rock or colored glass media
• Fill level about 1/4 inch below the lip of the bowl to minimize media overow into the pool
• Fill media type, size and ll level will have dierent eects on water ow. Experiment to achieve the desired ow and
eect.
ONE BOWL MULTIPLE BOWLS
FLOW
FLOWFLOW
FIGURE 4a FIGURE 4b
3. FLOW RATES
Flow rates vary by product size and design
• Adjust the ow on site after installation with a valve to get the desired look at the water feature.
24"W × 7"H 24"W × 12"H 28"W × 12"H 32"W × 12"H 36"W × 16"H
15-20 GPM 15-20 GPM 15-20 GPM 20-25 GPM 20-25 GPM
4. FLOW TEST
• Open water valves
• Turn on water source
• Adjust valve to correct ow rate
• Adjust valves per bowl to balance ow on multiple bowl set-ups
• Turn o water valve or water source
• Check for leaks at base of bowl and all tting connections

6
F. MATERIAL CARE GUIDE
COPPER
PATINA: Dark brown to green to blue. All copper products will patina. Patina is a natural process of oxidation where copper
reacts to the elements and produces a series of colors that build up in order to protect the copper. The nal color can vary
widely depending on location, environment and other factors.
WHAT COLOR WILL MY PRODUCT BE?
All products ship in their natural copper state. Depending on where they are stored or transported, patina may begin to
develop. It is very likely the color may change between manufacture and delivery and will continue to patina after installation.
Copper can be cleaned after installation to reset the patina process.
CLEANING
• Patina color may vary from piece to piece, even when delivered on the same day. If you prefer to restore the material after
installation, a cleaning solution such as TarnX® may be used.
• Hand Prints/Water Spots: Products develop hand prints from handling or water stains from water testing. The natural patina
process will cover up the markings as the whole piece begins to darken.
STAINLESS STEEL
PATINA
Stainless steel does not develop a patina.
CLEANING
• Stainless steel is steel that is “stain-less” however, this DOES NOT MEAN THAT STAINLESS STEEL WILL NEVER RUST OR
CORRODE. Stainless steel can show water spots and deposits of minerals or other natural substances that appear, orange,
white and/or brown. We suggest regular cleaning, at least once a month.
• Use distilled, soft or puried water (preferably warm) while cleaning and as a last rinse. Dry with a soft cloth.
• General maintenance and/or light buildup can be done with a soft cloth. Windex works well if you want to remove water
spots. Otherwise a mild soap or vinegar (1 part vinegar to 3 parts water) will remove light buildup.
• Try to go in the direction of the natural polishing grains
• Heavier build-up can be cleaned using very ne red Scotch-Brite™ cleaning pads.
• In many cases, cleaning over time will greatly reduce reappearance of build-up.
SALTWATER
Stainless steel is not warranted for use in or around salt water. Bobé products are made of 316 marine grade stainless steel.
Stainless steel can get water spots and stainless steel can get deposits of minerals or other natural substances that appeared,
white and/or brown. If this happens you’ll need to clean the areas each time the build up occurs and after 3-6 cleanings the
problem areas should be free of any build up returning.

7
Record Information on this System Below & Keep for Your Records
Installer _______________________________________________________________
Purchased From _______________________________________________________
Installation Date _____________________________
Model Number ______________________________
Pool Size in Gallons __________________________
Customer Service & Tech Support
Toll Free: 1-800-733-9060
suppor[email protected]
Warranty Questions
Support Resources & Videos Online
c-m-p.com/support
SAVE THESE INSTRUCTIONS

CUSTOM MOLDED PRODUCTS | 36 HERRING ROAD, NEWNAN, GA 30265 | WWW.C-M-P.COM0320sb
-
 1
1
-
 2
2
-
 3
3
-
 4
4
-
 5
5
-
 6
6
-
 7
7
-
 8
8


Ask a question and I''ll find the answer in the document
Finding information in a document is now easier with AI
Related papers
Other documents
-
 Fossil Blu FSW1105 Installation guide
-
 Zebra Technologies Snapdragon Sierra Water & Fines Removal Equipment 7309 User manual
-
Kallista P34600-00-CP User guide
-
 Astracast ZR2033 User manual
-
 The 1810 Company CUR/01/CH/TRIO Datasheet
-
Aurora Vertical Turbine Owner's manual
-
In-Sink-Erator SS-100-28 User manual
-
Crathco / Grindmaster D15 User manual
-
Cleveland WT-300 User manual
-
Charbroil Patio Caddie User manual


