Page is loading ...

IP Office
5410 User’s Guide
40DHB0002UKEY – Issue 1 (7th February 2005)

Page ii - Contents
Page ii - Contents IP Office 5410 User’s Guide
40DHB0002UKEY – Issue 1 (7th February 2005)
The 5410 Telephone ............................................................................. 6
Overview of the 5410......................................................................................................... 6
Call Appearance Keys ....................................................................................................... 7
System Features...................................................................................................................... 8
Call Appearance/Function Key Icons....................................................................................... 8
Basic Call Handling Features .............................................................. 9
Answer a Call .................................................................................................................... 9
Making a Call..................................................................................................................... 9
Clearing a Call ................................................................................................................... 9
Headset Working ............................................................................................................. 10
Speakerphone ................................................................................................................. 10
Speed Dial ....................................................................................................................... 11
Redial .............................................................................................................................. 11
Mute................................................................................................................................. 11
Hold ................................................................................................................................. 11
Transfer ........................................................................................................................... 12
Conference ......................................................................................................................12
Message .......................................................................................................................... 12
Speed Dials.......................................................................................... 13
Overview of Speed Dials ................................................................................................. 13
Using Speed Dials ........................................................................................................... 14
Dialing a Speed Dial Number................................................................................................. 14
Deleting a Speed Dial ............................................................................................................ 14
Editing a Speed Dial .............................................................................................................. 14
Converting a Call Log Entry to a Speed Dial.......................................................................... 14
Adding a New Speed Dial ...................................................................................................... 15
Using the Call Log .............................................................................. 16
Overview of the Call Log ................................................................................................. 16
Using the Call Log ........................................................................................................... 17
Viewing the Call Log .............................................................................................................. 17
Making Calls from the Call Log .............................................................................................. 17
Saving a Call Log Entry to Your Speed Dial List.................................................................... 17
Deleting a Call Log Entry .......................................................................................................18
Erasing All Logged Calls........................................................................................................18
Setting Which Calls are Logged............................................................................................. 18
Changing the 5410 Options ............................................................... 19
Overview of 5410 Options ............................................................................................... 19
Selecting Personalized Options....................................................................................... 20
Ring Options .......................................................................................................................... 20
Adjusting the Display Contrast............................................................................................... 20
Call Log Setup ....................................................................................................................... 21
Using Self Test ...................................................................................................................... 21
Default Phone/Erase All Settings........................................................................................... 21
Language............................................................................................................................... 22
Changing Key Labels.............................................................................................................22
Automatic Gain Control (AGC)............................................................................................... 22
Contents

Contents - Page iii
IP Office 5410 User’s Guide Contents - Page iii
40DHB0002UKEY – Issue 1 (7th February 2005)
Function Keys ..................................................................................... 23
Overview of the Function Keys........................................................................................ 23
Function Key Programming............................................................................................. 25
Shorthand Programming Mode.............................................................................................. 26
Longhand Programming ........................................................................................................ 27
Display Key Features............................................................................................................. 28
Dial (#) .......................................................................................................................................... 28
Group (#) ...................................................................................................................................... 28
User (#)......................................................................................................................................... 28
Absnt - Set Absent Text................................................................................................................ 30
Acct - Account Code Entry (!) ....................................................................................................... 30
AD - Abbreviated Dial (!)............................................................................................................... 30
Admin - Self-Administer (!)............................................................................................................ 30
Apear - Appearance...................................................................................................................... 31
AutCB - Automatic Callback (!) ..................................................................................................... 31
Busy - Busy................................................................................................................................... 31
BusyH - Busy On Held.................................................................................................................. 31
CFrwd - Call Forwarding All (!)...................................................................................................... 32
ClrCW - Clear CW ........................................................................................................................ 32
CnfRV - Conference Meet Me....................................................................................................... 32
Conf+ - Conference Add ............................................................................................................... 32
CPark - Call Park (!)...................................................................................................................... 33
CPkUp - Call Pickup (!)................................................................................................................. 33
CWOff - Call Waiting Off............................................................................................................... 33
CWOn - Call Waiting On............................................................................................................... 34
CWSus - Call Waiting Suspend ....................................................................................................34
DCW - Dial CW............................................................................................................................. 34
Dir - Directory (!) ........................................................................................................................... 34
Dirct - Dial Direct........................................................................................................................... 35
DNDOn - Do Not Disturb On......................................................................................................... 35
DNDOf - Do Not Disturb Off.......................................................................................................... 36
DNDX+ - Do Not Disturb Exception Add....................................................................................... 36
DNDX- - Do Not Disturb Exception Delete.................................................................................... 36
DPkUp - Directed Call Pickup (!)................................................................................................... 36
Drop - Drop (!)............................................................................................................................... 36
DTone - Secondary Dial Tone ...................................................................................................... 37
Emrgy - Dial Emergency............................................................................................................... 37
Flash - Flash Hook (#) .................................................................................................................. 37
FolTo - Follow Me To.................................................................................................................... 37
FwBNo - Forward On Busy Number ............................................................................................. 38
FwBOn - Forward On Busy On ..................................................................................................... 38
FwBOf - Forward On Busy Off ...................................................................................................... 38
FwdH+ - Forward Hunt Group Calls On........................................................................................ 39
FwdH- - Forward Hunt Group Calls Off......................................................................................... 39
FwdNo - Forward Number ............................................................................................................ 39
FwdOf - Cancel All Forwarding..................................................................................................... 39
FwNOn - Forward On No Answer On ........................................................................................... 39
FwNOf - Forward On No Answer Off ............................................................................................ 40
FwUOn - Forward Unconditional On............................................................................................. 40
FwUOf - Forward Unconditional Off.............................................................................................. 40
GrpPg - Group Paging (!).............................................................................................................. 40
HdSet - Headset Toggle (!)........................................................................................................... 40
Here- - Follow Me Here Cancel .................................................................................................... 41
Here+ - Follow Me Here................................................................................................................ 41
HfAns - Internal Auto-Answer (!)................................................................................................... 41
HGEna - Hunt Group Enable ........................................................................................................ 41
HGDis - Hunt Group Disable......................................................................................................... 42
HGNS+ - Set Hunt Group Night Service (!) .................................................................................. 42

Page iv - Contents
Contents - Page iv IP Office 5410 User’s Guide
40DHB0002UKEY – Issue 1 (7th February 2005)
HGNS- - Clear Hunt Group Night Service..................................................................................... 42
HGOS+ - Set Hunt Group Out of Service ..................................................................................... 42
HGOS- - Clear Hunt Group Out of Service ................................................................................... 43
Hold - Hold Call............................................................................................................................. 43
HoldCW - Hold Call Waiting.......................................................................................................... 43
IAuto - Automatic Intercom ........................................................................................................... 43
ICSeq - Set Inside Call Sequence ................................................................................................44
IDial - Dial Intercom ...................................................................................................................... 44
Inclu - Dial Inclusion...................................................................................................................... 44
Intru - Call Intrude ......................................................................................................................... 45
Listn - Call Listen .......................................................................................................................... 45
Login - Extn Login......................................................................................................................... 46
Logof - Extn Logout ...................................................................................................................... 46
Music - Hold Music ....................................................................................................................... 46
NATim - Set No Answer Time....................................................................................................... 46
OCSeq - Set Outside Call Sequence............................................................................................ 46
Page - Page.................................................................................................................................. 46
Park - Park (#) .............................................................................................................................. 47
Park - Call Park to Other Extension (!).......................................................................................... 47
PCall - Priority Call........................................................................................................................ 48
PhyEx - Dial Physical Extension by Number ................................................................................ 48
PickA - Call Pickup Any ................................................................................................................ 48
PickG - Call Pickup Group ............................................................................................................ 48
PickM - Call Pickup Members....................................................................................................... 48
Prog - Abbreviated Dial Program (!).............................................................................................. 49
Quota - Clear Quota ..................................................................................................................... 49
Queue - Call Queue...................................................................................................................... 49
RBak+ - Ringback When Free ......................................................................................................50
RBak - Cancel Ringback When Free............................................................................................ 50
RBSeq - Set Ringback Sequence................................................................................................. 50
Recor - Call Record ...................................................................................................................... 50
Relay - Relay Pulse ...................................................................................................................... 51
Rely+ - Relay On .......................................................................................................................... 51
Rely- - Relay Off ........................................................................................................................... 51
Resum - Resume Call................................................................................................................... 51
Rtriv - Retrieve Call....................................................................................................................... 52
Ride - Ride Call............................................................................................................................. 52
RngOf - Ringer Off (!) ................................................................................................................... 52
SAC - Send All Calls (!) ................................................................................................................ 53
Spres - AD Suppress (!)................................................................................................................ 53
Steal - Call Steal ........................................................................................................................... 53
SusCW - Suspend CW ................................................................................................................. 53
Suspe - Suspend Call ................................................................................................................... 54
Timer - Timer (!)............................................................................................................................ 54
TmDay - Time of Day (!) ............................................................................................................... 54
Toggl - Toggle Calls...................................................................................................................... 54
VMRB- - Voicemail Ringback Off..................................................................................................54
VMRB+ - Voicemail Ringback On................................................................................................. 55
VMCol - Voicemail Collect ............................................................................................................ 55
VMOff - Voicemail Off ................................................................................................................... 55
VMOn - Voicemail On ................................................................................................................... 55
WUTim - Set Wrap Up Time ......................................................................................................... 55
System Features ................................................................................. 57
Introduction...................................................................................................................... 57
Making Calls ....................................................................................................................57
Answering Calls............................................................................................................... 57
Call Forwarding ............................................................................................................... 58

Contents - Page v
IP Office 5410 User’s Guide Contents - Page v
40DHB0002UKEY – Issue 1 (7th February 2005)
Diverting Calls .................................................................................................................58
Do Not Disturb ................................................................................................................. 58
Voicemail ......................................................................................................................... 59
Default Feature Codes .................................................................................................... 59
Index..................................................................................................... 60

Page 6 - Overview of the 5410 The 5410 Telephone
Page 6 - The 5410 Telephone IP Office 5410 User’s Guide
Overview of the 5410 40DHB0002UKEY – Issue 1 (7th February 2005)
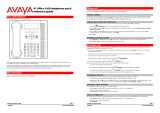
The 5410 Telephone
Overview of the 5410
This guide covers the use of the Avaya 5410 telephone, running in Key and Lamp
mode, on Avaya IP Office telephone systems operating with Level 3.0 software and the
5410 telephone’s software running at REL:2.00 or higher (see Using Self Test on page
21) The diagram below shows the main 5410 telephone features.
1. Display, Call Appearance and Function keys: Call Appearance Keys allow the
user to handle multiple calls and the display shows call information. System
functions (allocated by your System Administrator) can also be displayed. See Call
Appearance Keys on page 7 and Function Keys on page 23.
2. Message lamp - Lit when the user has voicemail messages. Can also be set to
flash when the phone is ringing.
3.
Previous/Next Page - Move through the different pages of the call
handling, speed dials and call log screens. Also used to move the cursor during
data entry.
4.
Messages: Access the user's mailbox.
5. Call Handling Buttons: See Basic Call Handling Features on page 9.
• Hold: Place call on hold.
• Transfer: Transfer call.
• Conference: Conference held calls.
• Drop: Drop call.
• Redial: Redial last number dialed.
6. Dial pad: Standard 12-button pad for dialing telephone numbers.
7.
Volume Controls: Adjust the speaker, handset, headset, or ringer
volume depending on which is currently in use.
8. Handset and Headset Sockets: The sockets for both the headset and handset
cables can be found on the side of the telephone.
9.
Mute: Turns the microphone on/off. When in use, the associated light is on
and the caller cannot hear you.

Call Appearance Keys The 5410 Telephone - Page 7
IP Office 5410 User’s Guide The 5410 Telephone - Page 7
40DHB0002UKEY – Issue 1 (7th February 2005) Call Appearance Keys
10.
Headset: Switches from handset to headset. The light associated with this
button turns on when the headset is active.
11.
Speaker: Access the speakerphone. The light associated with this button
turns on when the speakerphone is active.
12.
Exit: Returns you to the main call handling screen.
13.
Softkeys: Used to navigate to or initiate certain features, such as Speed
Dial or Call Log, as well as control certain actions within the features. These keys
correspond to the text prompts in the display screen immediately above them. See
Speed Dials on page 13, Error! Reference source not found. on page 16,
Changing the 5410 Options on page 19and Error! Reference source not found.
on page Error! Bookmark not defined..
Call Appearance Keys
Normally, the first page of the main call handling screen contains three keys set as 'call
appearance' keys. These are allocated to you by your System Administrator and are
indicated as a=, b= and c=.
Your System Administrator can change a call appearance key with:
• A Bridged Appearance
A bridged appearance key matches the status and operation of the Call Appearance
Key on a pre-defined colleague’s telephone. Hence, you can pick-up, make and
receive calls on behalf of your colleague.
• A Line Appearance
An IP Office exchange line (but not IP lines) can be allocated to you such that the
status of that line is displayed and you can use the line appearance key to make and
receive calls.
• Call Coverage Appearance
A call coverage appearance key alerts you when a pre-defined colleague is
receiving a call. The covered user does not need to be using call appearance keys.
Hence, you can pick-up calls on behalf of your colleague.
All of the above can only be allocated to you by your System Administrator.
For details of Bridged, Line and Call Coverage Appearance Keys set-up and their
operation, refer the IP Office Key and Lamp Operation manual.
CAUTIONS:
1. Having more than two Call Appearance keys is very useful. When holding a call
you can answer/make another call and then switch between calls or transfer or
conference. If you are set to receive call waiting indication, the waiting call is
shown against the next call appearance key.
2. Although the System Administrator can replace the Call Appearance Keys with:
• A Bridged Appearance
• A Line Appearance
• Call Coverage Appearance
• System Features
This would severely restrict the use of features such as conference and transfer.
It is for these reasons that it is strongly recommended that all Call
Appearance keys remain at their default settings.

Page 8 - Call Appearance Keys The 5410 Telephone
Page 8 - The 5410 Telephone IP Office 5410 User’s Guide
Call Appearance Keys 40DHB0002UKEY – Issue 1 (7th February 2005)
System Features
System Features can only be set against soft Function Keys by your System
Administrator. However, your System Administrator may allocate you two ‘self
administrator’ features that will enable you to add System Features to your soft
Function Keys. Refer to Function Keys on page 23 for details of the System Feature
that can only be allocated to you by your System Administrator.
In addition, there are a number of System Features that you can always access
yourself by the use of short codes. Refer to System Features on page 57 for details of
System Features that you can always access yourself by dialing short codes, e.g. *17
to listen to your VoiceMail messages.
Call Appearance/Function Key Icons
The icons displayed against the Call Appearance/Feature Keys allow you to determine
the status (for example, on Hold) of each call. Icons also indicate whether a feature has
been activated for a particular button.
• Incoming Call:
A
symbol next to a call appearance key indicates an incoming call.
Pressing the adjacent
key answers the call and puts any other current call on
hold.
• Connected
:
A
symbol next to a call appearance key indicates that it is the currently connected
call. The caller's telephone number (if available) is also shown.
Pressing the adjacent
key puts the call on hold. An H is also shown on the
display.
• On Hold
:
A
symbol next to a call appearance key indicate a call on hold.
Pressing the adjacent
key takes the call off hold and puts any other current
call on hold.
• Function Active:
e or f
The button to the left or right of the function key is active.
•
key takes the call off hold and puts any other current call on hold.

Answer a Call Basic Call Handling Features - Page 9
IP Office 5410 User’s Guide Basic Call Handling Features - Page 9
40DHB0002UKEY – Issue 1 (7th February 2005) Answer a Call
Basic Call Handling Features
Answer a Call
When a call arrives at your 5410 telephone, you hear a ringing tone and a blinking bell
(
) icon appears against the associated call appearance key.
To answer an incoming call:
Do one of the following:
• If you are not active on another call, answer the call using your handset, headset, or
speakerphone (see Speakerphone on page 10).
• If you are active on a call already, place the active call on hold (see Hold on page
11), and then answer the incoming call by selecting the call appearance key.
• If the call appearance for the ringing call is not displayed on the current screen
page, use
to return to the first page of the Home screen. When you locate the
call appearance for the ringing call, press the corresponding call appearance button.
Making a Call
You can make calls from the 5410 telephone using a variety of methods as follows:
To manually make a call:
1. Dial the required number on the key pad (remember to include the required access
code (for example, 9) for an outside line) and listen to the progress of the call.
2. Adjust speakerphone volume as necessary.
• To change the volume use the
and buttons. The display shows the
volume level. (There are eight volume levels.)
3. If the call is not answered, you can clear the call by pressing
Speaker or
Drop
or
4. When the call is answered, either speak or pick up the handset and speak to the
called party.
To automatically make a call:
Do any of the following:
1. Press
Redial and select from (up to) one of the last ten numbers that you
dialed by pressing the associated a call appearance key
. The call is made
automatically for you.
or
Access the Call Log and initiate a call to a specific entry.
See Using the Call Log on page 17.
or
Access the Speed Dial List in your personal directory and initiate a call to a specific
entry. See Speed Dials on page 13.
2. When the call is answered, either speak or pick up the handset and speak to the
called party.
Clearing a Call
To clear an established call either:
1. Replace the handset
or
2. Press
Drop. You will hear dial tone.

Page 10 - Headset Working Basic Call Handling Features
Page 10 - Basic Call Handling Features IP Office 5410 User’s Guide
Headset Working 40DHB0002UKEY – Issue 1 (7th February 2005)
Headset Working
When a headset is to be used on your 5410, it must be plugged in to the headset
socket on the side of your 5410 telephone. To activate the headset and switch off the
handset, press
Headset. The lamp beside the button is illuminated when
headset working is activated.
To answer an incoming call:
1. Press the call appearance key next to the flashing bell icon (
):
To clear a headset call:
1. Press
Drop.
To manually make a call:
1. Dial the number (remember to include the required access code (for example, 9)
for an outside line) and listen to the progress of the call.
To automatically make a call:
Do any of the following:
1. Press
Redial and select from (up to) one of the last ten numbers that you
dialed by pressing the associated a call appearance key
.
The call is made automatically for you.
or
Access the Call Log and initiate a call to a specific entry.
See Using the Call Log on page 17.
or
Access the Speed Dial List in your personal directory and initiate a call to a specific
entry. See Speed Dials on page 13.
2. When the call is answered, speak to the called party.
Speakerphone
The two-way built-in speakerphone allows you to make and answer calls without lifting
your handset. Keep in mind that two-way speakerphones may not operate satisfactorily
in every environment (such as in very noisy locations) and that they operate best when
you speak directly too them.
To make or answer a call without lifting the handset, or to use the speakerphone
with any feature:
1. Press
Speaker. The LED beside the button illuminates.
2. Make or answer the call, or access the selected feature.
3. Adjust speakerphone volume if necessary.
• To change the volume use the
and buttons. The display shows
the volume level. (There are eight volume levels.)
To change from the speakerphone to handset (or headset if fitted)
1. Pick up the handset (or press
Headset) and talk.
To change from the handset to the speakerphone
1. Press
Speaker. The LED beside the button illuminates.
2. Hang up the handset.
To end a speakerphone call
1. Press
Speaker again. The LED beside the button goes out.

Speed Dial Basic Call Handling Features - Page 11
IP Office 5410 User’s Guide Basic Call Handling Features - Page 11
40DHB0002UKEY – Issue 1 (7th February 2005) Speed Dial
Speed Dial
The Speed Dial feature allows you to have the 5410 telephone automatically dial calls
to telephone numbers stored in your personal directory (maximum of 48). See Speed
Dials on page 13.
To make a call to a personal directory entry using the Speed Dial feature:
1. Press the
SpDial softkey. The Speed Dial screen is displayed.
2. Press the button next to the entry you want to call.
3. If the entry you want is not displayed, use
and to cycle through the entries
or key the first letter of the required name to jump to the page with a matching
entry.
4. The 5410 telephone dials the number for you.
Redial
The Redial (or Last Number Dialed) feature automatically redials a previously dialed
extension or outside number (up to 24 digits). Your 5410 will store the up to ten of the
last numbers dialed.
Note: If you have dialed the same number twice in succession, it will only have one
appearance in the redial list.
To redial previously dialed number:
1. Press
Redial. Use and to step through the entries. When you have
located the required number, press the associated key.
Mute
During an active call, the Mute feature prevents the party with whom you are speaking
from hearing you. This feature is most commonly used in conjunction with the
Speakerphone, but can be used to hold an off-line conversation at any time during a
call.
Preventing the other person on the line from hearing you:
1. Press
Mute. The other party cannot hear you.
The indicator next to the Mute button lights when Mute is active.
2. To reinstate two-way conversation, press
Mute again.
Hold
If, with a call in progress, a second call arrives and is shown against a Call Appearance
key, you can then Hold the first call and answer the second call.
To put an existing call on hold:
1. Press
Hold or the Call Appearance button with the symbol against it. The
symbol changes to
; showing that the line is on hold.
2. Answer the second call by pressing the Call Appearance button with the
symbol
against it. The symbol changes to
; showing that the line is connected.
To return to the held call:
1. If you have a call in progress, then first put that call on hold as above.
2. To retrieve a held call, simply press the Call Appearance button with the
against it.
Notes: 1. After a pre-set time (defined by your System Administrator), you are
reminded that you have a call on hold by the
hold icon changing for a few
moments to
and the phone ringing.
2. If the system feature AutoHold is on (consult your System Administrator)
then you can hold an active call (
) by pressing the second call’s Call
Appearance button (
). If AutoHold is off, then pressing the second call’s
Call Appearance button (
) will drop the first call.
3. To transfer a held call see Transfer on page 12.

Page 12 - Transfer Basic Call Handling Features
Page 12 - Basic Call Handling Features IP Office 5410 User’s Guide
Transfer 40DHB0002UKEY – Issue 1 (7th February 2005)
Transfer
The Transfer feature allows you to transfer a call from your telephone to another
extension or outside number.
To transfer the current call to another extension
1. With a call in progress, press
Transfer
2. When you hear dial tone, dial the number to which the call is to be transferred.
3. Do one of the following:
• To transfer the call without announcing it, either hang up or press
Transfer again. The transfer is complete. If the transferred call is not answered
within a preset time, it is returned to you.
• To announce the call before transferring it, wait for the called party to answer.
If the called party is willing to accept the call, press
Transfer again to
complete the transfer.
If the called party does not wish to accept the call, press
Drop.
You can return to the held call by pressing its call appearance button.
• If the line is busy or if there is no answer, press
Drop.
You can return to the held call by pressing its call appearance button.
To transfer a new call to a held call using Conference:
1. With a call in progress and you wish to make an enquiry call or another call arrives,
press
Hold. Make or answer the second call. The second call requires to be
transferred to the first held call.
2. To transfer the new call to the held call, press
Conference and then
Drop. The transfer is complete.
Conference
The Conference feature allows you to conference other parties (including yourself) into
a call.
Notes: 1. The number of parties allowed in a conference is controlled by your
telephone system.
2. Two Call Appearance keys are required for the conference feature.
To add another party to a call:
1. With a call in progress press
Conference. The existing call is put on hold.
2. Dial the number of the person you want to add to the call.
3. Wait for an answer.
If the called party does not answer or does not want to join the conference, press
Drop. You can return to the held call by pressing its call appearance button.
4. To add the person to the call, press
Conference again.
5. Repeat steps 1 through 4 for additional conference connections.
To add a held call(s) to an active call:
1. Press
Conference.
2. All held calls are added to the conference.
To leave a conference call:
1. To leave a conference, press
Drop.
Message
Your Message lamp turns on when a caller has left a message for you.
Press the
Message button to retrieve your messages and follow the prompts.

Overview of Speed Dials Speed Dials - Page 13
IP Office 5410 User’s Guide Speed Dials - Page 13
40DHB0002UKEY – Issue 1 (7th February 2005) Overview of Speed Dials
Speed Dials
Overview of Speed Dials
The 5410 can store up to 48 personal speed dials. The list of these speed dials is
accessed by pressing
SpDial. If SpDial is not shown, press any Soft
Key.
• The speed dial list is sorted alphabetically.
• Press
and to move between pages or key the first letter of the required
name to jump to the page with a matching entry.
• Press the
or next to an entry to call the associated number.
• Use the
key options to perform other actions.
Pressing
Add or Edit gives access to the details of a particular speed dial.
Note: Speed dials can be used for any numbers that can be manually dialed from the
extension. Where a dialing prefix is required (for example a an external line
access digit; usually 9) then that prefix must be part of the speed dial number.

Page 14 - Using Speed Dials Speed Dials
Page 14 - Speed Dials IP Office 5410 User’s Guide
Using Speed Dials 40DHB0002UKEY – Issue 1 (7th February 2005)
Using Speed Dials
Dialing a Speed Dial Number
You can use the speed dial directory to make a call with the handset on hook or off
hook.
1. Press
SpDial. If SpDial is not shown, press any Soft Key.
2. Press
and to display different pages of speed dials or key the first letter of
the required name to jump to the page with a matching entry.
3. When the required entry is displayed, press the adjacent
or key. The
number is automatically dialed for you.
Deleting a Speed Dial
1. Press SpDial. If SpDial is not shown, press any Soft Key.
2. Press
Delete.
3. Select the speed dial entry you want to delete.
• Press
and to display different pages of speed dials or key the first
letter of the required name to jump to the page with a matching entry.
4. When the required entry is displayed, press the adjacent
or key. A request
for confirmation will appear.
5. Press
Yes to delete the entry or Cancel to exit without deleting.
6. Select another entry to delete or press
Done to return to the speed dial list.
Editing a Speed Dial
1. Press SpDial. If SpDial is not shown, press any Soft Key.
2. Press
Edit.
3. Select the speed dial entry you want to edit.
Press
and to display different pages of speed dials or key the first letter of
the required name to jump to the page with a matching entry.
4. When the required entry is displayed, press the adjacent
or key.
5. Edit the speed dial using the same methods as for adding a new speed dial. See
Adding a New Speed Dial on page 15.
6. After saving or canceling any changes you will be returned to the speed dial
selection list. Select another speed dial to edit or press
Done to return to the
speed dial list.
Converting a Call Log Entry to a Speed Dial
You can create a new speed dial from a call log entry. See Saving a Call Log Entry to
Your Speed Dial List on page 17. This process will start the normal speed entry screen
but pre-filled with the name and number from the call log entry.

Using Speed Dials Speed Dials - Page 15
IP Office 5410 User’s Guide Speed Dials - Page 15
40DHB0002UKEY – Issue 1 (7th February 2005) Using Speed Dials
Adding a New Speed Dial
1. Press SpDial. If SpDial is not shown press any Soft Key.
• Press
Add. If a message stating that the speed dial list is full appears,
you must first delete an existing entry before adding any new entry. See
Deleting a Speed Dial on page 14.
You can switch between
Name and Number
entry by pressing the
key next to the item you
want to edit. The soft
keys
options also
change accordingly.
2. With Name selected, begin entering text using the telephone keypad. Each key is
marked with the letters and number it provides. You may have to press the key
more than once depending on the character you require.
• For example, the key 2 is also marked as A, B and C. To enter a C, press 2
until a C is displayed.
• If the next character you want to enter is on the same key, press
to move
the cursor right and then enter the character.
• By default the first letter is entered in upper-case and the phone then switches
to lower-case entry mode. To change the case of the current character press
Case.
• To enter a space press
Space.
• Use the
key to move the cursor one space right.
• If you make a mistake, use
Backspace to delete the character to the left
of the cursor.
• If you have made a mistake in the middle of a character string and do not wish
to backspace and re-enter all the characters, use the
key to step back to
one character before the point where you wish to edit. Either insert the new
character or press
Backspace to delete the character to the left of the
cursor.
• Pressing the * key once enters a . (period) or twice a *. To enter more than
one * or period, press
to move the cursor right and then enter the
character.
• Pressing the # key once enters a - (dash) or twice a #. To enter more than
one # or dash, press
to move the cursor right and then enter the character.
3. When the name is set as required, select Number.
4. Enter the number required using the dialing keypad. For external numbers
remember to enter any external dialing prefix required (9 say).
• To enter a hyphen, press
Hyphen. This does not affect the number
dialed but may help make numbers more readable.
• To enter a 1.5 second pause, press
Pause. This will appear as a ,
(comma) character in the telephone number.
• Use the
and keys to move the cursor left or right.
• If you make a mistake, use
Backspace to delete the number to the left of
the cursor.
5. Do one of the following:
• To save the speed dial and return to the speed dial list, press
Save.
• To return to the speed dial list without saving the changes press
Cancel.
• To return to the call handling screen without saving the changes press Exit
.

Page 16 - Overview of the Call Log Using the Call Log
Page 16 - Using the Call Log IP Office 5410 User’s Guide
Overview of the Call Log 40DHB0002UKEY – Issue 1 (7th February 2005)
Using the Call Log
Overview of the Call Log
The 5410 holds and maintains a call log, accessed by pressing Log.
This log can store up to 48 entries. These can be a mixture of incoming answered calls,
incoming unanswered calls and outgoing calls. You can select which types of calls are
included in the log. You can also use call log entries to make return calls or convert the
entry into a speed dial for future use.
WARNING: Calls that are made using pin codes and other information will
appear in the call log. Either Logging of outgoing calls should be switched
off or those call logs removed manually.
See Setting Which Calls are Logged on page 18.
Note: Only outgoing calls made using the dial pad or a SpDial entry are logged.
When
Log is pressed a screen similar to the following is displayed:
• Missed calls are displayed first. You can select from InAns or Outgo. Alternatively,
press More and select All to display all three options.
• Logged calls are shown with the most recent first.
• The name of the called or calling party is shown if available.
• The number of the called or calling party is shown.
• Press either the
or key to display further pages of entries.
• Pressing the
or key next to a log entry display further details of that
particular call.
• The number of the log entry.
• The type of log entry, i.e. Answered, Un-answered or Outgoing.
• The name of the called or calling party is shown (if available).
• The number of the called or calling party is shown.
• The date and time of the call. (And for InAns/Outgo, the duration of the call.)
• Press either the
or key to display the previous or next logged call.
• The
keys provide a number of actions.
Also see Making Calls from the Call Log on page 17, Saving a Call Log Entry to Your
Speed Dial List on page 17, Viewing the Call Log on page 17 and Deleting a Call Log
Entry on page 18.

Using the Call Log Using the Call Log - Page 17
IP Office 5410 User’s Guide Using the Call Log - Page 17
40DHB0002UKEY – Issue 1 (7th February 2005) Using the Call Log
Using the Call Log
You can make calls directly from the call log. Whilst in the call log you can still make a
call by going off-hook, pressing
Speaker and dialing a new call. Similarly, you
can still receive calls and handle them using the dial pad key functions.
Viewing the Call Log
1. Press Log. If Log is not shown, press any Soft Key.
2. At default, Missed calls are displayed first. You can select from InAns or Outgo.
Alternatively, press More and select All to display all three options. To return to
Missed or InAns or Outg, press Back and make your selection.
3. Press
and to display different pages of log entries.
• To exit the call log and return to the previous screen press
Done.
• To exit the call log and return to the call handling screen press
Exit.
• To view the details of a particular log entry, press the
or key next to the
entry.
3. Press
Done to return to the previous screen.
Making Calls from the Call Log
1. Press Log. If Log is not shown, press any Soft Key.
2. At default, Missed calls are displayed first. You can select from InAns or Outgo.
Alternatively, press More and select All to display all three options. To return to
Missed or InAns or Outg, press Back and make your selection.
3. Press
and to display different pages of log entries.
4. When you locate the entry you want to call, press the
or key next to the
entry.
5. Press
Call make the call.
• If the number shown is external but doesn't include the external dialing prefix
used by your telephone system, go off-hook, dial the prefix and then press
Call.
Saving a Call Log Entry to Your Speed Dial List
1. Press Log. If Log is not shown, press any Soft Key.
2. At default, Missed calls are displayed first. You can select from InAns or Outgo.
Alternatively, press More and select All to display all three options. To return to
Missed or InAns or Outg, press Back and make your selection.
3. Press
and to display different pages of log entries.
4. When you locate the entry you want to call, press the
or key next to the
entry.
5. Press
Save. The speed dial editing screen appears, pre-filled with the details
from the call log entry. See Adding a New Speed Dial on page 15.

Page 18 - Using the Call Log Using the Call Log
Page 18 - Using the Call Log IP Office 5410 User’s Guide
Using the Call Log 40DHB0002UKEY – Issue 1 (7th February 2005)
Deleting a Call Log Entry
1. Press Log. If Log is not shown, press any Soft Key.
2. At default, Missed calls are displayed first. You can select from InAns or Outgo.
Alternatively, press More and select All to display all three options. To return to
Missed or InAns or Outg, press Back and make your selection.
3. Press
and to display different pages of log entries.
4. When you locate the entry you want to call, press the
or key next to the
entry.
5. Press
Delete and Done. The entry is deleted from the Call Log and the
details of the next call are shown.
6. To exit the call log and return to the call handling screen press
Exit.
Erasing All Logged Calls
Loss of power to the 5410 phone will cause all call log entries to be deleted.
The Erase All option also deletes all logged calls.
Caution: This action also deletes all speed dial entries and phone personalization
options.
See Default Phone/Erase All Settings on page 21.
Setting Which Calls are Logged
Caution: If you change these settings, any call details already in the call log that no
longer match the selection made are deleted.
1. Press
Option. If Option is not shown, press any Soft Key.
2. Press
Log Setup. A menu showing Answered, Un-Answered and Outgoing,
with their current settings, is displayed.
3. To toggle a particular setting between Yes or No, press the
key next to it.
• Alternatively, press the
key next to a call type to underline its current
setting and then press
Yes/No to change the value of the currently
underlined setting.
4. Do one of the following:
Note: If you press Save after changing the settings, any existing call log entries
that do not match the call types selected are deleted from the call log.
• To save the settings and return to the options menu, press
Save. You will
hear a confirmation tone.
• To return to the Options menu without saving any changes, press
Cancel.
• To return to the call handling screen without saving any changes, press
Exit.

Overview of 5410 Options Changing the 5410 Options - Page 19
IP Office 5410 User’s Guide Changing the 5410 Options - Page 19
40DHB0002UKEY – Issue 1 (7th February 2005) Overview of 5410 Options
Changing the 5410 Options
Overview of 5410 Options
The options menus are accessed by pressing Option. These menus allow you to
adjust a number of 5410 features.
To select an option:
1. Press the
or next to it
2. The
key actions change according to the current available actions.
3. To exit and return to the normal call handling screen press
Exit.
4. Whilst in the options menus, you can still make and receive calls using the
telephone keypad controls.
The options are:
• Ring Options:
Sets the:
• The ringing used by your 5410.
• Toggles the message lamp on/off to show when you have an incoming call.
• Toggles the ‘Show Phone Screen’ option on or off.
See Ring Options on page 20.
• Contrast:
Adjust the display contrast.
See Adjusting the Display Contrast on page 20.
• Log Setup:
Configure which calls appear in the call log.
See Setting Which Calls are Logged on page 18.
• Miscellaneous:
Enables you to select to remain in your Speed Dial Menu during call handling.
• Self Test:
Test the phone.
See Using Self Test on page 21.
• Language:
Select the phone's display language. See Language on page 22.
Press
to display:
• Handset AGC/Headset AGC:
Switch handset/headset automatic gain control on/off.
See Automatic Gain Control (AGC) on page 22.
Press
again to display:
• Erase:
Reset the telephone to its default settings. See Default Phone/Erase All Settings
on page 21.

Page 20 - Selecting Personalized Options Changing the 5410 Options
Page 20 - Changing the 5410 Options IP Office 5410 User’s Guide
Selecting Personalized Options 40DHB0002UKEY – Issue 1 (7th February 2005)
Selecting Personalized Options
Ring Options
The Ring Options menus allows you to:
• Choose a personalized ringing pattern for your telephone.
Note: If you receive a call while selecting a ring pattern, you are automatically
returned to the call handling screen.
• Set the message lamp to flash when you receive a call.
• Set the telephone to revert to the call handling screen when you are setting up/using
Speed Dial, Call Log, etc.
To change the ring pattern:
You can choose from among eight different ring patterns. This alters the tone and style
of ringing used by the 5420, e.g. the number of rings will still vary according to the type
of call.
1. Press
Option.
2. Press
Ring Options followed by Ring Pattern. A menu with the current
ring pattern appears.
3. To select a ringing pattern use either the
or keys or press a dial pad key
between 1 and 8. You will hear the selected ringing pattern.
4. To hear the ringing pattern again press
Play or repress the dial pad key.
• When you have selected a ringing pattern, press
Save. You will hear a
confirmation tone and be returned to the options menu.
• If you want to return to the options menu without changing the ring pattern,
press
Cancel.
To set the Flash Message Lamp:
1. Press
Option.
2. Press
Ring Options and set Flash Message Lamp to Yes or No.
When set to Yes the Message lamp will flash when you receive a call.
• Changing this option does not affect the voicemail visual indicator feature.
To set the Show Phone Screen:
1. Press
Option.
2. Press
Ring Options and set Show Phone Screen to Yes or No.
If set to Yes then, when you are setting up/using Speed Dial, Call Log, etc, you are
automatically returned to the call handling screen when you receive a call.
Adjusting the Display Contrast
You can adjust the contrast level on the telephone display. You can choose from
among fifteen levels of contrast.
1. Press
Option
2. Press
Contrast. A menu with the current contrast setting appears.
3. Use either the
or key to adjust the level of contrast.
4. When the contrast is set as required, either:
• Return to the options menu by pressing
Done.
• Return to the call handling screen by pressing
Exit.
1/59