Page is loading ...

1 of 1 Workrite Ergonomics | (800) 959–9675 www.workriteergo.com
No tools are required to install the Positive Tilt Lockout
LEADER Arm
A Positive Tilt Lockout
Qty: 1
Part Included
Tools Required
Required, Sold Separately
Assembly & Installation Instructions:
Positive Tilt Lockout, LEADER-PTLO
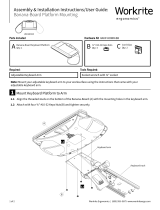
1 Raise Platform to Highest Level
Li the keyboard platform to its highest level.
Note: These instruction assume that you've purchased a LEADER Arm and a ISE Keyboard Platform and that the
system is installed on a worksurface, where the Positive Tilt Lockout will be installed from below. If your Leader arm is
not installed, simply flip it over and install the Positive Tilt Lockout from above.
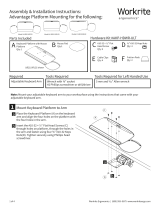
2 Unscrew Tilt Knob & Install Positive Tilt Lockout
2.1 Rotate the Tilt Knob clockwise until the Keyboard Mount
Plate is raised to the highest position (maximum negative
tilt.) This will expose the Tilt Knob Screw and move the
carriage to the far right.
2.2 Slip the Negative Tilt Lockout over the Tilt Knob Screw, to
the le of the carriage.
With the Negative Tilt Lockout in place, lower the platform
and rotate the Tilt Knob counter-clockwise until it seats
against the Positive Tilt Lockout.
Your keyboard platform should now be at 0° (zero degrees)
and you will not be able to tilt your keyboard tray in a
positive tilt direction.
1500373 Rev A
-20°
0°
-20°
0°
2.1
2.2 2.4
A
LEADER Arm
Keyboard
Mount Plate
Carriage
Shown with Straight
Keyboard Platform
Shown from below without
keyboard platform for clarity
Tilt Knob Screw details
Tilt Knob
/