
Dial Wrench Operating Instructions
Rev 1.0
Corporate Headquarters: 1080 North 11th Street, San Jose, CA 95112 Phone: (408) 292-2214 Fax: (408) 292-2733
www.etorque.com
Operating Dial Torque Wrenches
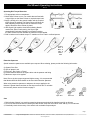
1. Fit appropriate socket or attachment.
2. Move Slave Pointer to zero. For models that are fitted with
a signal light, set the Slave Pointer to required torque load.
3. Apply a steady pull to the wrench handle until the required
torque figures is reached. The Slave Pointer will follow the
Main Indicating Needle and record the maximum torque
applied. Reset the Slave Pointer by hand.
4. With Signal Light models, when Main Indicating Needle
reaches the Slave Pointer setting, the Signal Light
automatically illuminates. Should you exceed this setting,
the Slave Pointer will then indicate the maximum torque applied.
5. Built in ratchet on all models except “E” enables tool to be used in confined spaces.
Extension Spanners
Special extension spanners are available upon request. When ordering, please provide the following information:
A) Square Drive Size
B) Size of spanner end
C) End type - Box, Open or Flared
D) Center distance between the square drive and the spanner end fitting
E) Maximum torque to be applied
Note: Due to the low torque ranges and high accuracy, it is recommended
that Models ADS4 & ADS8 should not be used with Extension Spanners.
When using extension spanners or adapters, the torque applied to the
fastener is greater than that shown on the torque wrench dial. To calculate
the increase, please use the formula on page 2.
Care
1. Dial Indicating Wrench is a precision measuring instrument and should be handled carefully at all times.
2. Do not use chemical solvents for cleaning the dial window. Keep the tool exterior clean and dry. Do not lubricate.
3, Periodically check the accuracy of the wrench with a suitable torque analyzer.
Clockwise CounterClockwise
Models
ADS
BDS
Models
ADS - S
BDS - S
CDS - S
DDS-S
EDS
D
A
C
B
Open End Flare End Box End
Page 1

Dial Wrench Operating Instructions
Rev 1.0
Corporate Headquarters: 1080 North 11th Street, San Jose, CA 95112 Phone: (408) 292-2214 Fax: (408) 292-2733
www.etorque.com
Extension Adapters
Adapters offer alternative solution for overcoming space and access
imitations and are available upon request.
1. Place the end fitting to the extension adapter.
2. Then attach to the square drive of the wrench.
3. Measure and note distance “E” from the center of the end fitting to the
wrench square drive.
Square Dr Item # Item # Item #
3/8” Drive 20-A96102 20-A96112 20-A96122
1/2” Drive 20-A96103 20-A96113 20-A96123
Note: Extension Adapters cannot be used with the ADS4, ADS8, ADS12D.
When using extension spanners or adapters, the torque applied to the fastener is greater than that shown on the torque
wrench dial. To calculate the increase, please use the formula below.
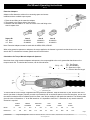
Calculations for Torque Wrench Adapters & Spanners
Note than when using extension adapters and spanners, the torque applied to the nut is greater that that shown on the
torque wrench dial. To calculate the increase, use the formula below.
To ensure that the correct torque is applied when using extension spanners, keep the extension “in-line” with the axis of the
wrench (as shown in diagram). Should you wish to permanently use an extension spanner on the Dial wrenches, we can lock
the ratchet mechanism and re-calibrate the dial to show a true torque reading for that particular extension. The following table
gives the value of dimensions “L” for all Dial wrenches. It is important to have the “L” dimension for any wrench where an
extension is required.
E
TT =
DR (L + E)
L
TT = True Torque
DR = Dial Reading
E = Extension Length
L = Effective Wrench Length
L+E
E
L
True
Torque
TT
Indicated Torque
(Dial Reading) DR
Model in mm in mm in mm in mm in mm in mm
Dimension L 7.5 190 14.5 368 17.5 445 25 635 33 850 68 1727
All ADS
Models
BDS80,
A/AS/E/ES
Other BDS
models
CDS
models
DDS
models
EDS
models
Page 2

Dial Wrench Operating Instructions
Rev 1.0
Corporate Headquarters: 1080 North 11th Street, San Jose, CA 95112 Phone: (408) 292-2214 Fax: (408) 292-2733
www.etorque.com
Battery for Signal Light Models
1. For models fitted with optional light signal, use leak proof batteries whenever possible. Check the batteries frequently to
avoid corrosion problems, especially if the wrench is used in damp or humid conditions.
2. If the wrench is likely to be stored for a period of time, first remove the batteries before storing.
3. For accessing the battery see drawings below.
Calibration
1. Check wrench against an appropriate torque tester to verify accuracy.
2. After checking, determine if wrench is within tolerance.
Designed and manufactured to meet or exceed the accuracy and repeatability requirements of ISO 6789:2003
(Tools < 10 N.m (+/- 6% of setting): ADS4 & ADS8 models
(Tools > 10 N.m are +/- 4% of setting): All other Dial Wrench models.
3. If out of tolerance, then make the according adjustments.
Preparation before Calibration
1. Ensure that the wrench spindle rotates smoothly without excessive friction and that the ratchet operates (Not EDS model).
2. Ensure that the rack and pinion assembly operates smoothly and that the main pointer is free to rotate without coming into
contact with the dial or window.
3. Ensure that the torque needed to rotate the slave pointer in the window bush is 0.03 cN.m +/-10% and when rotated the
pointer does not contact the dial face or window moulding.
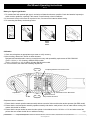
ADS-S BDS-S
CDS-S
DDS-S
EDS-S
Coil Spring Mounted on Eccentric Pivots
Solid Rack & Pinion Mechanism
Stop Overload Protection
Adjustment Screw
Tie Bolt
Square Drive
Page 3

Dial Wrench Operating Instructions
Rev 1.0
Corporate Headquarters: 1080 North 11th Street, San Jose, CA 95112 Phone: (408) 292-2214 Fax: (408) 292-2733
www.etorque.com
4. Two dials varying values (-,0) are available for each model of a dial wrench. If a main spring has been changed it may be
necessary to ensure that the replacement spring corresponds to the value of the dial fitted.
5. If the wrench is a signal model check the functioning of the electric signalling system.
6. Movement of the two halves of the wrench about the main spindle should be possible manually, but without excessive play
or end float. The movement should be easier for lower ranged models and stiffer for models of increasing capacity. ADS &
BDS wrenches are now fitted with a threaded spindle bush that will allow axial adjustment of the halves relative to the
spindle axis without the use of shims.
The threaded bush is fitted to the lower half casting of ADS wrenches and to the top half casting of BDS wrenches, and
cannot be retrofitted to earlier models. Adjustment requires the use of a special thin “C” type key and may be carried out
as follows:
A) Remove black sealant from the socket set screw fitted adjacent to the spindle in the lower half casting.
B) Release this screw by one turn.
C) Using the special key, engage the key in one of the three radial slots machined in the head of the bronze bush.
D) Turn anti-clockwise to decrease the axial clearance of clockwise to increase.
E) When the correct end float has been achieved retighten the socket set screw and reseal the hexagon socket. Do not
apply excessive force on this screw, which could result in damage to the bush.
Calibration Procedure for ADS and BDS Wrenches
1. Apply Loctite 290 after assembly to the flat faces of the eccentric pivots and set to their mid position indicated by the
screwdriver slot lying along the length of the wrench with the small land towards the top (window side) of the body.
2. Apply a torque value to the wrench equivalent to the lowest major graduation on the dial. This should be done in
conjunction with an appropriate calibration device*.
3. Using the M5 adjustment screw, set the main pointer to the torque value applied. Nip up the M3 locking set screw.
4. Check the wrench at the maximum main graduation of the dial.
5. The eccentric pivots may have to be rotated to achieve the correct sweep of the main pointer such that the wrench
calibrates at both the lowest and highest readings. To increase the sweep of the main pointer, the eccentric pivots smaller
land should be rotated towards the tie bolt. To decrease the sweep of the pointer rotate away from the tie bolt.
6. Starting at the lowest main dial graduation ensure that the wrench calibrates at all the main graduation points.
A tolerance of the following allowable: (Tools < 10 N.m (+/- 6% of setting): ADS4 & ADS8 models
(Tools > 10 N.m are +/- 4% of setting): All other Dial Wrench models.
Repeat steps (2) and (6) until satisfactory results are obtained.
7. Set the overload stop to a position equivalent to 5% above the maximum value of the wrench capacity.
8. Thoroughly degrease and apply Loctite to threads of the tie bolt and nut. Assemble and tighten such that the main
pointer lies within the black zero area of the dial.
9. Finally tighten the M3 lock screw and rubber bung seal the overload adjustment screw.
Calibration Procedure for CDS, DDS and EDS Wrenches
1. Locate the main spring in the top half of the body casting such that the exposed “tail end” of the coil spring is adjacent to
the rack and pinion mechanism.
2. Apply a torque value to the wrench equivalent to the lowest major graduation on the dial. This should be done in
conjunction with an appropriate calibration device*.
3. Using the M5 adjustment screw, set the main pointer to the torque value applied. Nip up the M3 locking set screw.
4. Check the wrench at the maximum main graduation of the dial.
5. The main spring may have to be rotated to achieve the correct sweep of the main pointer such that the wrench calibrates
at both the lowest and highest readings.
6. Starting at the lowest main dial graduation ensure that the wrench calibrates at all the main graduation points.
A tolerance of the following allowable: (Tools > 10 N.m are +/- 4% of setting): All other Dial Wrench models.
Repeat steps (2) and (6) until satisfactory results are obtained.
7. Set and lock the overload stop to a position equivalent to 5% above the maximum value of the wrench capacity.
Page 4

Dial Wrench Operating Instructions
Rev 1.0
Corporate Headquarters: 1080 North 11th Street, San Jose, CA 95112 Phone: (408) 292-2214 Fax: (408) 292-2733
www.etorque.com
8. Thoroughly degrease and apply Loctite to threads of the tie bolt and nut. Assemble and tighten such that the main
pointer lies within the black zero area of the dial.
9. Finally tighten the M3 lock screw and rubber bung seal the overload adjustment screw.
10. Fit cover plate
* Calibration Device
Ideally a calibrated beam and weight system should be used to check the
calibration of dial indicating torque wrenches. Alternatively a Torque Analyzer
with an appropriately ranged transducer should be used.
In all cases the torque wrench should be used to apply torque to the calibration
device until the required test reading is obtained on the calibration device and the
reading on the torque wrench is noted at this point.
Mountz Calibration & Repair Services
With over 39 years of experience, Mountz features an experienced calibration and repair staff that delivers rapid service and
provides quality that you can trust. Mountz features a new state-of-the-art calibration lab and a repair facility. The Calibration
Lab can calibrate up to 20,000 lbf.ft. Our certified technicians can calibrate & repair most any tool and our calibration stan-
dards are traceable to NIST (National Institute of Standards and Technology). Mountz factory service provides current
upgrades for all digital torque analyzers at time of service.
Mountz Service Centers
Mountz, Inc.
19051 Underwood Rd
Foley, AL 36535
Phone: (251) 943-4125
Fax: (251) 943-4979
Mountz, Inc.
1080 N. 11th St
San Jose, CA 95112
Phone: (408) 292-2214
Fax: (251) 292-2733
Page 5
800-456-1828
Fax: 408-292-2214
www.etorque.com
ISO 9001
-
 1
1
-
 2
2
-
 3
3
-
 4
4
-
 5
5


Mountz DDS-S Operating instructions
- Type
- Operating instructions
Ask a question and I''ll find the answer in the document
Finding information in a document is now easier with AI
Related papers
-
 Mountz EMT 6 Operating instructions
-
 Mountz PTT-2000 Operating Instructions Manual
-
 Mountz TCA Operation & Calibration Instructions
-
 Mountz EDTW Operating instructions
-
 Mountz BL-3000 Operation Instructions
-
 Mountz HM-27 Operating instructions
-
 Mountz BMX Series Operation Instructions
-
 Mountz RETW Operating Instructions Manual
-
Mountz EZ-TorQ II Operating Instructions Manual
-
 Mountz MTWD Operating Instructions Manual


Other documents
-
 MountzPro MountzProDT135 Owner's manual
-
RIDGID 83037 Specification
-
Checkline TBX User manual
-
 ATD Tools ATD-112 User manual
-
CPS BLACKMAX BTLDTW User manual
-
CDI 1002TAA-CDI User manual
-
 AmazonBasics B07SV45HRY User manual
-
norbar 43222 Installation guide
-
 Tohnichi DOT (-MD) Owner's manual
-
 SUGPV AWI-60 User manual


