Page is loading ...


BMX Transducer Operation Instructions
Rev 1.0
Corporate Headquarters: 1080 North 11th Street, San Jose, CA 95112 Phone: (408) 292-2214 Fax: (408) 292-2733
www.etorque.com
BMX Transducer Mounting
The BMX transducer needs to be mounted securely before operating. Immobilizing the transducer is critical for the safety of
the operator as well as for the accuracy of torque measurements during operation. A loose BMX transducer during utilization
can impact the validity of torque readings. Mountz offers mounting brackets for the BMX transducers.
BMX Cabling/Connecting
Attach the appropriate cable (sold separately) for connecting the BMX with a Mountz Torque Analyzer:
For non-Mountz Torque Analyzers, please reference Pin Diagram. Mountz can make cables for non-Mountz Torque
Analyzers, please contact Customer Service at 408-292-2214.
Operating BMX
Once the BMX is connected with a Mountz Torque Analyzer, follow the instructions in the Torque Analyzer manual for
accessing external transducers.
Using Hand Tools
Make sure the tool is within the torque range of the BMX model. If the tool is under the torque range, then the accuracy may
not be reliable. If the tool is over the torque range, then you may overtorque the BMX and damage the transducer. Place the
wrench or screwdriver’s drive into the BMX’s F/Square Drive and apply torque. You may require adapters for calibration or
tool checks. Always make certain adapters are as short as possible and fit properly, with little “play.”
Using Power Tools
Make sure the tool is within the torque range of the BMX model. If the tool is under the torque
range, then the accuracy may not be reliable. If the tool is over the torque range, then you may
overtorque the BMX and damage the transducer.
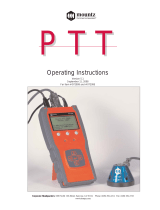
Always use a quality joint rate simulator (run down adapter) when testing power tools in a
simulated application. Place the rundown adapter in the BMX as shown in the drawing on the
right. Then place a Square Drive Adapter into the bit socket of the power tool and then slide it
into the run down Adapter.
Switch the driver into “Forward” mode and apply torque. Once the rundown is complete, switch
the driver in “Reverse” and reverse the Run Down Adapter to a consistent “home” position.
For BMX Models Item #
BMX20z thru BMX500F models 062109
BMX1000F thru BMX2500F models 062129
BMX5000F model 062128
Mountz Analyzer Cable Item #
TorqueMate® Plus 065145-XD5
TorqueLab® 065145-XD5
Wizard 065145-WD5
Wizard Plus 065180
Super Series 065145-XD5 & 065126*
*(Stic Box needed)
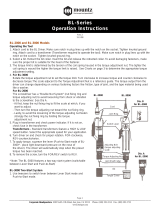
Pin A (+ Excitation)
Pin F (N/A)
Pin B (- Excitation)
Pin C (- Signal)
Pin D (+ Signal)
Pin E (+ N/A)
Place Run Down Adapter into BMX
Reference Item # 500290

Corporate Headquarters: 1080 North 11th Street, San Jose, CA 95112 Phone: (408) 292-2214 Fax: (408) 292-2733
www.etorque.com
BMX Transducer Operation Instructions
Rev 1.0
Calibration Procedures
1. Attach the BMX securely to a work surface with the cable connector toward the top so that the axis of tool rotation is
parallel to the ground.
2. Connect the BMX to a torque analyzer/display. Review the torque range of the transducer and select the appropriate
measurement units.
3. Determine type of calibration to be performed.
Calibration at 3 Pts. Test at 10%, 50% and 100 of Full Scale.
Calibration at 6 Pts. Test at 10%, 20%, 40%, 60% 80% and 100 of Full Scale.
Direction Clockwise and/or Counter Clockwise
4. Select the appropriate Calibration Arm or Wheel. Attach it to the input drive of the BMX.
5. Gently connect the Hanger to the Calibration Arm or wheel.
6. Load 3 times to minimum 80% FS in direction of operation and reset to zero after loading.
7. Apply series of increasing torques in direction of operation starting from the lowest test point.
8. Record readings from the test device at each test point prior to performing any adjustments.
9. Repeat steps 6-8 in the opposite direction (if required).
10. Perform calibration adjustments. Repeat test as described above until readings at all test points are within tolerances.
11. Repeat test as described above and record 5 readings from test device at each test point. Compile all necessary details
to generate test report.
12. Remove old calibration label and place new label on transducer.
Mountz Calibration & Repair Services
With over 39 years of experience, Mountz features an experienced calibration and repair staff that delivers rapid service and
provides quality that you can trust. Mountz features a new state-of-the-art calibration lab and a repair facility. The Calibration
Lab can calibrate up to 20,000 lbf.ft. Our certified technicians can calibrate & repair most any tool and our calibration stan-
dards are traceable to NIST (National Institute of Standards and Technology). Mountz factory service provides current
upgrades for all digital torque analyzers at time of service.
Mountz Service Centers
Mountz, Inc.
19051 Underwood Rd
Foley, AL 36535
Phone: (251) 943-4125
Fax: (251) 943-4979
Mountz, Inc.
1080 N. 11th St
San Jose, CA 95112
Phone: (408) 292-2214
Fax: (251) 292-2733
800-456-1828
Fax: 408-292-2214
www.etorque.com
ISO 9001
/