Page is loading ...

Issue 3
24.01.05
Part Number 39303
Installation Guide for 43222
80 mm
INSTALLATION
1. Identify a suitable surface and position to mount the instrument.
2. Using the template on this guide, mark the position of the 4 mounting holes.
3. Drill (drill and tap) the 4 mounting holes suitable for 10.0 mm (⅜ inch) fasteners
(M10; Grade 8.8 minimum; cap head type are recommended or the equivalent ⅜
inch).
4. Fix instrument in position using fasteners at a torque of 35 to 40 N.m (25 to 30
ft.lb).
5. Connect power supply (supplied) to the instrument. All display segments will light
and buzzer will sound briefly. The instrument is ready for use.
WARNINGS
• ENSURE THE MOUNTING SURFACE IS CAPABLE OF SUPPORTING THE
INSTRUMENT WHEN 350 N.M TORQUE IS APPLIED.
• ONLY USE THE POWER SUPPLY PROVIDED.
• DO NOT APPLY TORQUE ABOVE 350 N.M.
• NOT TO BE USED WITH IMPULSE OR IMPACT WRENCHES.
www.norbar.com
115 mm

Issue 3
24.01.05
Part Number 39303
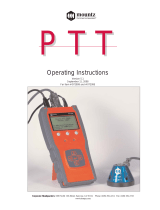
Operation Guide for 43222
OPERATION
MODE Button
1. Press MODE button briefly to display current mode of operation.
2. Press and hold MODE button to change mode of operation. Release button at
required mode to accept.
3. Modes of operation.
Track Mode (‘trAC‘ is displayed).
Display follows torque applied
Click Mode (‘CLIC‘ is displayed).
Display shows first peak of torque applied. Serial data output of peak torque is
automatically transmitted. Display automatically resets after 3 seconds.
For use with ‘click’ type torque wrenches.
Dial Mode (‘dIAL‘ is displayed).
Display shows peak of torque applied. Press RESET to clear the display.
For use with ‘dial’ and ‘electronic’ type torque wrenches.
UNIT Button
Press UNIT to change units of measurement.
RESET Button
Press RESET to reset display in Dial mode. Serial data output of peak torque is also
transmitted.
Press RESET to transmit serial data in Track mode.
LIMIT Button
1. Press LIMIT to enter target torque setting.
Display flashes between ‘SEt’ and the target torque setting.
Press MODE to increase target setting. Hold to increase speed of change.
Press UNIT to decrease target setting. Hold to increase speed of change.
2. Press LIMIT to enter ± percentage tolerance setting from 1 to 10%. Enter ‘0’ for no
limits.
‘%’ and the ± percentage tolerance setting is displayed constantly.
Press MODE to increase ± percentage tolerance setting.
Press UNIT to decrease ± percentage tolerance setting.
3. Press LIMIT to finish. Display shows ‘Fin’ for 1 second.
Using the Instrument
1. Select mode of operation.
2. Place wrench in the instrument and operate wrench in desired direction. Remove
wrench and zero the display (if required) by pressing the RESET and LIMIT buttons
together. ‘SEt0’ is displayed for 1 second.
3. Place wrench in the instrument and operate wrench in desired direction.
Serial Port.
Connect lead (supplied) between TruCheck Plus serial port and computer/ printer.
Communication settings: 9600 Baud, 8 data bits, 1 stop bit, no parity.
/