Page is loading ...

Installation Guide
Accessories
K-6816, K-6817, K-6818,
K-6819-GD, K-6820, K-6821,
K-6824, K-6826, K-6828,
K-6829
M product numbers are for Mexico (i.e. K-12345M)
Los números de productos seguidos de
M corresponden a México (Ej.
K-12345M)
Français, page “Français-1”
Español, página “Español-1”
1020822-2-B

Tools and Materials
Thank You For Choosing Kohler Company
We appreciate your commitment to Kohler quality. Please take a few
minutes to review this manual before you start installation. If you
encounter any installation or performance problems, please don’t
hesitate to contact us. Our phone numbers and website are listed on
the back cover. Thanks again for choosing Kohler Company.
Before You Begin
DANGER: Risk of personal injury. These products are not
designed or intended for use as a grab bar or support bar. Do
not install any of these products in any area where they are
likely to be used inadvertently as a grab bar or support bar.
Observe all local plumbing codes and building codes.
These products should be located and mounted to a wall stud.
While it is possible to mount them to any surface, a stud
mounted product will yield the best results.
Use a level to ensure that the center lines for the wall plates are
vertical where applicable and the post center lines are horizontal
where applicable.
Kohler Co. reserves the right to make revisions in the design of
products without notice, as specified in the Price Book.
Claw
Hammer
Measuring Tape
Drill
Level Pencil
Assorted Hex
Wrenches
Assorted
Screwdrivers
Assorted woodworking tools may
be needed to finish the wall.
Plus:
• Assorted Drill Bits
1020822-2-B 2 Kohler Co.

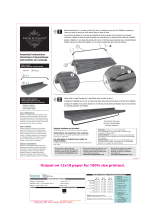
1. Prepare the Site
For Multiple-Post Accessories
NOTE: Take into account the length of the accessory components to
determine the required distance between the post center points.
NOTE: Tissue holders generally rough-in at 8″ (20.3 cm) to 12″ (30.5
cm) about the toilet rim and 6″ (15.2 cm) in front of the toilet bowl.
Mark the vertical and horizontal centerlines for each post. Use a
level to ensure that all center points are level.
For Single-Post Accessories
Mark the vertical and horizontal centerlines for the post. Use a
level to ensure that all center points are level.
Level
Multiple-Post Accessory
Center-To-Center Points
1020822-2-B 4 Kohler Co.

2. Mark and Drill the Pilot Holes
Draw a 1-3/8″ (3.5 cm) diameter circle around the accessory post
center point.
Position the wall plate over the circle and mark the three hole
locations.
NOTE: There is no provision for later adjustment if the center points
and the resulting pilot holes for multiple-post accessories are not
level with each another.
If your accessory requires multiple posts, verify the center points
are level.
NOTE: Use a 5/16″ drill bit for horizontal tissue holder installations.
Use a 1/2″ drill bit for all other accessory installations.
Set the wall plate aside, then drill a hole at each marked location.
Wall Plate Hole Locations
Wall Plate
Holes
1-3/8"
(3.5 cm) D.
11/16"
(1.7 cm) R.
Kohler Co. 5 1020822-2-B

3. Install the Wall Anchors
NOTE: You may need to disassemble some of the accessories. Some
accessories will be packed with the wall plate installed in the post.
Loosen the setscrew and remove the wall plate if needed.
For Horizontal Tissue Holder Installations
Press and hold the legs of a wall anchor together, then insert the
wall anchor legs into the hole. Insert all wall anchors into the
pre-drilled mounting holes.
Carefully tap each wall anchor into the finished surface. Ensure
the wall anchors are flush with the finished surface.
For All Other Accessory Installations
Hold the toggle anchor flat alongside the plastic straps and slide
it through the previously drilled hole.
With one hand, pull the looped end straight out (do not pull at
an angle) so that the toggle anchor rests flush behind the wall.
Slide the clip along the straps with your other hand until the
flange of the clip is flush with the wall.
Place your thumb between the plastic straps. Wiggle the straps
side-to-side until they snap off at the wall.
Insert the enclosed bolt through the wall plate and tighten until it
is flush with the wall.
Minimum clearance behind the wall is 1–7/8” (4.8cm).
All Other Accessories
Anchor Hole
Toggle Anchor
Loop
Clip
Strap
Loop
Nail
Horizontal Tissue Holder
1020822-2-B 6 Kohler Co.

4. Install the Wall Plate
Align the mounting holes on the wall plate with the anchors in
the wall.
Secure the wall plate to the wall with three screws.
Fully tighten the screws.
Anchors
Screw
Wall Plate
Install the Wall Plate
Kohler Co. 7 1020822-2-B

5. Install the Post
NOTE: If installing the towel ring, refer to the ″For Multiple Post
Accessories and Towel Ring″ instructions below.
NOTE: If installing the horizontal tissue holder, skip this step and
refer to the ″Install the Horizontal Tissue Holder″ section of this
guide.
NOTE: If installing the mirror, skip this step and refer to the ″Install
the Mirror″ section of this guide.
For Single-Post Accessories
Loosen the screws in the wall plate 1/4 turn to allow for
adjustment.
Remove the center cap packed with the post.
Temporarily place the post onto the wall plate so the hex slots in
the post are vertical.
Align the splines in the post with the splines on the wall plate.
NOTE: If the splines do not align, remove the post, then rotate the
wall plate slightly. Place the post over the wall plate to ensure the
splines are aligned. Repeat as necessary.
Gently remove the post and tighten the screws on the wall plate.
Place the long sleeve onto the rod, then slide the rod through the
hex slots of the post.
Single-Post Accessories
Anchors
Screw
Post
Wall Plate
Center Cap
Rod
Long Sleeve
Short Sleeve
Washer
Bottom Cap
Hex Slots
Wall Plate
Splines
Sleeve
Escutcheon
Gasket
Post
Hex Slot
Screw
Multiple-Post Accessories
1020822-2-B 8 Kohler Co.

Install the Post (cont.)
Insert the short sleeve and washer onto the lower end of the rod.
Thread the bottom cap onto the lower end of the rod.
Secure the assembled post to the wall plate.
For Multiple-Post Accessories and Towel Ring
Place the escutcheon and sleeve over each wall plate.
Place the gasket and post onto the escutcheon. The hex slots on
the post should be horizontal.
Ensure the splines inside the post align with the splines on the
wall plate.
Secure the post to the wall plate with a screw.
Repeat with the other posts.
Kohler Co. 9 1020822-2-B

6. Install the Single-Post Accessories
Robe Hook: Thread the robe hook onto the rod.
Soap Dish and Tumbler Holder: Thread the soap dish and
tumbler holder onto the rod.
Vertical Tissue Holder: Place the tissue holder over the rod and
long sleeve. Thread the knob onto the tissue holder.
Towel Ring: Slide the center cap onto the post. Place the pin into
the hex slot in the post. Carefully spread the towel ring apart and
slip the open ends of the ring over the pin. Use care when
spreading the towel ring to avoid scratching the post.
Post
Knob
Post
Screw
Center Cap
Towel Ring
Pin
Vertical Tissue Holder
Sleeve
Rod
Robe Hook
Tumbler Holder
Insert
Post
Soap Dish
1020822-2-B 10 Kohler Co.

7. Install the Towel Bar
Unscrew one of the knobs from the hex bar and remove one of
the short sleeves and the long sleeve.
Slide the hex bar with the short sleeve through one of the posts.
Slide the long sleeve over the hex bar, then slide the hex bar
through the other post.
If the posts do not align, repeat the procedure in the “Install the
Post” section as necessary.
Make sure the sleeves fit into the recesses in the center caps.
Slide the remaining short sleeves onto the end of the hex bar and
attach the knob.
Center Cap
Hex Bar
Knob
Short Sleeve
Post
Long Sleeve
Kohler Co. 11 1020822-2-B

8. Install the Horizontal Tissue Holder
Place the escutcheon onto the wall bracket, then place the O-ring
onto the escutcheon.
Slide the spline adapter into the escutcheon. Secure with the
screw provided.
Place the sleeve over the spline adapter.
Place the washer over the sleeve.
Position the tissue holder assembly onto the assembled
escutcheon.
Hold the tissue holder assembly in place while turning the
escutcheon clockwise until hand tight. Do not overtighten.
Adjust the tissue holder assembly in the desired position.
Tissue Holder Assembly
Wall Bracket
Escutcheon
O-Ring
Spline Adapter
Sleeve
Washer
Screw
1020822-2-B 12 Kohler Co.

9. Install the Glass Shelf
Insert a bearing into the mounted post. Align the holes in the
bearing with the hex slots on the post.
Slide the center cap over the mounted post. Align the holes in the
center cap with the hex slots in the post.
Slide a support bar through the bearing.
Place a sleeve over the bracket extension on a shelf bracket.
Screw the shelf bracket onto the support bar.
Place a sleeve over the opposite end of the support bar.
Screw a knob and washer onto the support bar.
Repeat this procedure for the remaining mounted post.
Start the setscrews into the shelf brackets. Make sure the
setscrews do not protrude into the inside of the shelf bracket.
Wet the end of the glass shelf with a mild soap solution.
Carefully slide the shelf into the brackets.
Adjust the shelf brackets as necessary to achieve level.
Tighten all setscrews.
Knob
Support Bar
Mounting Screw
Bearing
Center Cap
Bracket
Extension
Shelf Bracket
Sleeve
Sleeve
Washer
Post
Kohler Co. 13 1020822-2-B

10. Install the Mirror
Install the Posts
Place the mirror face down on a flat, padded surface.
Insert a post over each stud.
Insert a bearing into each post. Align the holes in the bearing
with the hex slots on the post.
Slide a center cap over each post. Align the holes in the center
cap with the hex slots in the post.
Slide a support bar through each bearing.
Align the posts to the same plane for the proper mirror angle.
Screw a knob and washer onto each support bar.
Mount the Mirror
Place the escutcheon, sleeve, and gasket over the wall bracket.
Orient the holes in the post horizontally, then secure with a
mounting screw.
Place a bearing in the post and replace the center cap on the post.
Slide the support bar into the bearing.
Place the sleeve over the bracket extension.
Screw the bracket onto the support bar.
Place the sleeve over the opposite end of the support bar.
Screw the end cap with a washer onto the support bar.
Wall Plate
Escutcheon
Wall Sleeve
Gasket
Support Bar
Measure distance.
Mirror
Post
Stud
Sleeve
Bearing
Support Bar
Center Cap
1020822-2-B 14 Kohler Co.
/