Page is loading ...

115014-2-AA (A)
1999 Kohler Co.
IV GEORGES BRASS
ACCESSORIES
K-6817
K-6820
K-6821
K-6829
K-6818K-6816
K-6826
K-6824
K-6828
K-6819
NOTES
These products are not designed or intended for
use as a grab bar or support bar. Do not install
products in any critical support area (see ASTM
F446).
To avoid product damage, do not force accessories
into alignment. For single-post accessories, test
alignment with stem bonnet installed before fully
tightening wall bracket screws.
ORDERING INFORMATION
18”Towel Bar K-6816. . . . . . . . . . . . . . . . . . . . . . . . . . . . . .
Towel Ring K-6817. . . . . . . . . . . . . . . . . . . . . . . . . . . . . . . .
Vertical Toilet Tissue Holder K-6818. . . . . . . . . . . . . . . . .
Tumbler and Toothbrush Holder K-6819. . . . . . . . . . . . . .
Soap Dish K-6820. . . . . . . . . . . . . . . . . . . . . . . . . . . . . . . .
Robe Hook K-6821. . . . . . . . . . . . . . . . . . . . . . . . . . . . . . . .
Brass Mirror K-6824. . . . . . . . . . . . . . . . . . . . . . . . . . . . . . .
24” Towel Bar K-6826. . . . . . . . . . . . . . . . . . . . . . . . . . . . .
Horizontal Toilet Tissue Holder K-6828. . . . . . . . . . . . . . .
Glass Shelf K-6829. . . . . . . . . . . . . . . . . . . . . . . . . . . . . . .
INSTALLATION
For single post accessories: Determine desired
location for accessory on finished wall and mark
accessory post center point.
For two post accessories: Use a level to ensure
two-post center-to-center points are horizontal. Deter-
mine desired location for accessory on finished wall. Mark
center points for both accessory posts.
Fig. #1
Center-to-Center Points
Two-Post Accessories
Center Point
Single-Post Accessories
Level
Center-to-Center Dimensions
Two-Post Accessories
18”
24”
29-1/2”
K-6818
K-6826
K-6829
Draw a 1-3/8” dia. circle (11/16” radius) around accessory
post center point. Position wall bracket over circle and
mark three mounting hole locations. Remove wall
bracket. Drill 5/16” hole at each wall bracket hole location.
Fig. #2
1-3/8” D.
11/16”
Radius
Wall Bracket
Holes
Wall Bracket Hole Locations
Two-Post Accessory
Center-to-Center Points

2
115014-2-AA (A)
Kohler Co., Kohler, WI
Drill 1/8” pilot hole at each toggle anchor marked location.
If wall stud is drilled, use screw and washer in place of
toggle anchor for mounting. For installation of toggle
anchor, drill 1/2” hole. Insert toggle anchor into 1/2” hole.
Pull ring and push cap to wall. Snap off straps. Partially
thread hex head bolt with flat washer into toggle anchor.
Fig. #3
Toggle Anchor
Cap
Ring
Strap
Install wall bracket(s) with screws provided.
For single-post accessories except towel ring, tighten
screws, then loosen 1/4 turn to allow for adjustment.
Remove end cap packed with center post skirt.
Temporarily place center post skirt onto wall bracket so
hex slots in bonnet are vertical for single-post accessories
or horizontal for two-post accessories. Splines in center
post skirt must align with splines on wall bracket. Rotate
wall bracket slightly if necessary, then gently remove
center post skirt and tighten screws.
For two-post accessories or towel ring, the wall
bracket may be tightened in any position. Fully tighten
screws.
Fig. #4
Anchors
Wall Bracket
Screw
Center
Post Skirt
End
Cap
Place escutcheon and sleeve over wall bracket. Place
end cap into center post skirt. Place center post skirt onto
wall bracket so hex slots in center post skirt are vertical
for single-post accessories or horizontal for two–post
accessories. Splines in center post skirt must align with
splines on wall bracket. Repeat procedure as mentioned
previously if necessary. Secure with screw. Align end cap
over center post skirt.
Fig. #5
Center
Post Skirt
Escutcheon
Wall Bracket
Sleeve
Gasket
End Cap
Splines
Screw
For single post accessories except towel ring, place
long sleeve onto rod and place rod through center post.
Place short sleeve over lower end of rod. Thread end cap
with washer onto the rod.
Fig. #6
Center Post
Rod
Long Sleeve
Short Sleeve
End Cap
Washer

3
115014-2-AA (A)
Kohler Co., Kohler, WI
Fig. #7
Sleeve
Rod
Center Post Skirt
Pin
Towel Ring
Center
Cap
Screw
Rod
Tissue Holder
For towel bars: Unscrew one of the knobs from the hex bar
and remove one of the short sleeves and the long sleeve.
Slide the hex bar with short sleeve through one of the
center post skirts. Slide the long sleeve over the hex bar,
then slide hex bar through other center post skirt. If center
post skirts do not align, repeat procedures in steps 4 and
5 as necessary. Be sure that sleeves fit into recesses in
caps. Slide the remaining short sleeve onto the end of the
hex bar and attach the knob.
Knob
Center Post Skirt
Long Sleeve
End Cap
Hex bar
Short Sleeve
Fig. #8
For K-6829. Orient holes in center post skirt. Secure with
mounting screw. Place bearing in center post skirt and
replace center cap over center post skirt so holes align.
Slide support bar into bearing. Place sleeve over bracket
extension. Screw bracket onto support bar. Place sleeve
over opposite end of support bar. Screw end cap with
washer onto support bar.
Fig. #9
Shelf
Bracket
Sleeve
Sleeve
Support Bar
Washer
End
Cap
Center
Post Skirt
Center Cap
Bearing
Mounting Screw
Start set screws into brackets of bracket assembly. Check
that screws do not protrude into recesses for the shelf.
Wet ends of the shelf with mild soap solution. Carefully
slide shelf into position in brackets; adjust bracket
assembly alignment as necessary. Tighten set screws to
secure bracket assemblies to wall plates.
Fig. #10
Glass Shelf
Set Screw

4
115014-2-AA (A)
Kohler Co., Kohler, WI
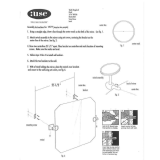
For K-6824. Determine desired location for mirror on
finished wall. Mark center points for one post. Draw a
1-3/8” dia. circle (11/16” radius) around post center point.
Position wall bracket over circle and mark three mounting
hole locations. Remove wall bracket. Drill 5/16” hole at
each wall bracket hole location. See figure #3 for toggle
anchor installation. Install wall bracket with screws
provided.
Fig. #11
1-3/8” D.
11/16”
Radius
Wall Bracket
Holes
Place mirror face down on a flat, padded surface. Insert a
center post skirt over each mirror stud, along with the
bearing, sleeve, center cap and secure loosely with the
support bar. Align posts to the same plane for proper mirror
angle.
Fig. #12
Center
Cap
Center
Post
Skirt
Bearing
Mirror Stud
Sleeve
Support
Bar
Mirror
Measure the distance between the center-lines of the two
posts. Install the second wall bracket to this dimension.
Once the second bracket installed, remove the center post
skirt from the mirror.
Fig. #13
Measure
Distance
Have a helper hold the mirror assembly in place. Then place
escutcheon, sleeve and gasket over wall bracket. Orient
holes in center post skirt. Secure with mounting screw.
Place bearing in center post skirt and replace center cap
over center post skirt so holes align. Slide support bar into
bearing. Place sleeve over bracket extension. Screw
bracket onto support bar. Place sleeve over opposite end
of support bar. Screw end cap with washer onto support
bar.
Fig. #14
Wall Bracket
Sleeve
Sleeve
Support Bar
Washer
End Cap
Center
Post Skirt
Center
Cap
Bearing
Screw
Escutcheon
Sleeve
Gasket
Mirror
Stud
Mirror
/