Page is loading ...

The Quick Reference Card provides a quick overview of your spa's main
functions and the operations accessible with your digital control pad.
Quick Reference Card
Troubleshooting
Pumps have started up for
one minute on several
occasions and "Filter Cycle
"
icon is flashing.
Not a bug but a feature!
Our Smart Winter Mode
protects your system fro
m
the cold by automatically
turning the pumps on for
one minute several times a
day to prevent water from
freezing in pipes.
Water temperature is
displayed
.
Water temperature in the
spa has reached 112˚F
(44˚C).
Do not enter the water!
Allow water to cool down.
The system will reset au
-
tomatically when water
reaches 109˚F (43˚C).
Call your dealer or service
supplier if problem persists.
3 flashing dots are dis
-
played
.
A problem has been de-
tected.
Do not enter the water!
Che
ck and open water
valves. Clean filters if nec-
essary. Check water level.
Add water if needed.
Shut power off and power
your spa up again to reset
the system.
Call your dealer or service
supplier if problem persists.
The display is flashing.
A power failure has
occurred. Press any key
to reset the system, then
reprogram all desired
parameters.
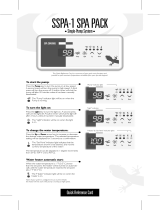
Use Up or Down arrow key to regulate water
temperature. The temperature setting will be
displayed for 5 seconds to confirm your new
selection.
The "Set Point" symbol indicates the
desired temperature, NOT the current
water temperature!
Water temperature can be adjusted by 1˚ in-
crements from 59 to 104˚F (15 to 40˚C).
Setting water temperature:
When water temperature is 1˚F (0.5˚C)
lower than the Set Point, the heater will
automatically turn on until water tempera-
ture reaches Set Point plus 1˚F (0.5˚C).
The "Heater" icon lights up when the
heater is on. It flashes when there is a
request for more heat but the heater
has not yet started.
Automatic water heater start:
Press and hold Light key for 5 seconds to
display water temperature in either Fahr-
enheit (˚F) or Celsius (˚C).
Temperature display unit:
The display toggles every 5 seconds alternately
showing the hourly time and the current water
temperature.
Time & temperature display:
Press Pump 1 to turn Pump 1 on at low
speed. Pressing a second time turns Pump 1
to high speed. A third time turns Pump 1 off.
When at high speed, a built-in timer turns
pump off after 20 minutes and when at low
speed after 2 hours, unless it has been
manually deactivated.
The "Pump 1" icon lights up when
Pump 1 is on at high speed. It flashes
when Pump 1 is on at low speed.
Starting Pump 1:
Press Blower to turn blower on at high speed.
Press a second time to turn blower to low
speed. A third time turns blower off. A built-in
timer turns blower off after 20 minutes, unless
manually deactivated first.
The "Blower" icon lights up when
blower is on at high speed. It flashes
when blower is on at low speed.
Starting the blower:
Starting Pump 2:
When blower or Pump 3 are not installed:
Press Pump
2 once to turn Pump 2 on at low
speed. Pressing a second time turns Pump 2
to high speed. A third time turns pump off. A
built-in timer turns pump off after 20 minutes,
unless manually deactivated first.
The "Pump 2" icon lights up when
Pump 2 is on at high speed. It flashes
when Pump 2 is on at low speed.
When blower and Pump 3 are installed
:
Press Pump 2 once to turn Pump 2 on at low
speed. Pressing a second time turns Pump 3
on and Pump 2 to high speed. A third time
turns both pumps off. A built-in timer auto-
matically turns pumps off after 20 minutes,
unless manually deactivated first. The
"Pump 2" icon lights up when Pump 2 and
Pump 3 are on at high speed. It flashes
when Pump 2 is on at low speed.
The filter cycle is suspended if the water temperature raises more than 2˚F (1˚C) above Set
Point . The "Filter" icon will blink (on 0.5 second, off 0.5 second, on 0.5 second, off 1.5 seconds).
MC-MP-DY2 SPA PACK
Press Pump 3 to turn Pump 3 on. Pressing a
second time turns Pump 3 off. A built-in timer
automatically turns pump off after 20 minutes,
unless manually desactivated first
.
Starting Pump 3:
Pressing Light key once turns light on at high
intensity. Pressing a second time turns light to
low intensity. A third time turns light off. A
built-in timer turns light off after 2 hours, unless
it has been manually deactivated.
The "Light" icon is displayed when light
is on at high intensity. It flashes when
light is on at low intensity.
Fiber Box Option: If spa has an optional fiber
box only, pressing Light key turns fiber box
(motor & light) on. Pressing again turns fiber
box motor off but leaves light on. A third time
turns both motor and light off. A built-in timer
turns fiber box off after 2 hours, unless it has
been manually deactivated. The "Light" icon is
displayed when fiber box light is on. It flashes
when fiber box motor and light are on at the
same time.
Fiber Box & 12V light (via jumper):
Pressing
Light key once turns fiber box (motor
& light) and 12V light output on. Pressing again
turns fiber box motor off but leaves lights on. A
third time turns 12V light off and a fourth time
shut fiber box light. The "Light" icon is displayed
when fiber box motor is off and both lights on
(or only the fiber box light). It flashes when
fiber box (motor & light) and 12V light are on.
Turning the light on:

7
•
E
Q
U
I
P
P
E
D
W
I
T
H
G
E
C
K
O
'
S
E
X
C
L
U
S
I
V
E
•
Smart
Winter
Mode
TM
9919-100417-B
Lock
icon
Temperatur
e
unit
Programming Mode
icon
Filter Cycl
e
icon
Heater
icon
Economy Mode
icon
Up & Down
arrow
s
Step
Programming
Sequence
Step 1
Step
2
Step
3
Step
4
Time of day
Filter cycle start time
Filter cycle duration
Filter cycle frequency
Summary of control panel parameters
FSxx Filter cycle start time
Fdxx Filter cycle duration
FFxx Filter cycle frequency
ESxx Economy mode start time
Edxx Economy mode duration
Tu X Temperature unit
LocX Control pad lockout
Step 5
Economy mode start time
Step 6
Economy mode duration
Step 7
Storing settings in memory & returning to Normal mode
This function allows you to prevent unauthorized parameter
setting of the unit. This feature is especially helpful when young
children have access to the keypad
.
There are two modes you can choose from:
Full lock or Partial
lock. Full lock means that all keypad functions are locked. Partial
lock means that the basic functions of the spa will remain accessi-
ble (pumps, blower and light), but it will be impossible to change
the temperature Set Point, to override the Economy mode or
to enter the Programming mode.
When control pad is locked, the "Lock" icon will be displayed.
Locking your digital control pad:
1- Press and hold Pump 1 key for
5 seconds.
2- The display will show LocP, with "P"
representing Partial lock.
3- Release the key and the keypad will be
in Partial lock mode. Keep key pressed
down for 5 more seconds if you want
to be in Full lock mode. The "LocF"
message will then be displayed.
When control pad is locked, all automatic functions of the
system run as usual. If a key is pressed down, a "LocP" or "LocF"
message will be displayed for 1 second. To unlock the keypad,
simply press and hold
Pump 1 key again for 5 seconds.
Digital control pad lockout
LocP
LocF
Inverted display
Press and hold Pump 2 for 5 seconds to invert the display. Note
that the ˚F or ˚C icon is not displayed in reverse mode. Follow
the same procedure to return to default mode. If a power-up
occurs, the display always returns to default mode.
Economy mode
Press Econo key to switch from Normal mode to Economy
mode. To save energy, the Economy mode Set Point is 20˚F
(11˚C) below the Normal mode Set Point.
The "Economy Mode" icon lights up when Economy
mode is on.
There are 3 available Economy operating modes:
noEc: No Economy mode
Ec 1: Economy mode always on
Ec 2: Economy mode on during a programmed
number of hours (see Steps 5 & 6*)
Selecting the desired Economy mode:
1- Press and hold Econo key for
more than 2 seconds.
2- The display will show the current
mode (noEc, Ec 1 or Ec 2).
3- Keep key pressed down until the
desired mode is displayed.
After 5 seconds, the new setting will be programmed.
Ec 1
noEc
Step 1- Time of day
Setting the time:
1- Enter Programming mode by holding
Prog. key pressed down for 2 seconds.
2- The display will show the current setting.
3- Use Up and Down arrows to change
setting.
11:43
pm
10:25 am
The system automatically performs two filter cycles per day, at
12-hour intervals. During the filter cycle, Pumps 1 & 2 and the
blower will run the first minute, then Pump 3 will run for one
minute. Pump 1 will then run at low speed for a programmed
number of hours. The "Filter Cycle" icon lights up when a filter
cycle is on.
To program a filter cycle, you must enter: 1) the time you want
the cycle to start and 2) the duration of the cycle. If no filtering is
required, the duration should be set to "0". For continuous
filtering, the filter cycle duration should be set to "12:00".
Setting filter cycle start time
:
1- Press Prog. key a second time.
2- The display will show FSxx, with "xx"
representing the starting hour.
3- Use Up and Down arrows to change
setting.
Setting filter cycle duration
:
1- Press Prog. key a third time.
2- The display will show Fdxx, with "xx"
representing the duration in hours.
3- Use Up and Down arrows to change
setting.
Steps 2 & 3- Filter cycle start time & duration
FS12
FS01
Fd12
Fd00
Setting filter cycle frequency:
1- Press Prog. key a fourth time.
2- The display will show FFxx, with "xx"
representing the frequency per day.
3- Use Up and Down arrows to change
setting.
Step 4- Filter cycle frequency
FF04
FF01
Step 7- Storing settings in memory
Press Prog. key a seventh time to store settings in the system's
non-volatile memory and to return to Normal mode.
Steps 5 & 6- Economy mode start time & duration*
Setting Economy mode start time:
1- Press Prog. key a fifth time.
2- The display will show ESxx, with "xx"
representing the starting hour.
3- Use Up and Down arrows to change
setting.
Setting Economy mode duration
:
1- Press Prog. key a sixth time.
2- The display will show Edxx, with "xx"
representing the duration in hours.
3- Use Up and Down arrows to change
setting.
ES08
ES10
Ed04
Ed01
/